Turret & Gazebo Roof Cap Ordering Details & Information Page

Updated 4 / 2022

Company
Profile
You are already here Roof Caps Chimney
Caps
Scuppers Gutters Shipping

Contact Info

.

.

Lead Time? Sizing & Design Cap Fasteners?
Minimum Order? Why 20oz+ Copper? Our Contact Info?
What Info We Need? Volume Discounts? References?

What is Our Lead Time?
Check our Latest News for our current schedule. I strive to check for new e-mail at least a couple times each day, and respond to those e-mail within 24 hours. So that process should go fairly swiftly, but I am still a hands-on fabricator. Not just sitting at my computer all day long waiting for your e-mail.  Feel free to call if you have some questions to assist you in working out the details, but I may not be able to provide you with a quote over the phone. That process often takes hours to do the calculations if I have the right measurements, diagrams, and clear photos from you to work with. Otherwise I'm working blind.

This Internet exposure has gotten CBD a lot of attention, so I have been booked out several months with projects over the last decade, which means it may be a while before I could begin the actual fabrication of your project, after we had locked down all the details and received your deposit. Unless it is just a simple roof cap without a finial/weathervane mount built in, which I could whip out within a couple hours between other larger projects. I do not have a larger shop with lots of workers to speed up production, so it is simply on a first come - first serve basis. We insist on a half down deposit to get your project in our cue, so that you are locked in, and cannot be pushed out further by a more lucrative offer.

We ship with FedEx Ground for small packages or Roadrunner Trucking for large crates. We have no control of the shipping time, other than to charge you a lot more for 2 day, or over night shipment, which can cost more than the contents.  Most of these ground shipments have not been taking more than a week to get across the Country from the West Coast to the East USA, so it hardly seems worth the cost of moving such large projects a few days sooner. We have very rarely had had a Client who was willing to pay that much for Express Shipping.

If you are in a hurry; to expedite this process, some clients have sent in a $200 deposit even before we were able to work out all the details, so that they are scheduled next on our list of projects.  If you decided to do this, we will refund 90% of that deposit if for any reason you changed your mind and did not contract with us to do this project for you. We do require the rest of the agreed payment for the item(s) before we shipping.  Click here for our contact and payment info.

If this will not wait for the postal lag time, and or you need to make the payment with a credit card we have a link to our Paypal account on the link above.

What is Our Minimum Order?
Our minimum order is $200.  This minimum charge does include shipping and packaging cost. That should get you as much as 3 to 6 square feet of the 20oz copper we use, depending on distance and complex fabrication details. We require full payment before we will begin fabrication.

For orders over $500 require only half down to start. I will send you digital photos of the progress for your approval. Then I require the final payment before shipping this order off to you.

For orders over $2k I am fine with just a 1/3 deposit. Then the second third after I have shown you your project has begun fabrication. With the final payment after your project is finished. I will also weigh it to see how much copper actually went into your final project and adjust the final cost down accordingly if it took less copper than estimated. I am sure you will agree this is an ethical business practice that you would be hard pressed to find else where, but I have been doing this for our Clients for over 2 decades now. You can read more of our thoughts on Ethical Responsibility at:

http://mind-temple.com/ethics.htm

What Information Will We Need?
Believe it or not, I would love to be able to get up on your roof and get the measurements and angles for you.  But in most cases that is simply not a viable option with most of my Clients being out of State from Oregon, so for a quote from CBD to make you a copper roof cap like you see on our web pages I will need to know the following information listed below.  If you are a Clients that is able to do their 'home work' and get all the right info and have a good idea of just what they want, and are able to convey this in their first e-mail to us, you can qualify for a 10% discount reward.

Style: I need to know what style cap you want CBD to make for you. If you did not find what you are looking for in the examples shown here, diagram your idea, take a picture of it with your phone, or better yet scan it in to send it to me as a image file through e-mail. I have a cable modem, so large file sizes are not a problem. Anything you can do to help convey your wishes will aid in getting just what you want from us, and I will better be able to quote you a price. My primary goal is to provide you with your dream cap at a price you are OK with.  See below for ideas to help you work up a design and decide what size.

Size: I need to know how large this cap needs to be.  How wide do you want the roof cap to be straight across the base is what I want to know from you. Maybe you think all you need is a small 12" wide cap to seal the tip of the roof, but that may look a bit tiny on any roof over 6' wide. Here is a general suggestion for proper sizing of a cap for your roof. Think of this roof cap as a scale model of the whole roof: 1/8th scale of your roof size = a fairly small size cap, 1/6th scale = a medium cap, 1/4th scale = a large cap. Of course the size will greatly affect the cost, but it is rare we are asked to make a cap less than 18" wide, unless it was for a cute child's playhouse turret.  Keep in mind that an 18" roof cap only overlaps the center tip by 9" on each side. You may want the cap to come down far enough to at lest meet where the hip shingles start to overlap each other. From the ground that is going to look pretty small still. Our $200 minimum charge will usually get you an 18" to 20" wide cap including shipping, depending on the style you choose.

Roof Angle: I need to know the angle or pitch of your roof.   Normally this is calculated in the inches rise per 1 foot straight over from the outer edge.  Example: a 6/12 pitch is 6" up for every 12" sideways, which equals a 27 degree angle.  To get this measurement: using a small level, set a 1' ruler level out from the roof and drop a tape measure straight down at the end of it. That number on the tape measure to the underside of the ruler will be the first number for your roof angle.  The second number is always 12. This photo shows a Client named Mr. Grace testing the roof angle that was to be a 12/12 pitch. As you can see this roof was correctly built, but it is plenty common for a Contractor to tell you the pitch, but when tested was found to be different than what he said it was. If we make the roof cap too steep, that is still workable, but if the roof is steeper than the cap, that can be a problem. You want the bottom of the copper cap to sit tight to the roofing. Unless this cap is used as a hidden ridge vent (well advised) I typically make roof caps a little steeper than the roof to accommodate any odd shingle bulges at the top.

Address & Phone#:  I need to know your contact info of where to send the copper roof cap: name, address, and phone number.  Shipping Companies prefer to have a business address to deliver it to, so there is a better chance to have a person there to receive it, but that is not a requirement.  They will need your phone # to call you if there is a problem finding your address, or you do not answer the door when a signature is required for shipments valued at over $500.

Cap Sizing & Designing:
Of course we are happy to build you a cap as large and as ornate as you wish, but we are plenty busy with orders, so I am not out to up-sell you.  Our focus is on you're long term satisfaction with the size, quality, and price of our caps. One of the best ways to figure out the right size is to make a full size cover with inexpensive and easy to work with materials. Like left over roofing felt, or cardboard. This way you can stand back a ways to get a better feel for how this will look. Then you can decide if it should be a little larger or smaller than the cover you had just made. Simply cut a circle in that flat material. Then cut one line from the outer edge into the center. From there you can overlap this seam to form a cone shape that will conform to your roof angle.

Temporary Roof Cap:
I understand how many had not planned ahead and may not have the time to wait for our custom cap to arrive, so if you are concerned about sealing the roof peak until the new roof cap arrives and is installed; for not just have the roof shingled up near the top where the shingles begin to converge. Then use some roofing felt cut in a large circle (as described above). Without even cutting the roofing felt it can be fold on one side to overlap up to the center point to form into a cone shape to make a temporary cap which will then cover the top of your roof. Tape the fold together and tack it in place on the roof peak. It can also give you a better idea of what size cap would look best up there. This will relieve the pressure to make a hasty decision of what sort of roof cap would be best, a finial or weathervane added, and whom you should do business with.

Sizing:
If you are having any trouble visualizing what to ask us to fabricate in copper sheet metal for you, you are not alone. We get asked what size we advise quite often.  As a general rule; you can take the width of the roof at the base.  For example; if your roof is 12' wide, you can divide it by 1/6th to get a medium size range. Or divide by 4 to get a large size cap. Although, if this is for a gazebo roof that is lower to the ground, you can divided by 8 to get a cap that is on the small size.

If it were a gazebo roof, people commonly lean toward the medium to small size, depending on how ornate they are looking to go. On a turret roof for their house, people commonly lean towards the medium to large range, since it is usually on a second story roof, which will make the cap look that much smaller from the ground, where it will be seen most. We hope this helps you figure out what is the best size for your roof.

 To recap our sizing guide:

1/4th scale of your roof size = a large size roof cap

1/6th scale = a medium size roof cap

1/8th scale = a small size cap

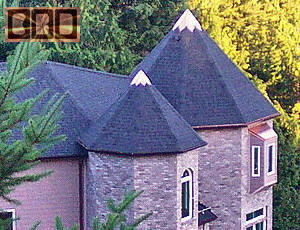
You are welcome to consider any variant in size between these numbers it calculates to, but this is just to help narrow the parameters. As you can see in this photo it would have looked odd if i had made this pair of roof caps the same size for these two different size turrets.

We wish we had more photos of caps in place on the roofs of our clients to show you, but even though many clients say they will send us a picture of their new cap after installation, it is rare that that we hear from them again, and I am not the kind of company to pester our Clients for those images they had promised.

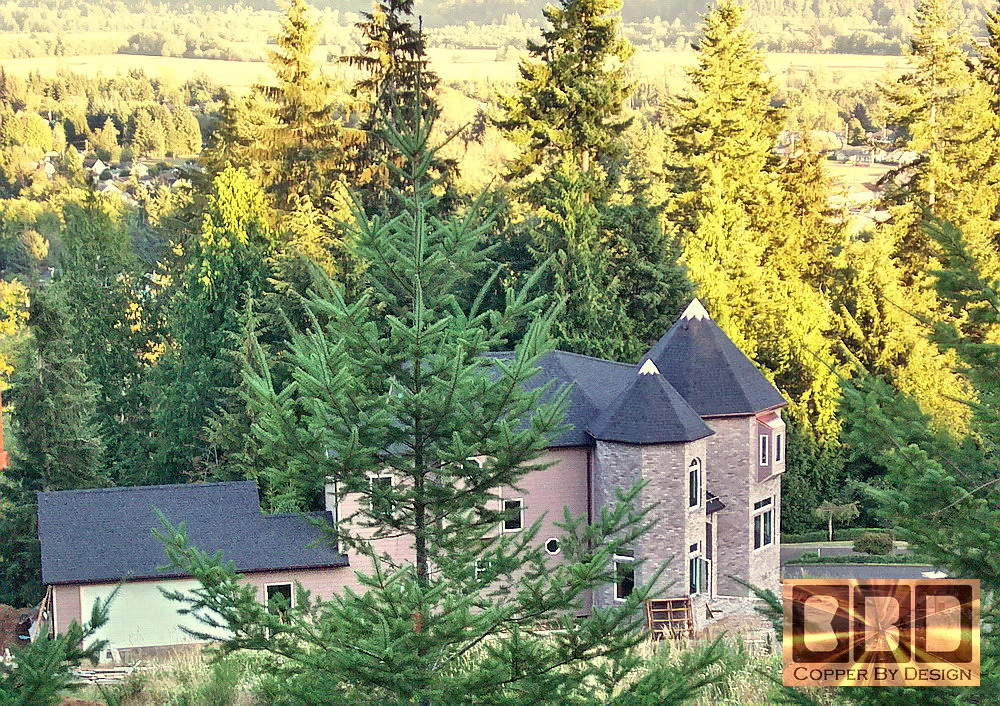
This house happened to be near enough (150 miles away) for me to get this photo (shown right).  The roof caps shown here are just a medium sized to the roof below.  Even though it seems over whelming there on the ground before installation (shown up above), after installation this Clients said he felt they were definitely not too large, as you see here.

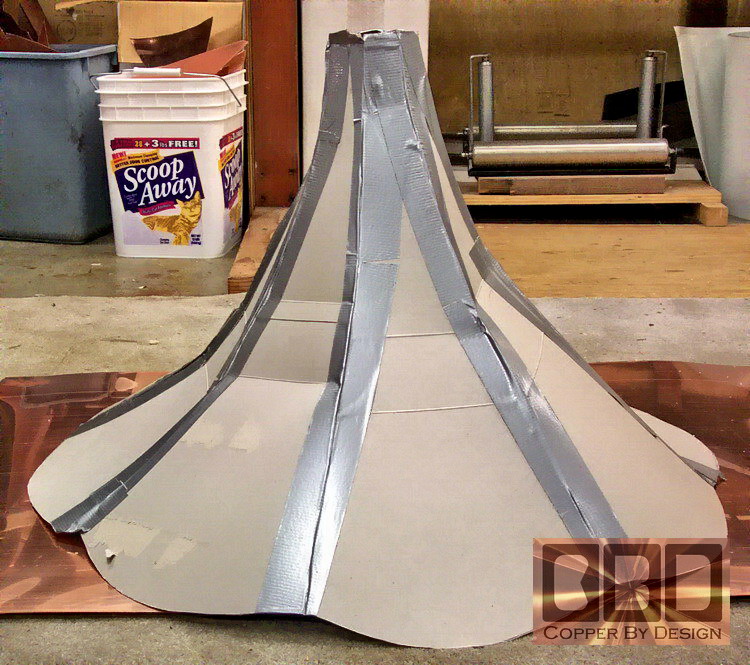
To experiment with different size options, a small scale model of the roof may help a little, but it does not clearly represent how it will look from the ground of the real roof top. So to build a simple life-size prototype of a roof cap will help this process immensely, since once I make this in copper the size will be set for life:

(a) Get some cardboard to cut up for a sample cap. To first get the dimensions for the cardboard; you can use a rope or string to place it in a circle near the top of the roof around where you think you would like the bottom edge of the cap to be. Write down the measurement from that rope, and the measurement up to the peak of the roof as well.  Divide the rope length by the number of sides of your roof. This will give your the width of each triangle.
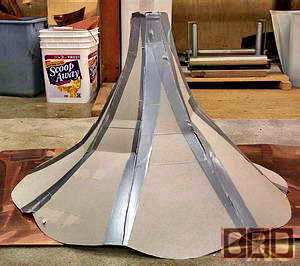
(b) Draw out one of these triangles on a sheet of paper and cut it out to use as a template to draw it out on the cardboard.  Cut and tape those sections together in the shape of the cap, like shown in the photo to the right. 
(c) For simplicity, you could just roll the cardboard together in one large cone shape taped or stapled together, and then cut the bottom edge off in a circle at the same distance from the center point.
(d) Set this prototype up on the roof top and look at it from a distance to get an idea how one of our copper caps might look. You can then get a much better idea if you want it any larger or smaller than your prototype, or other details like the angle or height.
(e) From there you will be ready to tell me what the dimension is of the cap you want CBD to make for you, so I can quickly quote you an exact price to fabricate it just the way you want.

Why 20oz  Copper or Better?

Sheet Metal Thickness?
Most sheet metal fabricators only work with a thinner 16oz copper as the standard in the industry for copper gutters and roof flashing. They are still able to claim it is solid copper and save costs, in stead of using a more expensive thicker sturdier copper.  That 16oz copper sheet metal is also a lot easier to cut, drill, and bend. For several years I had also believed 16oz copper was all that was available in large sheet stock at our local suppliers, but it has been over a decade since CBD has offered 16oz copper as a cheaper option, realizing the material cost is only a small percentage of what a Client has to pay for this sort of custom fabrication with freight costs included.

The 20oz & 24oz copper we use for most roof caps and chimney cap projects is the same thickness used for aluminum gutters: 0.027" & 0.032". I can use thicker grades of copper if you would like. The next thicknessof 32oz: 0.043", which we use for most counter tops, mantles, and fire pit covers, which is 4 times as strong as the normal 16oz copper used by other shops.

Thicker than 16oz copper sheet metal was so rarely requested by Contractors that I did not even know 20oz copper was available until 2003.   I feel that since the labor cost in any custom project like this is clearly the largest part of the project cost, so why not use the better material, since the cost difference would be less than 10% of the total end-user cost?  So I stopped offering the thinner 16oz copper as a bargain option in 2004 for these custom projects, and in 2011 I discontinued 16oz copper as an option for gutters as well. By request I will gladly mail you a free scrap sample of the 20oz copper we use to compare.

The reason we use primarily copper sheet-metal, as opposed to other rust-free metals like aluminum or stainless steel is this:

The Look:
Copper is on of the few metal that is meant to be seen without a painted surface coat. With it's attractive patina effect that darkens the copper to a calm soft dark brown look within a few months exposure to the elements.  Where stainless-steel remains a shiny eye-sore and will mildew. Copper is said to be a living finish with it's ever changing look with random stryations.

Maintenance Free:
(a) Copper of course need not be painted or coated with a clear coat, since it will nor rust or deteriorate with exposure to the elements. Eliminating any stripping and repainting issue for the life of the metal.
(b) Copper also need not be cleaned, since it does not mildew, as any painted surface and stainless steel will do here in the Northwest.
(c) Copper has also been known to aid in reducing moss and mildew growth on the roofing shingles below it. Found only in galvanized steel, which will eventually create unsightly rust stains as well.

Cost-v-Value:
(a) Copper is a better value to a high quality non-magnetic stainless steel, which is so expensive that it's sold in a much thinner sheet-metal than copper. (Stainless-steel is such a hard metal that it has to be thinner to cut, drill, and bend, where copper is a softer more malleable metal, and less prone to crack)
(b) There is no misleading you that most of the cost for this sort of custom work is the labor involved. There is no way we can begin to compete with the cost of mass-produced items coming out of China.  So I spare no reasonable expense to use the best metal possible, short of sterling silver. 

Note:
Other shops prefer stainless-steel over copper to save money since:
1. Stainless-steel is easier to assemble by just spot-welding it together for fast mass-production.
2. Stainless-steel requires no special handling or polishing when completed.
3. Stainless-steel is thinner, there fore being lighter for lower shipping costs.
4. Stainless-steel is often substituted with a cheap galvanized steel or at least some parts of that project, which most Homeowners will not realize this swindle until a decade later when it starts to rust. By then there is not much they could do about this fraud. Copper would not be so easy to fake. If you have any stainless steel test it with a magnet. A good grade of stainless steel will not attract a magnet at all.

We will work in stainless steel, but since copper cost about the same for thicker sheet-metal, our clients have preferred solid copper we use in over 95% of the custom projects we make.

What about Volume Discounts
Sure, I will consider a volume discounts, but the most common discounts is to clients who aid us by carefully reading over these web pages and clearly convey their needs to us in their first e-mail, in order to minimize the number of e-mails needed to iron out these details.  If you have read this far, you are off to a very good start.  Feel free to mention this discount in your e-mail.

References
I have worked very hard to maintain a solid reputation for quality and reliability over the last 2 decades.  Go to our referral web page to read letters we have received about our work practices and the quality of our work.

.

..

.

.

Helpful Roofing Information
For some valuable advice with regards to roofing and rain management issues check out our:

(a) Gutter Installation
(b) Gutter Debris Protection Options
(c) Roofing Quality Standards
(d) Chimney Flashing

(e) Moss Control & Treatment

web pages for answers and solutions that could save you thousands of $ and a great deal of anguish.

If you do find this information very helpful, feel free to send us a $ tip for the assistance we so freely have published on the web here for your benefit, like you might tip a waitress.  Heck, send us a gift certificate for a candle lit dinner for two.


Below is a photo of our
Better Business Bureau's
NW Business Integrity Award
for the year 1998

1999 Better Business Award

We were also a 1997 finalist for this same award. See our referral web page to see how we managed to be honored with this special award

Back to homepage
Homepage

Site Map


Company
Profile
You are already here Roof Caps Chimney
Caps
Scuppers Gutters Shipping

Contact Info
.

.

.

.

.

.

.

.

.

.

.

.

.

.

.

.

.

.

.

.

.


copper-by-design.com