|
From what I have seen chimney flashing is
the most neglected area of a roof, if re-flashed at all. That is why
this is such and important detail that you need to be aware of. More
times than not it wasn't re-flashed during the last re-roof, which
is against minimum Building Code. Here in Oregon they recently
changed Building Code to indlude a cricket when ever reroofing is
done, yet it is still rarely added to the job, since most homeowners
do not know of this change to the code. Now you know.
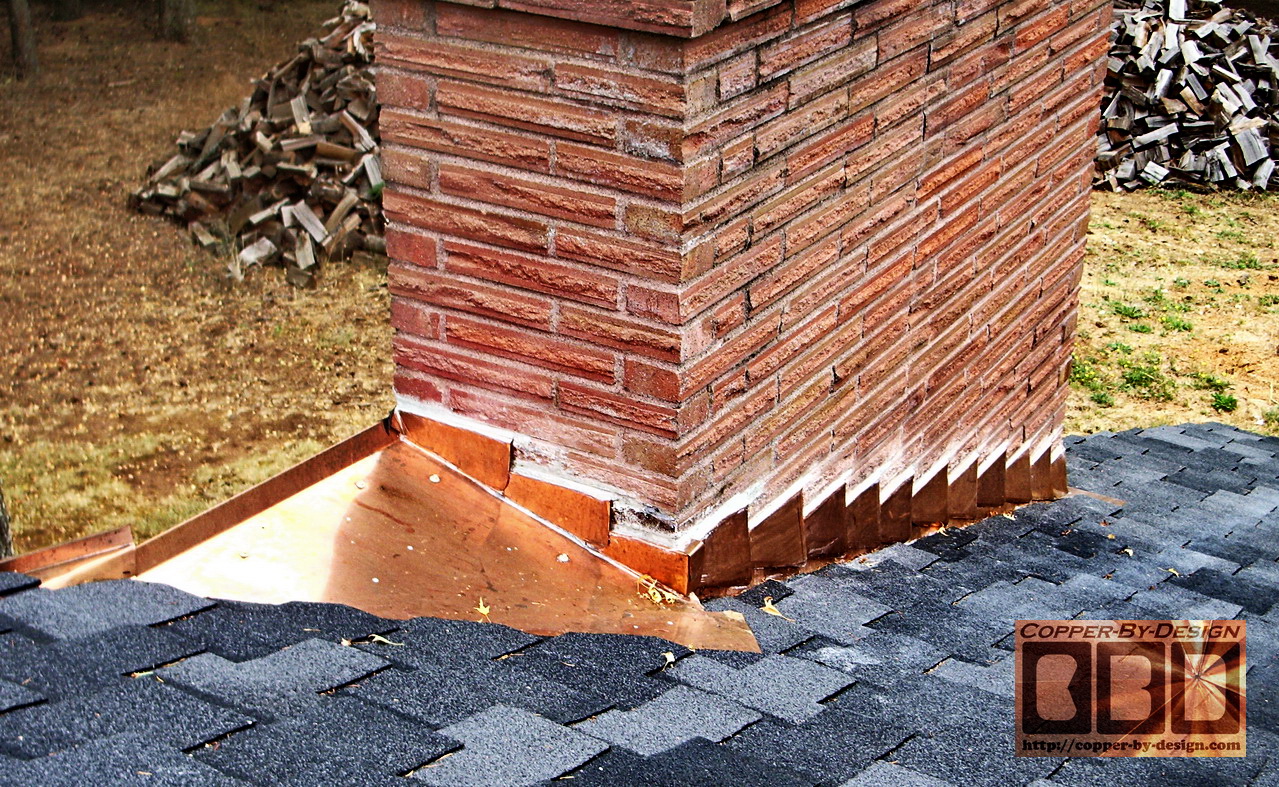
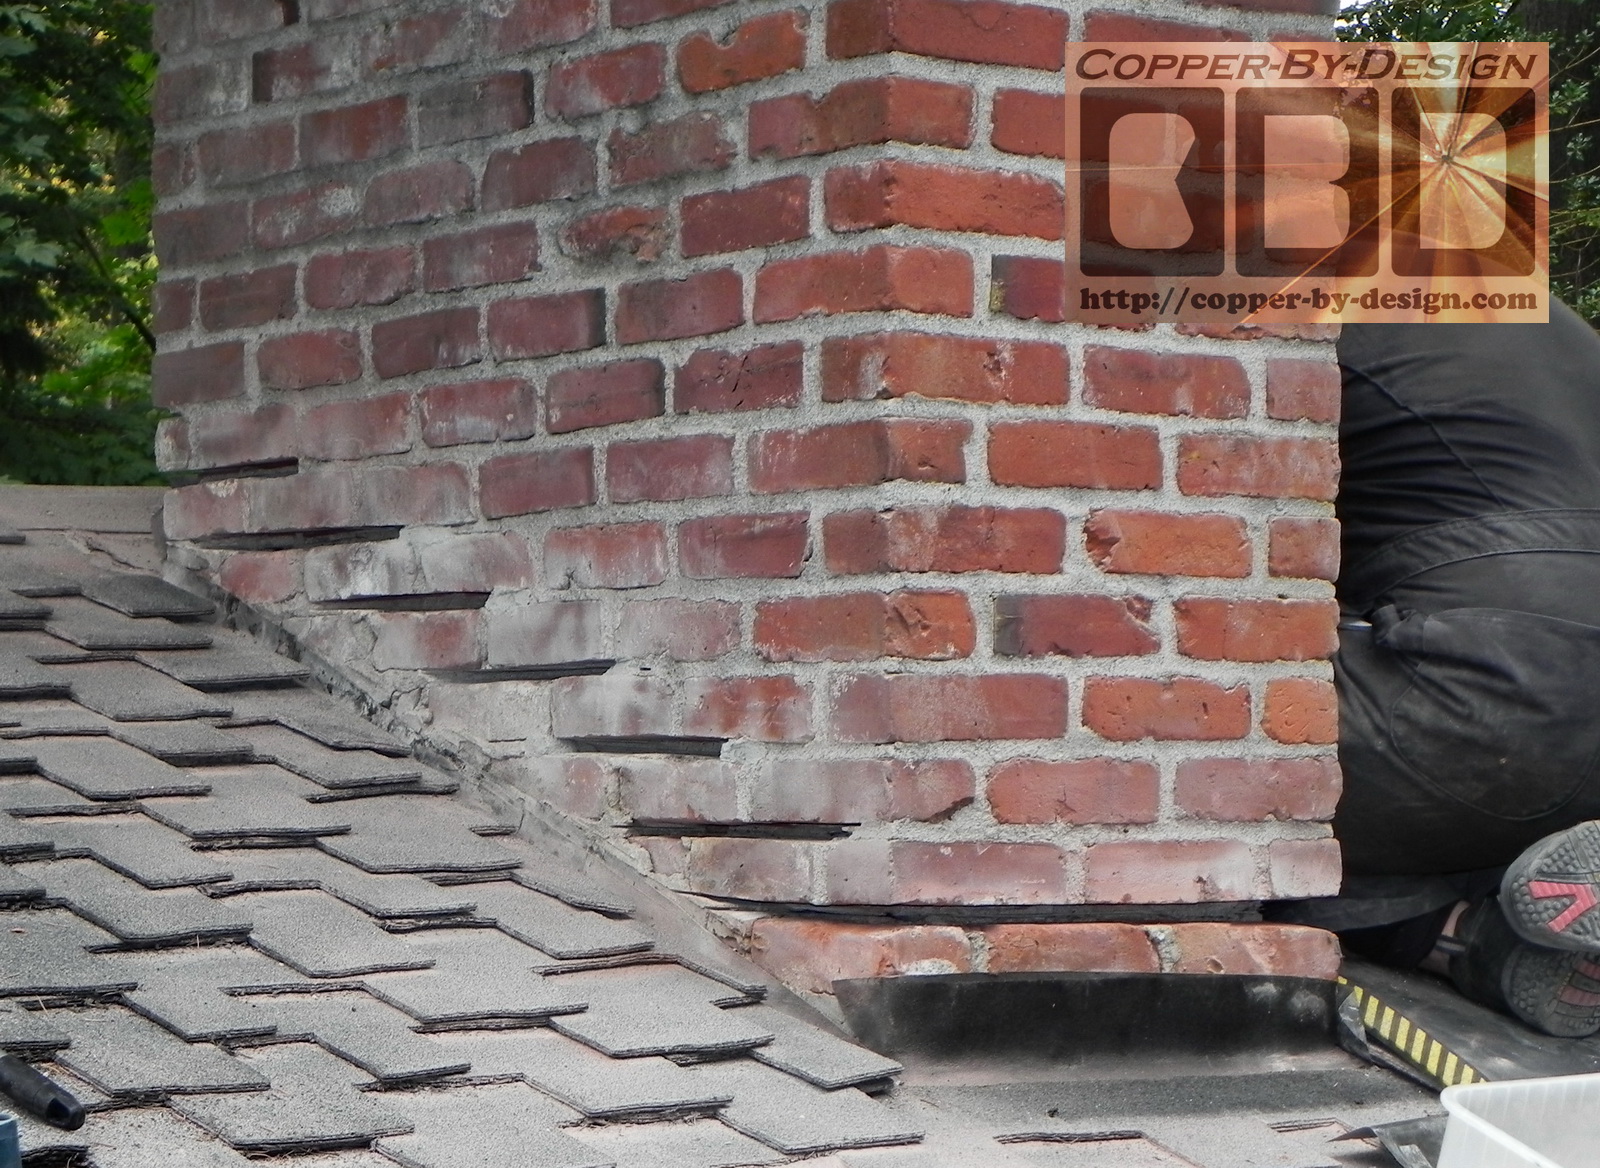
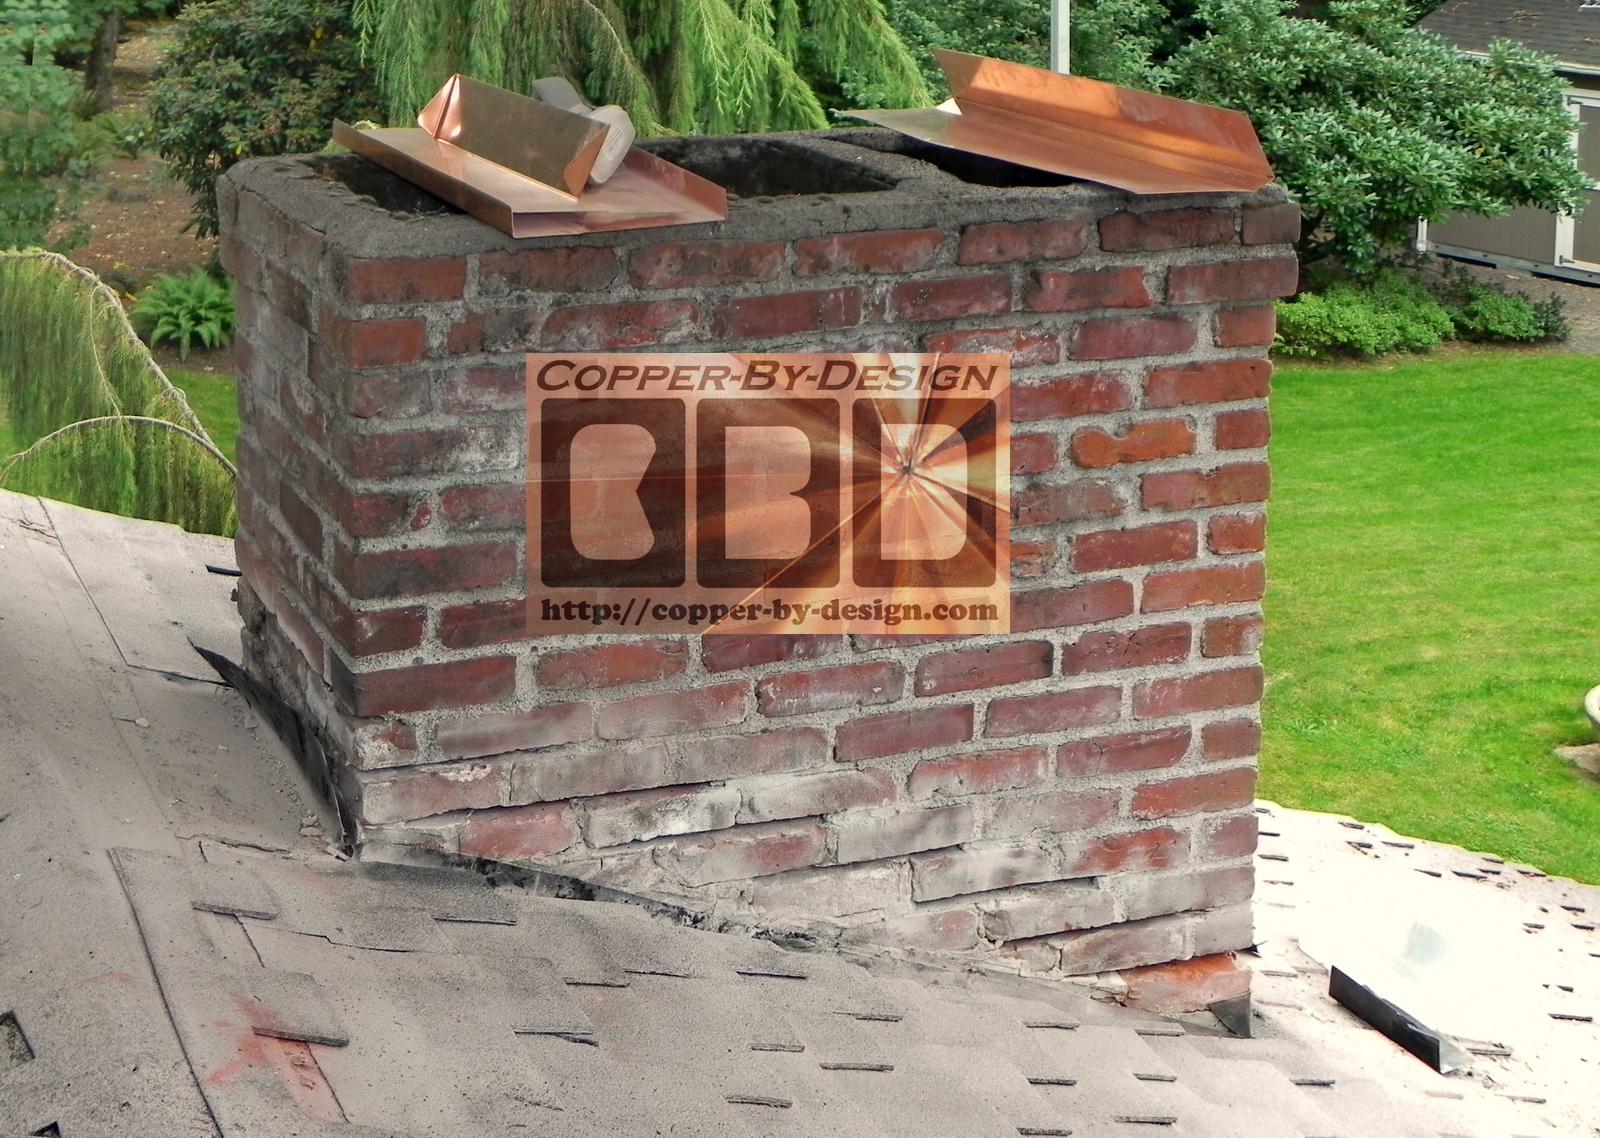
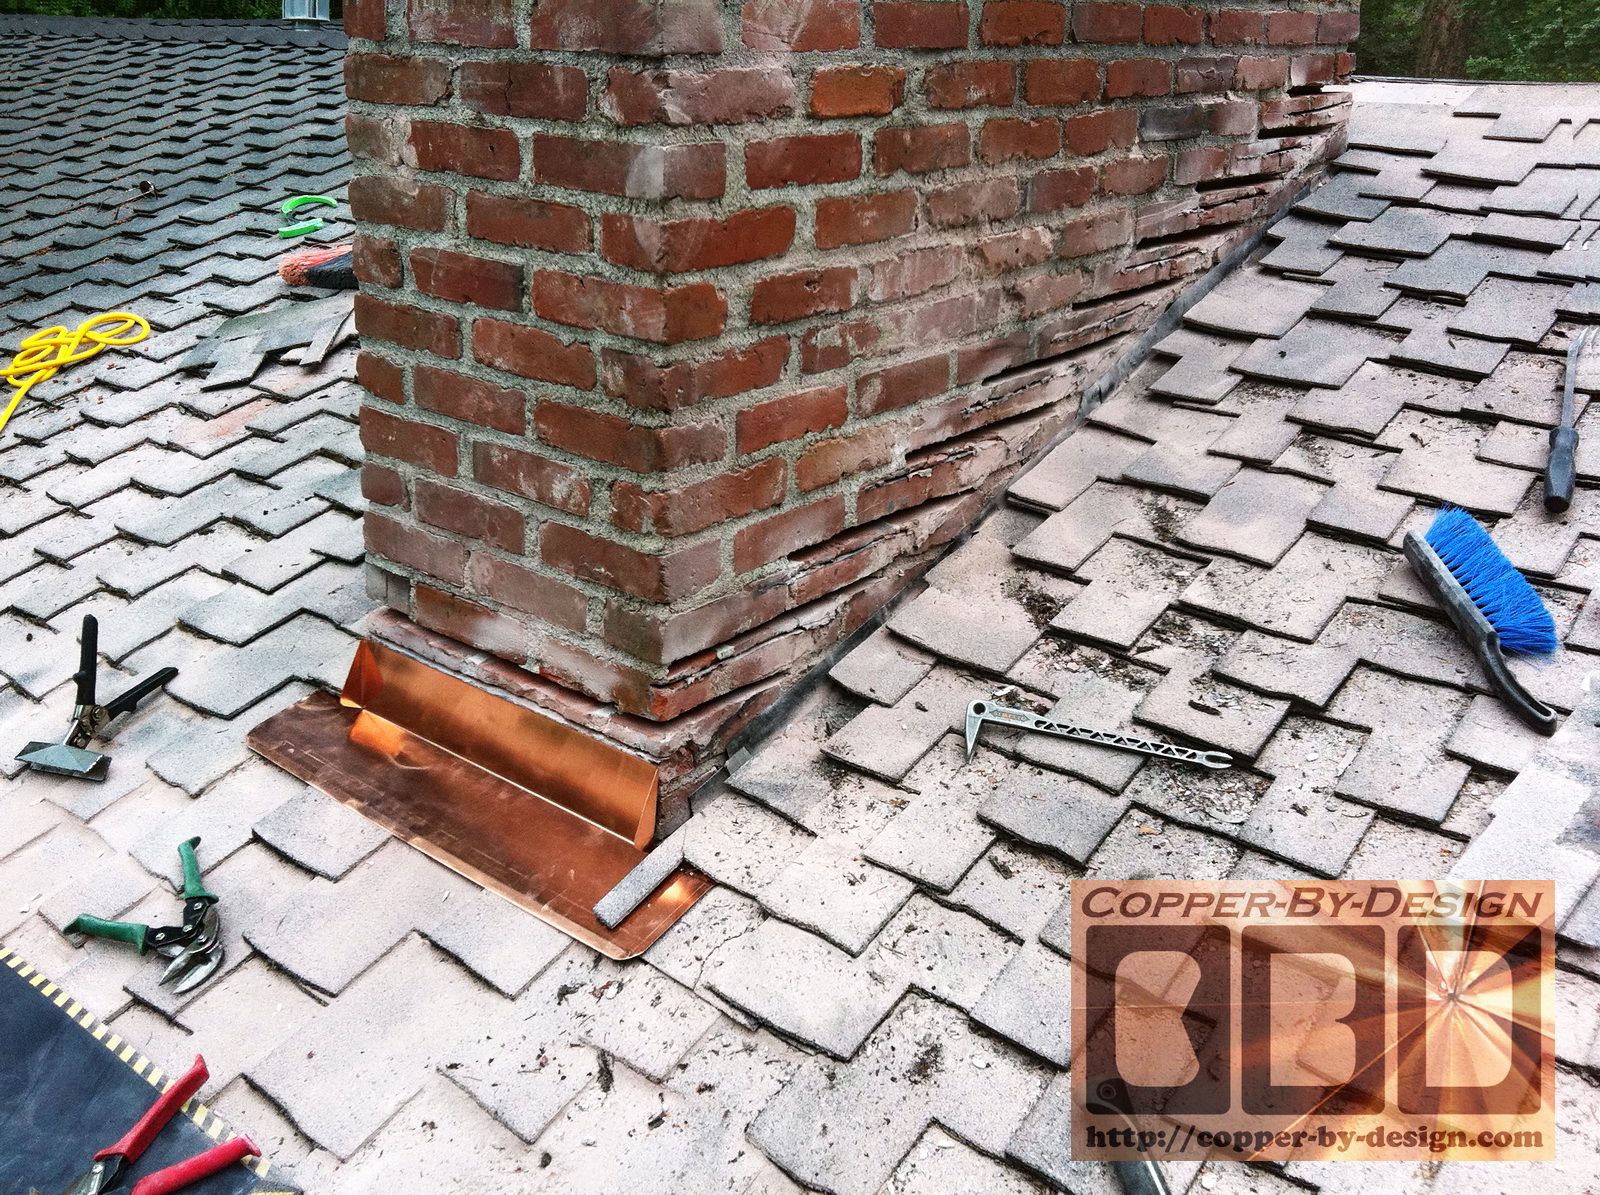
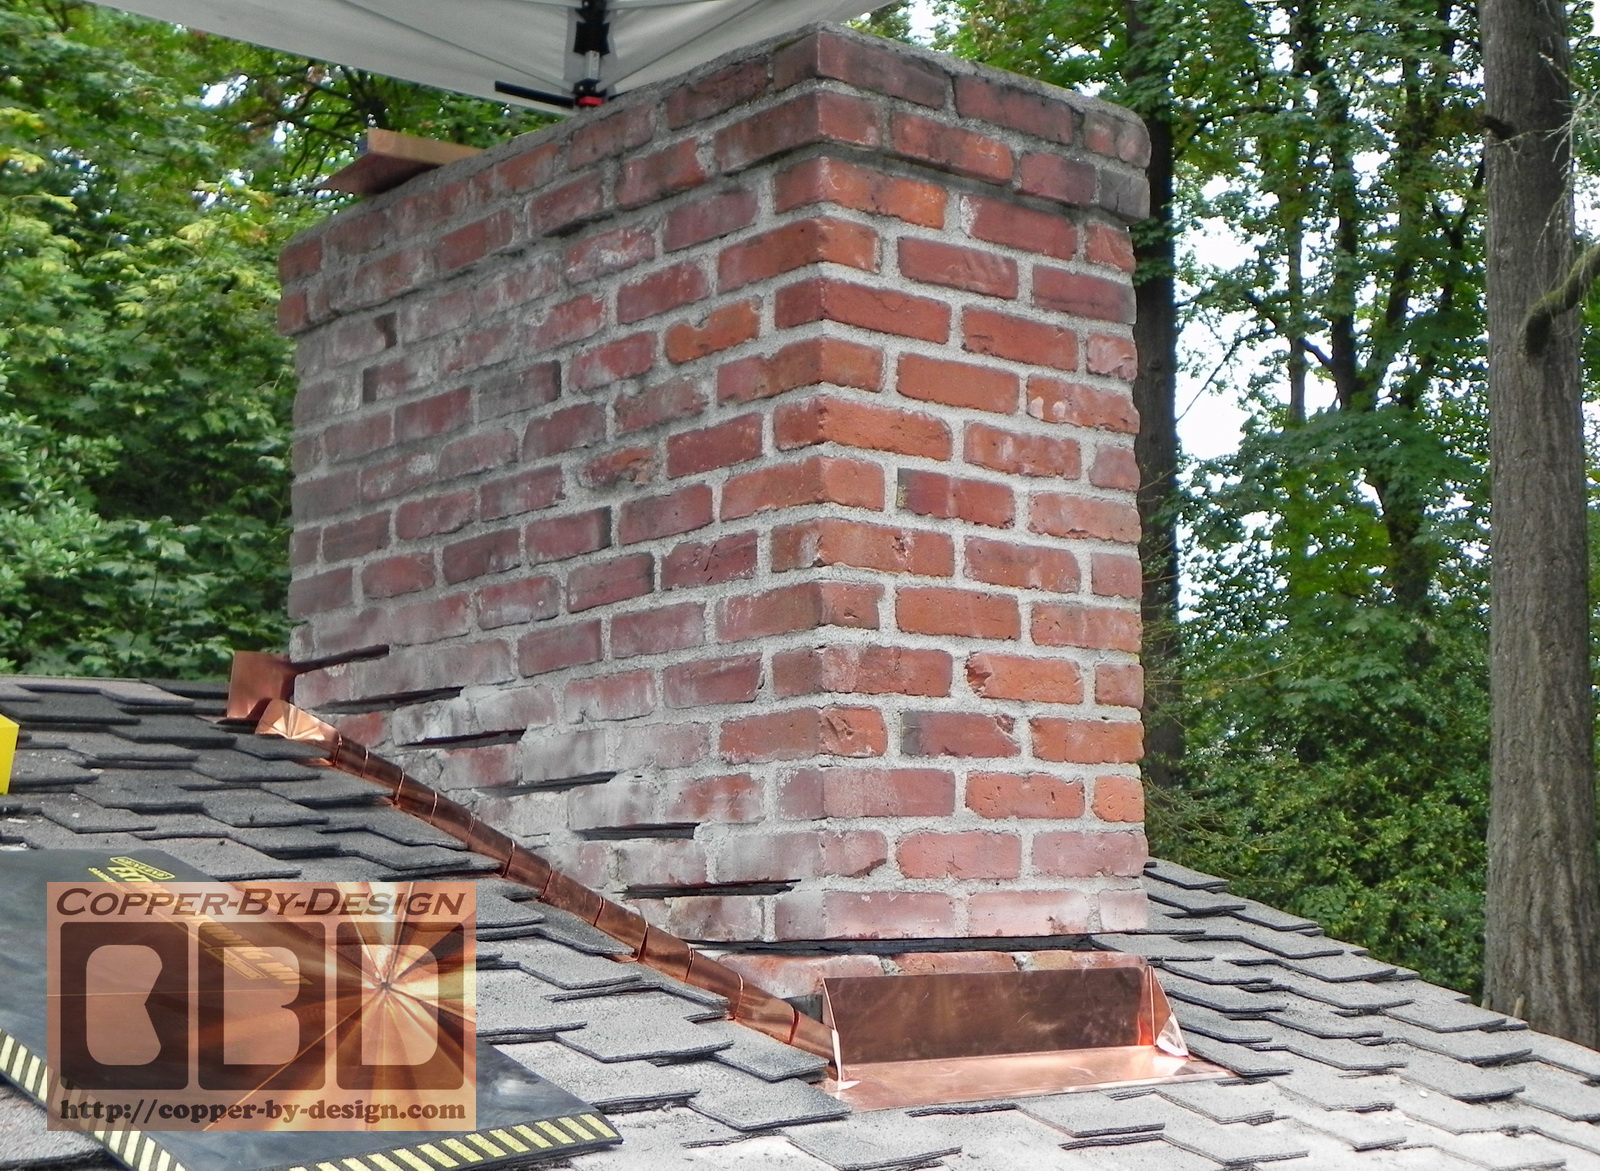
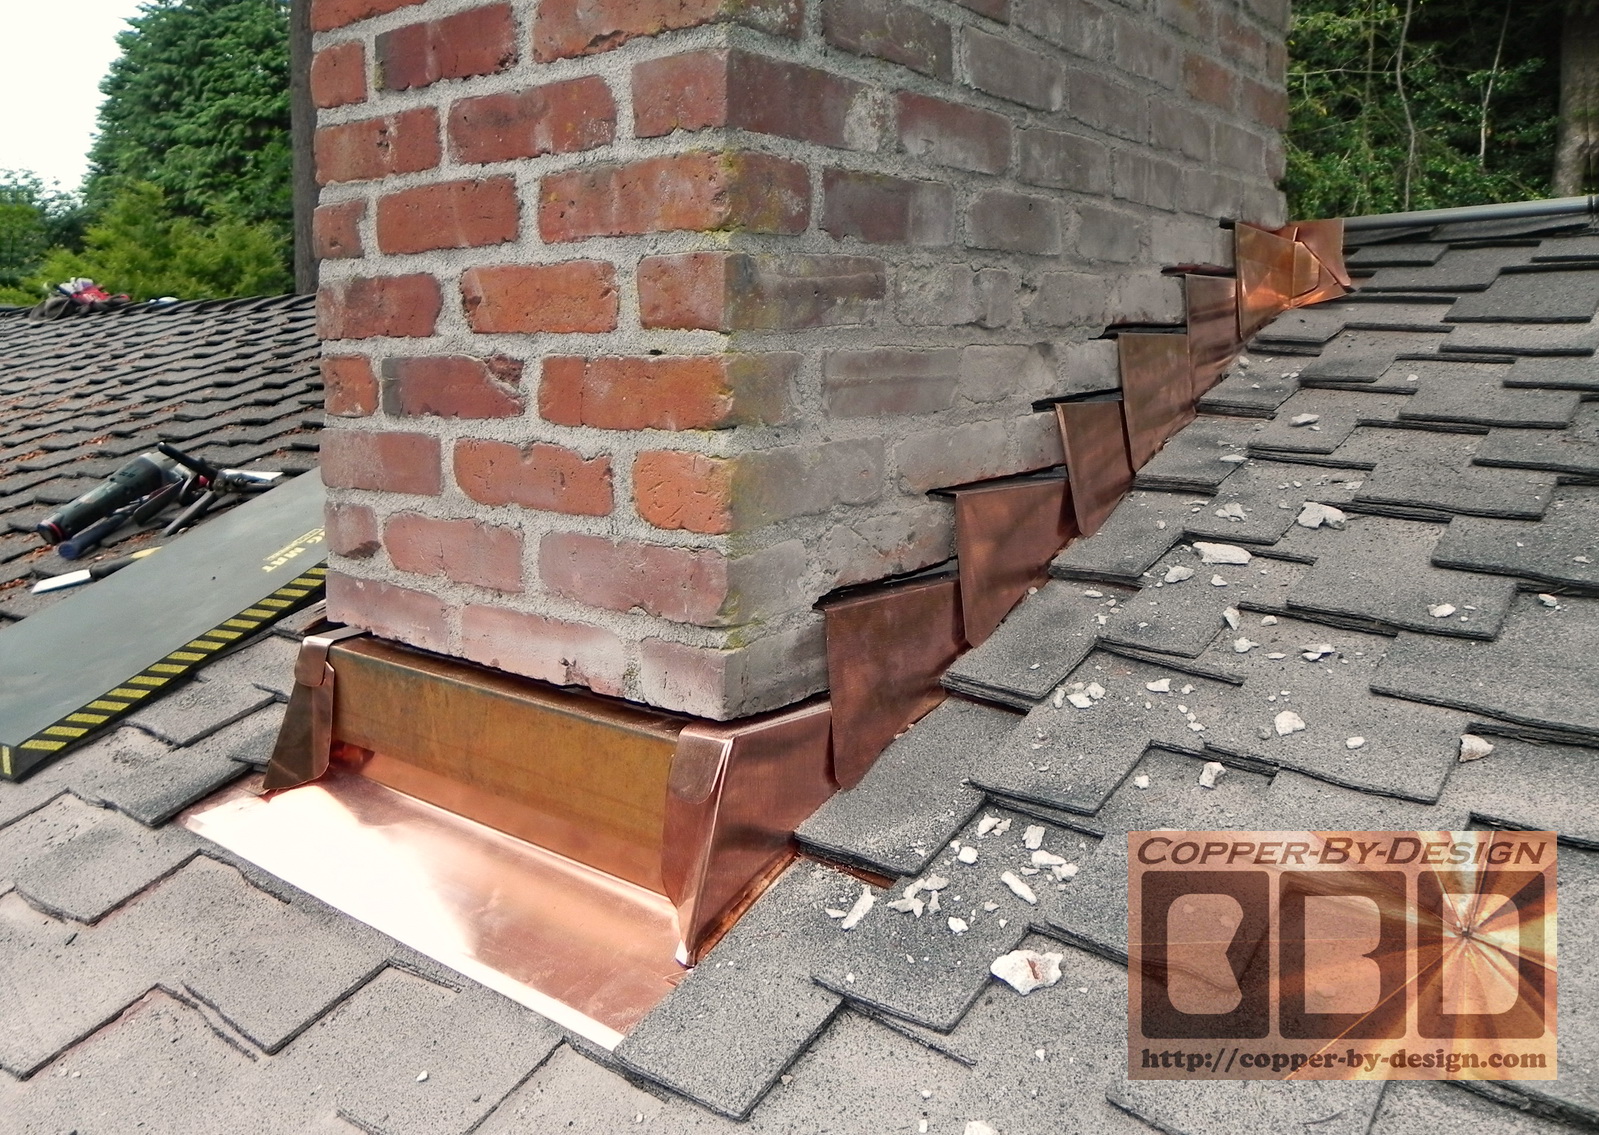
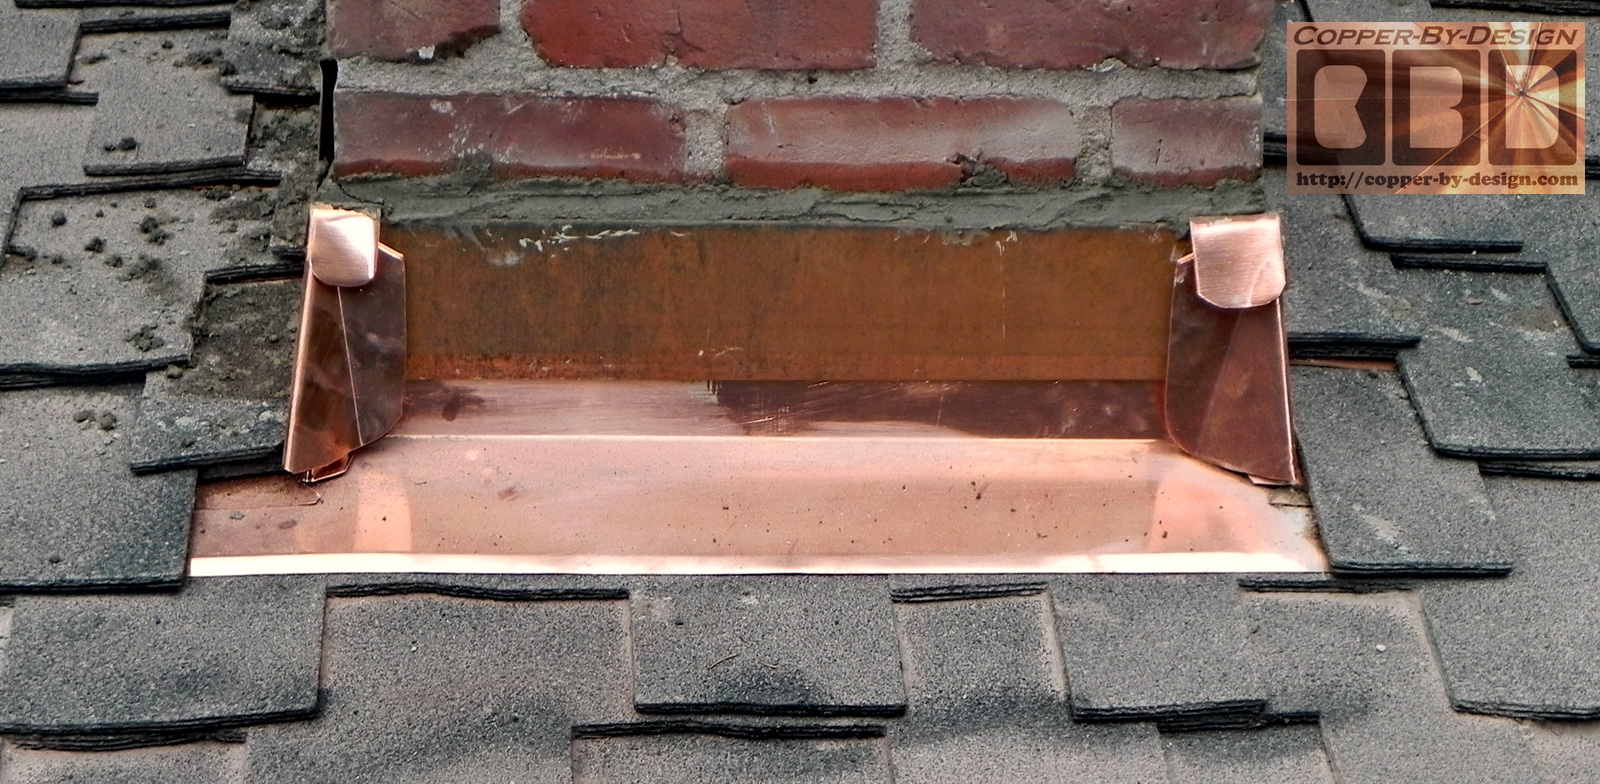
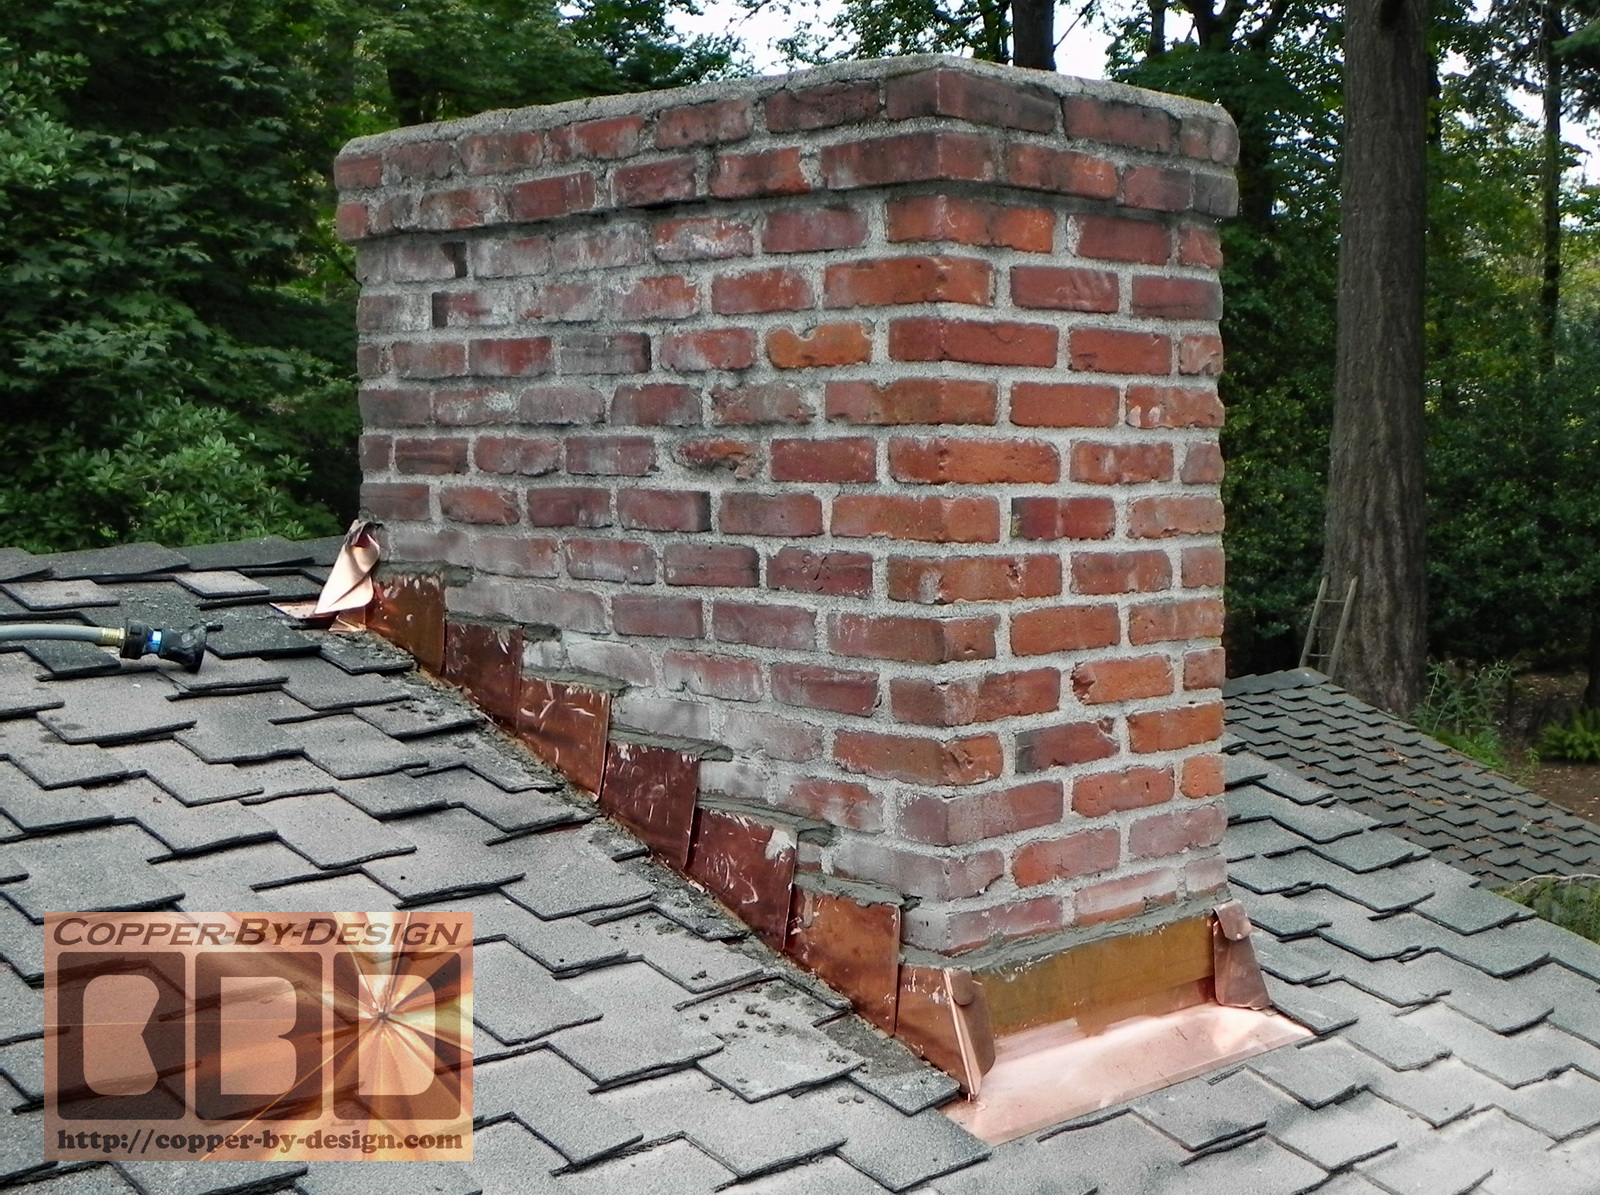
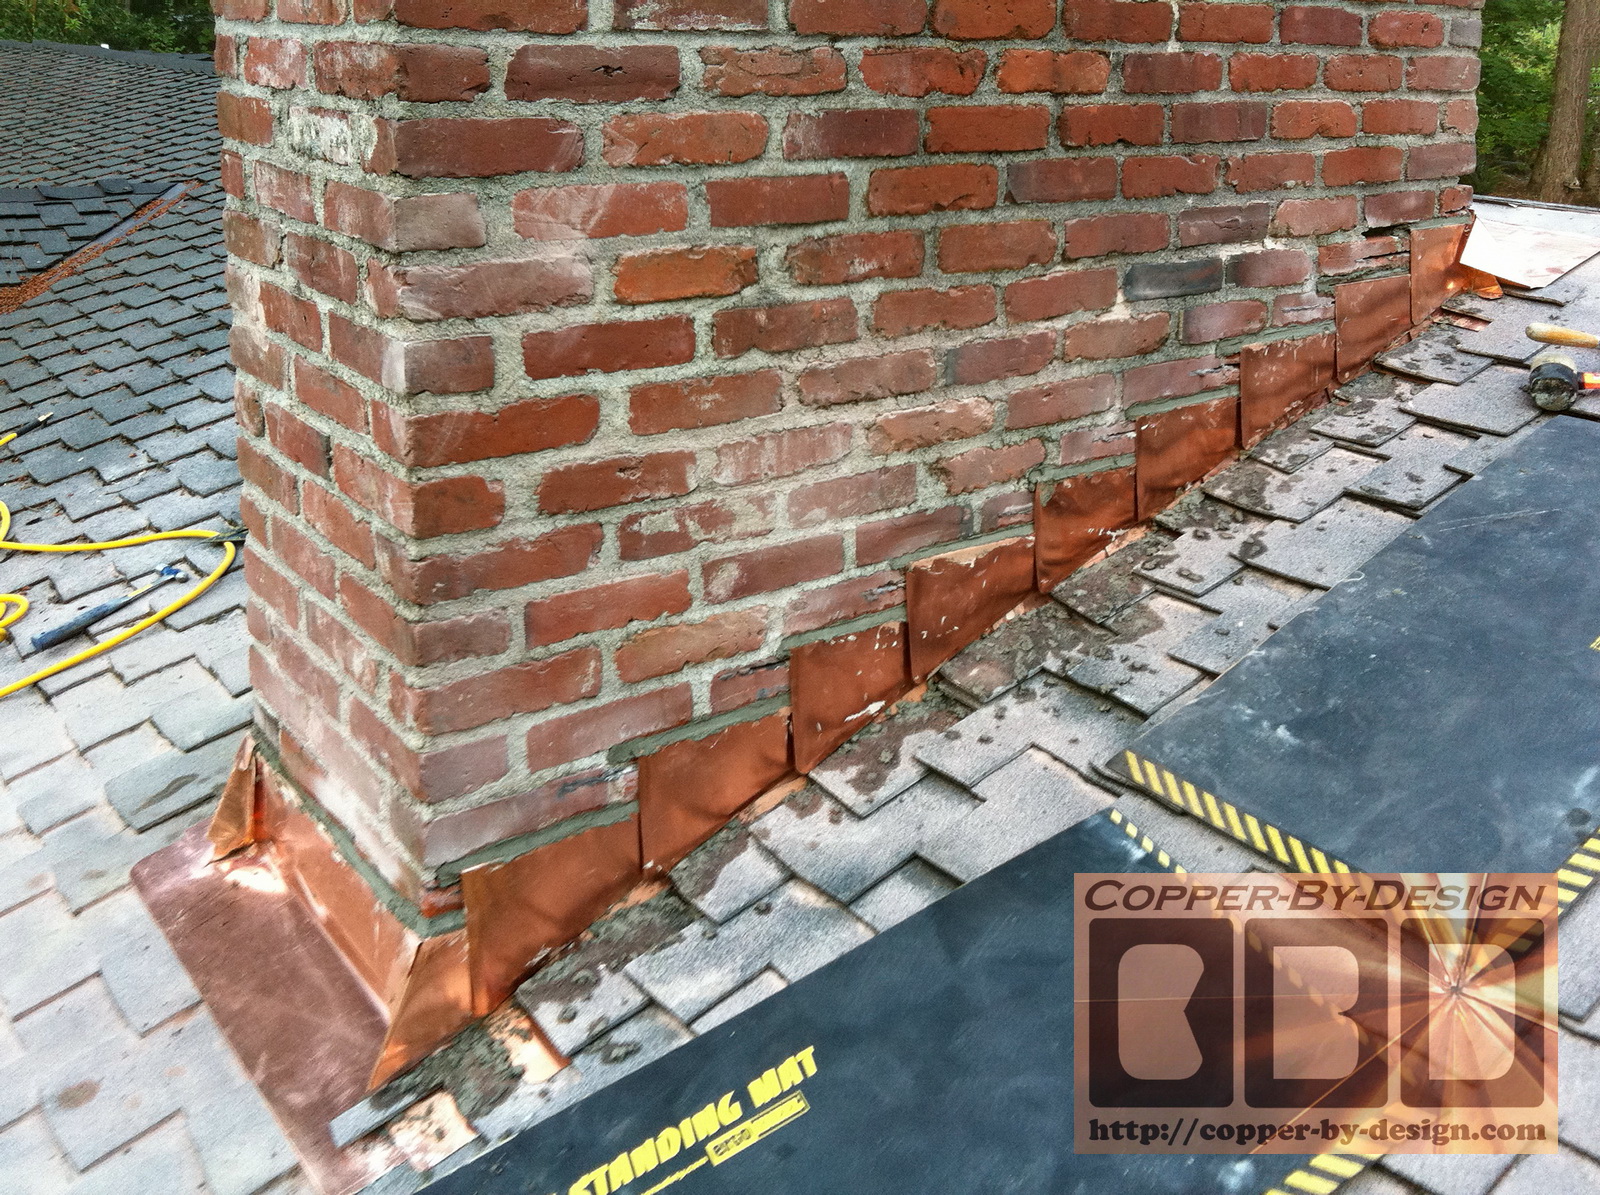
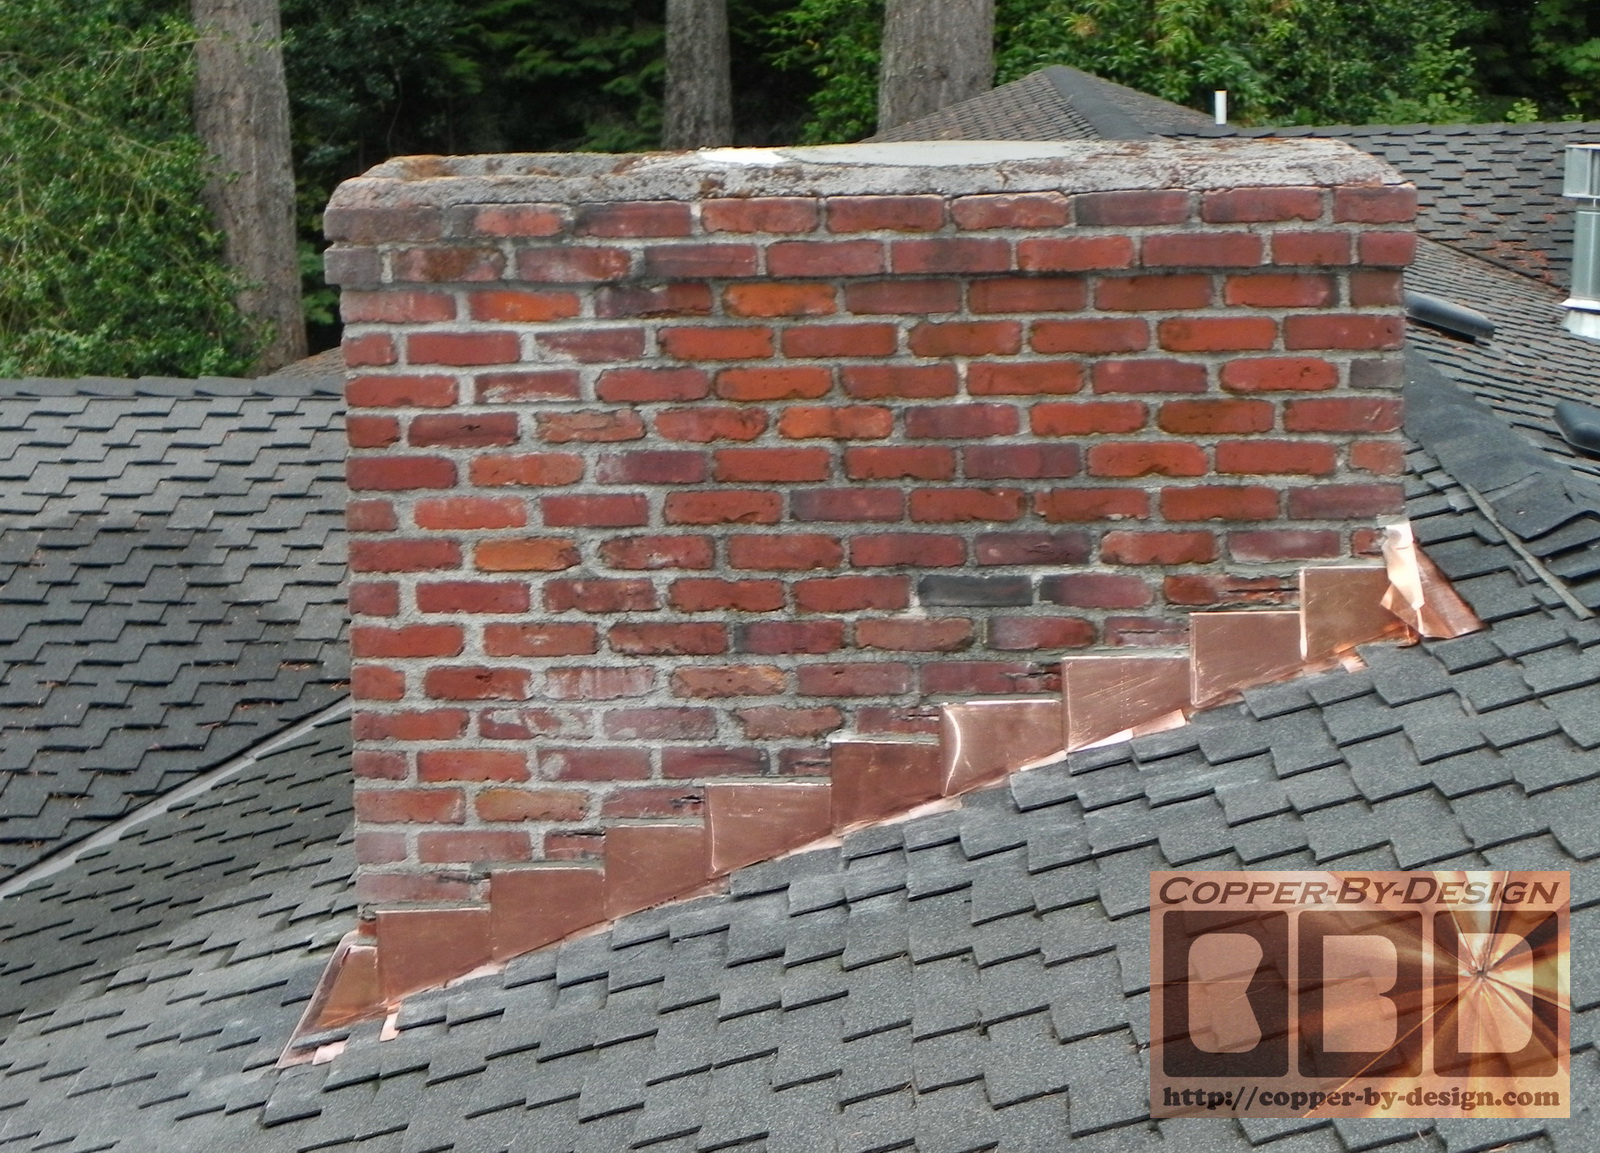
Why a 2-Part Flashing is Needed with any Brick Chimney:
Chimney flashing needs a
2-piece; a step-flashing mounted on the roof deck integrated with
the shingles, and a separate counter-flashing piece that is mortared
into the gap between the bricks. NEVER cut into the brick! This
2-part system to allow for the movement of clay structure of the
chimney and the wood structure surrounding it, caused by expansion and contraction
as temperatures change throughout the day, and throughout the
seasons from below zero to possibly 120 degrees. Also, as you heat up the chimney while in use.
The step-flashing gets nailed on the
roof and lays up against the side of the chimney. Then the
counter-flashing is mortared in the chimney (NEVER caulked) to hang down over the
step-flashing to maintain a water tight seal, yet allow for this movement.
This is why caulking this flashing is futile and will separate before
long. If it is flashed properly, there should be no need to caulk it
at all. Even in the corners. It needs to maintain this seal even
with wind-driven rain and snow.
If you see black tar smeared on your
roof, that is only a desperate temporary fix at best, and needs to
be remedied quickly with proper rust-free flashing.
Common Problems
With Roof Flashing:
Clearly the #1
cause of roof failure is faulty and or rusted out steel flashing; either from improperly
installed, or complete lack there of, which I have seen all too
often. If there is caulk on your roof that's
usually a sign of a temporary leak repair and needs properly dealt
with as soon as possible!
In my
3 decades of experience crawling up on several thousand roofs, seeing
these details up close, I've seen how in most cases
the Roofing Contractors did not re-flash many of these problem areas,
which
they were hired to fix in the first place. Let alone flashed the
right way. Leaving the worse problem areas of your roof not resolved,
so
you've just been cheated out of thousands of dollars and made to
suffer continuing stress. That's like
having your car repainted without even washing your car first, or neglecting to
sand the rusty areas for the paint to stick to a good
clean solid surface. Resulting in the paint starting to peal off the
first time you run it through the Car Wash.
I've done several tear-offs where I removed 2 layers of composite shingles
over
the bottom layer of wood shakes; in where the only flashing I found
around the dormer was under the wood shakes, and of course it was
very rusty and deteriorated. That means the last 2 Roofers had not bother to re-flash their
dormer at all. I have yet to see evidence of a decent Roofer
in this area (no joke). It really is that bad!
This means you are
99% at risk of being ripped off by any Roofing Contractor you're
likely to encounter, so I have added this educational information to
help arm you while interviewing potential Roofers. Since I do not
sell roofing work, this infor is honest and unbias.
One of the problems stem from sheer
ignorance, ethics, and lack of good examples to follow. Roofers come more from a hammer and nail
Framer mind-set. Not from a
sheet metal worker's perspective like me, so these areas of roofing escapes
their private logic and confound them on how to manage wind driven
rain, which all roofs will encounter.
Sadly ethical responsibility seems
to be a thing of the past. I understand this is not just a local
issue either. Improper roof flashing using
just cheap
steel is the standard across the Nation. This thin steel flashing
will not even last as long as the most inexpensive low life-span 25 year shingles. Even if it does not rust all the way through it will cause
unsightly rust stains down the roof, as seen in these photos.
To see more photos of this project click
the link below
http://copper-by-design.com/rf/Viges.htm
I have personally seen thousands of
examples of this close-up. In most cases they will just bend the
old counter-flashing out and slip the new step-flashing under it, and
then just bend that rusty counter-flashing back down over it. When I've
gone out of my way to question Roofers about this they say it is the
job of a Mason to replace that flashing. This might be OK if a Mason
was called out to do it. Or, at least make sure the Homeowners was
made aware this roof job is
not yet finished, and they need to call in a Mason to finish their
work. I have come to learn most Masons do not know how to replace
this flashing either, and really don't want to be bothered with it.
It's way too much work and not worth their time to even bid such a
small and dangerous job, so you as the Homeowner are left with no options.
How does this make any sense?
Even if this flashing is not rusty at all, it is not
going to last through the life-span of the new roof. Even though Roofers
are not willing to replace old flashing
they are not likely to bother notifying you the Homeowner of these rust
issues that still need fixed, so you don't have a clue that the
roofing job was never finished. Then you'll start to notice staining inside from
those leaks, which means
serious damage has already occurred.
What's worse with this scenario is how many Homeowners are conned into paying to fully re-roofing
their house because of these flashing leaks, instead of just
replacing that flashing. These fancy talking Salesman are much more
motivated to sell a whole re-roofing package to unsuspecting Homeowners
to make that big ticket sale. All the while, knowing they have no intention
to replace that defective flashing with something better.
Even if they do actually replace
that flashing, they again will do this new work without the benefit
of using a rust-free metal like aluminum or copper. Keep in mind how
in most cases they will not bother to re-flash the problem areas
as they had promised; failing to solve your
actual problems.
This is the main reasons liability insurance
for Roofers has been very hard to get and extremely costly for
several decades. Costing around 500% more than any other type of construction work.
That is very telling in of itself; demonstrating irrefutable proof of what I'm
saying here. Numbers don't lie. Feel free to research this.
Most of roof flashing can be replaced without
re-roofing the whole house (as seen above), but of course that is far less profitable
for a Roofing Contractor, so that option is rarely discussed or considered as an option.
Each one of those Roofers know better, but they still do
the same kind of crapy roofing work with that same cheap steel flashing, which they
just tore off of your house. Seeing the evidence of it's failure
time and time again.
They all know how the new flashing will fail in short
order, but they just don't care. Isn't this said to be the definition of insanity: doing the
same thing and expecting different results. Sadder yet is how they
are only saving not more than $300 on the average reroofing by not using
all aluminum flashing; which is about twice as thick and will not rust even if all
the paint were to flake off decades later and still protect your
house.
It's criminal in my mind. Can you imagine the amount of
landfill that could be reduced if steel flashing was made illegal?
Yet for over 30 years that I know of; Roofing Suppliers are not allowed to
stock aluminum, stainless steel, or copper flashing by their
Corporate Office.
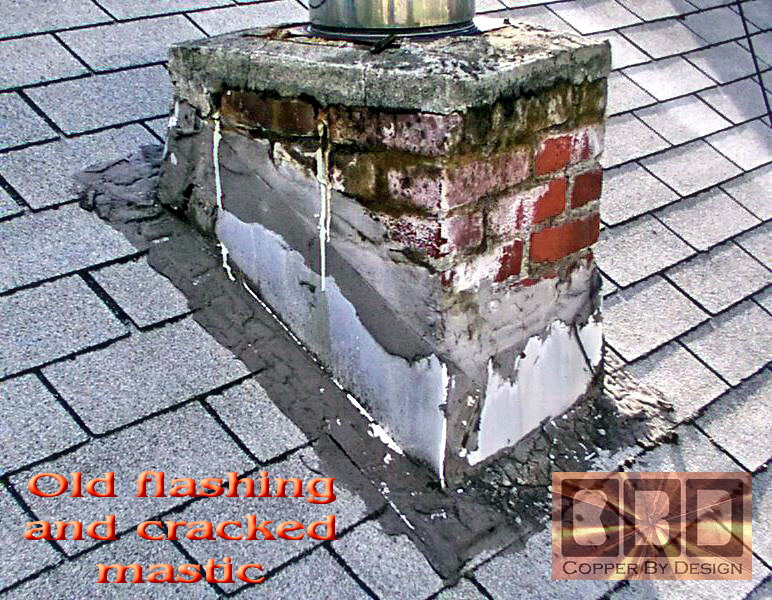
If that were not bad enough; Instead of flashing
areas with metal; they will often use the cheapest caulking sold; called mastic
or asphalt tar.
They just smear it around those problem areas. Mastic is just fibered tar with
no UV protection. This will usually get the roof past their minimum
required 1 year warranty the Construction Contractors Boards requires
of any Licensed Contractor, but not lasting much more than that. Mastic
will become brittle, crack, and peal away within a few years. If
their work were to be inspected by a State Code Enforcement
Inspector it would not be approved. They are not to use mastic
anywhere on a roof. That is a clear sign this roof was not properly
flashed right. Mastic is only to be used as an emergency patch to pacify
the leak until a proper fix can be made. Although, it makes for a very messy
clean-up when that repair can be done. The roofing in that area has to be replace after a mastic attack, as
seen in these photos:
 
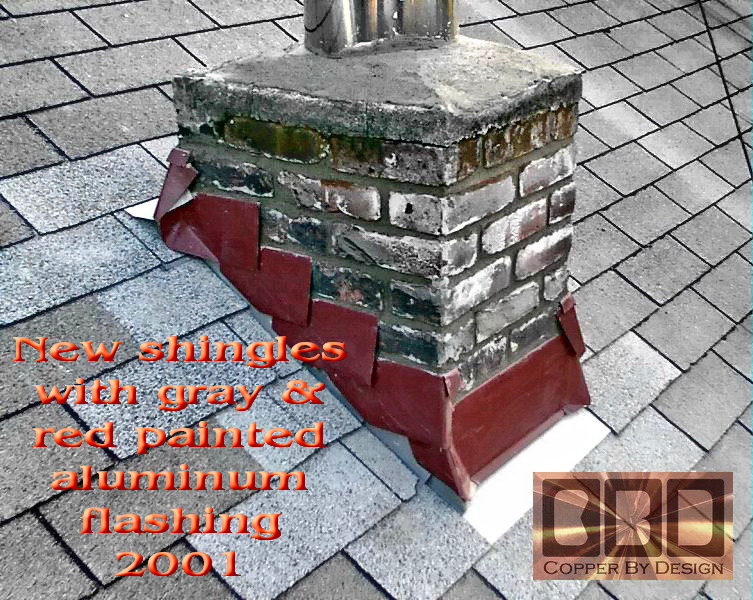
To see more photos of aluminum flashing
click the link below
http://copper-by-design.com/rf/Alum.htm
We know this to be a very common intentional crime of
Roofing Contractors, since pretty much any roofer has seen the
evidence of these
all too common issues when doing a tear-off of an old roof;
i.e. very rusty steel flashing on the roof and mastic failure with
stained plywood underneath. When they tear into
a bad roof for replacement it tells a story: why this roof failed.
They would have to be complete morons to not see this clear evidence in front
of their eyes.
Yet, they continue to ignore this evidence and do
the same shoddy work, since in most cases they are not required to file for a
building permit to replace your roof year after year; not having to worry
about an inspector double checking their work. It has been this way
for over 3 decades that I know of. If more than 15% of the roof deck
needs replaced a Roofer is required to file for a permit. Yet that
is still rarely done, since they know their work will not withstand
the scrutiny of an inspection and you are the victim of this
negligence.
What about Lead Flashing?
Some clients have asked about using lead for chimney flashing.
Roofers like it, since they can cut is so easily with a box-cutter
and form it by hand. It is some times use while the chimney is being first built, but I do
not know how you could be able to get it into the mortar, when the
more rigid and thinner copper flashing is difficult to quickly
install before the mortar sets.
Another important issue with lead is how
soft it is. I have seen numerous cases where animals had chewed
holes in lead flashing.
My understanding is lead is harmful to the environment and people as well, so lead is ill advised.
That is why they made lead illegal to use in gasoline almost 50
years ago.
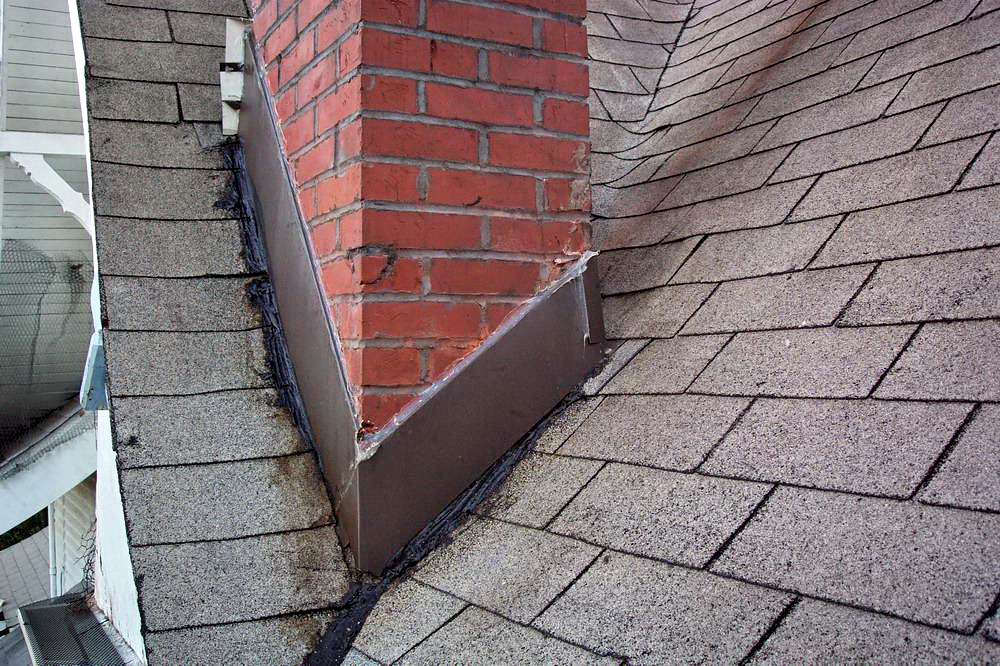
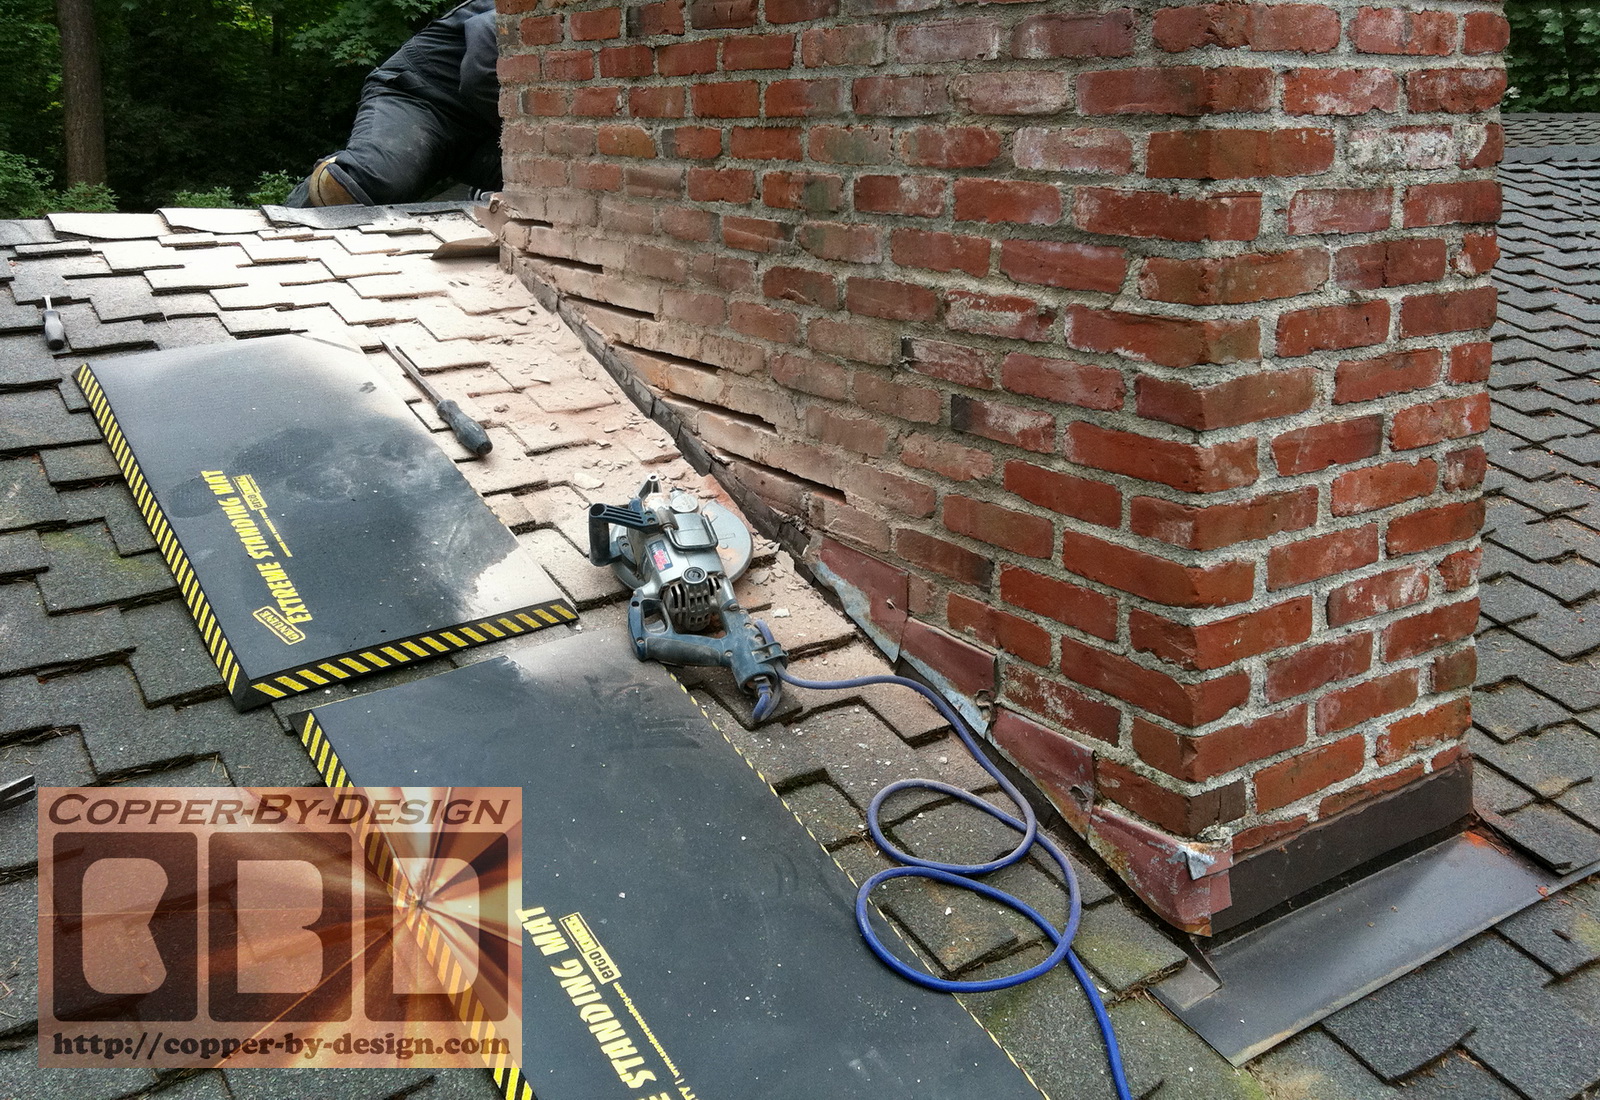
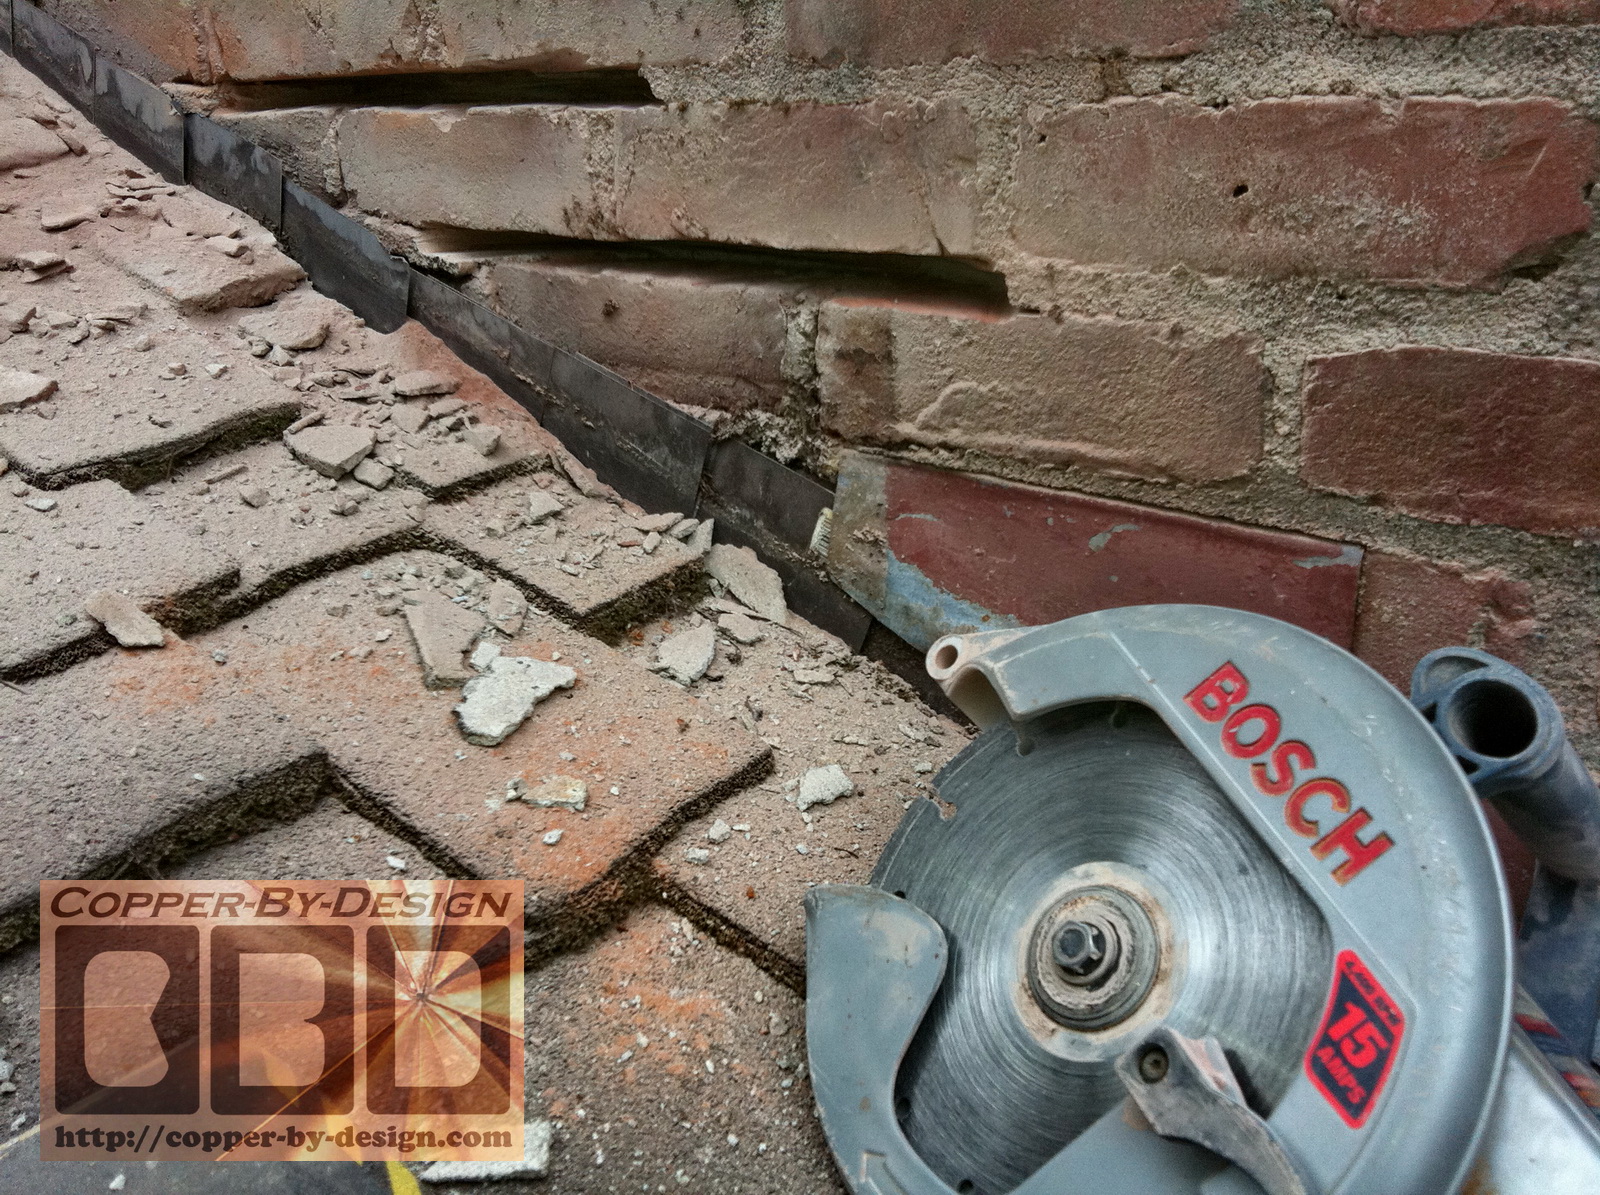
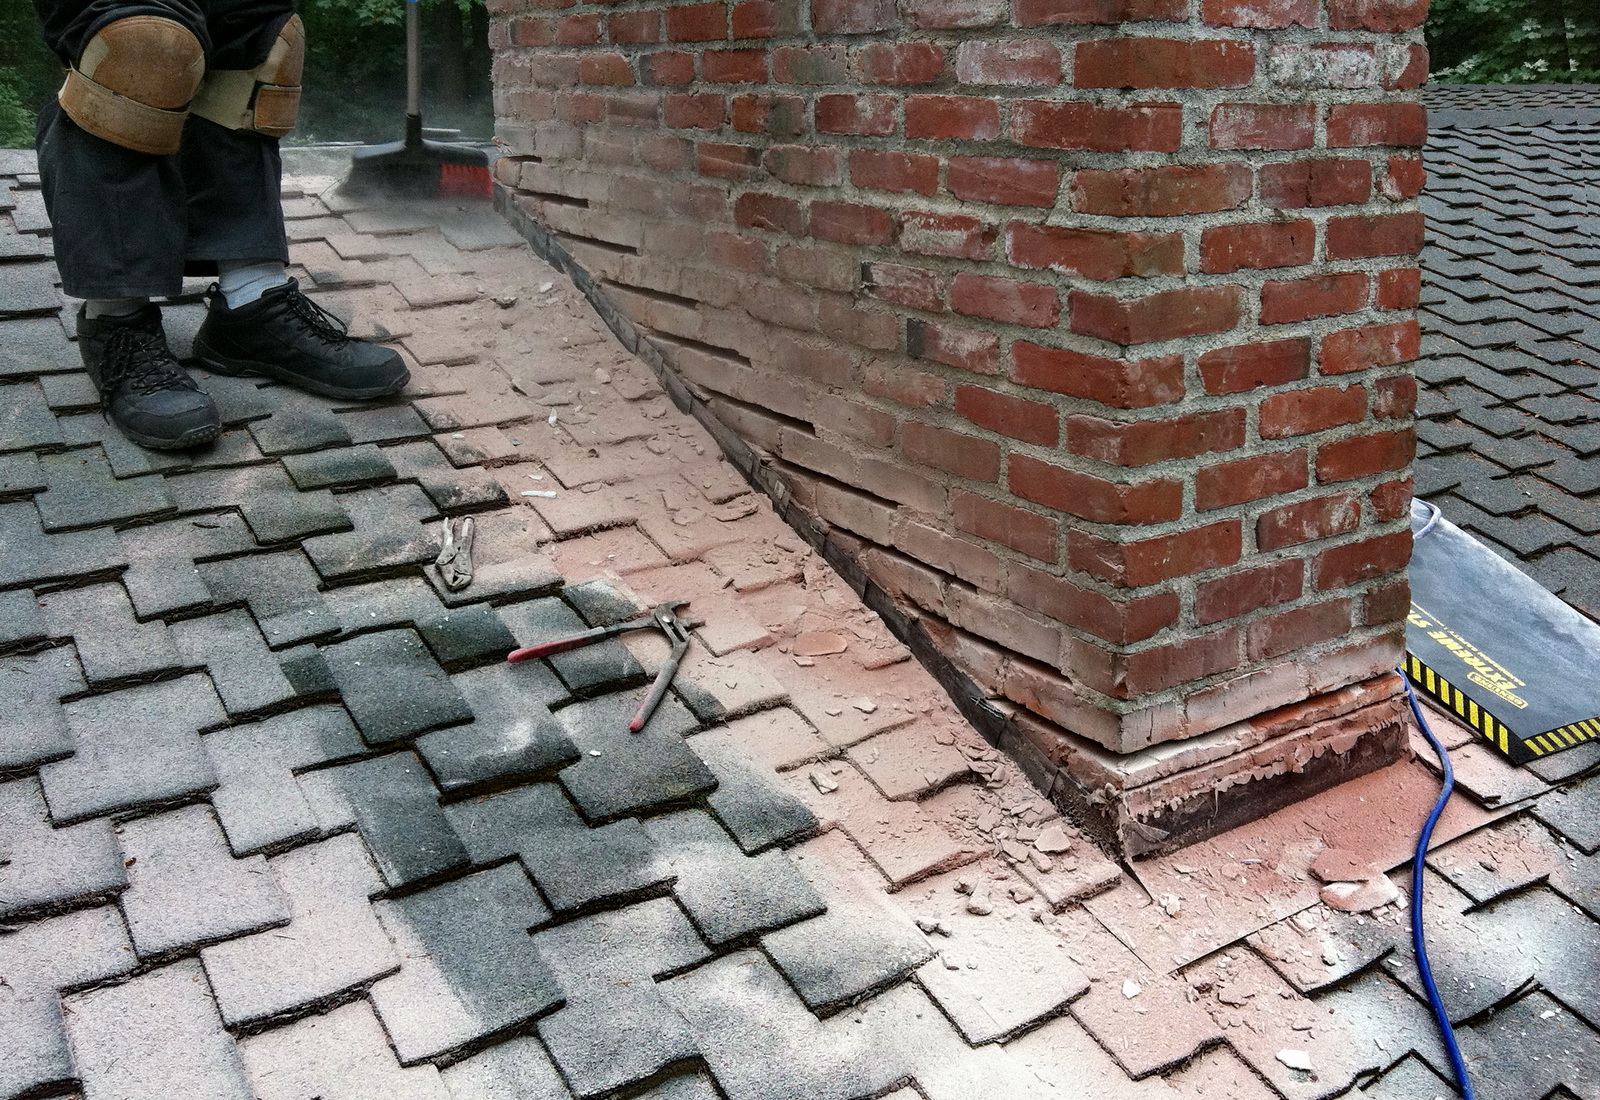
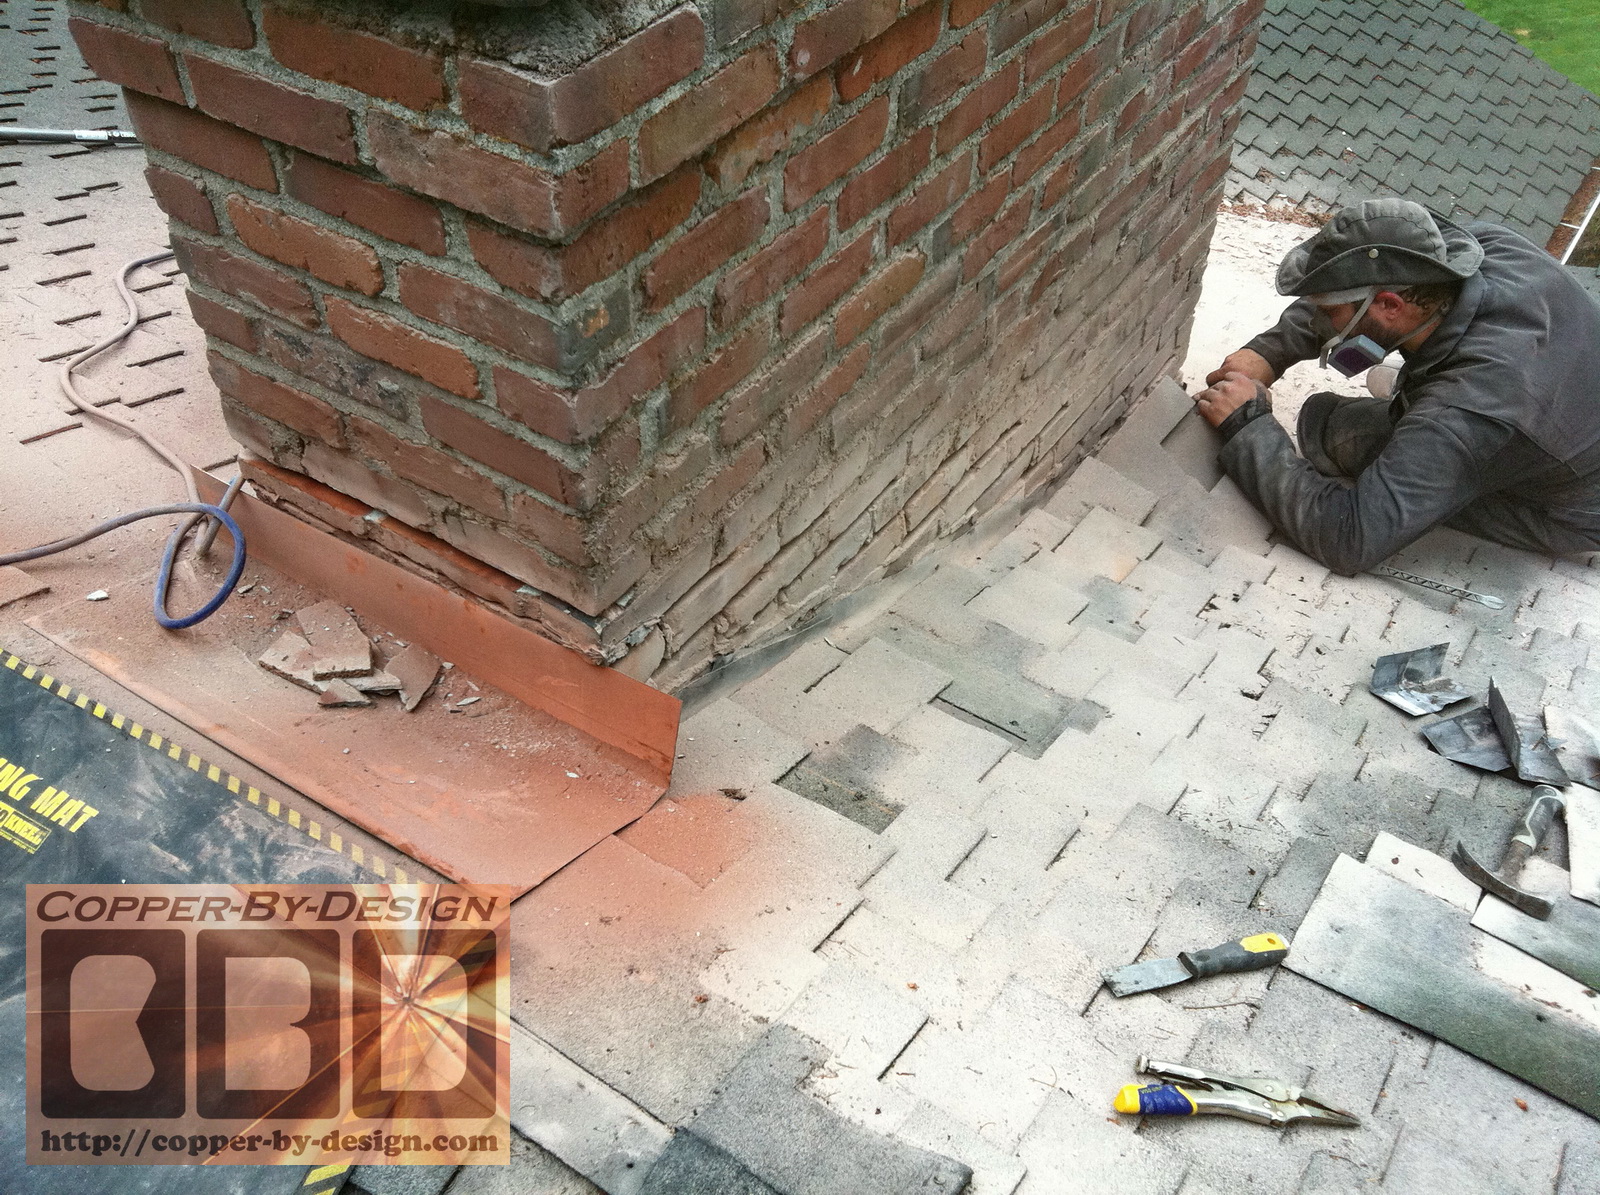
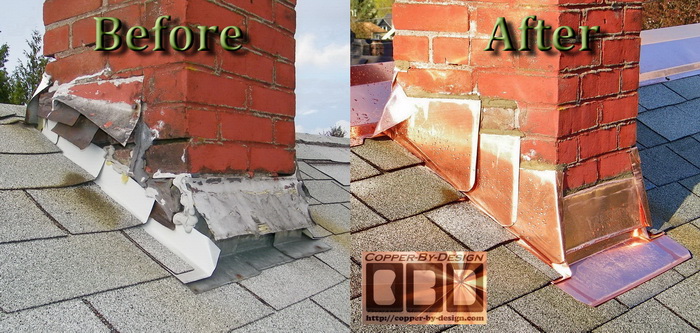
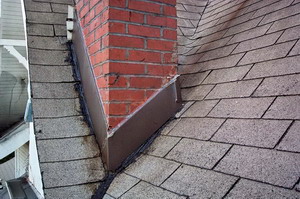
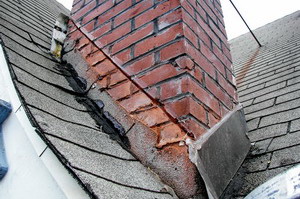
Common signs of shoddy workmanship:
The most common mistake I see Roofers make when they have bothered to re-flash a chimney is to cut a shallow groove
along the diagonal sides of the chimney to caulk a straight piece of
flashing in, but these will not remain attached for long to the crumbly bricks and
old mortar. Although that is not the worst problem; this sets up a
fracture point for the chimney to crack and possible collapse in a
minor
Earth tremor. I have seen lots of evidence of this happening. So,
keep in mind how if
they do this to your chimney, they have permanently damaged your
chimney. Where the only solution would be to rebuild the chimney
down to the roof line with new bricks. If this damage has not yet been done
to your chimney you need to warn your Roofer how you will require
them to rebuild your chimney if they do this.
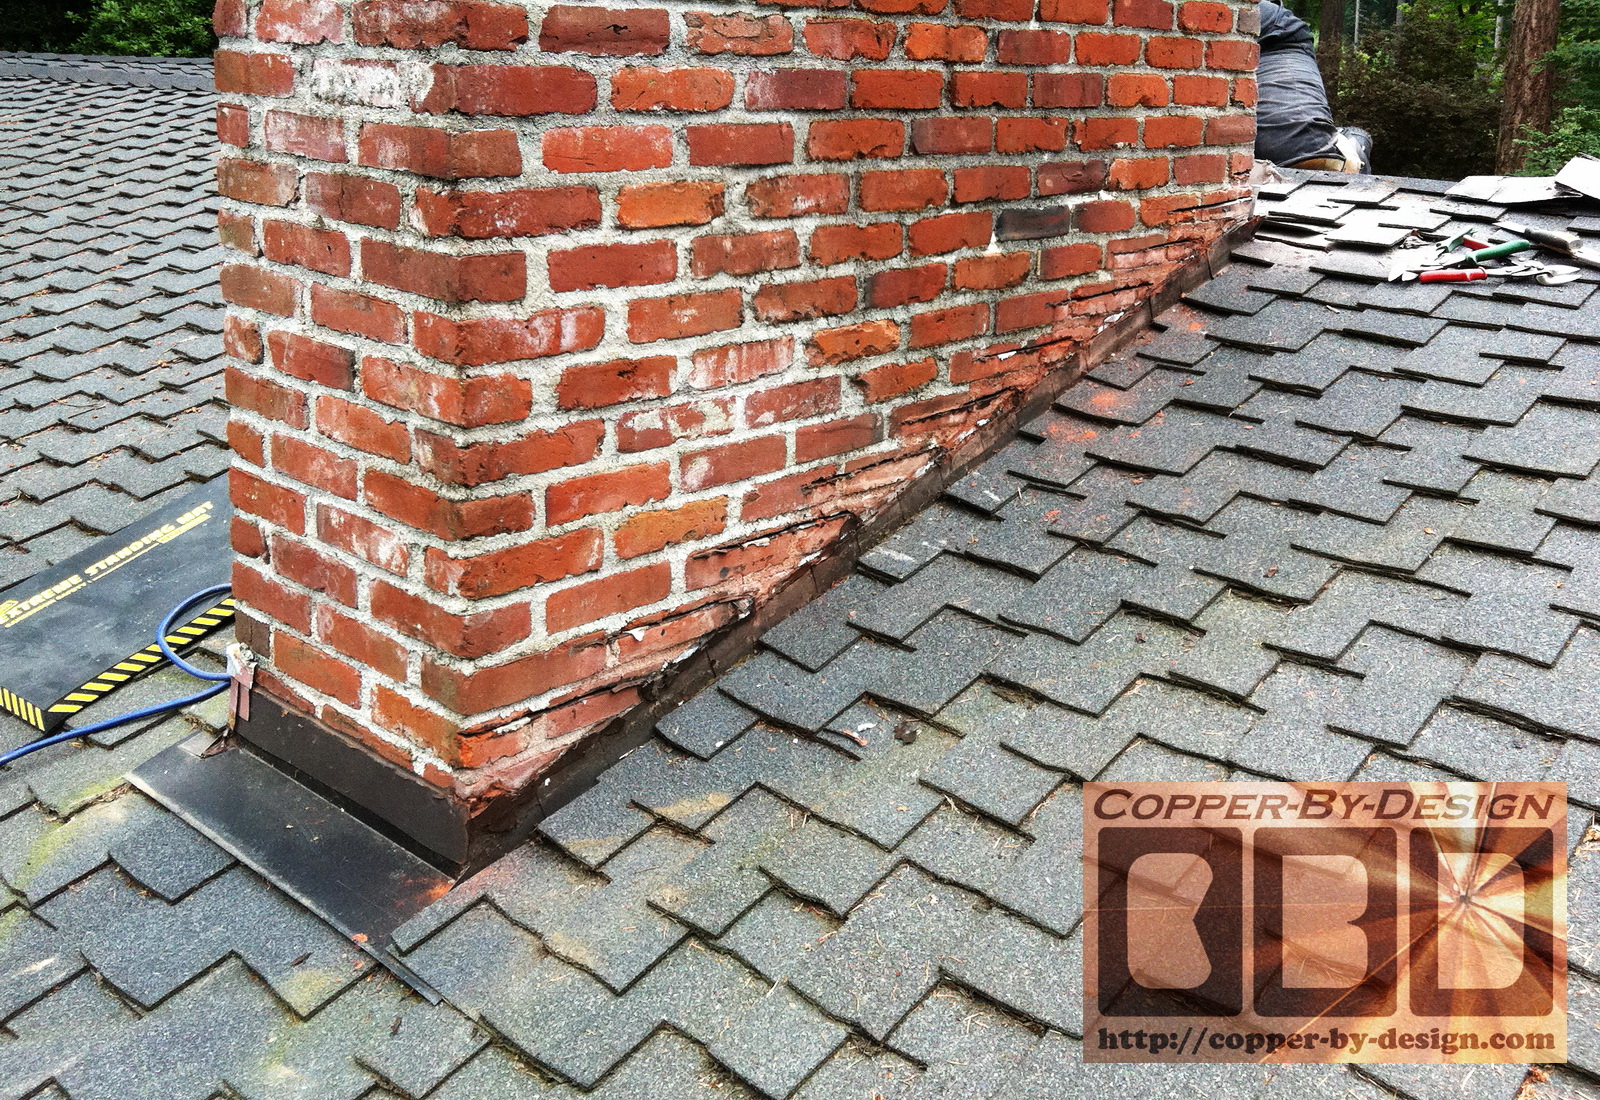
Shown in these photos below I was able to
easily pull the long side flashing piece off without straining. Let
alone the need for tools to pry it off. That is an example of how
poor this sort of fix is. This was not an old install either. It was
done less than 2 years prior to my replacement work.
To see 12 more photos of this project
click the link below
http://copper-by-design.com/rf/Bassett.htm
Even high quality silicone caulk should never be used to
attach counter-flashing, because it is just rubbery and adds no structural
strength to your compromised chimney. Just as with the useless effort of tuck-pointing
a chimney to make the mortar grooves look nice again; the new
granulated caulk
in such a shallow groove has only the old crumbling mortar to stick
to, so it will simply fall out within a few years. These grooves
need to be ground out a lot deeper than just 1/2" in order to
have the upper and lower brick surface to adhere to, and only be filled back in with
REAL mortar. The groove
needs to be at least 1.5" to 2" deep. Anything short of that
is a waste of time and money.
Aluminum flashing can be special ordered
from a fabrication shop like mine, but of course that makes it just
much more expensive than mass produced stock, but the time delay is
the main reason roofers will not have it made for your house. If you
bothered to have aluminum flashing listed int he contract, 9 times
out of 10 they will still show up with steel flashing parts. If you
are not there with a magnet to test and demand they get the right
flshing, you just got screwed!
My Roofing web page at:
http://dmr-gutters.com/rf/roofs.htm
goes into more detail about these terrible issue. So don't
leave without reading it over. It will help to save yourself a great deal of
wasted cost and anguish
down the road.
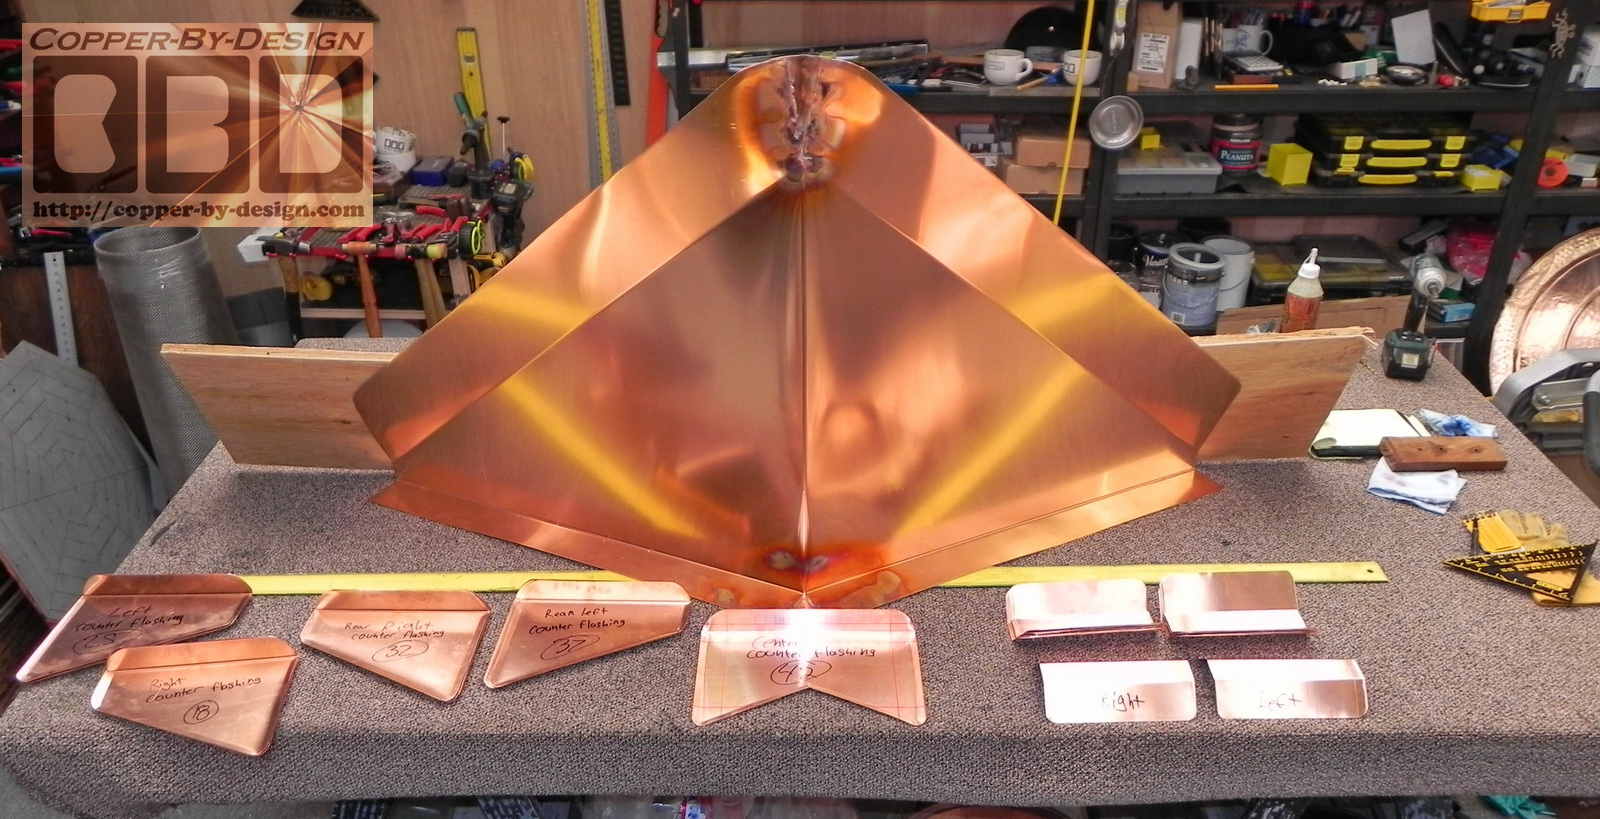
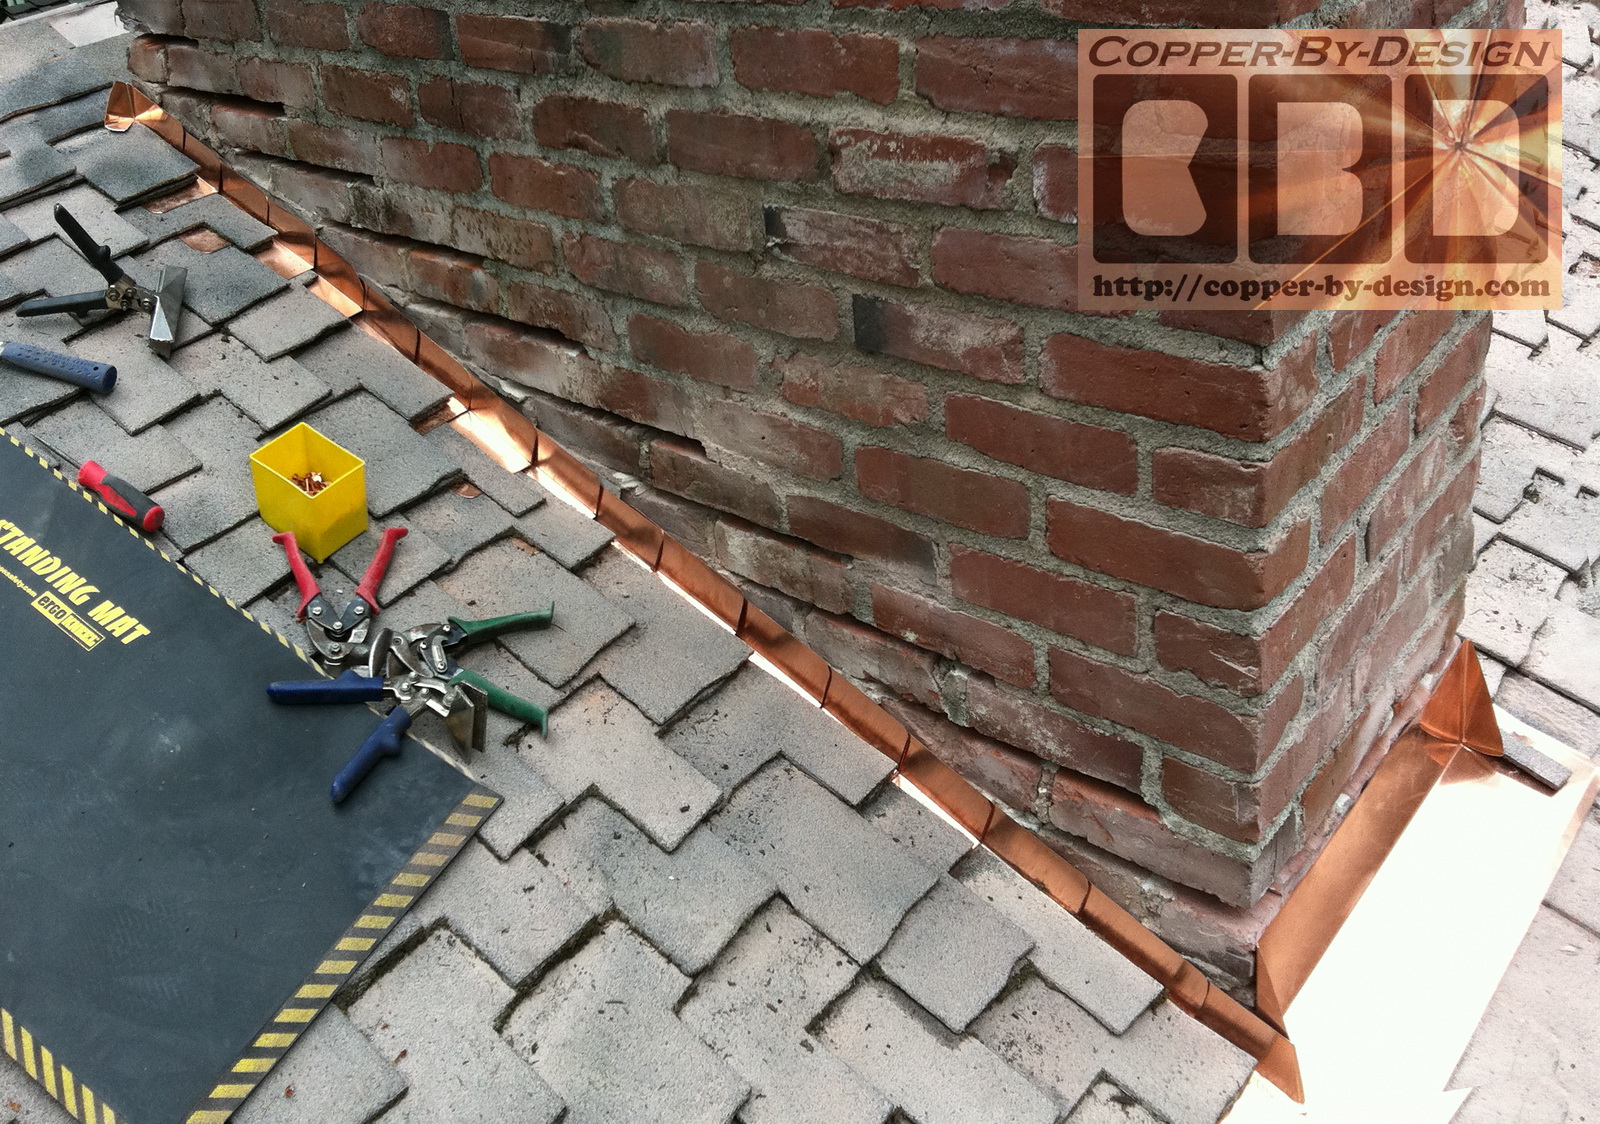
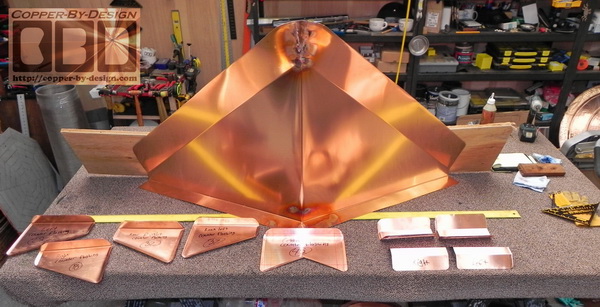
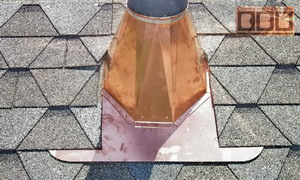
Can you make us a custom copper chimney flashing kit?
Here is an example
of one of my first Client installed chimney flashing kits back in
2008:
I seem to be the only sheet metal shop willing to spend the time to work
with Homeowners through e-mail to figure out these custom kits for
them or their local installer to use. They are labeled and numbered
in order of installation, precut, and bent to minimize
customization needed at the job site. Below is some instruction and
detailed photos to help give you a good idea of how to do this
properly.
For more information regarding custom
chimney flashing kits I make for our Clients across the Nation go to my Flashing
Kits web page for
more details:
http://copper-by-design.com/rf/cf-kits.htm
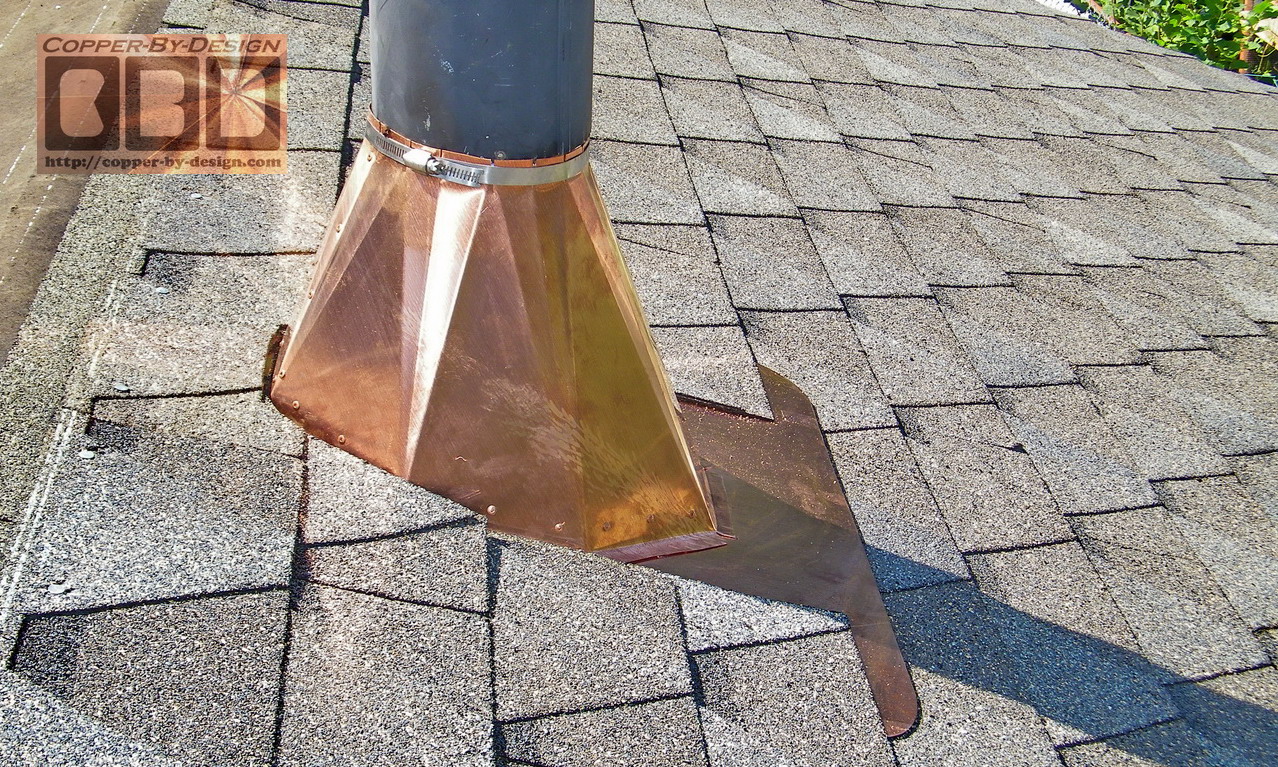
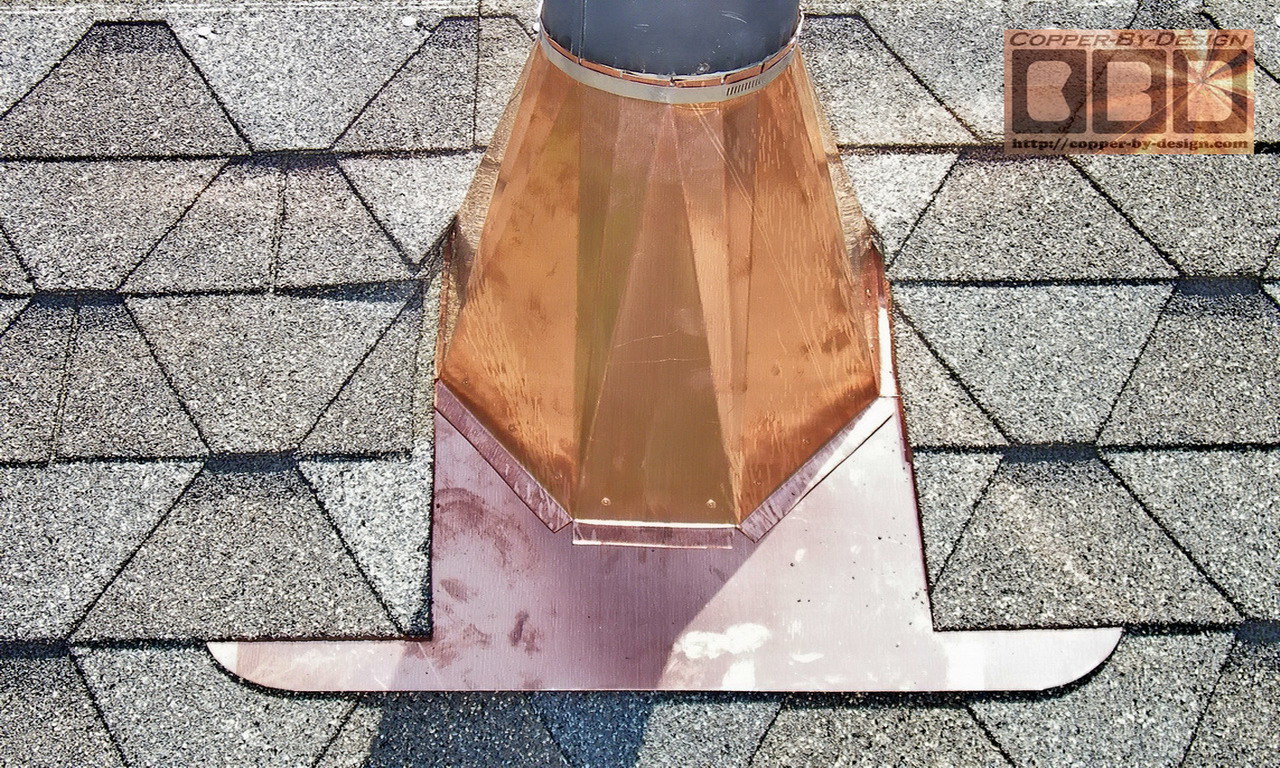
What about chimney flue pipe flange and
other flashing?
As you can see from our web
site I can also help with many other custom flashing needs. Although,
you may need to consider physical contact of the copper flashing
with steel pipes and the detrimental effect it will have on the
steel through electrolysis or galvanic corrosion. The steel will not harm the copper, but
the copper will accelerate the deterioration of the steel. Stainless
steel is compatible with copper. This chimney pipe for a wood
stove in my wood shop corroded within a year and became unusable.
What If
I Already Have This Kind Of Shoddy Workmanship On My House?
If you are are a victim of this all too common unethical business practice
you can show your Contractor this web site. Then you should be able
to deduct the cost of repairing your chimney and it's flashing even
if you are going to do it yourself, plus the cost of cleaning off
that black tar. I would encourage you to insist he has that tar
removed and cleaned off by his workers to the point as if it were never there.
That ought to teach him a lesson. It is messy work
and solvents on your new roofing will damage the shingles and cause a terrible
staining mess. If the contractor uses a solvent he'll then need to replace
all the damaged and stained shingles at the same time.
Do not let them talk you into any other
alternative, trying to minimize their costs. They will try to
discredit me and say I do not know what I am talking about, but it
is simple logic here they cannot BS their way out of if you stand your ground. Roofers will
claim that it can only be done this way when the chimney was first built
by the brick mason, but I prove here that is simply not true.
Below are examples of jobs I've worked
on, that show these shoddy practices I've worked to repair.
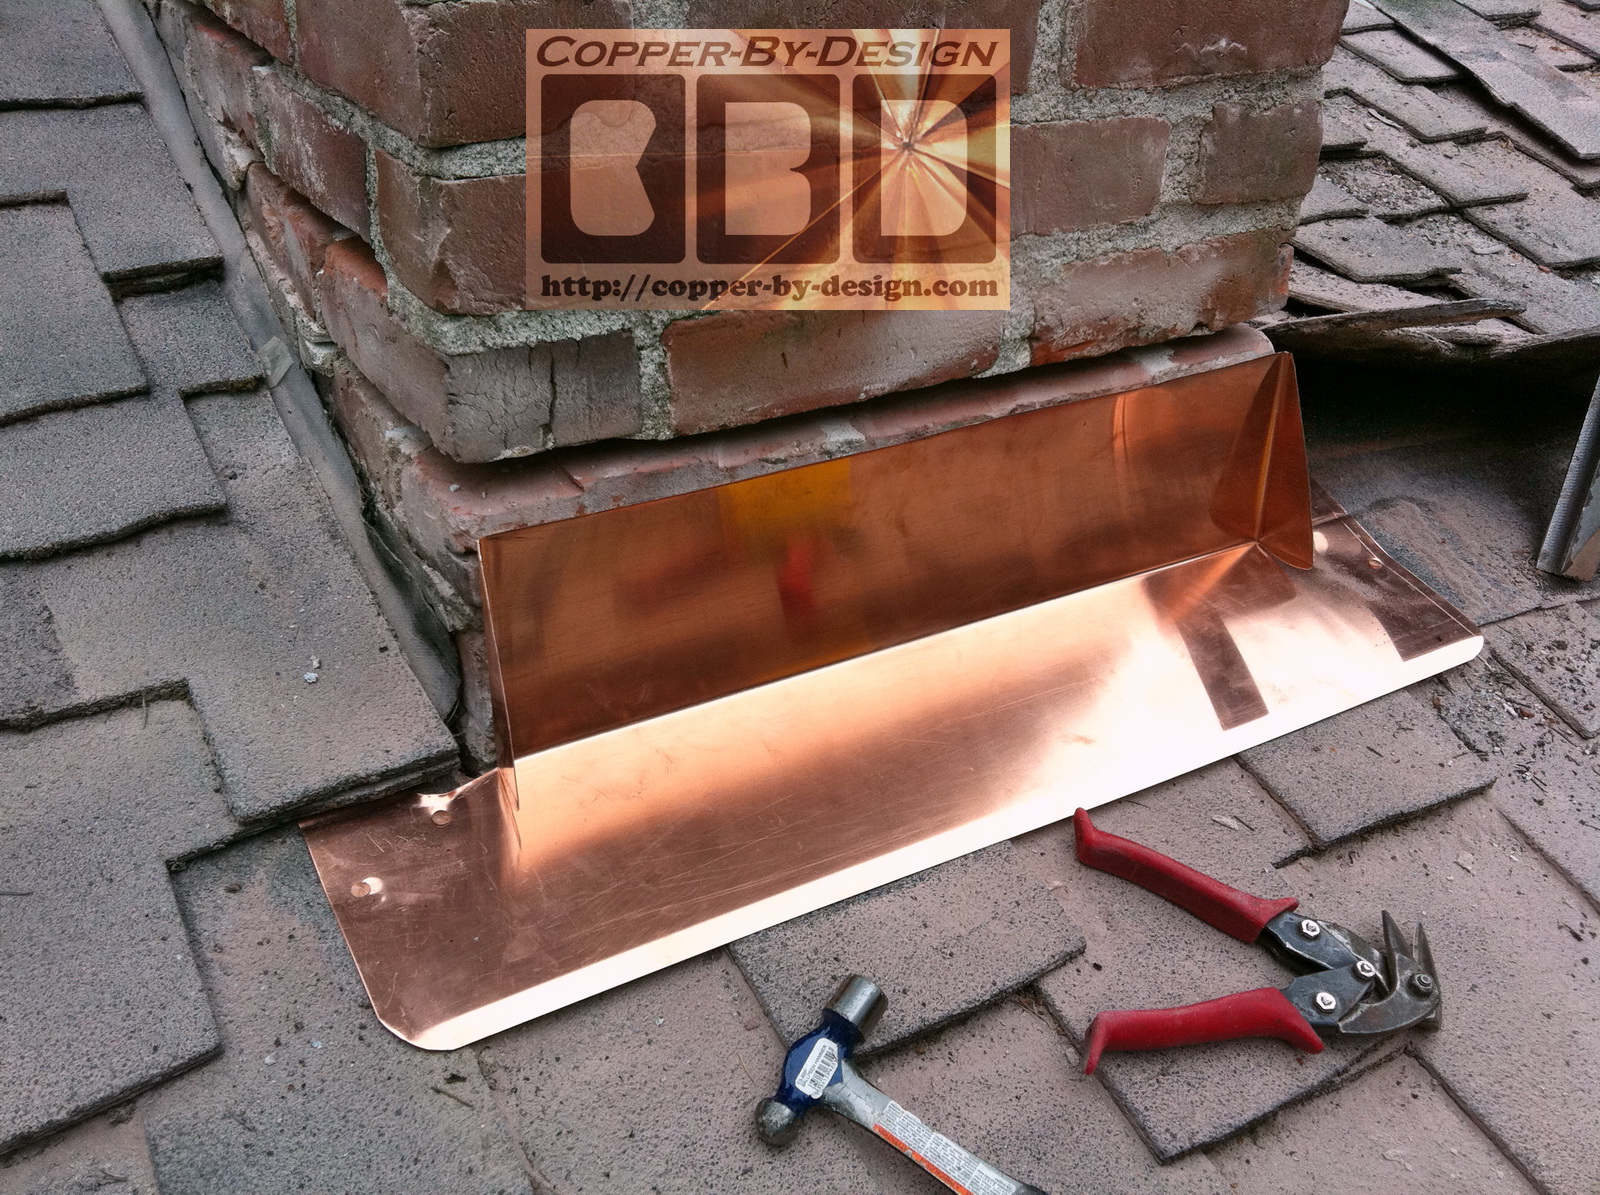
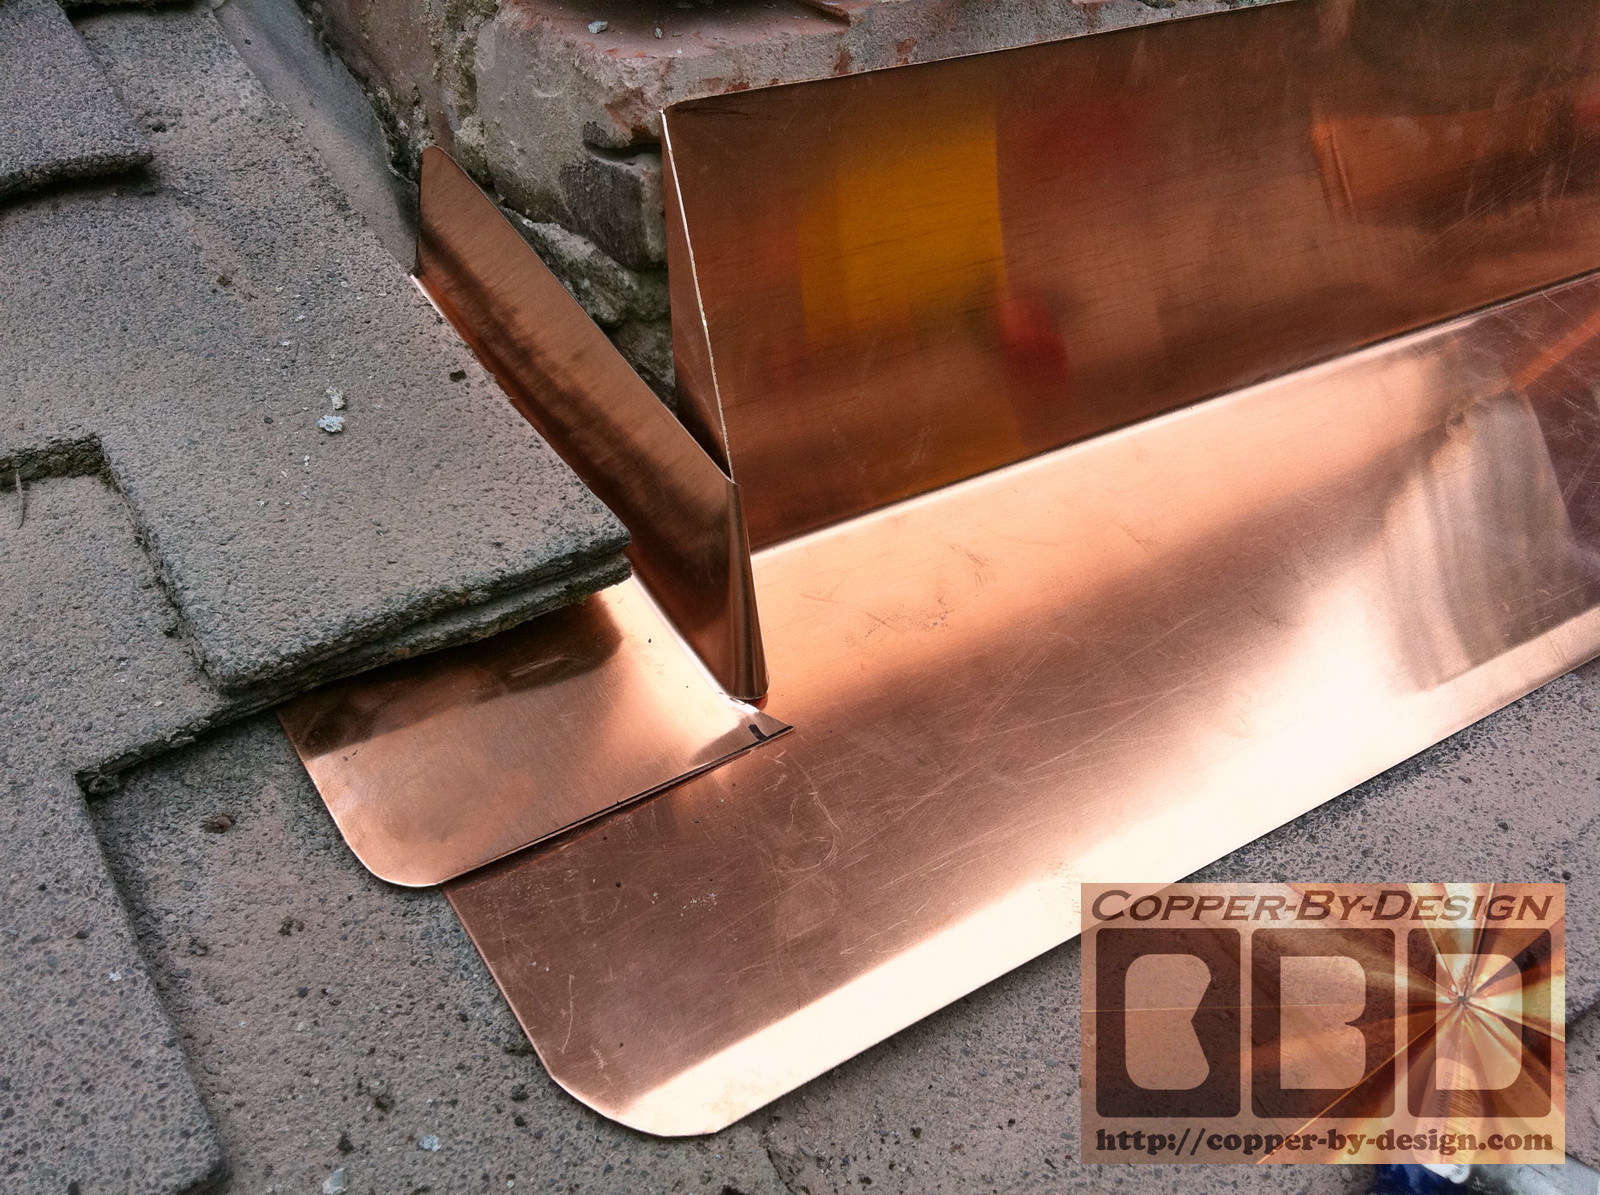
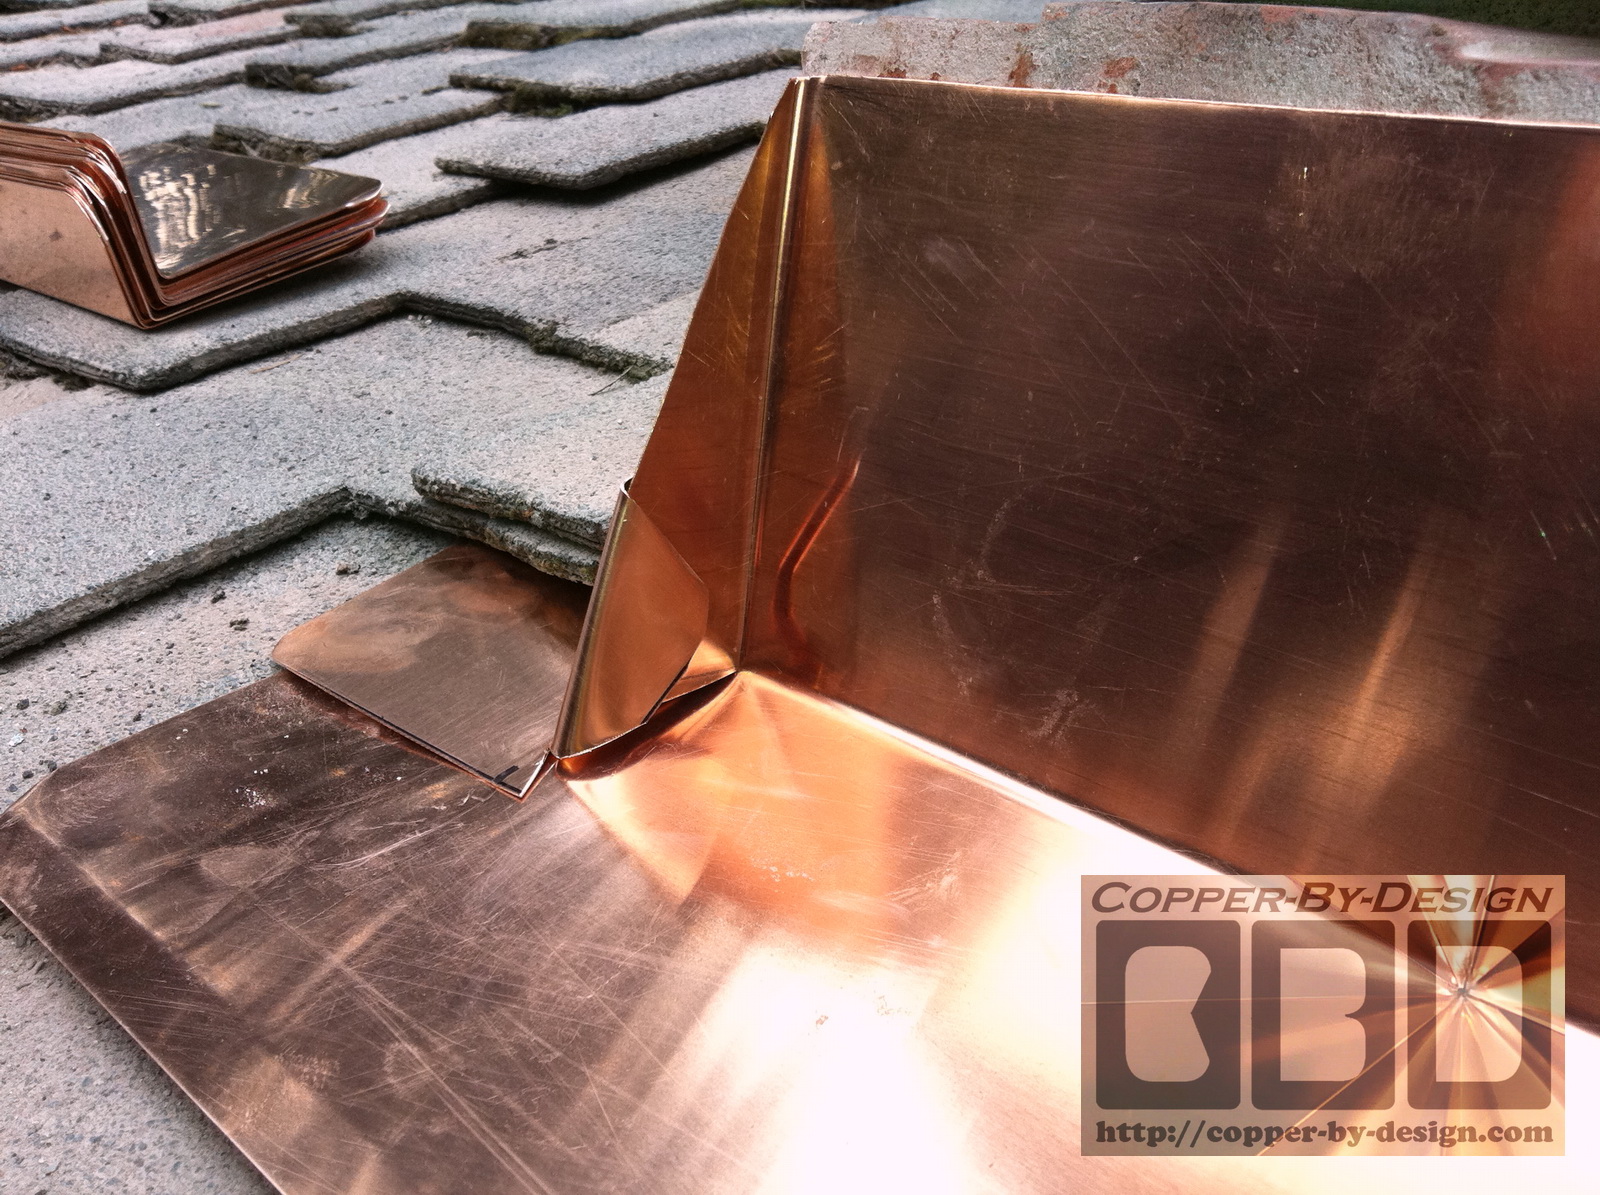
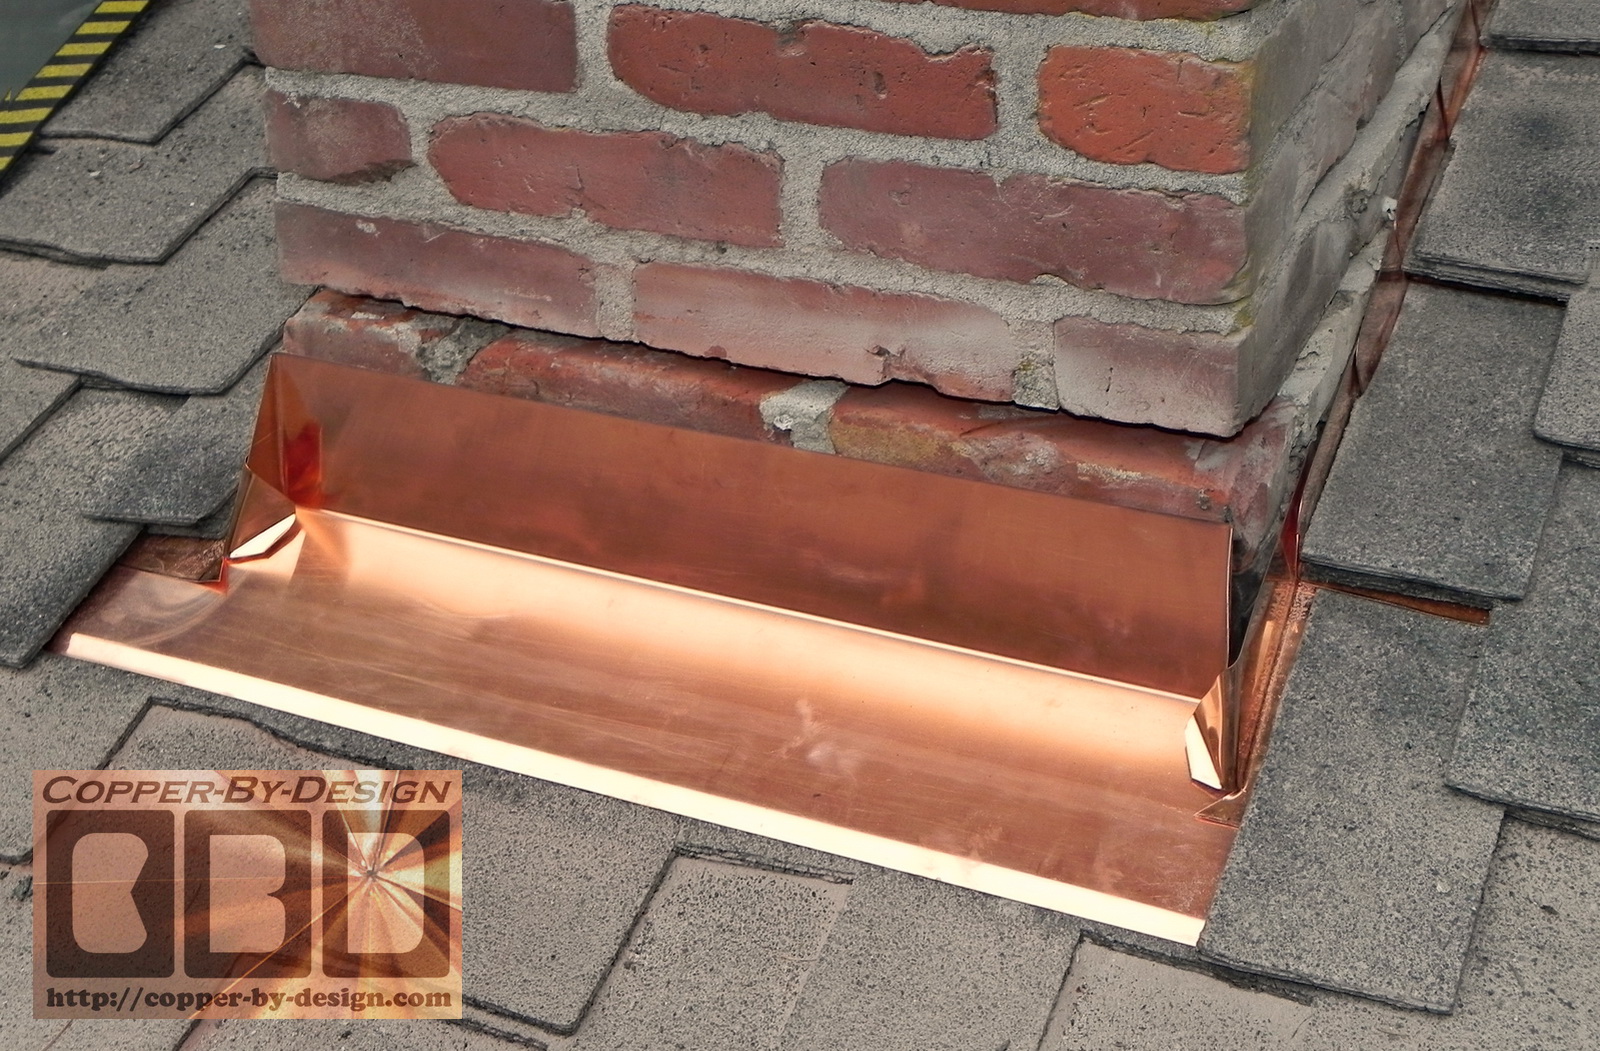
Are there any other flashing shapes that
may be better?
In my effort to seek a better product for my
clients I had designed a special type of
step-flashing with a pair of 45 degree bends, in stead of just a
single 90
degree bend. This is an improvement over the standard right angle
bend configuration normally used. This has several advantages and
should not be difficult to fit into any type of roofing material.
Here are a pair of photos of this
alternative flashing being
installed by one of our clients:
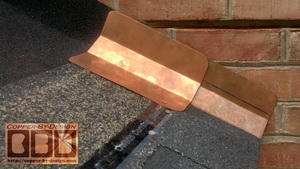 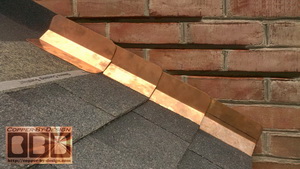
Sealing around the corners of a chimney has always
presented a problem to make sure it's water tight without the use of
a caulk, which could fail sooner than the life span of the roof. It
needs to maintain a seal even in the harshest wind storms and allow
for the expansion and contraction with will differ than the wood
structure. I have
found this alternative shape helps in several other ways as well:
(a) navigates the rain water out away
from the corners of the chimney a bit better.
(b) slows the water down and reduces
upward splattering under the counter flashing.
(c) helps to be able to trim off the
commonly compromised and damaged shingles nearest the chimney when
replacing the flashing without a full re-roofing project, thus reducing the shingles needing replaced around the chimney.
(d) helps reduce scraping needed
where the chimney meets the roof: old caulk or sloppy mortar work.
(e) makes it easier to cut the new
grooves without needing to grind so close the the roof.
(f) application of an underlayment resting
up against the side of the chimney for added protection is also made possible;
without such risk of cracking that membrane needed with conventional
flashing with such a sharp bend profile.
To see more photos of this installation
follow this link:
http://copper-by-design.com/rf/Druschel.htm
Let me know if you need any special
configuration and we'll customize your kit to fit.
|