|
|
The Curry
Turret Roof Cap Photos & Details Page Updated 11-8-2005 |

|
|
Company Profile |
|
Roof Caps |
|
Chimney Caps |
|
Scuppers |
|
Gutters |
|
Shipping |
|
Contact Info |
|
|
The Curry
Turret Roof Cap Photos & Details Page Updated 11-8-2005 |
|
|
Company Profile |
|
Roof Caps |
|
Chimney Caps |
|
Scuppers |
|
Gutters |
|
Shipping |
|
Contact Info |

.
| The detailed fabrication of a 36" wide, 14/12 octagonal copper turret roof cap (8-05) |
|
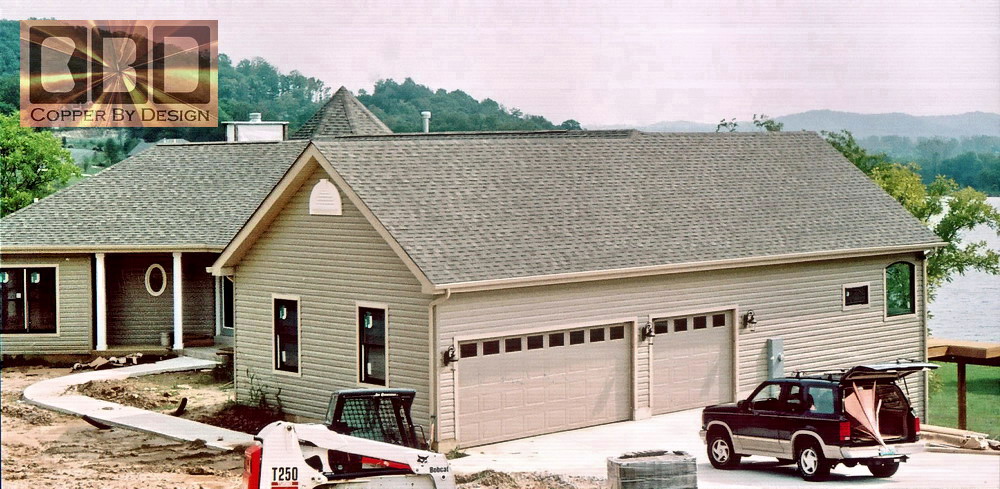
This 1/8th scale, small size solid 20oz copper turret cap was custom made for clients, Jim & Saundra Curry in St. Charles, Missouri. It was designed for their new house on the lake, as seen here. They worked for several years in a Third World County to be able to afford this house. Remember you can click on all the pictures to get a better look.
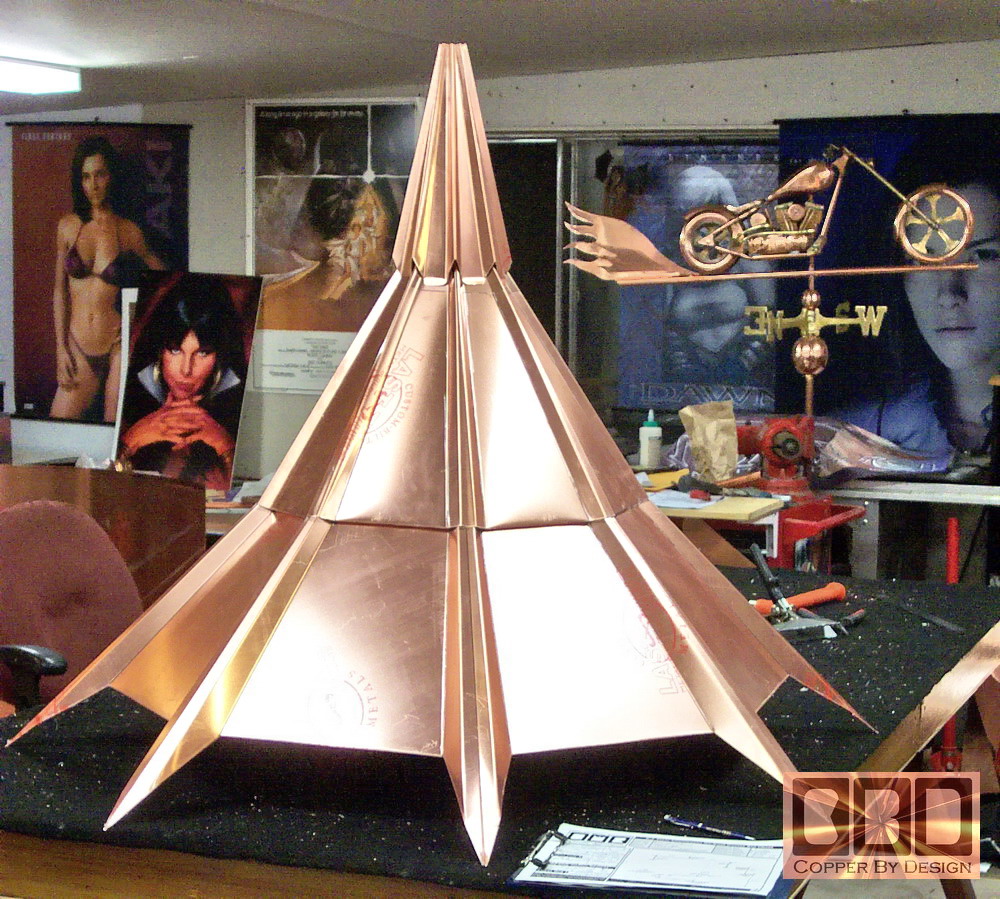
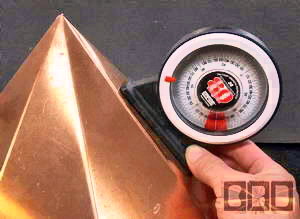
The turret is made at a 12/12 pitch, or a 45 degree angle roof. The peak is at a right angle, or 90 degrees. They asked for a cap with raised spiked corners, and a graduating pitch to a steeple. This 4 stage design helps to minimize the cost and be as seamless as possible, adding strength and protection. Horizontal seams are less of a concern. The final cost with shipping was $500.
|
|
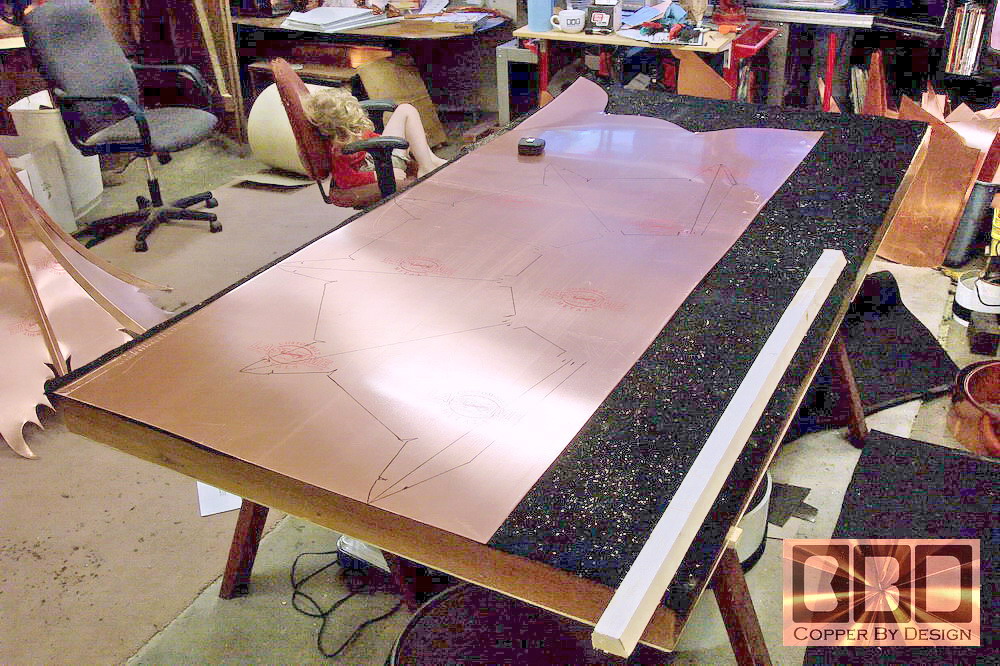
Our work table is 4' x 8'. The sheet of copper shown below comes 10' long and 3 feet wide, but has some of the end cut off from a different project. It still has the clear plastic film over one side that will be used for the outside of this copper roof cap to protect it from finger prints and scratches. The cap angles need to be carefully calculated so there are no errors or unexpected complications. We have to think several steps ahead, like working out the problems of a Rubics Cube. If we are in error, we may ruin some very costly copper material.
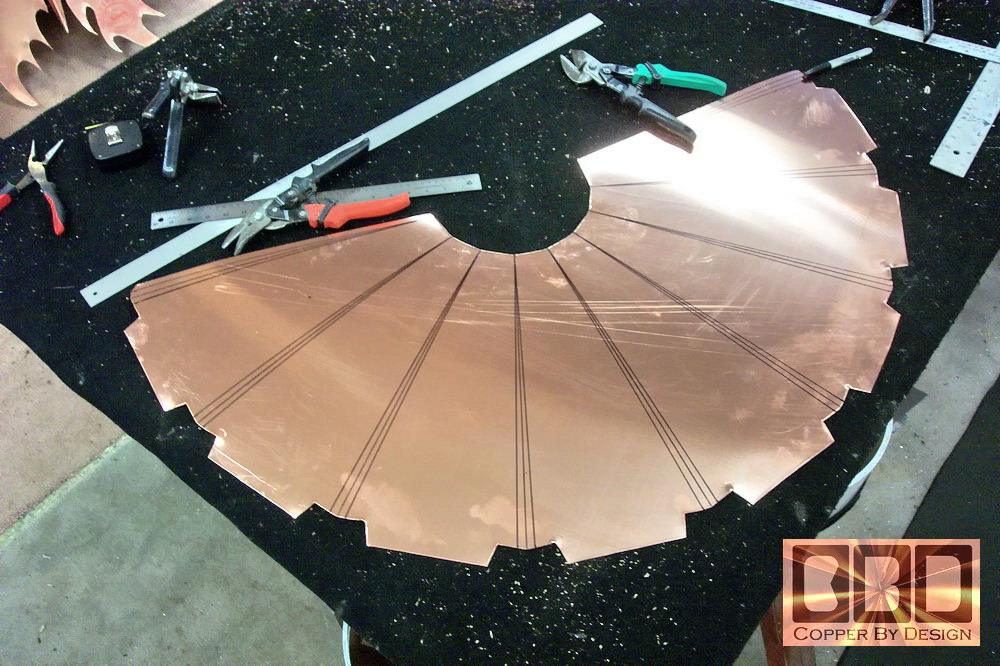
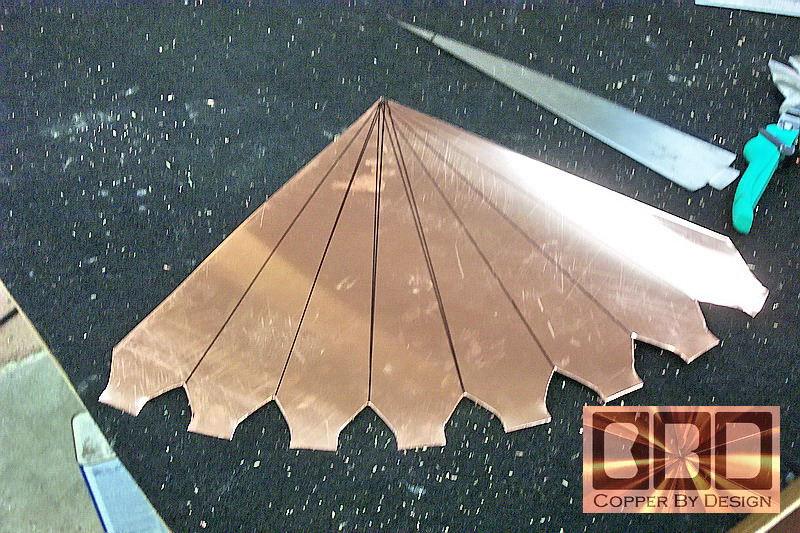
The lower section design has been drawn out on the copper on both the film side and the underside, since there are several bends to be made in both direction. The picture to the right shows the sheet cut out for this lower cap section. We have the cut and fold lines for this cap drawn out on the copper. The cuts in the outside bottom edges are for the bends we need to make for the bottom safety hem. |
|
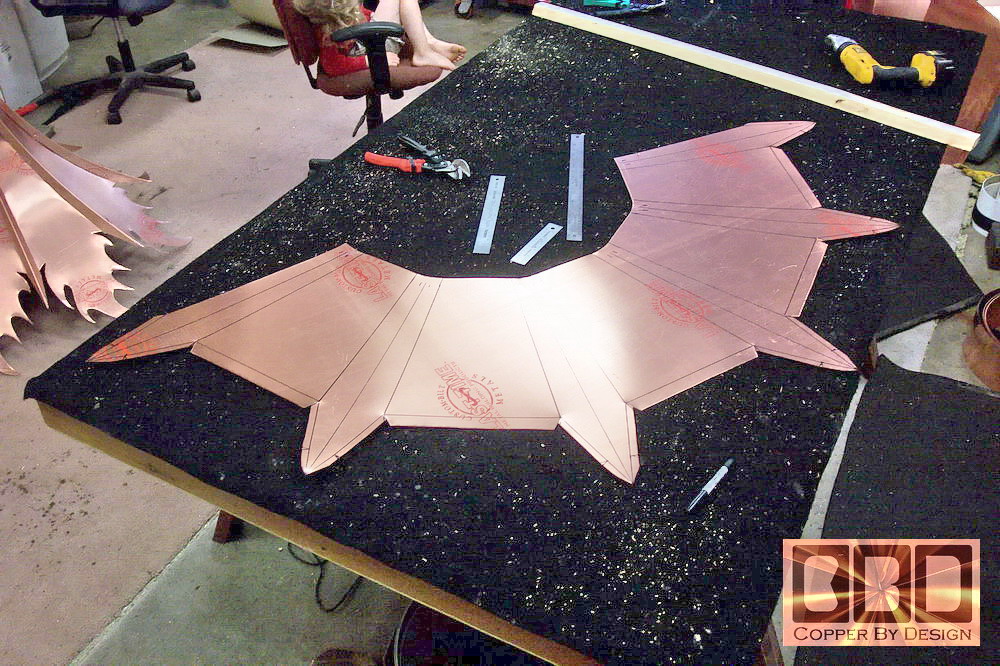
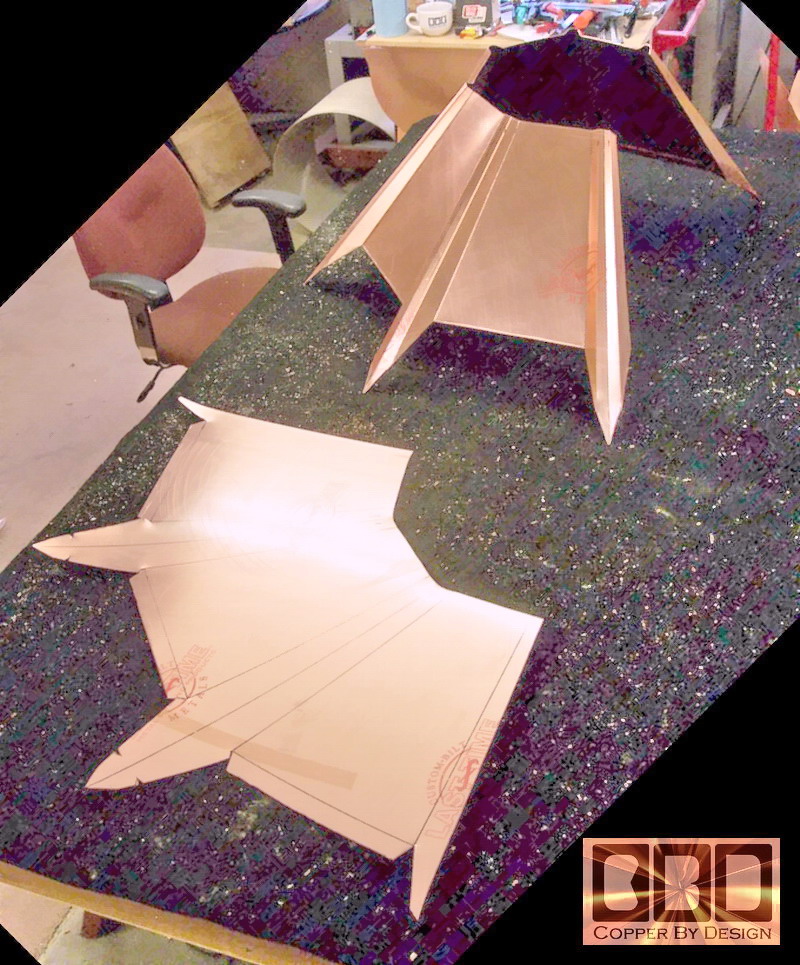
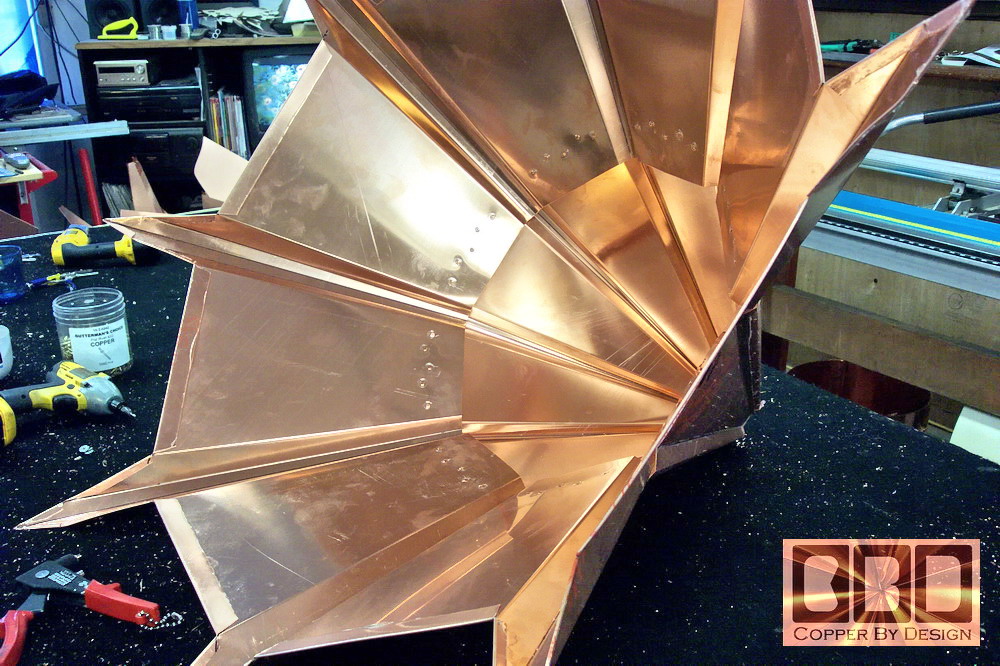
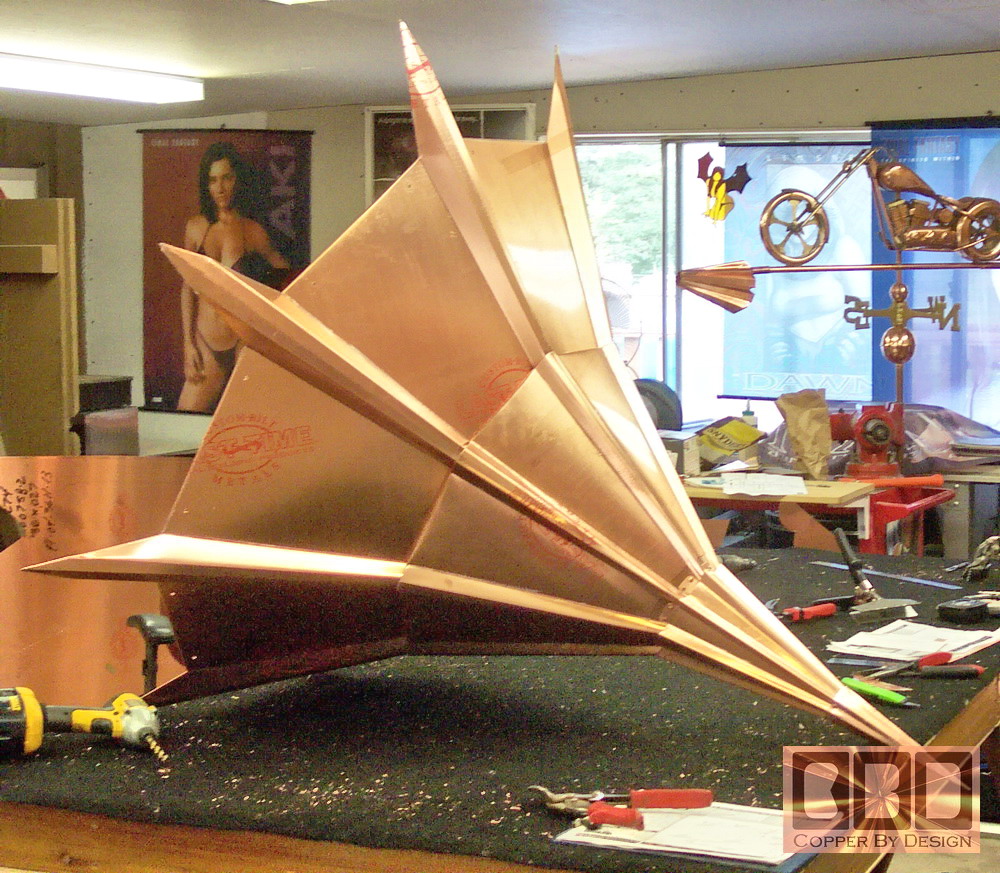
Because of the size, we could not fabricate it from one single piece, as we try to do with most caps. So we had to cut these 5 sides out in the first sheet, and the other 3 sides on a separate piece. The way we make these roof caps may not the most practical use of copper sheet metal, but this way it is much less likely to develop a leak, and it is much stronger than if each edge were seamed together. This method of working in large sections adds a level of complexity, but we find it is the correct way for quality and esthetics. You will see in this photo the notches cut out for the safety hem, and the 5 sided section all prepared. The safety hem on the leading edge adds a double layer to this thicker copper we use. The tips of the spiked corners are remarkably strong, supporting the weight of this whole copper roof cap when completed. |
|
|
|
Here is the mid section being made. The extended tabs are cut along the bottom edge of the design for tabs bent inward to use for a hidden attachment to the lower section.
|
|
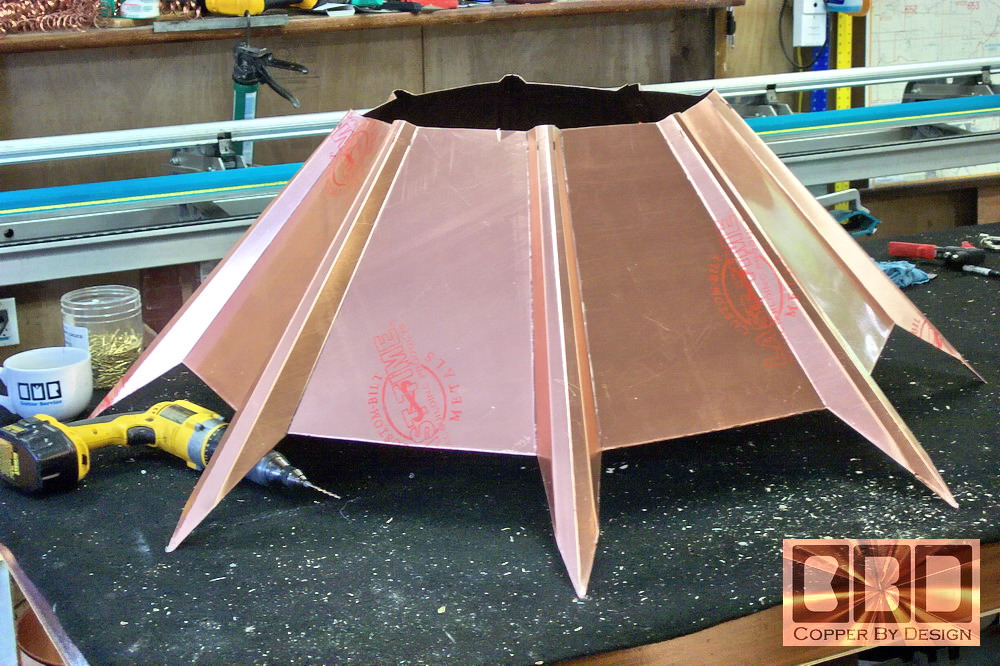
These pictures show these 2 cap sections bent into shape, sealed, and riveted together into the cone shape from underneath. You can see the 2 seams of the lower section that need to be sealed. There are 5 hidden rivets per side to connect the 2 sections together, which makes 40 rivets in all. The tricky part is to have it pressed together tightly, be straight onto the lower section, and not dent the outside layer while drilling the rivet holes. This was a very complicated part of the construction, and took well over an hour to do.
|
|
Here we show the upper cap section laid out to be formed, sealed, riveted together, and attached to the main sections. The second photo shows this third section set in place, but not riveted on. It is really coming together now.
|
|
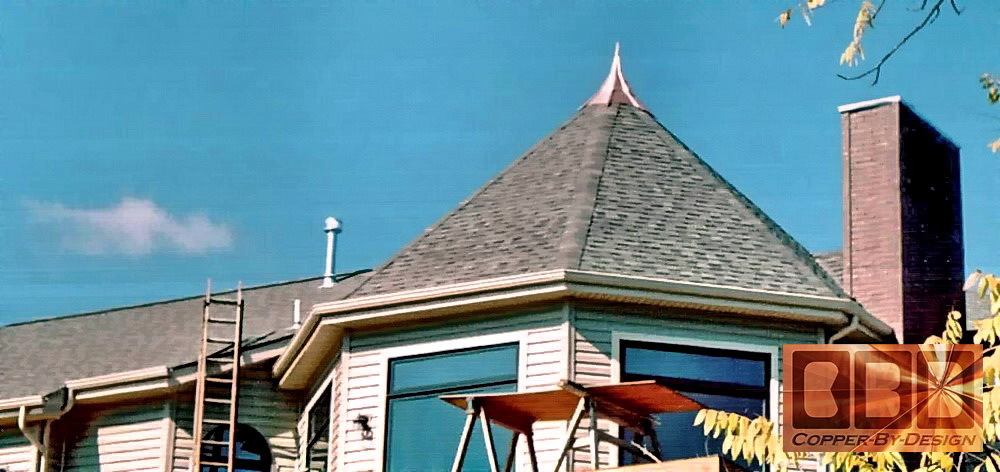
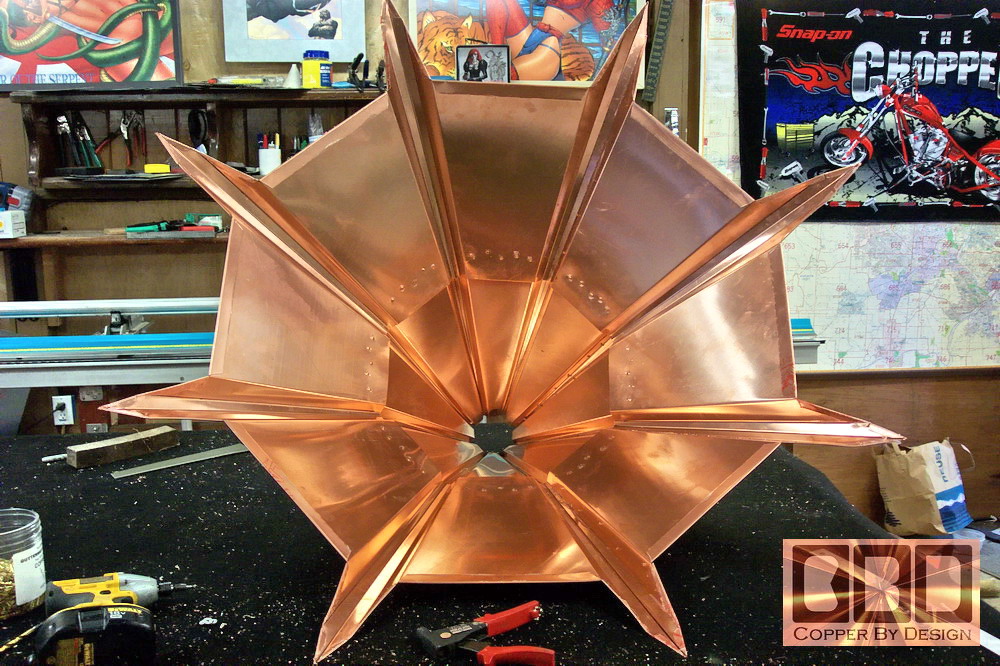
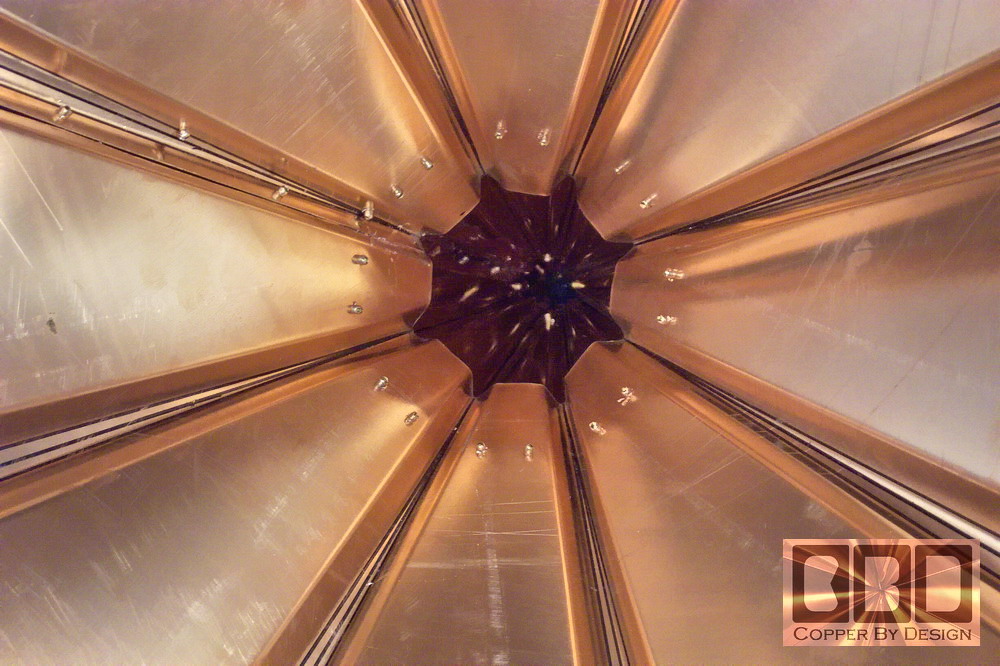
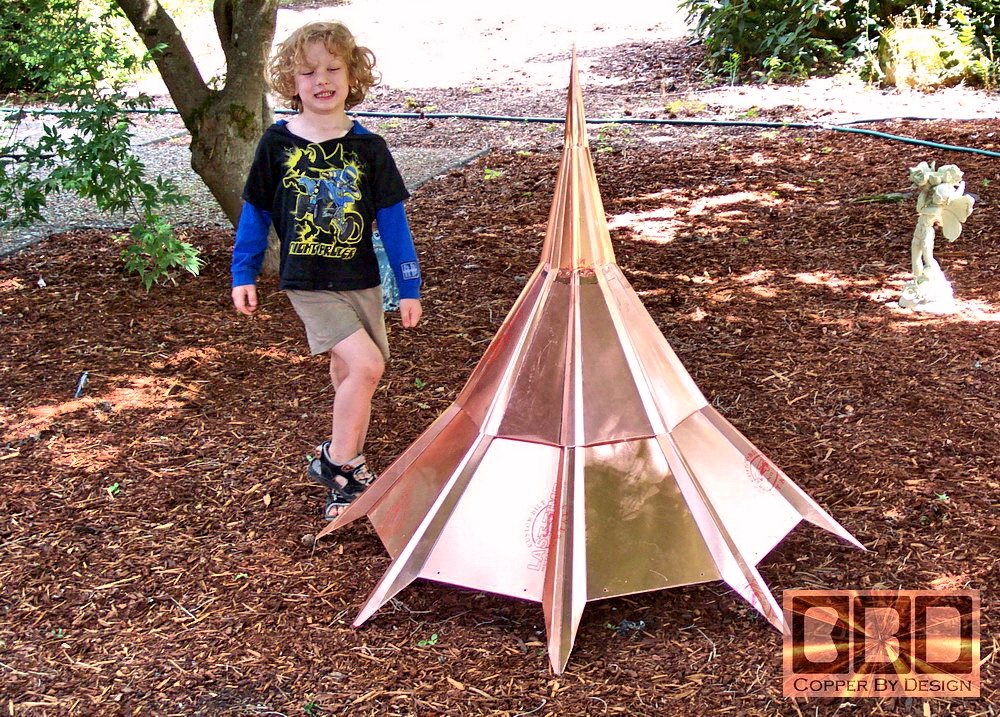
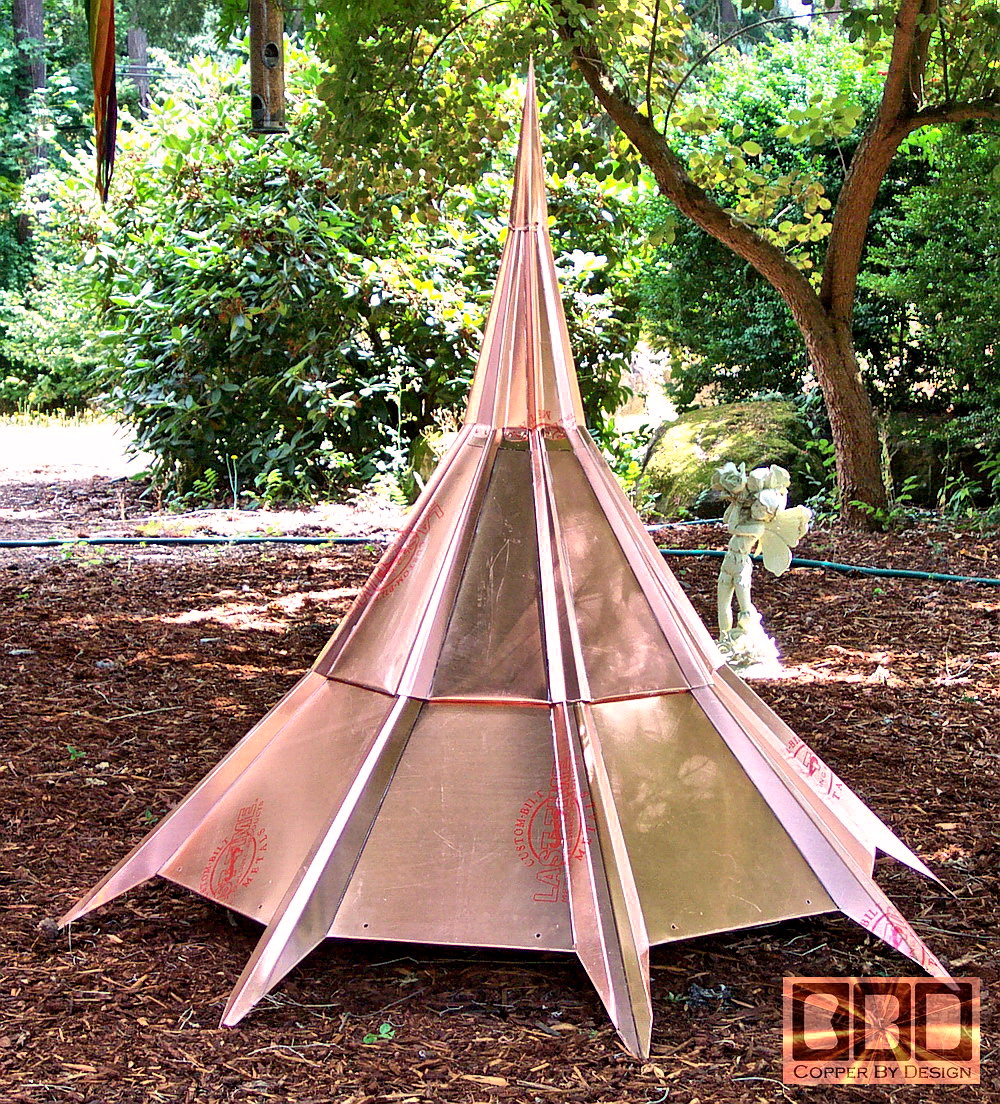
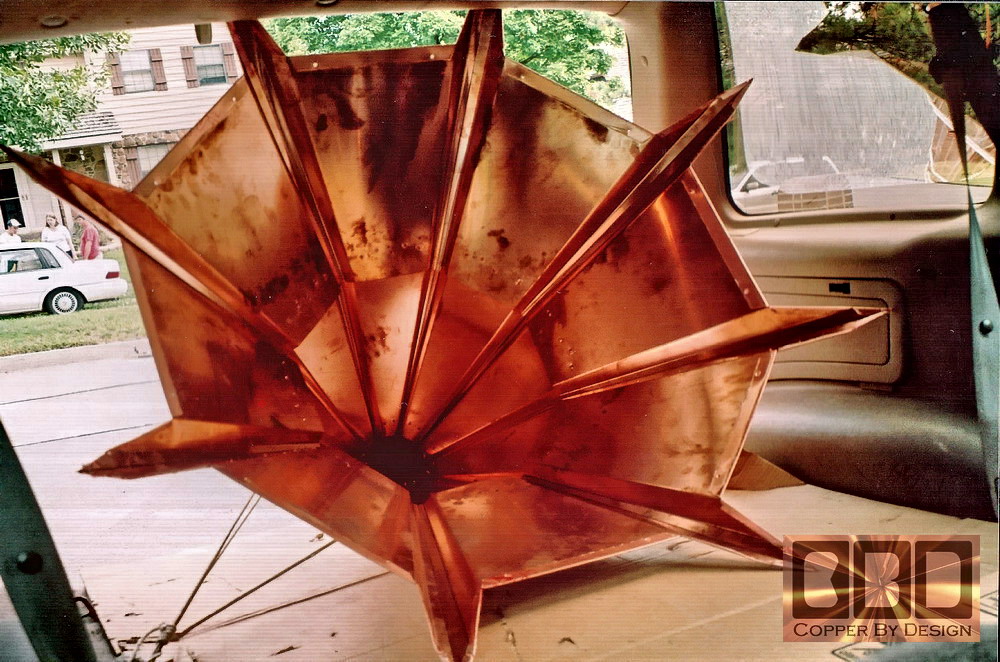
Below shows a close-up of the inside center of the roof cap complete. The second picture shows the cap finished and on its side, to better see the 'Dynamic' curve of the 4 different graduations in pitch. The diagonal length of the peak down to the spiked corners is over 4'.
|
|
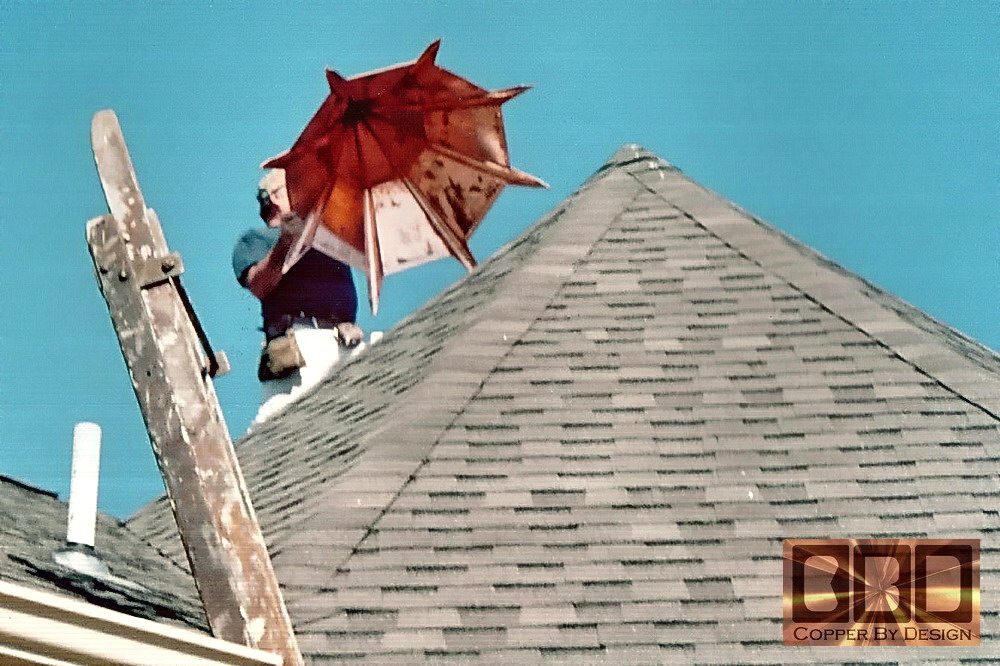
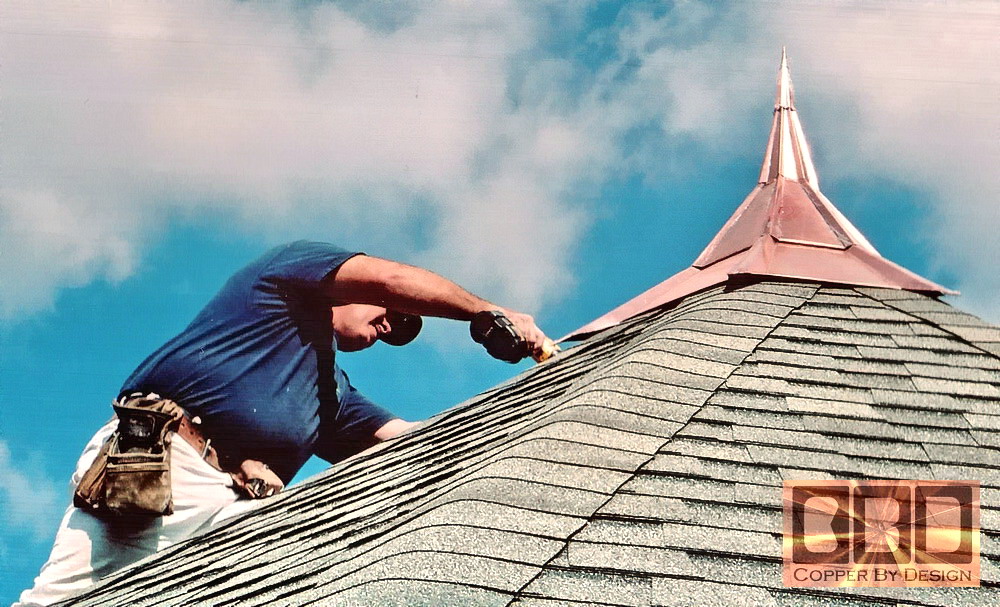
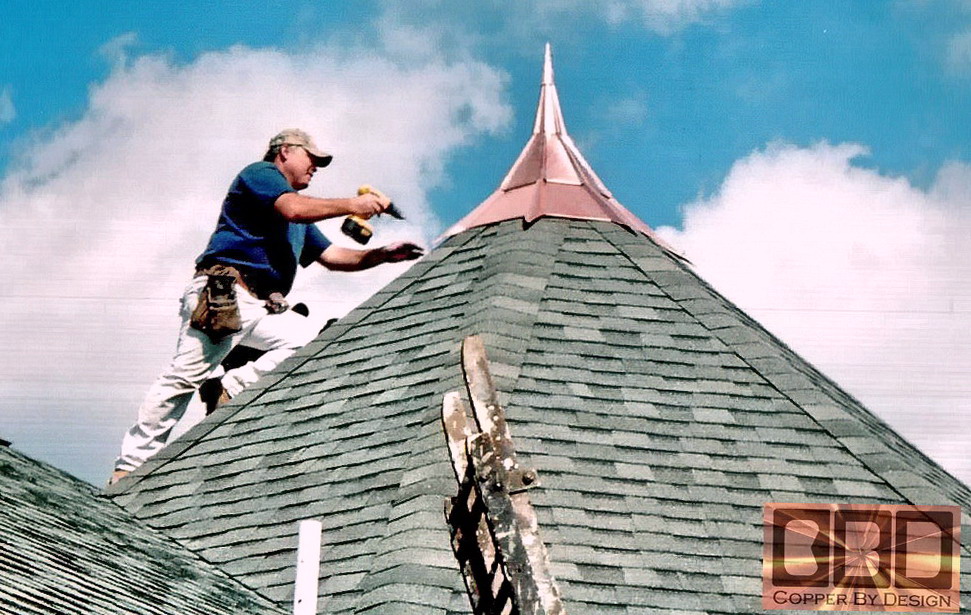
Here is the roof cap outside for a better look in daylight with our 4.9 year old son, postioned next to it to give it some proportion.
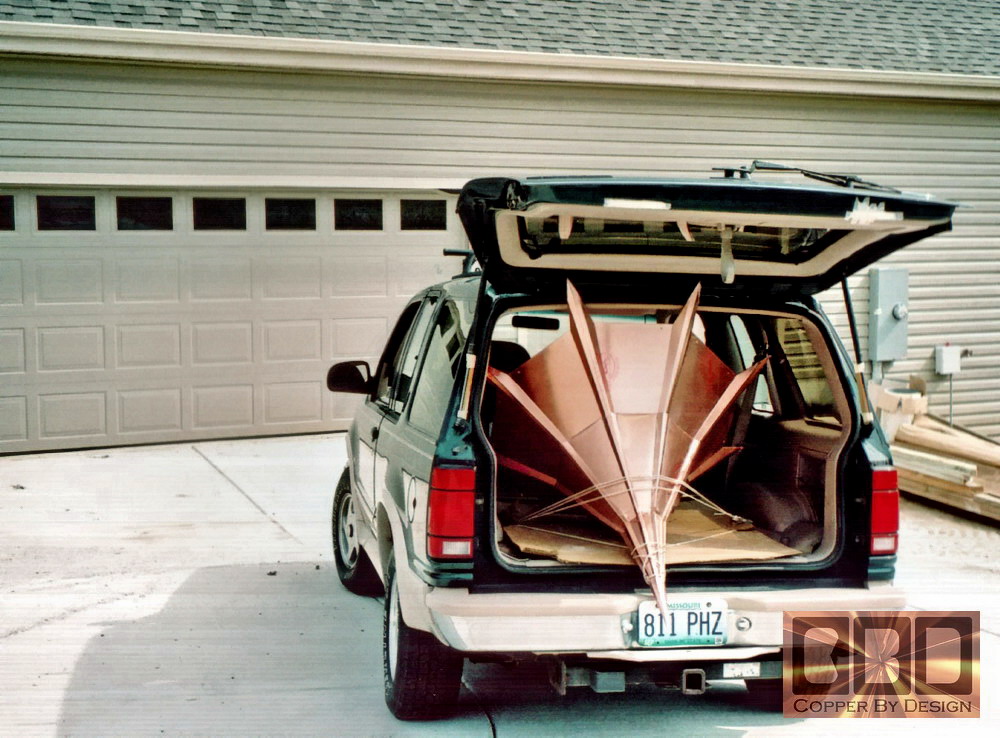
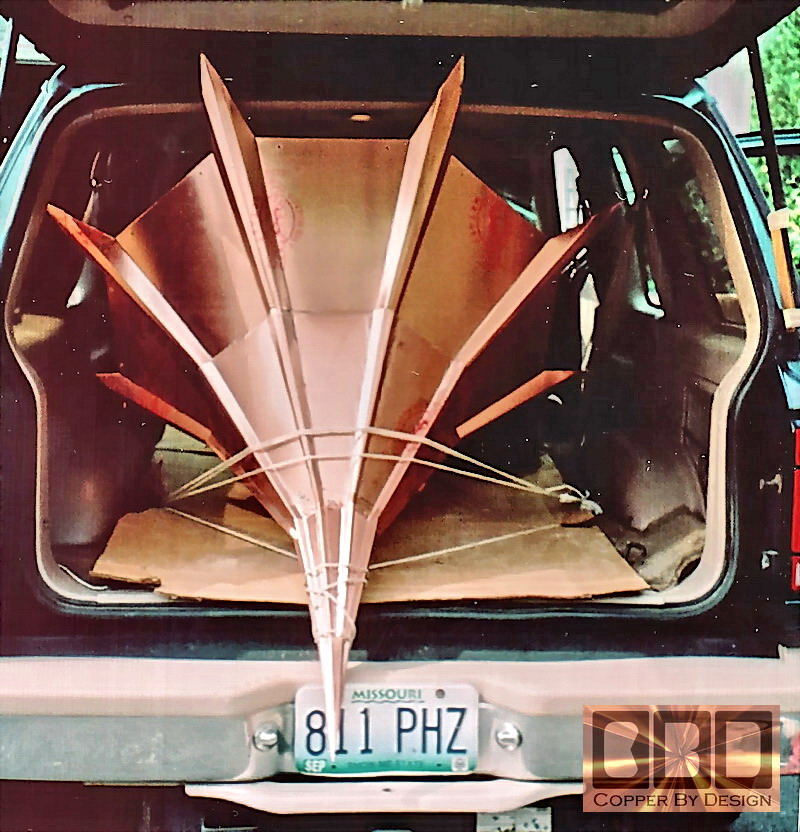
We sent the client these digital photos of the progress to receive their feedback, and see if they had any ideas or concerns. They said they were very pleased with the progress. It took only a couple full days to fabricate this roof cap. We then made a custom wood frame crate to ship it in that was 49" x 49" wide and 48" tall. The frame was covered with cardboard using a staple gun, a rope handle on all four corners for easy handling, and an inspection hatch open so the shipper can see we are not smuggling contraband. We then use a hand stapler to seal the crate with the last cardboard side. We marked the cardboard with a 'Top' side, so the shipper knows which side would be best during transit. |
|
Shipping
this Roof Cap We delivered it to the DHL distribution center to find out the policies had changed. They decided they are no longer willing to ship large packages through ground shipping, no matter how light it may be. Being only half their maximum weight limit of 150lb. They insisted it needed to go express air shipment rated at over 6 times it's actual weight, for double the cost we had charged the client for the cap and the delivery charges put together! They now wanted over $1,000 to deliver this cap, we were expecting it to run less than $150. Clearly this was an impossible cost. We informed the client of our new dilemma and scrambled to find another way to have this shipped for a reasonable rate, so we did not have to require the client to pay more, or loose this cap all together. We found that Greyhound ships packages from terminal to terminal in only a few days time for $80. They do have a height requirement of 30" tall, so that it will fit inside their luggage compartments below the regular seating for passengers. We had to remove most of the staples securing the cardboard, remove the roof cap, drill out the 16 copper rivets holding the upper half of the cap in place, box up the top of the cap, cut the 12 wood side supports down, reassemble the crate, and re-cover in cardboard. This meant the client will now need to pick the crate up in St Louis, and reassemble the roof cap. We managed to get the OK for this change in shipping plans from the client. We drove it to the Downtown Portland, Oregon Greyhound transit center on the 18th of August. We got it into the Express Package service area, and everything seemed to go off without a hitch. they called a few days latter saying it was still too tall. It seems that 30" maximum requirement did not take into account the hinge of the compartment door. They said they would need to wait for one of their larger busses and it would take two people to get it in. I could have done it, but I expected it would take a couple people, hence the rope handles we install on most crates. Weeks went by and the client had still not been able to pick up their package. We got the run around for another two weeks until they finally found the package in Denver. It seems they lost the package slip off of the package and failed to research it's information. Fortunately the client was able to get it on the 23rd of September. He writes: Yippee! - Dachshund Delivery Lines finally came through. When the guy I have been bugging at Greyhound called he was as excited as I was that it made it. Came through in great shape (good package design). Haven't opened the small box yet but got it out of the crate and into the back end of my explorer (1-inch too wide to fit with crate). In Greyhound's defense (very little defense) it was by far the largest package in their package pickup warehouse so they may still be ok to use for smaller stuff. Thanks, Will send photos later. Jim We will be very weary of using Greyhound ever again. We would rather not make our clients have to drive out to pick up the merchandise we sell, but if costs remain to be so high for large packages, we may have no choice. We cannot see charging 2 to 3 times more for the crate and shipping cost than the copper roof cap costs.
Date: 11-08-05 David, Thanks for the fine craftsmanship. Jim |
|
Detailed Installation Instructions:
A Hidden Roof Vent:
Roof Cap Installation: |
  |
|
.
| Click this
photo to go back to the Custom Copper Roof Cap main page.
|
.
|
Below is a
photo of our |
|
|
|
We were also a 1997 finalist for this same award. See our referral web page to see how we managed to be honored with this special award |
 Homepage |
|
|
Company Profile |
|
Roof Caps |
|
Chimney Caps |
|
Scuppers |
|
Gutters |
|
Shipping |
|
Contact Info |
.
.
.
.
.
.
.
.
.
.