|
Tom Anderson's Blog:
Tuesday, May 08, 2007
Crowning Achievement -- Installing a Turret Cap
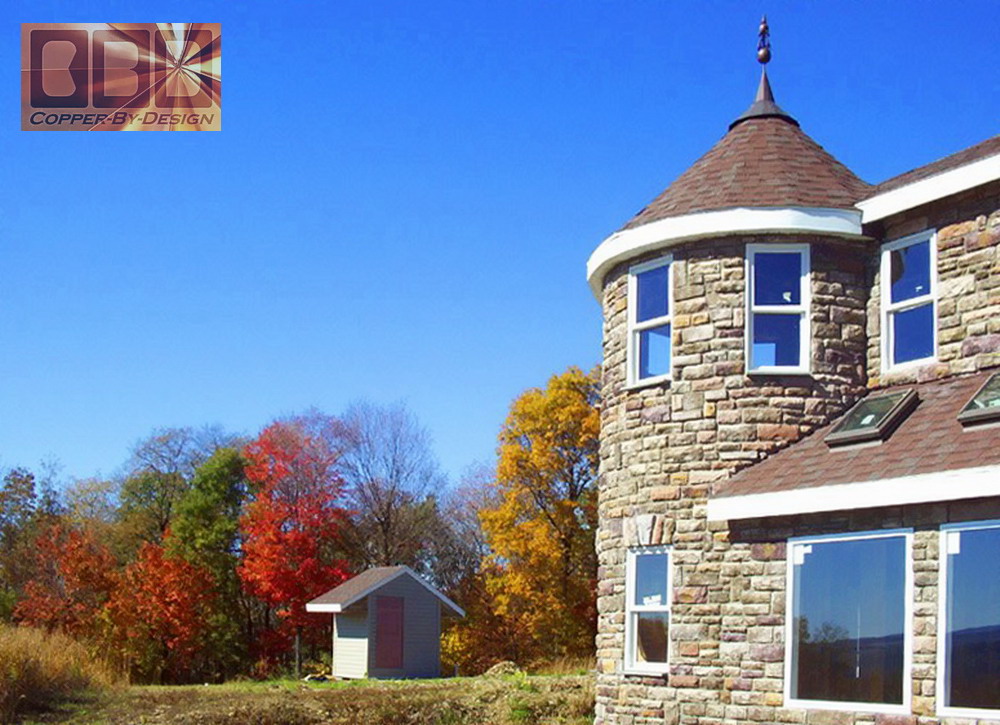
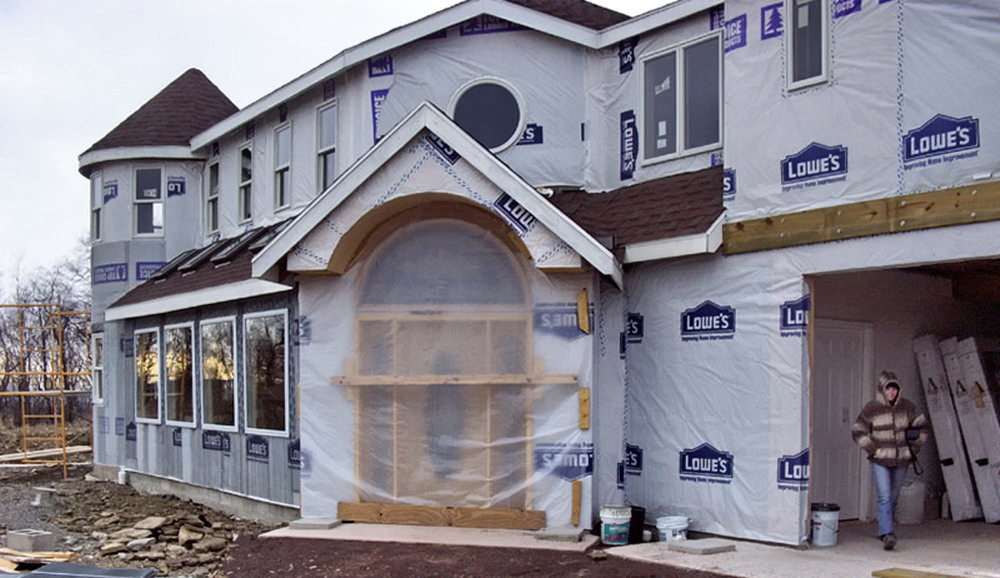
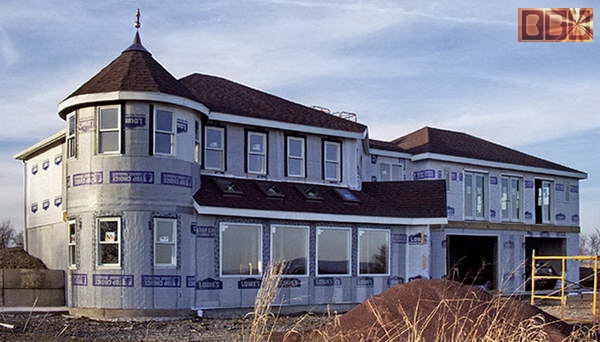
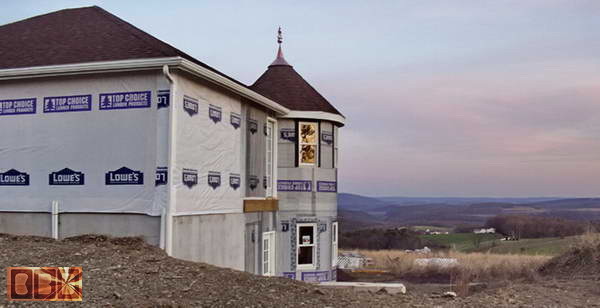
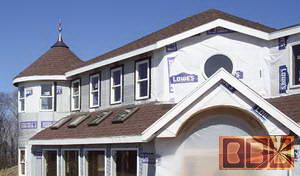
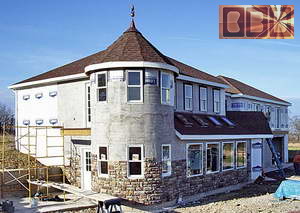
As you may know if you've been
reading my blogs or know me in real life, my wife and I have designed
and are building a new house. Something we've always admired architecturally
is the beautiful
turrets
or towers found on
Romanesque and
Queen Anne style buildings, among others, of the Victorian era (1837-1901)
which are prevalent in the cities and towns across northern New Jersey
and Pennsylvania.
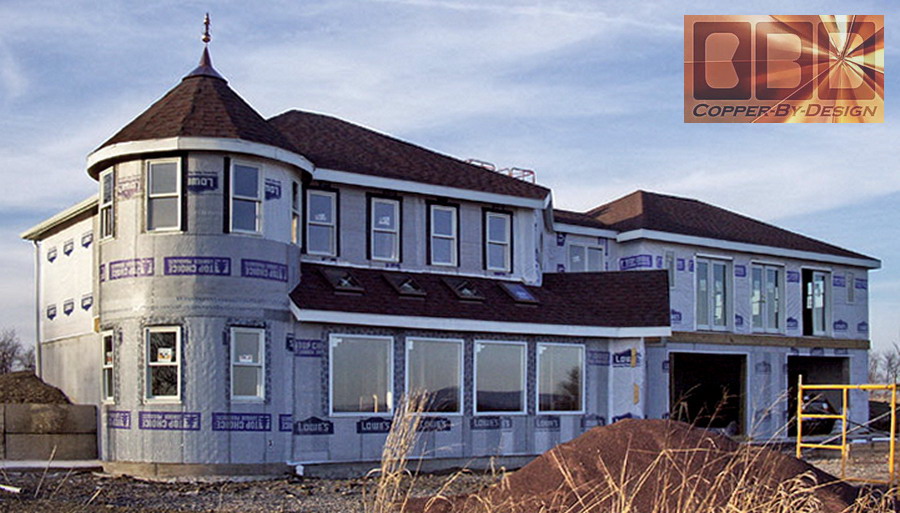
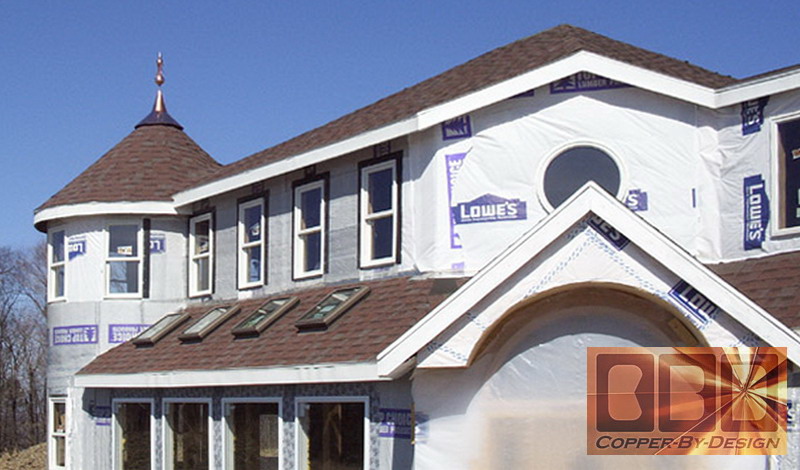
 So,
when designing our own home, including a turret was high on our design
criteria. Unfortunately, while the beautiful historic buildings
are numerous and seemingly cherished, it would appear that this architectural
style is seldom if ever used in present designs and probably hasn't
been in 100 years. This has presented us with untold frustrations
in building this feature on our home. But detailing them is not
the point of my current missive, which is to document with photos the
recent installation of the crowning cap and finial on our turret.
If any of you were wondering why I've been missing from the MySpace
universe for the past few weeks, this is one reason why. So,
when designing our own home, including a turret was high on our design
criteria. Unfortunately, while the beautiful historic buildings
are numerous and seemingly cherished, it would appear that this architectural
style is seldom if ever used in present designs and probably hasn't
been in 100 years. This has presented us with untold frustrations
in building this feature on our home. But detailing them is not
the point of my current missive, which is to document with photos the
recent installation of the crowning cap and finial on our turret.
If any of you were wondering why I've been missing from the MySpace
universe for the past few weeks, this is one reason why.
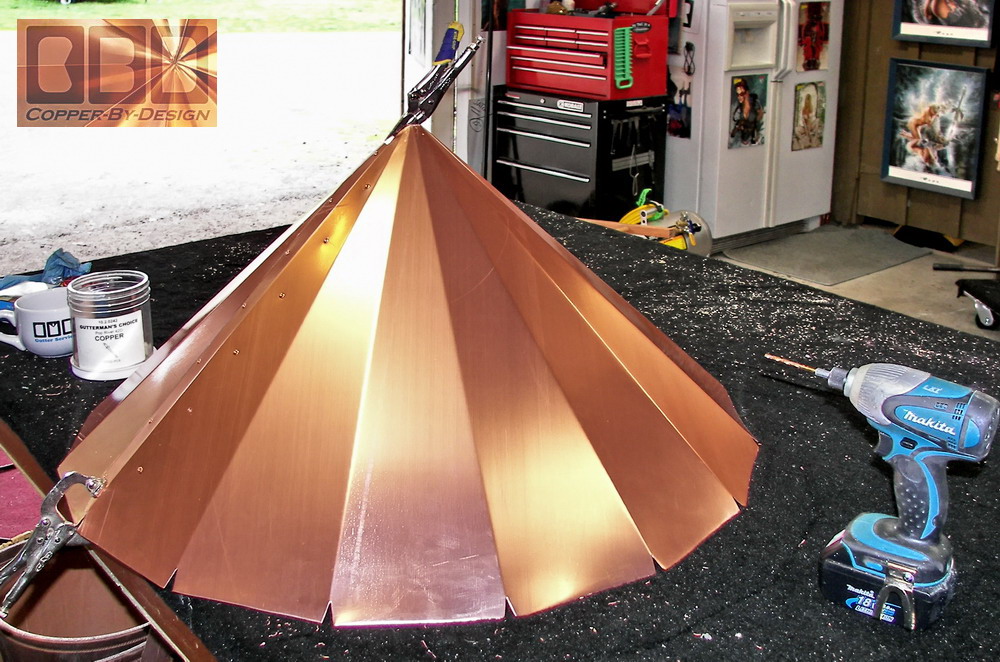
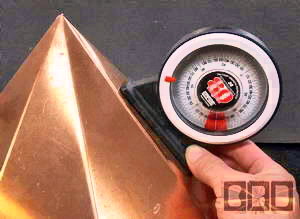
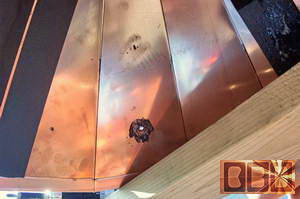
The first decision to make regarding how we would
finish the top of the turret surrounded the appropriately durable weather-proofing
material which would prevent rainwater from leaking onto our bed below.
There is no easy way to terminate the rows of asphalt shingles, so as
to achieve this when they come to a point. This is a unique problem
not often encountered in today's common roof styles.
We considered
carving, assembling, and routing a small wooden cap, but that presented
both stylistic and durability concerns. We then considered various
forms of metal flashing. Research revealed that most metals would
not be very durable over the long term, as acids in the atmosphere and
rain would corrode them within a few years. The best bet was copper,
as was often used for such purposes in the past. It is the least
prone to corrosion, and after several decades turns from shiny to dull
brown to light green (like the
Statue of Liberty) as a thin patina covers and protects it from
any further deterioration. And during this process, as an added
bonus, minute amounts of copper ions invisibly coat the roof, protecting
the shingles from moss, mold, and mildew.
 The
next problem came in finding a metal fabricator to construct our cap.
Because of the aforementioned dearth of new turrets being constructed,
there are no mass-produced turret caps, and even if there were, we would
not likely find one to match the specific pitch of our roof. So
we clearly had to have this custom fabricated. Surely there must
be a niche demand for this considering how many historic turrets exist
out there which occasionally must require repair. Thankfully,
the internet provided a very short list of people with experience in
this. The
next problem came in finding a metal fabricator to construct our cap.
Because of the aforementioned dearth of new turrets being constructed,
there are no mass-produced turret caps, and even if there were, we would
not likely find one to match the specific pitch of our roof. So
we clearly had to have this custom fabricated. Surely there must
be a niche demand for this considering how many historic turrets exist
out there which occasionally must require repair. Thankfully,
the internet provided a very short list of people with experience in
this.
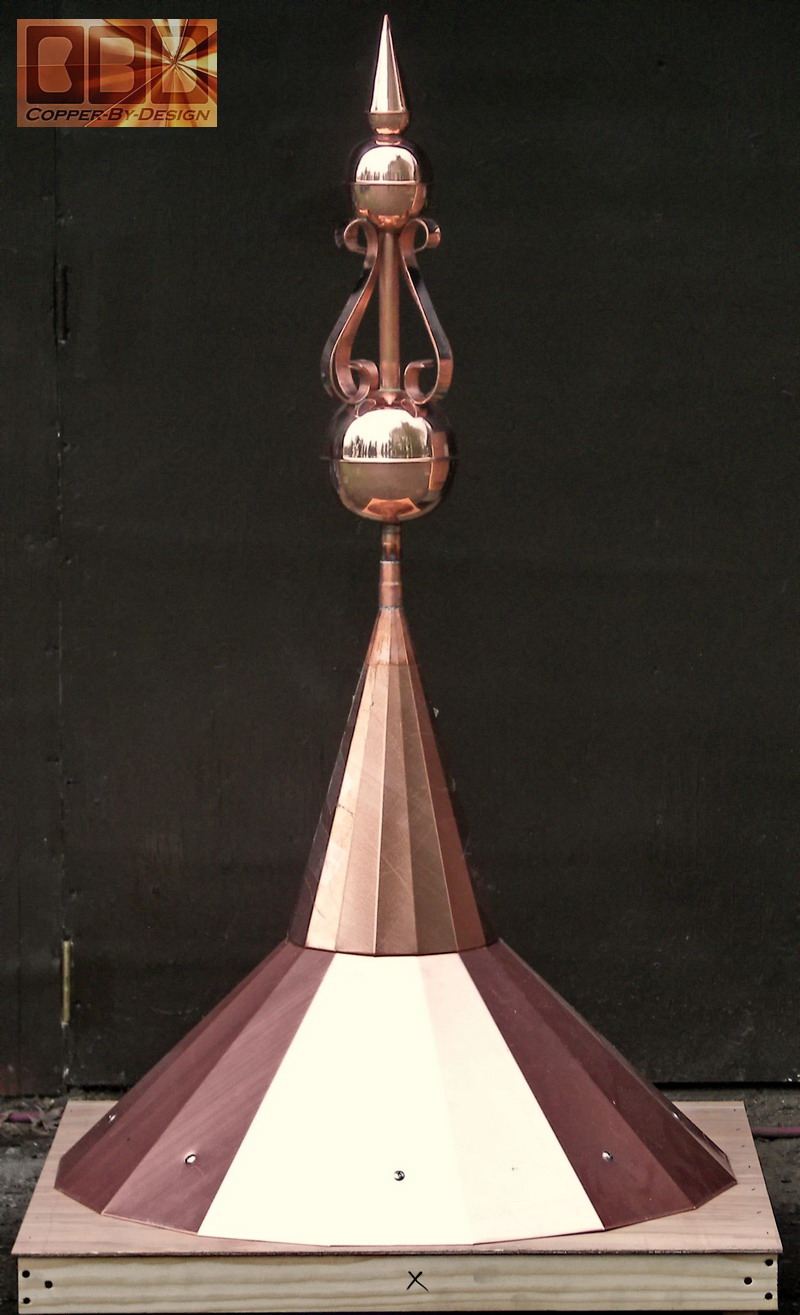
Of the companies I researched and requested quotes
from, I was only truly comfortable with one company, and that was
Copper By Design
(David Rich and his wife, Tia). Their website was filled with
high-resolution photos of their work and detailed documentation of their
design principles and workmanship standards. I was thoroughly
impressed and inspired by what I read. I got lots of ideas from
the photos, including the addition of a decorative finial and roof vents.
I discussed my specs with David in a few emails and we came up with
a good design which incorporated everything I could have hoped for.
The price was relatively steep compared to my overall budget, but it
was reasonable considering the custom nature of the work. Since
it is such a small company, the waiting time was fairly long.
I ordered and paid for the work in late summer, and the product was
delivered by early spring.
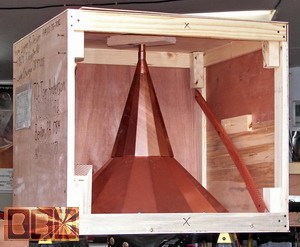
 The
cap was delivered in an impressive custom-built wooden crate, fully
secured against shifting or bending during delivery. Everything
needed for installation was included, except the directions! Assuming
they would have been packed with the materials, I neglected to print
them off of the internet, hampering our initial installation attempt.
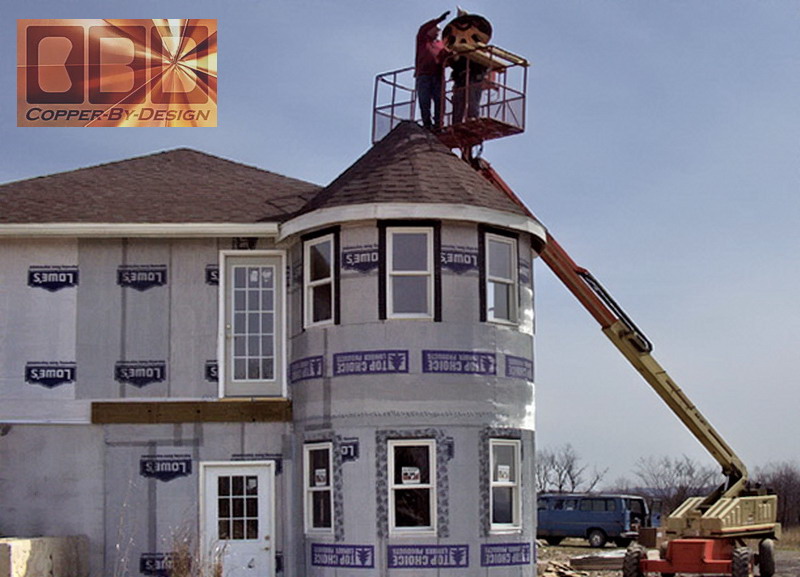
But, after printing them, we began the installation. To facilitate
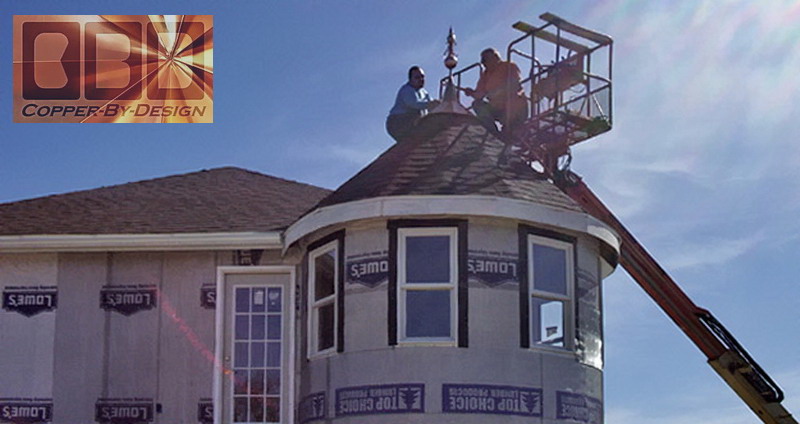
our sky-scraping endeavor, we rented a boom lift truck. Without
this it would have been very difficult and dangerous work, if not impossible.
Even with the lift, the roof angles, the wind, and the height made the
task precarious at times. I enlisted the help of my father to
ensure things went smoothly. The
cap was delivered in an impressive custom-built wooden crate, fully
secured against shifting or bending during delivery. Everything
needed for installation was included, except the directions! Assuming
they would have been packed with the materials, I neglected to print
them off of the internet, hampering our initial installation attempt.
But, after printing them, we began the installation. To facilitate
our sky-scraping endeavor, we rented a boom lift truck. Without
this it would have been very difficult and dangerous work, if not impossible.
Even with the lift, the roof angles, the wind, and the height made the
task precarious at times. I enlisted the help of my father to
ensure things went smoothly.
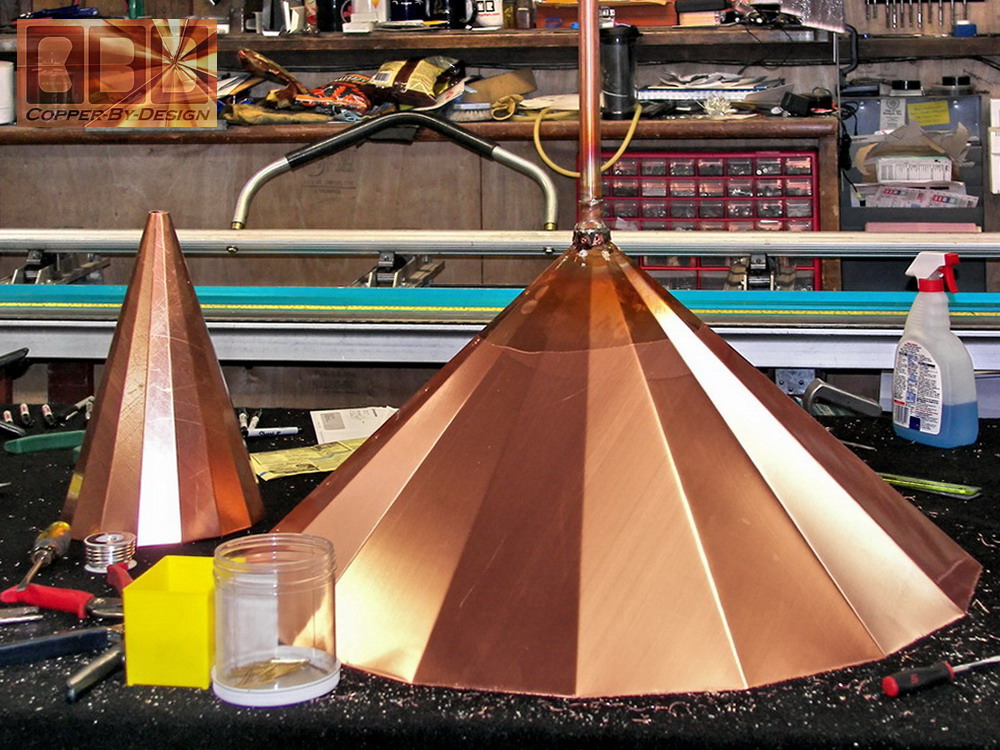
 The
first step was to set it on the top of the turret to make sure that
the slope matched and to get a feel for how it would be mounted.
The actual installation would require several steps. These were
fairly well thought-out and documented by CBD. First we would
apply the included epoxy to the wooden blocks screwed to the inside
of the cap and set it on the roof. After the requisite curing
time, we would unscrew the cap from the blocks and then screw the blocks
(which remained glued to the roof) permanently into the roof.
This would provide the solid anchoring for a long-lasting, wind-proof
fixture. The
first step was to set it on the top of the turret to make sure that
the slope matched and to get a feel for how it would be mounted.
The actual installation would require several steps. These were
fairly well thought-out and documented by CBD. First we would
apply the included epoxy to the wooden blocks screwed to the inside
of the cap and set it on the roof. After the requisite curing
time, we would unscrew the cap from the blocks and then screw the blocks
(which remained glued to the roof) permanently into the roof.
This would provide the solid anchoring for a long-lasting, wind-proof
fixture.
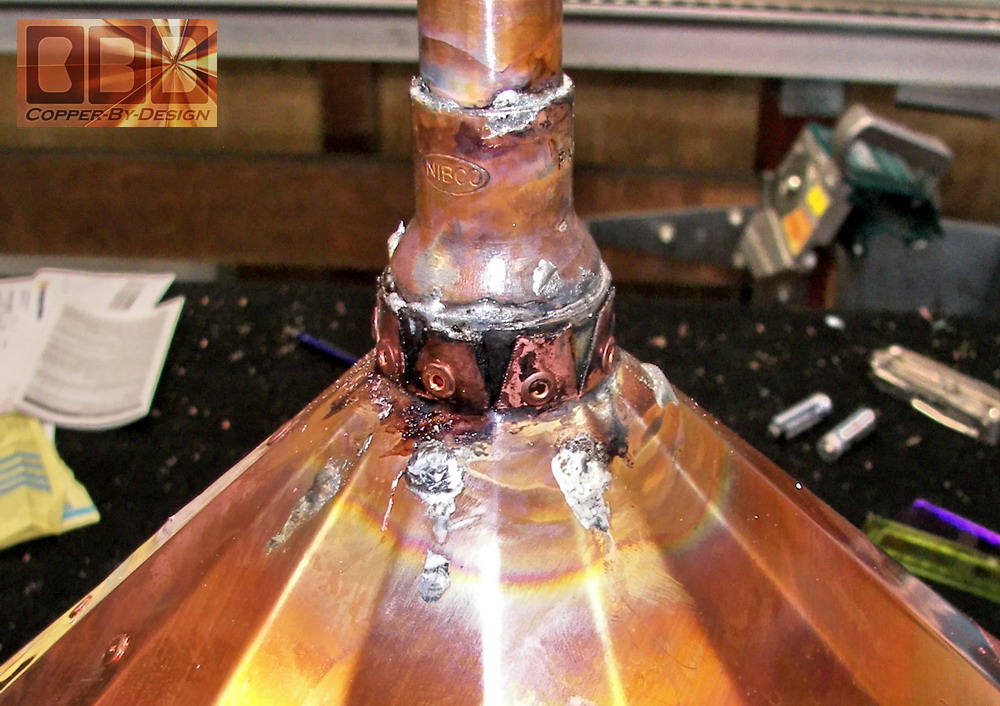
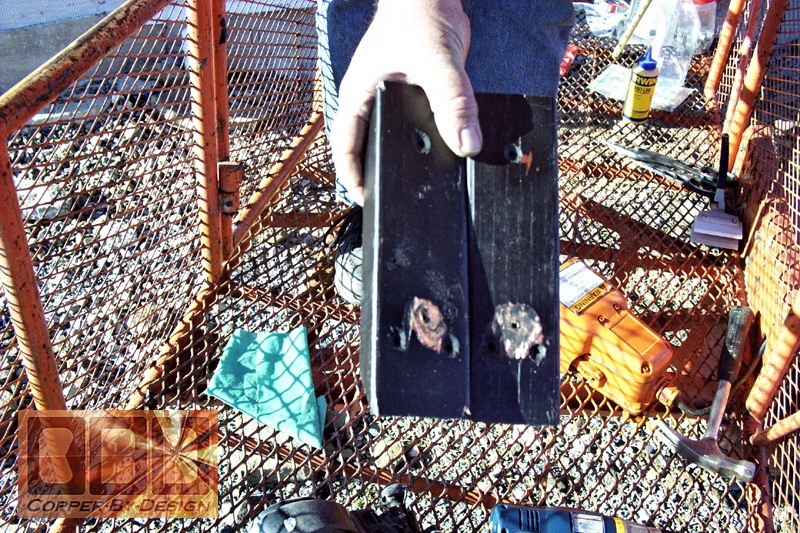
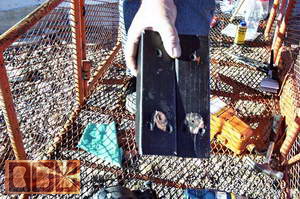
That was all well and good in theory. Unfortunately,
there was a snag, as there seemingly always must be, in that simple
plan. It seems that David and Tia jumped the gun when they screwed
the wooden blocks to the copper cap. The black, protective paint
must not have been fully dry yet. As a result, when we lifted
the cap off of the roof, the now-dried paint provided greater adhesion
to the cap than the epoxy did to the roof! Thus, most of the blocks
came back up, as can be seen in the following photos. We had to
pry the blocks off of the cap.
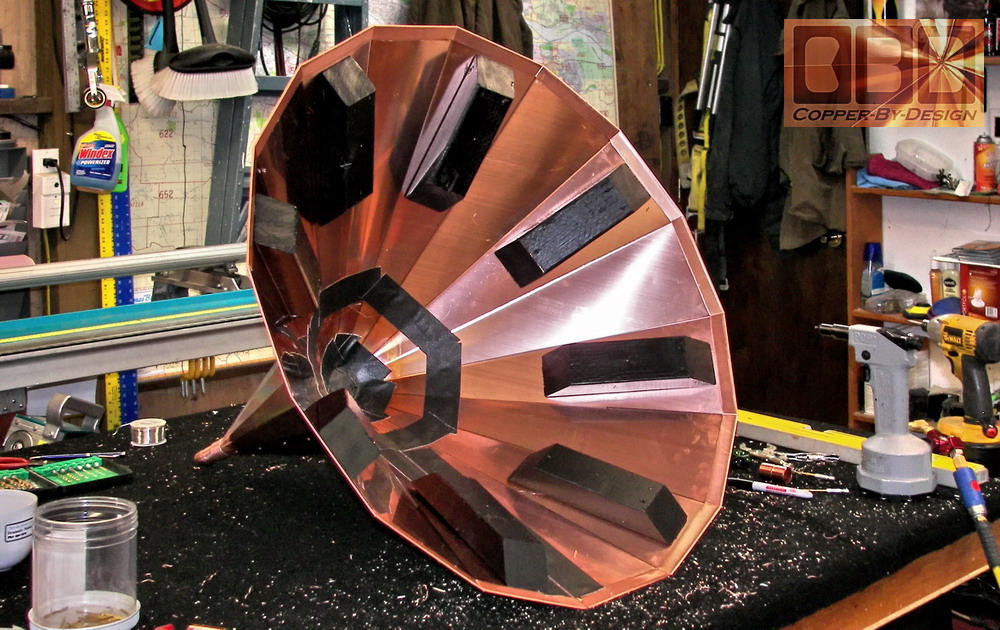
 With
time ticking and a very expensive lift truck due to be returned soon,
we had to improvise. The initial scheme was meant to have the
blocks perfectly lined up to the cap. And we could have tried
that method again, having separated the blocks from the cap, but we
didn't have an extra day for the epoxy to set. So we grabbed some
powdered chalk (for a chalk line) and coated the undersides of the blocks.
Again we set the cap (with blocks attached) onto the turret, and then
immediately lifted it off again, leaving behind an imperfect but useable
indication of where the blocks needed to be situated. We then
screwed the blocks down, hoping that the cap would fit snugly over them. With
time ticking and a very expensive lift truck due to be returned soon,
we had to improvise. The initial scheme was meant to have the
blocks perfectly lined up to the cap. And we could have tried
that method again, having separated the blocks from the cap, but we
didn't have an extra day for the epoxy to set. So we grabbed some
powdered chalk (for a chalk line) and coated the undersides of the blocks.
Again we set the cap (with blocks attached) onto the turret, and then
immediately lifted it off again, leaving behind an imperfect but useable
indication of where the blocks needed to be situated. We then
screwed the blocks down, hoping that the cap would fit snugly over them.
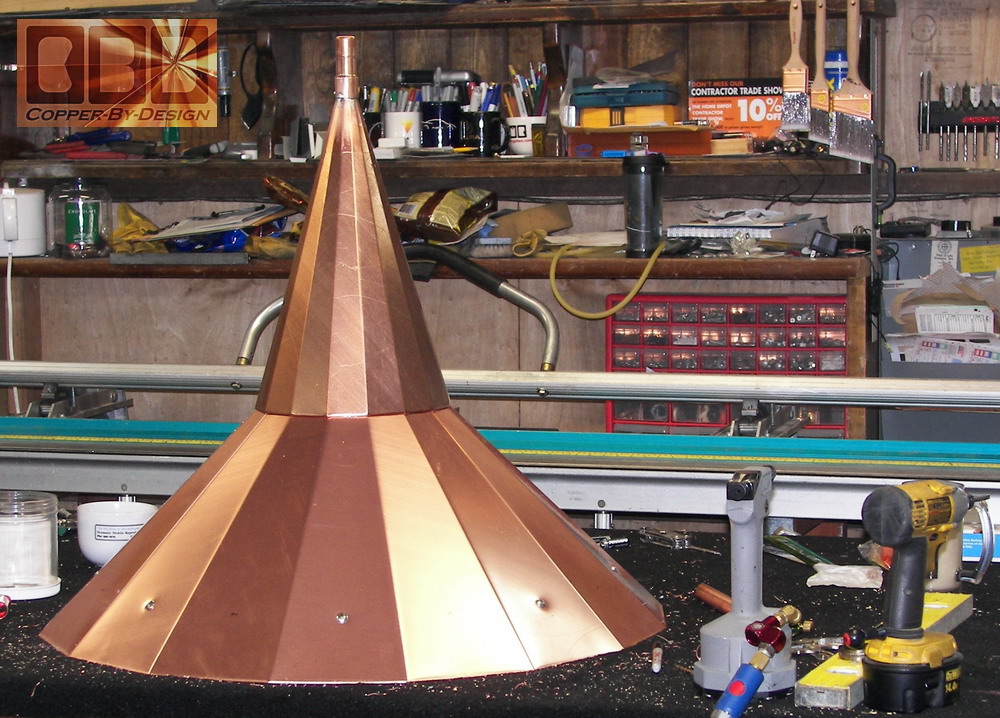
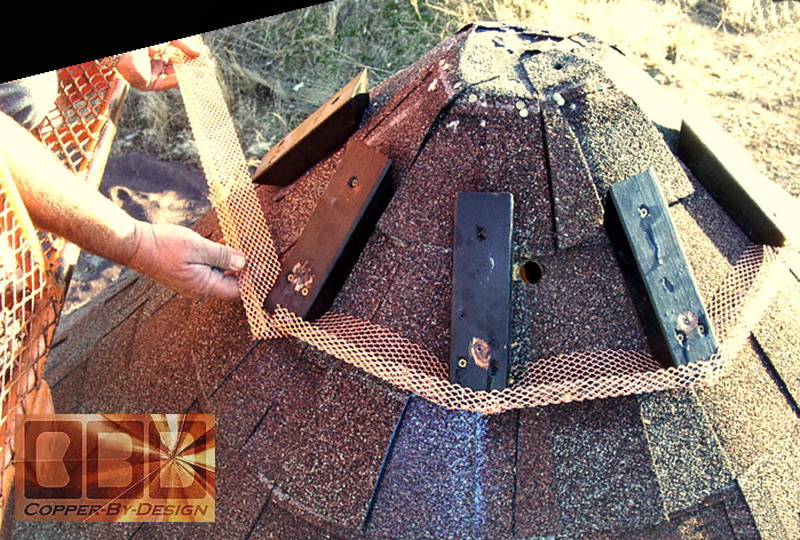
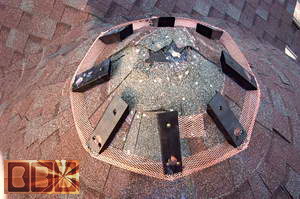
 Another
part of the installation procedure was for the integrated roof venting.
Apparently this is a new, experimental feature on David's designs.
The instructions consisted of drilling some vent holes in the roof and
covering them with copper mesh, and then fastening copper mesh to the
bottoms of each of the mounting blocks. This mesh was meant to
prevent insects from nesting in the cap or finding an entrance into
the house. It seemed to be working quite well at first, but a
critical flaw was immediately apparent once the cap was set on the blocks.
There were 16 facets to the cap, but only 8 mounting blocks. With
the mesh stretching straight from one block to the other, every other
facet provided a large gap away from the mesh. If this were an
octagonal cap, it would have worked splendidly, but as a 16-sided cap,
it didn't work as planned. However, since the roof holes themselves
were covered with mesh, I decided to let it go as is. The lower
mesh would still provide some impediment for insects, although not complete Another
part of the installation procedure was for the integrated roof venting.
Apparently this is a new, experimental feature on David's designs.
The instructions consisted of drilling some vent holes in the roof and
covering them with copper mesh, and then fastening copper mesh to the
bottoms of each of the mounting blocks. This mesh was meant to
prevent insects from nesting in the cap or finding an entrance into
the house. It seemed to be working quite well at first, but a
critical flaw was immediately apparent once the cap was set on the blocks.
There were 16 facets to the cap, but only 8 mounting blocks. With
the mesh stretching straight from one block to the other, every other
facet provided a large gap away from the mesh. If this were an
octagonal cap, it would have worked splendidly, but as a 16-sided cap,
it didn't work as planned. However, since the roof holes themselves
were covered with mesh, I decided to let it go as is. The lower
mesh would still provide some impediment for insects, although not complete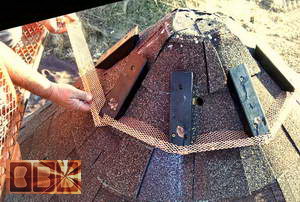 ,
and the roof-hole mesh would prevent them from entering the house.
Nonetheless, I'll probably add some extra screening on the inside of
the roof as well. In future designs, David may wish to instead
solder the mesh to the bottom rim of the cap, as this would provide
a continuous, impenetrable barrier. I drilled two one-inch holes
for the ventilation. I'm not sure if that will be enough of not.
I may drill one or two more depending on how it works this summer as
far as removing heat from the turret roof. ,
and the roof-hole mesh would prevent them from entering the house.
Nonetheless, I'll probably add some extra screening on the inside of
the roof as well. In future designs, David may wish to instead
solder the mesh to the bottom rim of the cap, as this would provide
a continuous, impenetrable barrier. I drilled two one-inch holes
for the ventilation. I'm not sure if that will be enough of not.
I may drill one or two more depending on how it works this summer as
far as removing heat from the turret roof.
 After
some adjusting to get it to fit just right, we were relieved to find
that the cap set down nicely on the blocks. We checked for level
and plumb and then screwed the cap down permanently to the blocks, putting
a dab of silicone caulk on the shaft of each screw to help prevent water
leakage around the mounting blocks. After
some adjusting to get it to fit just right, we were relieved to find
that the cap set down nicely on the blocks. We checked for level
and plumb and then screwed the cap down permanently to the blocks, putting
a dab of silicone caulk on the shaft of each screw to help prevent water
leakage around the mounting blocks.
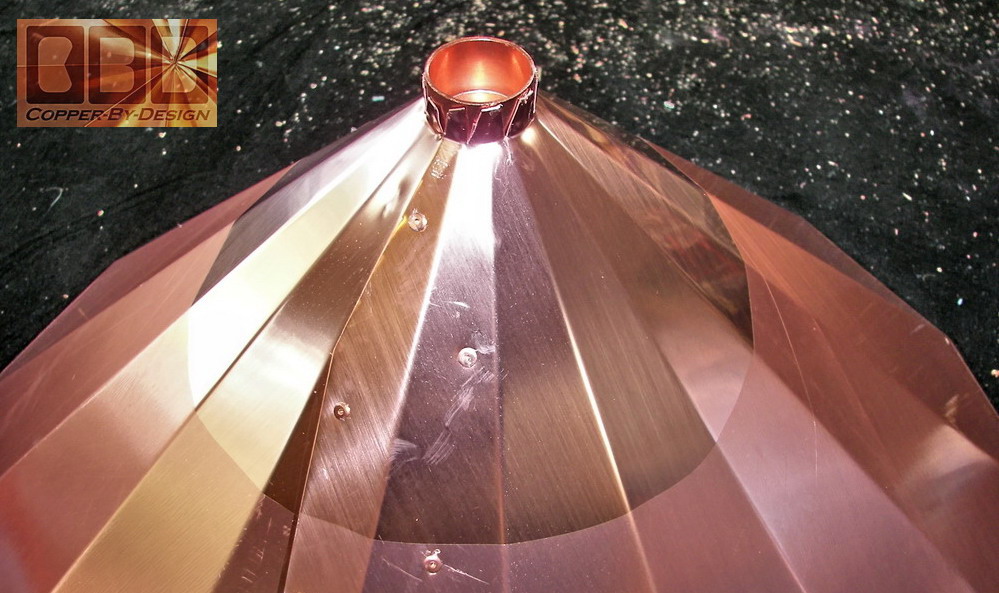
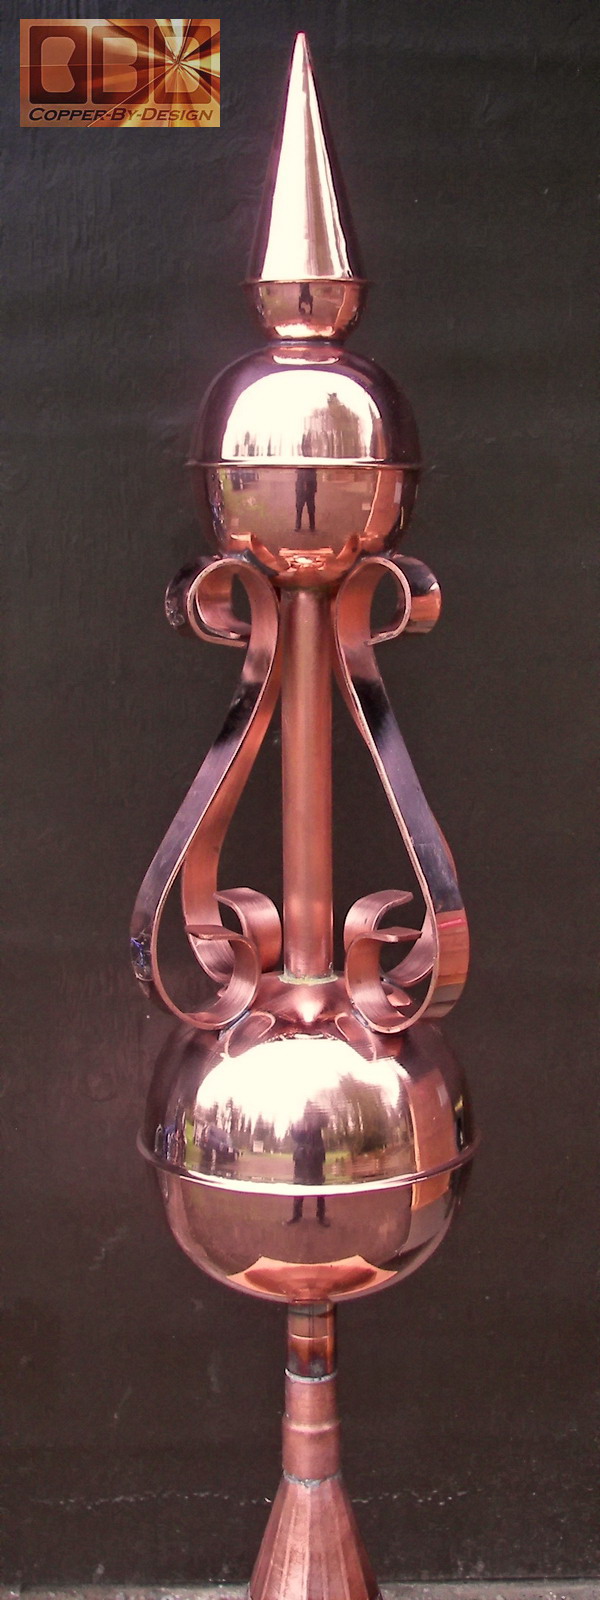
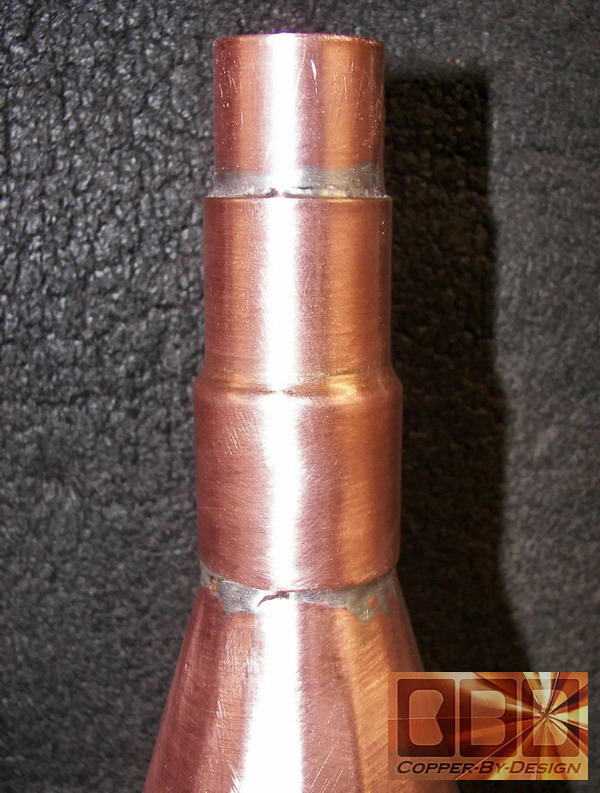
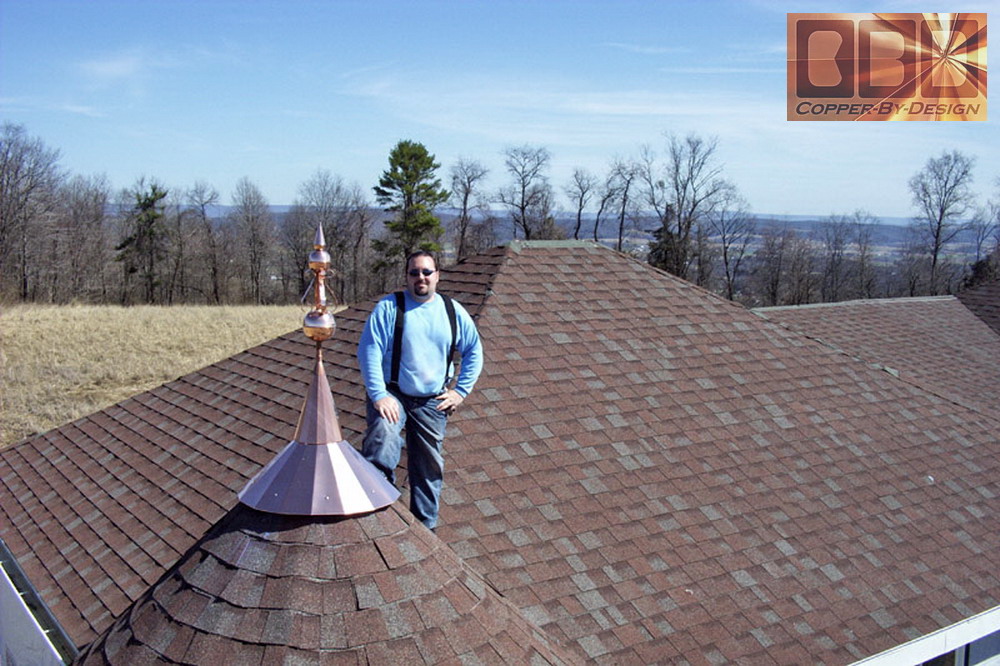
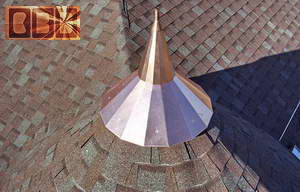
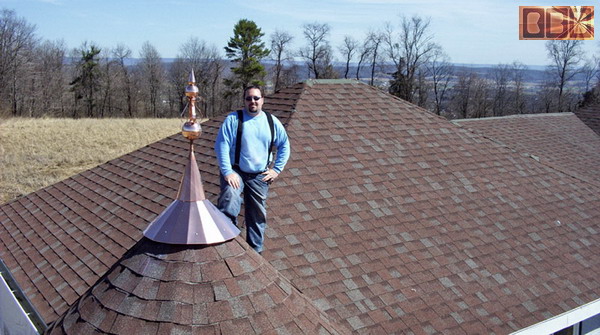
CBD designed into the cap
an integrated finial support which felt very robust. I'm very
confident that it will hold up against our strong winds. We dropped
in the heavy brass support rod and then the decorative finial, applying
caulk to both. It was very impressive seeing the completed cap
and finial finally mounted on the roof.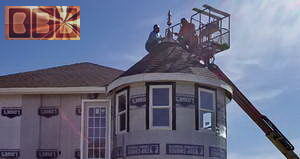
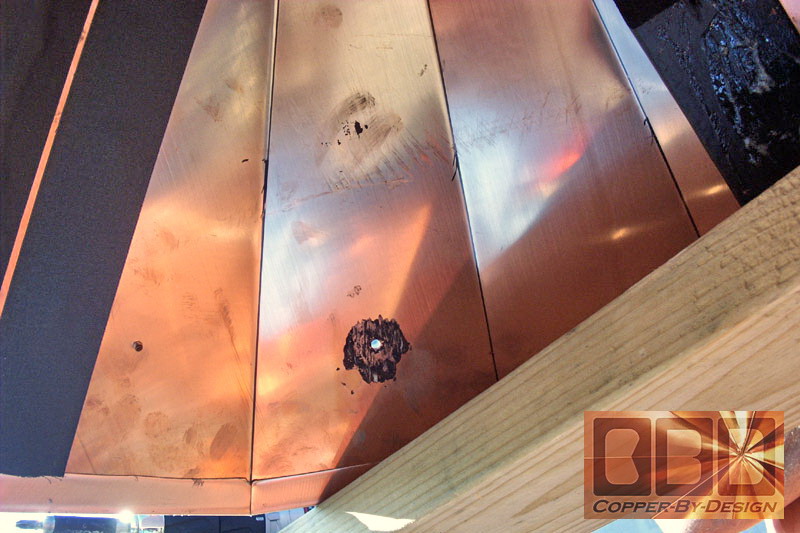
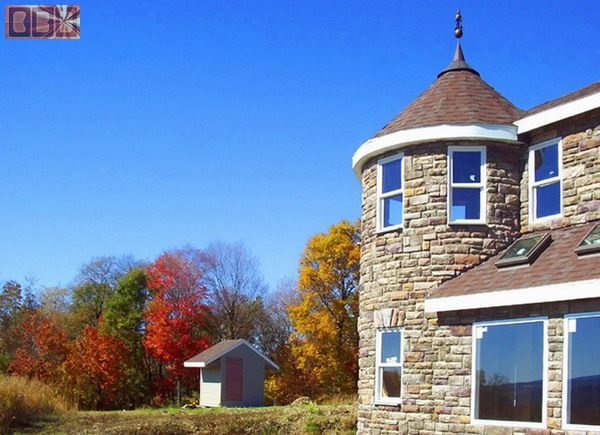
As a final step, we peeled back the protective plastic film covering
the copper cap, revealing underneath a beautiful shiny finish.
At last, the turret roof was properly crowned in traditional Victorian
style.
The next project is applying stone...
|