|
Cell# (503) 351-7082 See our Facebook profile for the most recent Fire pit cover builds |
Copper Lanterns Fabrication Page Updated 3 / 2025 |
|
Cell# (503) 351-7082 See our Facebook profile for the most recent Fire pit cover builds |
Copper Lanterns Fabrication Page Updated 3 / 2025 |

.
|
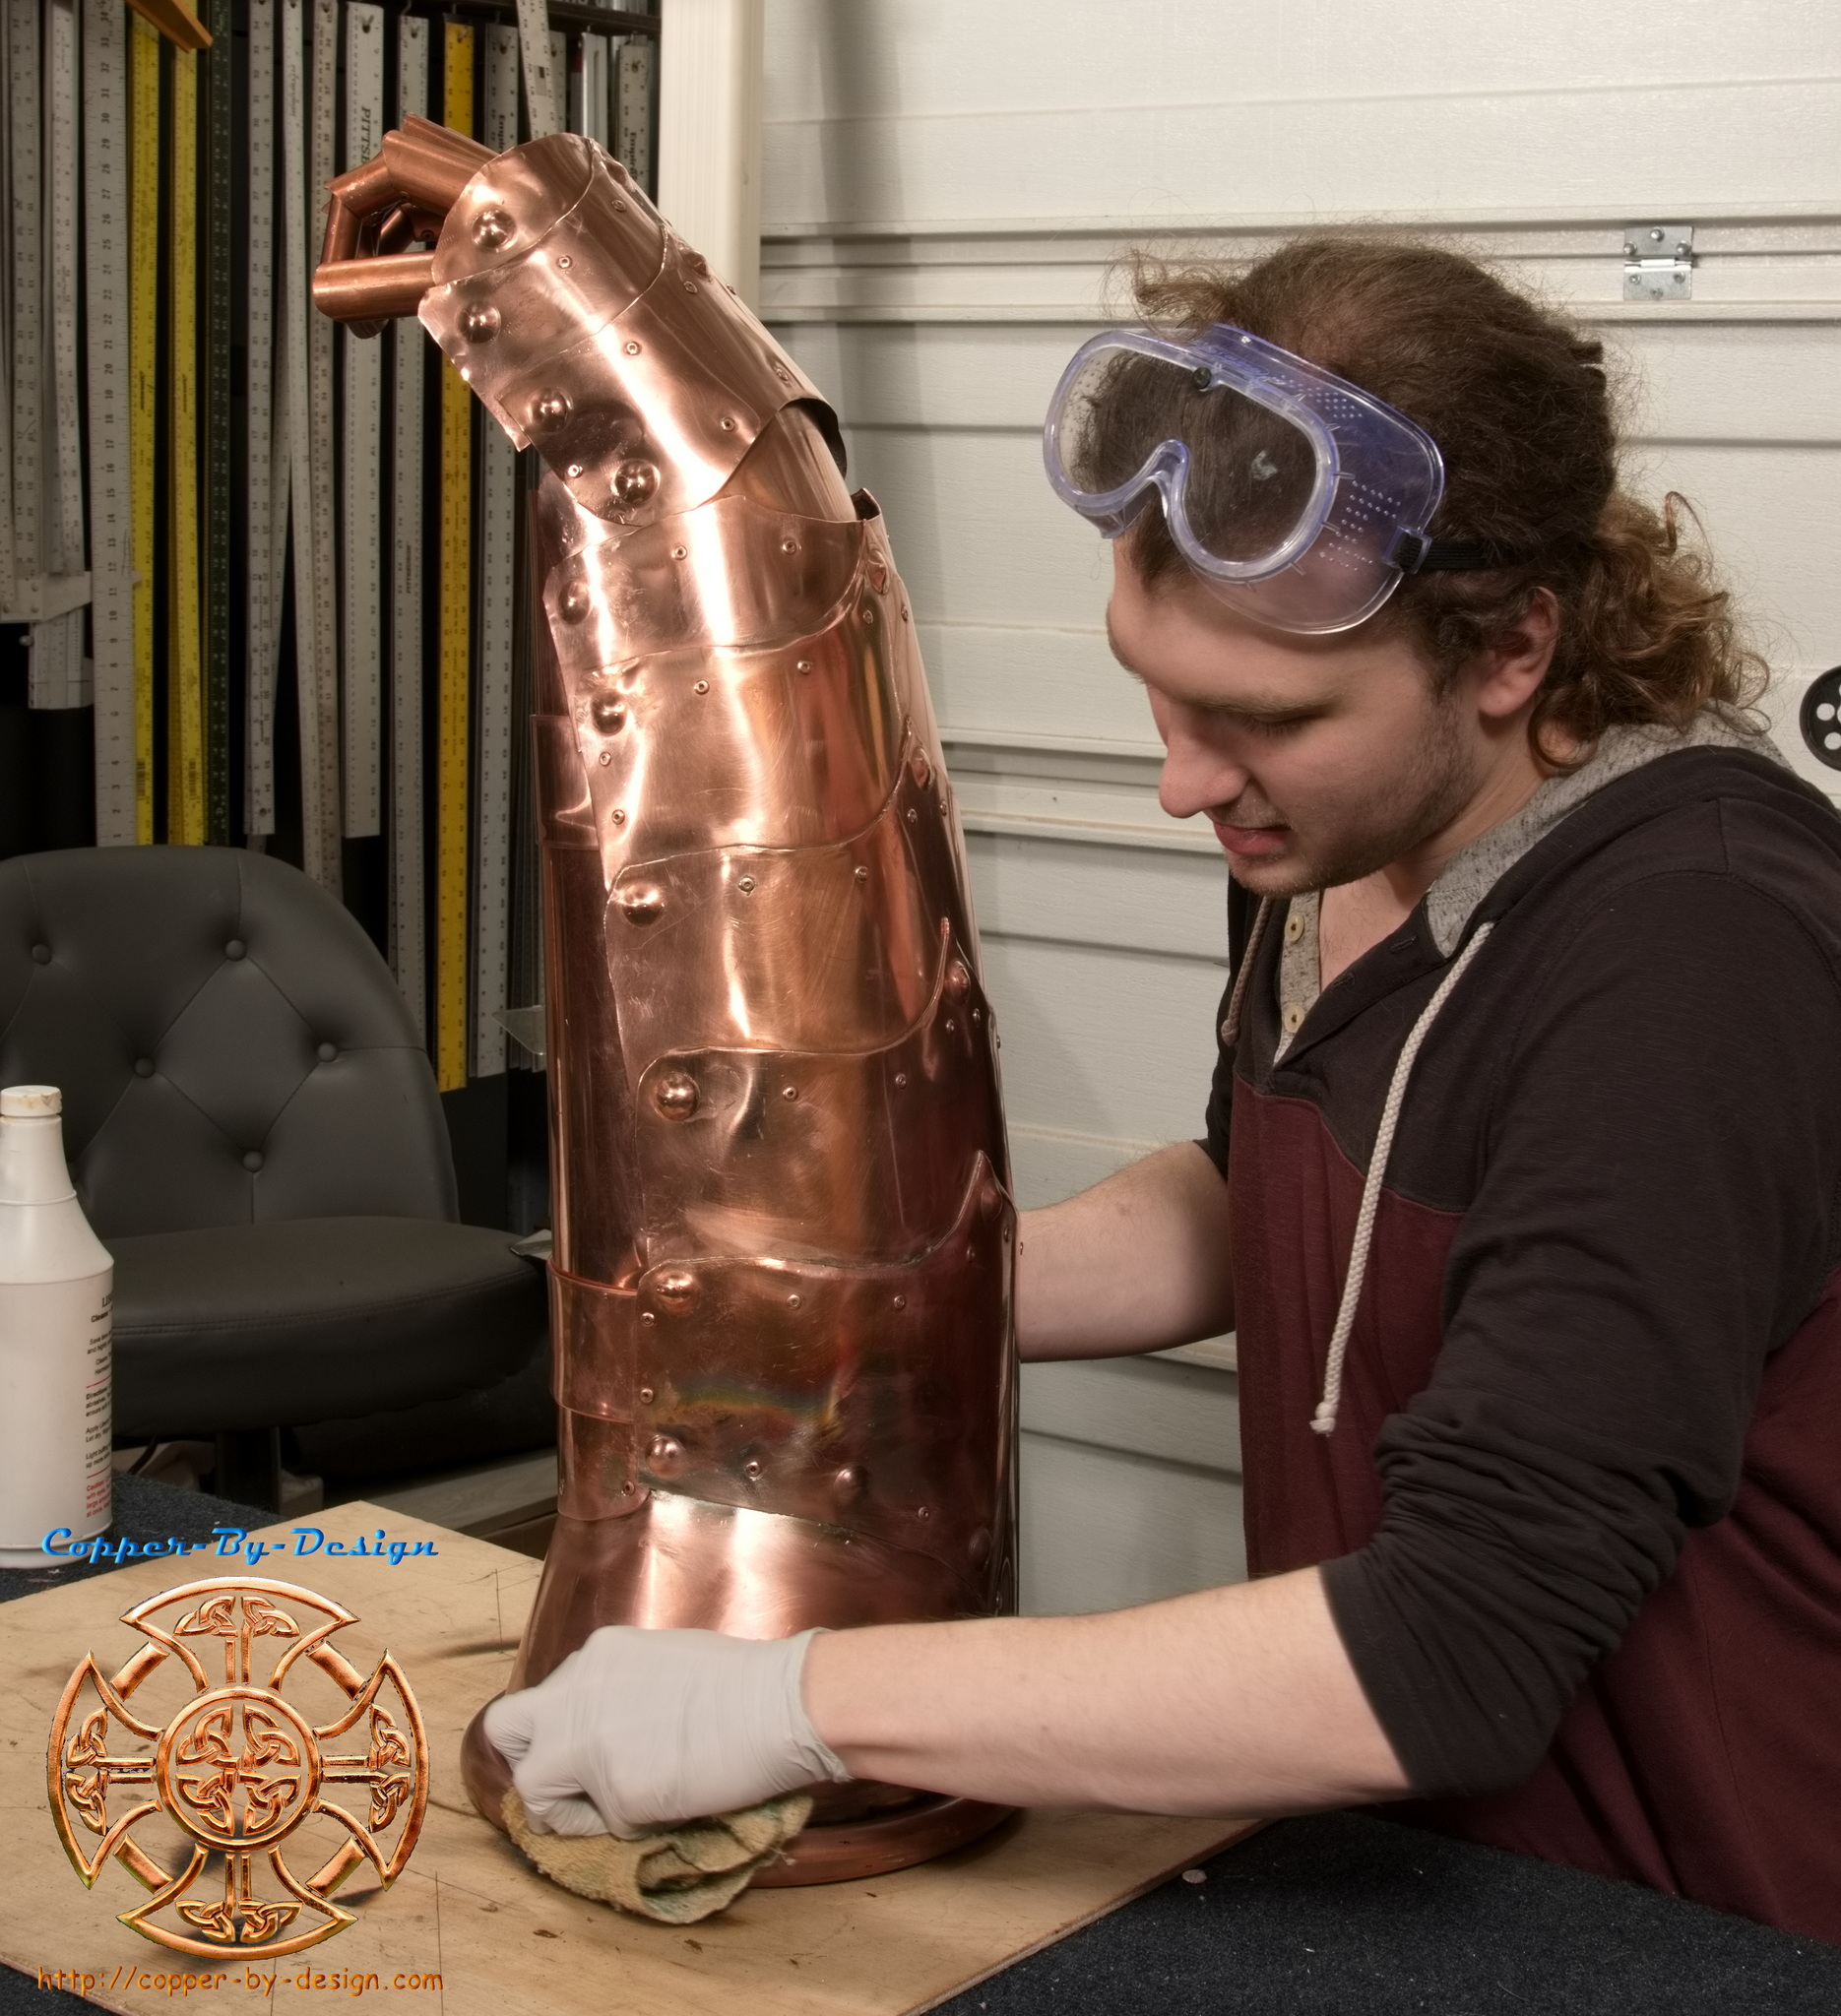
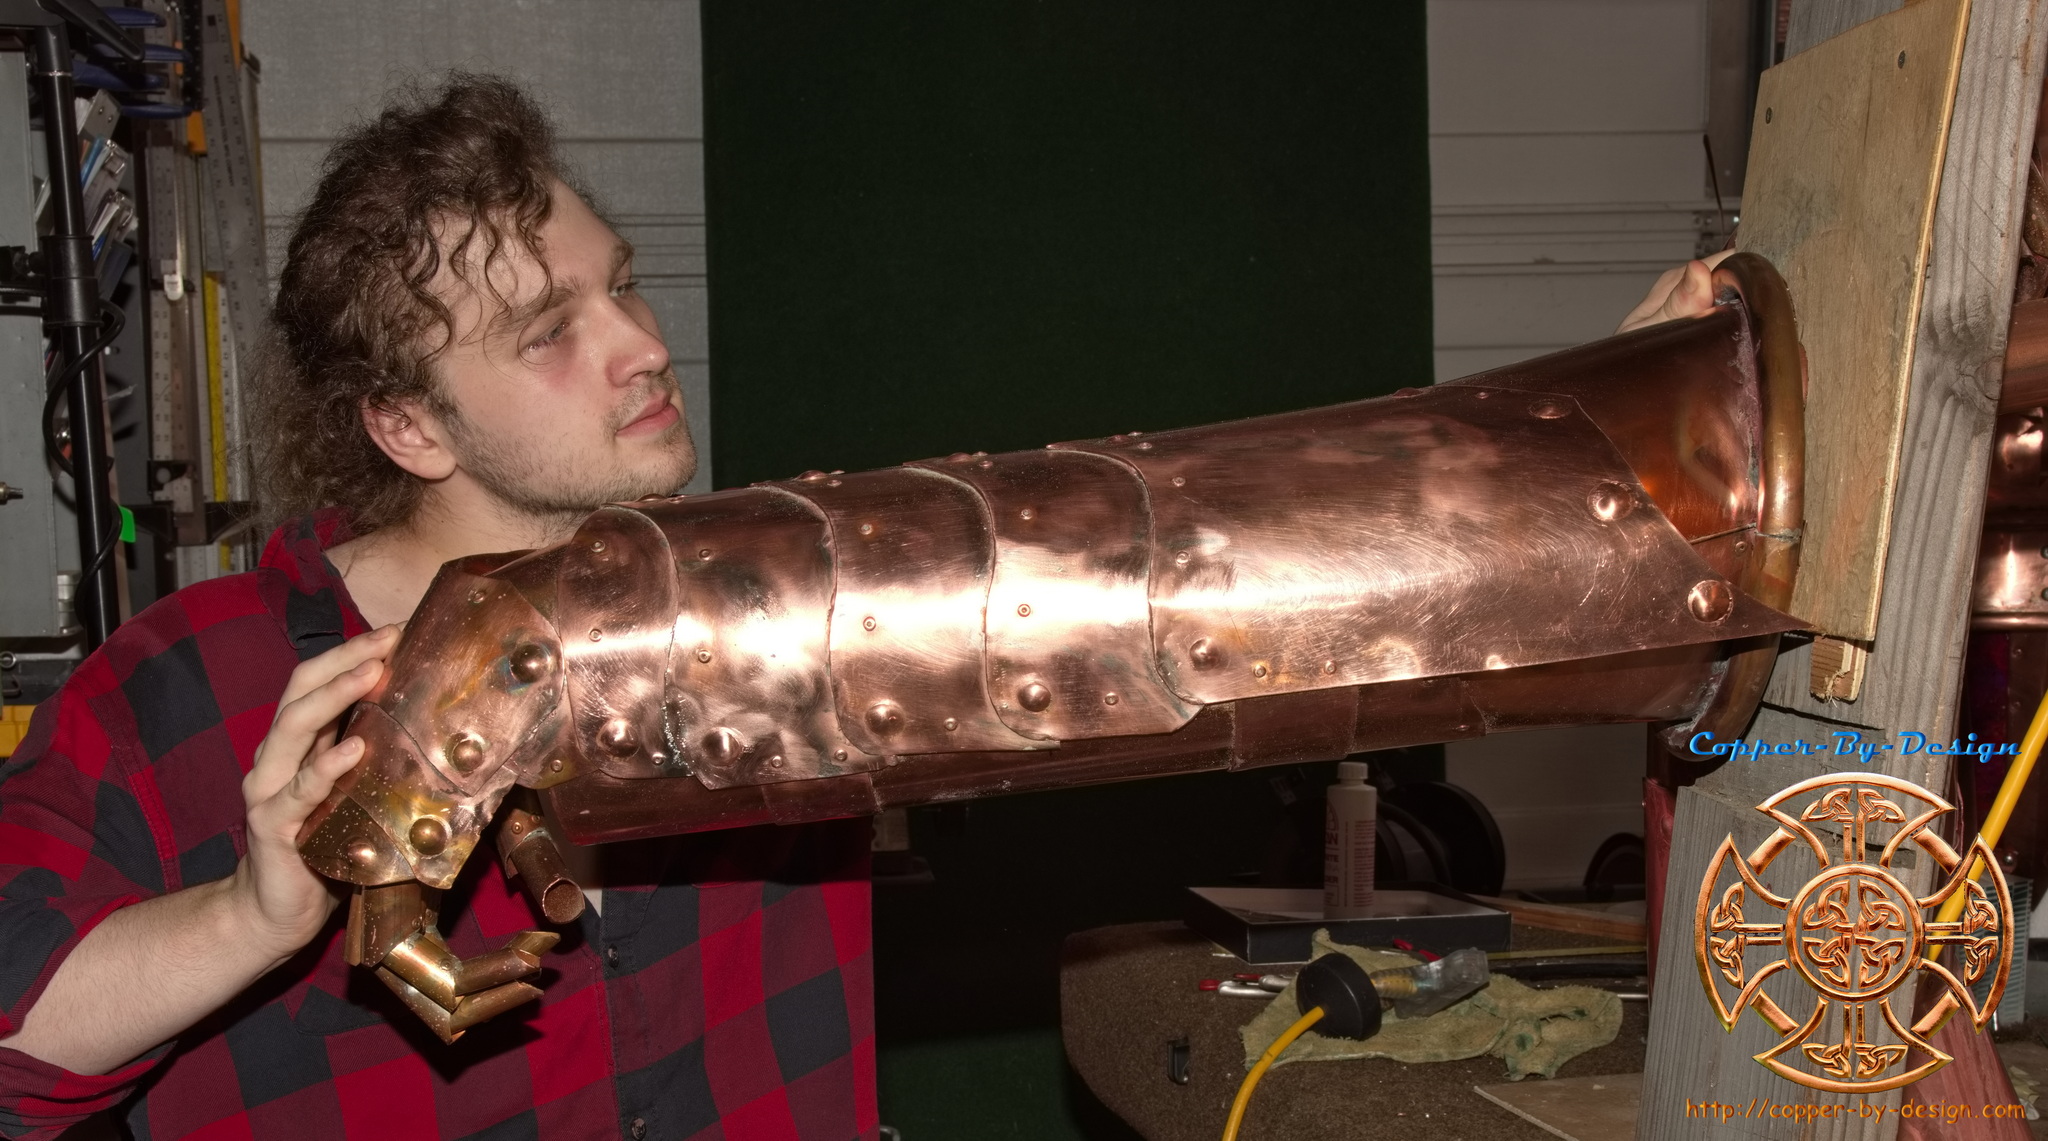
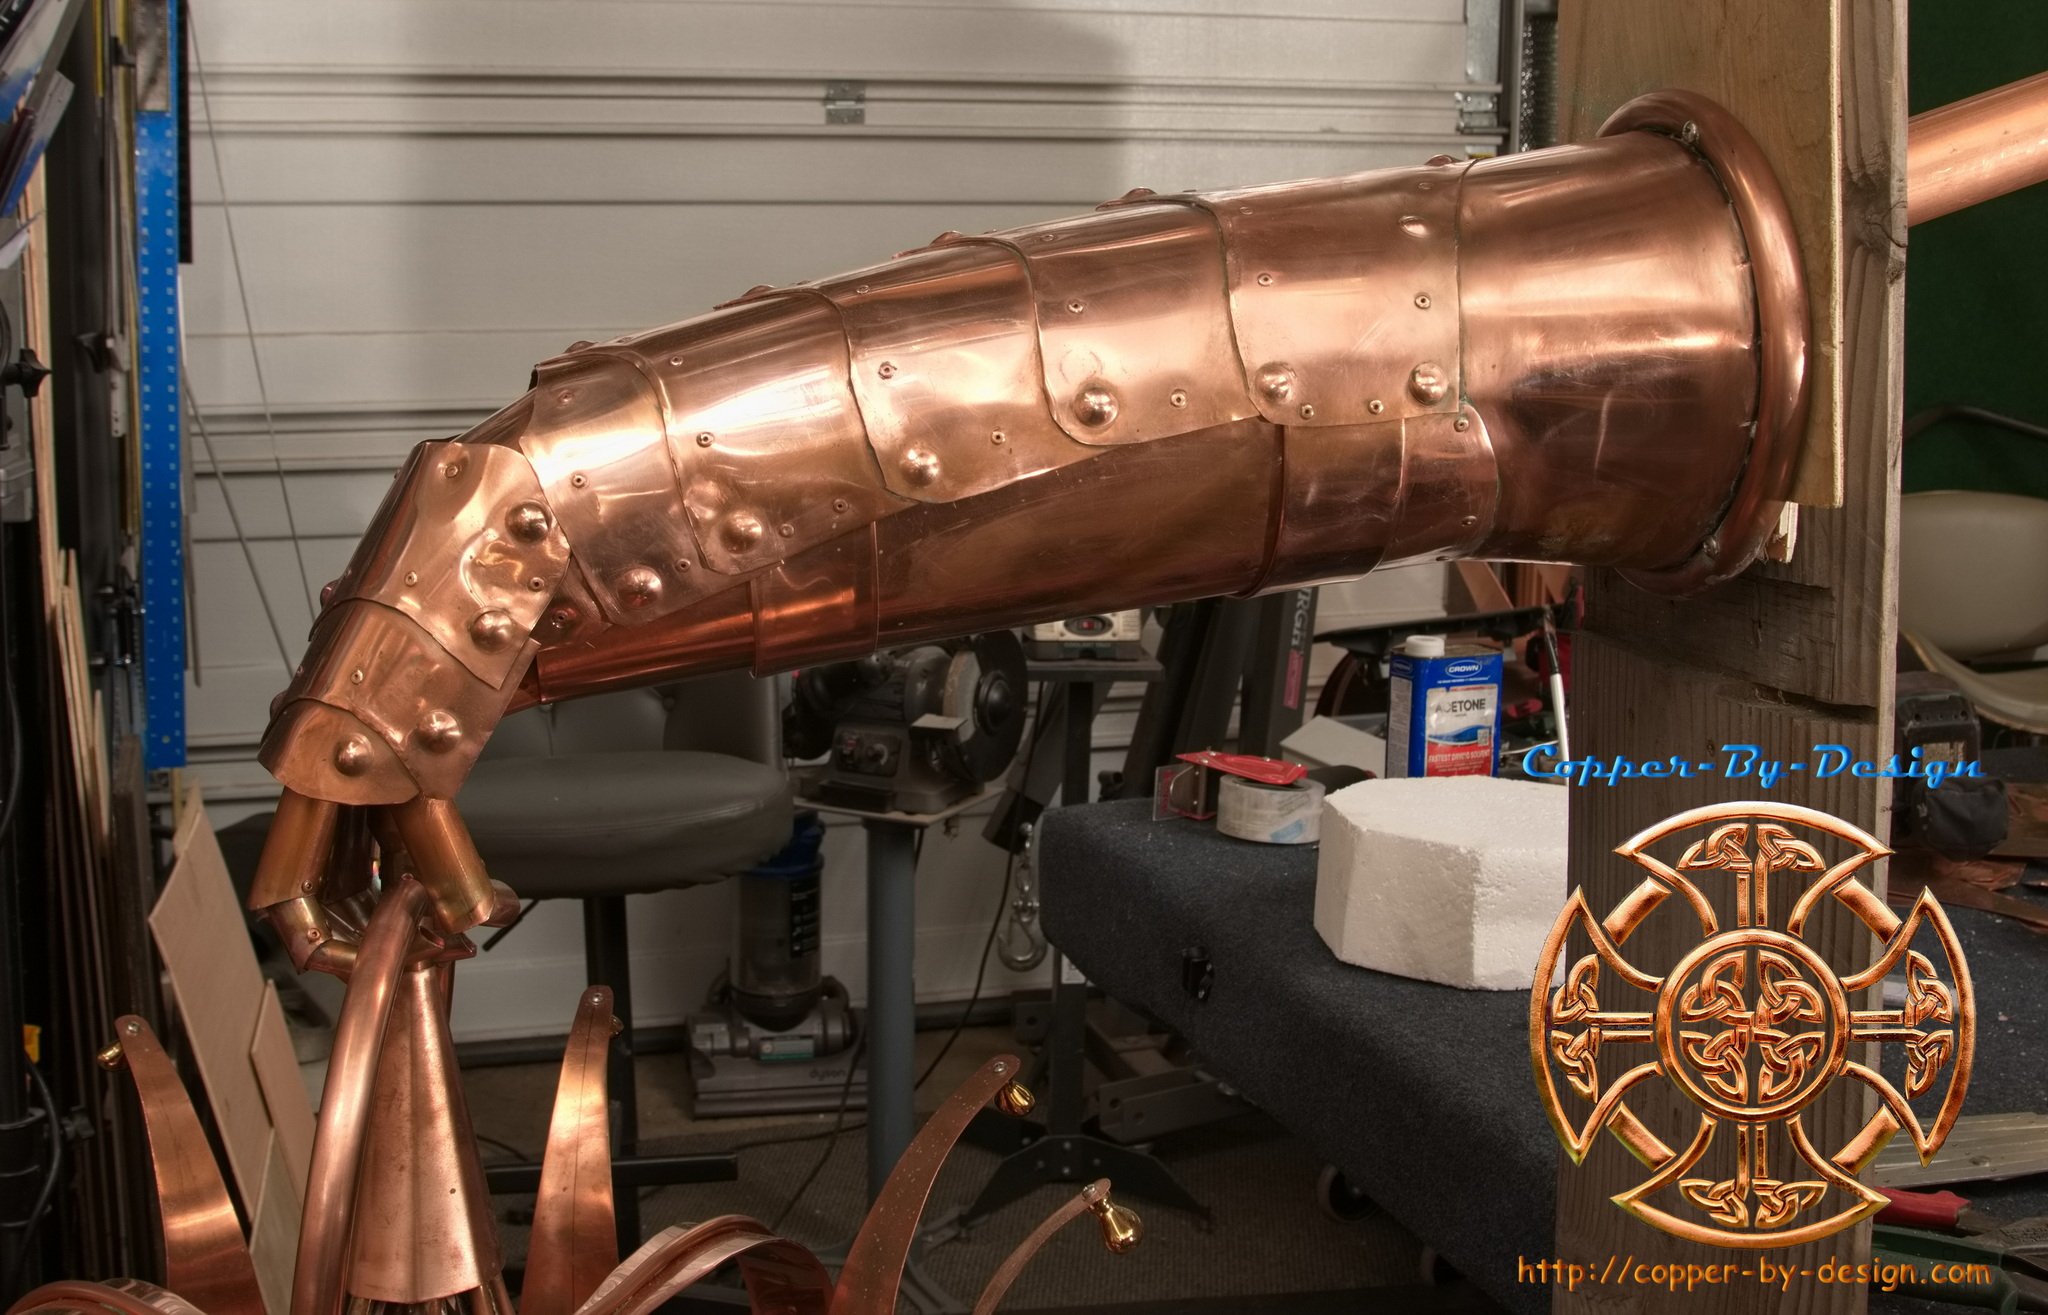
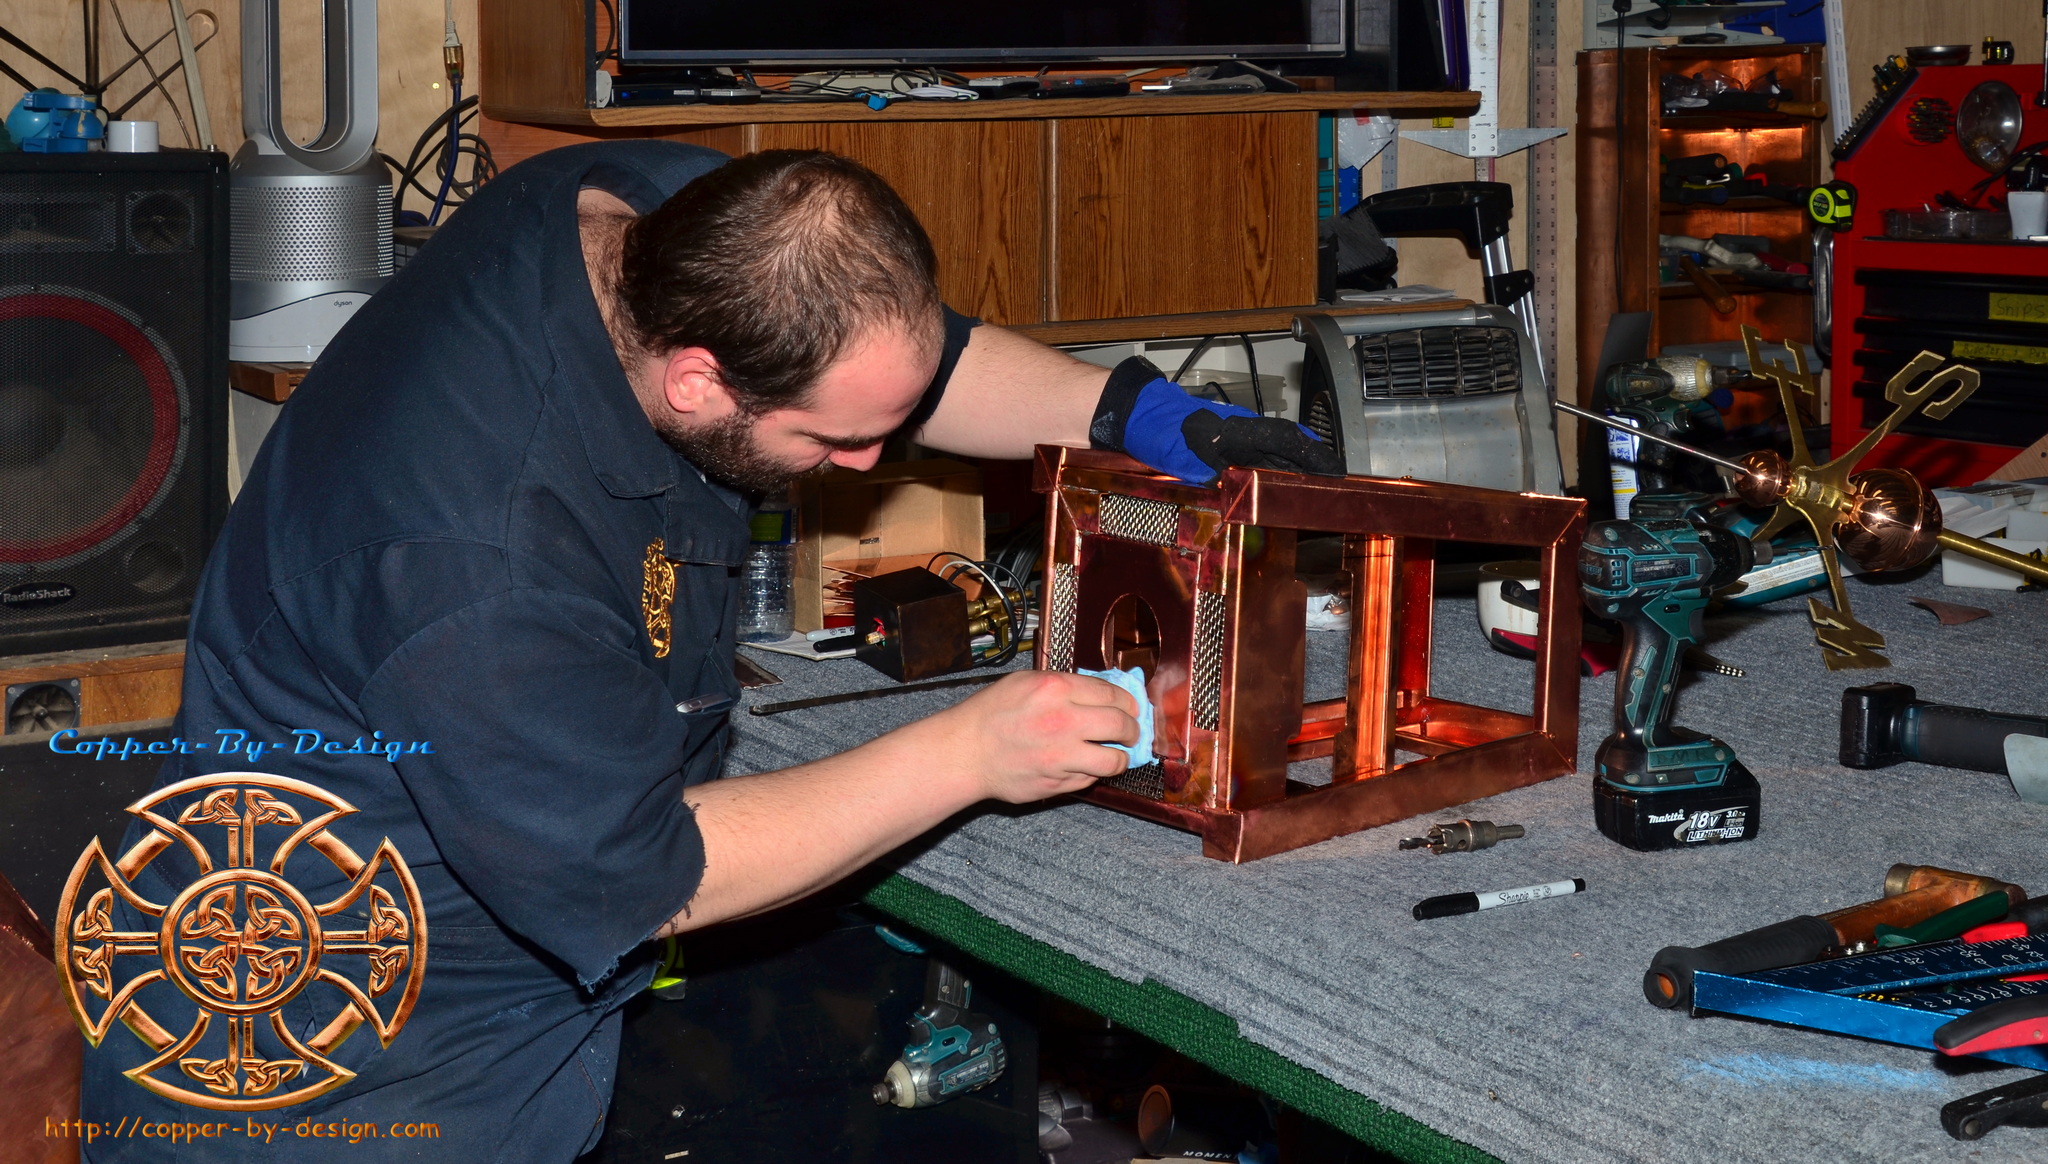
First off, I am not claiming to be an expert designer/fabricator of lanterns. I have helped design and fabricated these, trying my best to make them sturdy and look decent. We follow the specifications given to us by our Clients, and I make some suggestions to improve their durability, function, and looks. Lanterns can be made with just 20oz copper, but it is recommended to build these with a sturdier 32oz and or 48oz copper for better durability and dent resistance. The edges are carefully sanded smooth, so they have no rough or sharp edges exposed. These are made to make sure the soldered seams do not leak rainwater, but we cannot guarantee they will meet you desired light effect, as there are a lot of different factors that need to be worked out before fabrication and after installation to adjust the flow of light. Any amount of testing beforehand is important to the success of these water-features. Before making these in copper they can be formed in a cheaper metal or plastic to test the action you will be getting. They would need to be hooked up at your location with what electrical codes for your area and application, since I am not allowed do the installation myself. Beside the look of the housing, here are some of the details that need to be worked out, which can vary this action seen in place:
|
| I would hate for you to get this installed and realize you dislike any aspect of them, so I will do my best to work out these details and option with you. This may be a tedious process, which takes time to get the plan right. Small production custom projects like this will cost considerably more than what you could buy off the shelf, so be prepared to spend a good sum for these kind of products. |
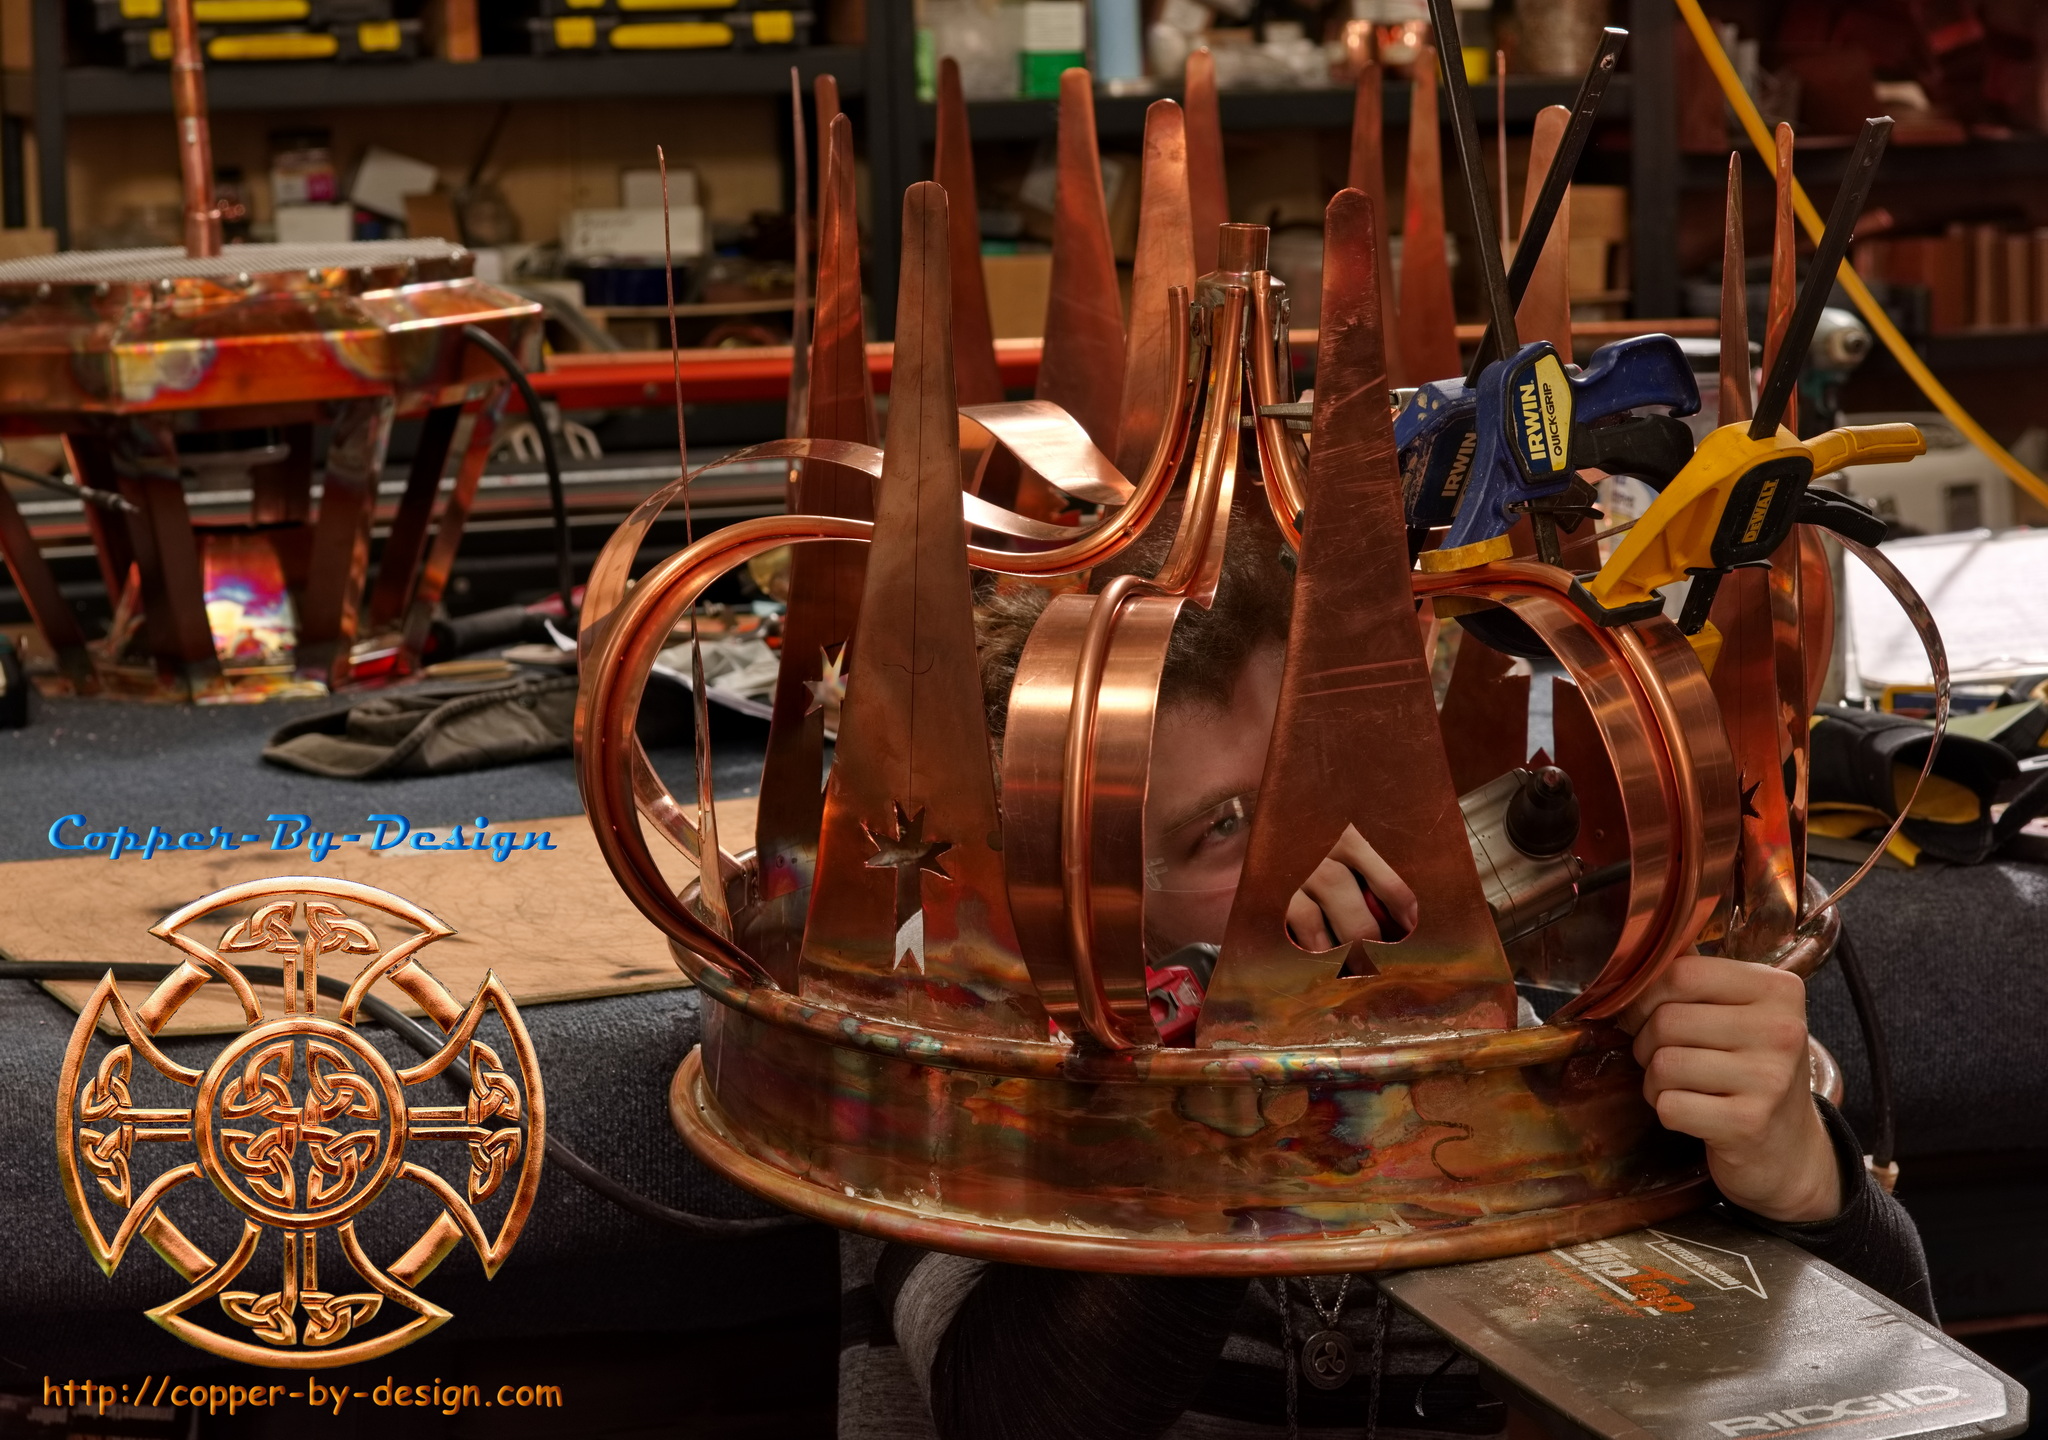
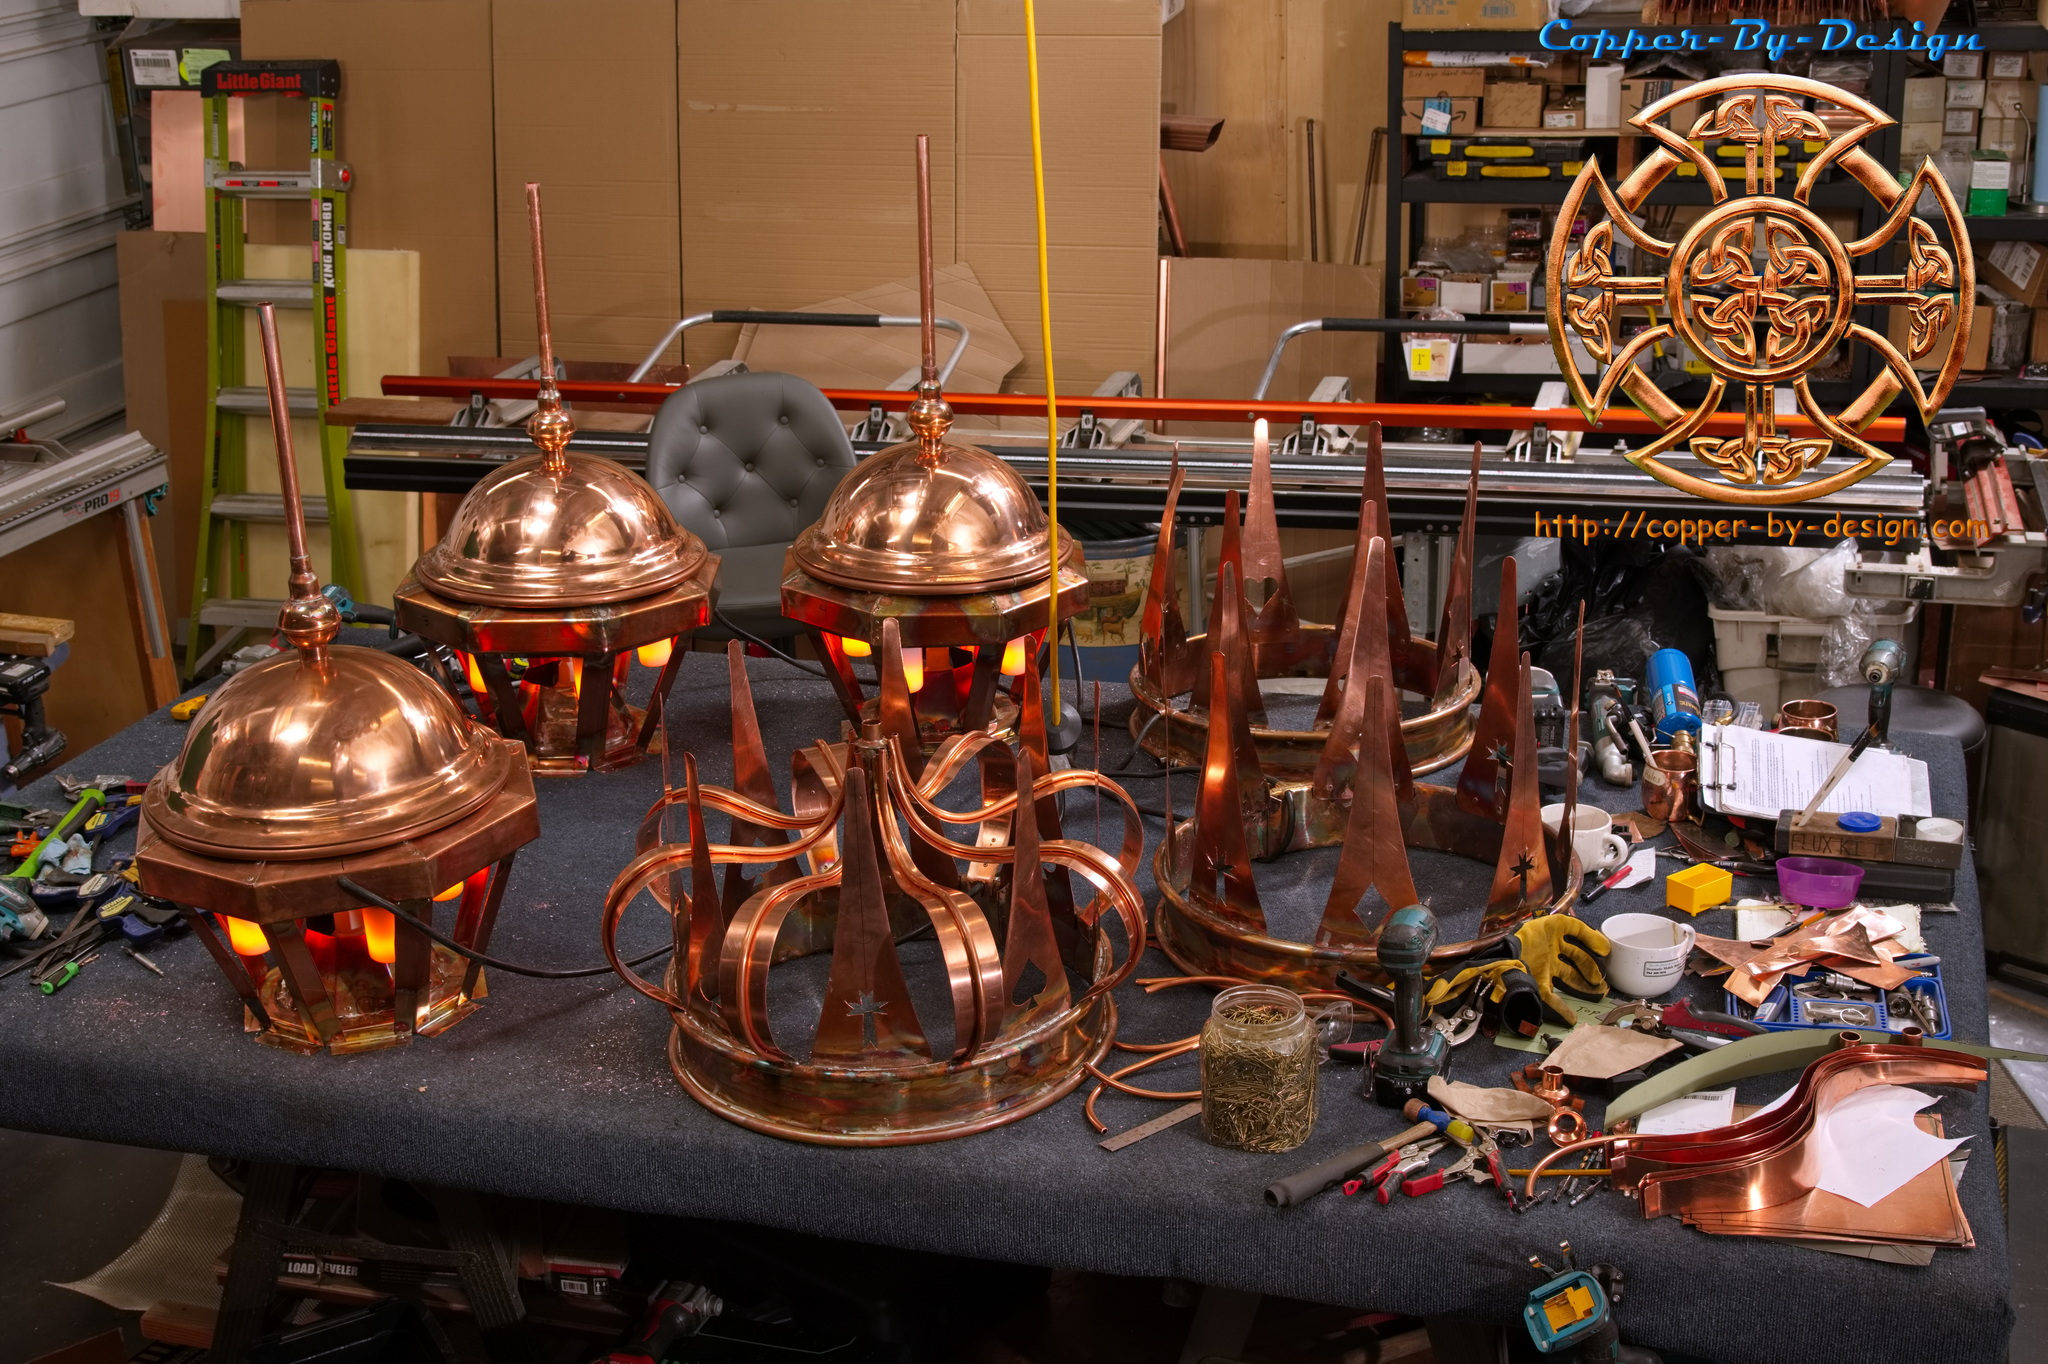
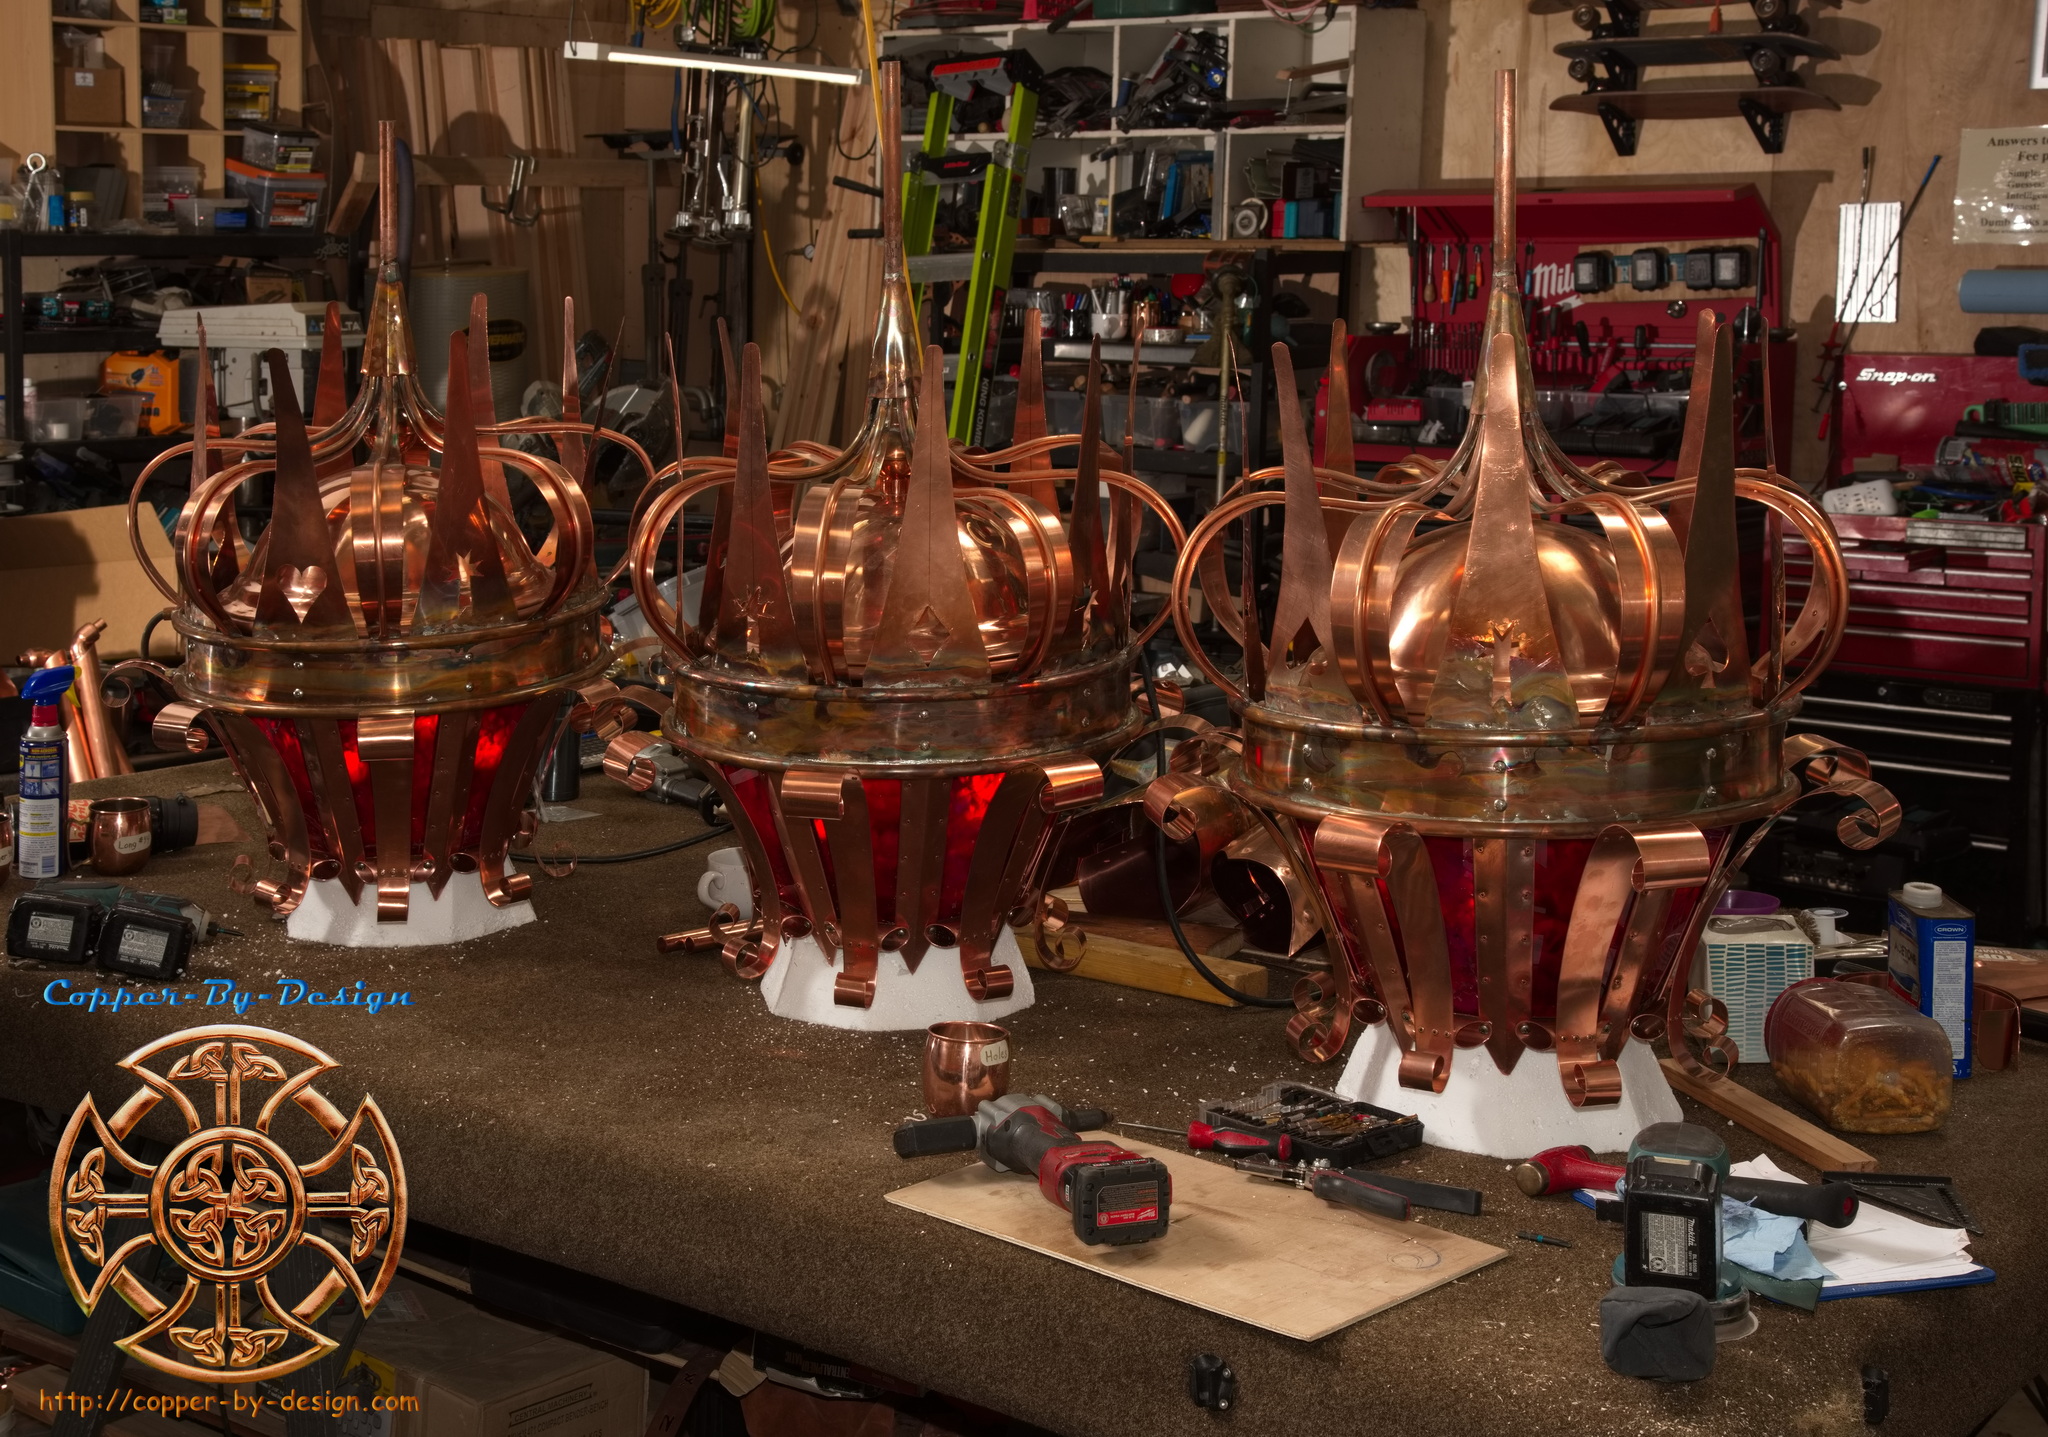
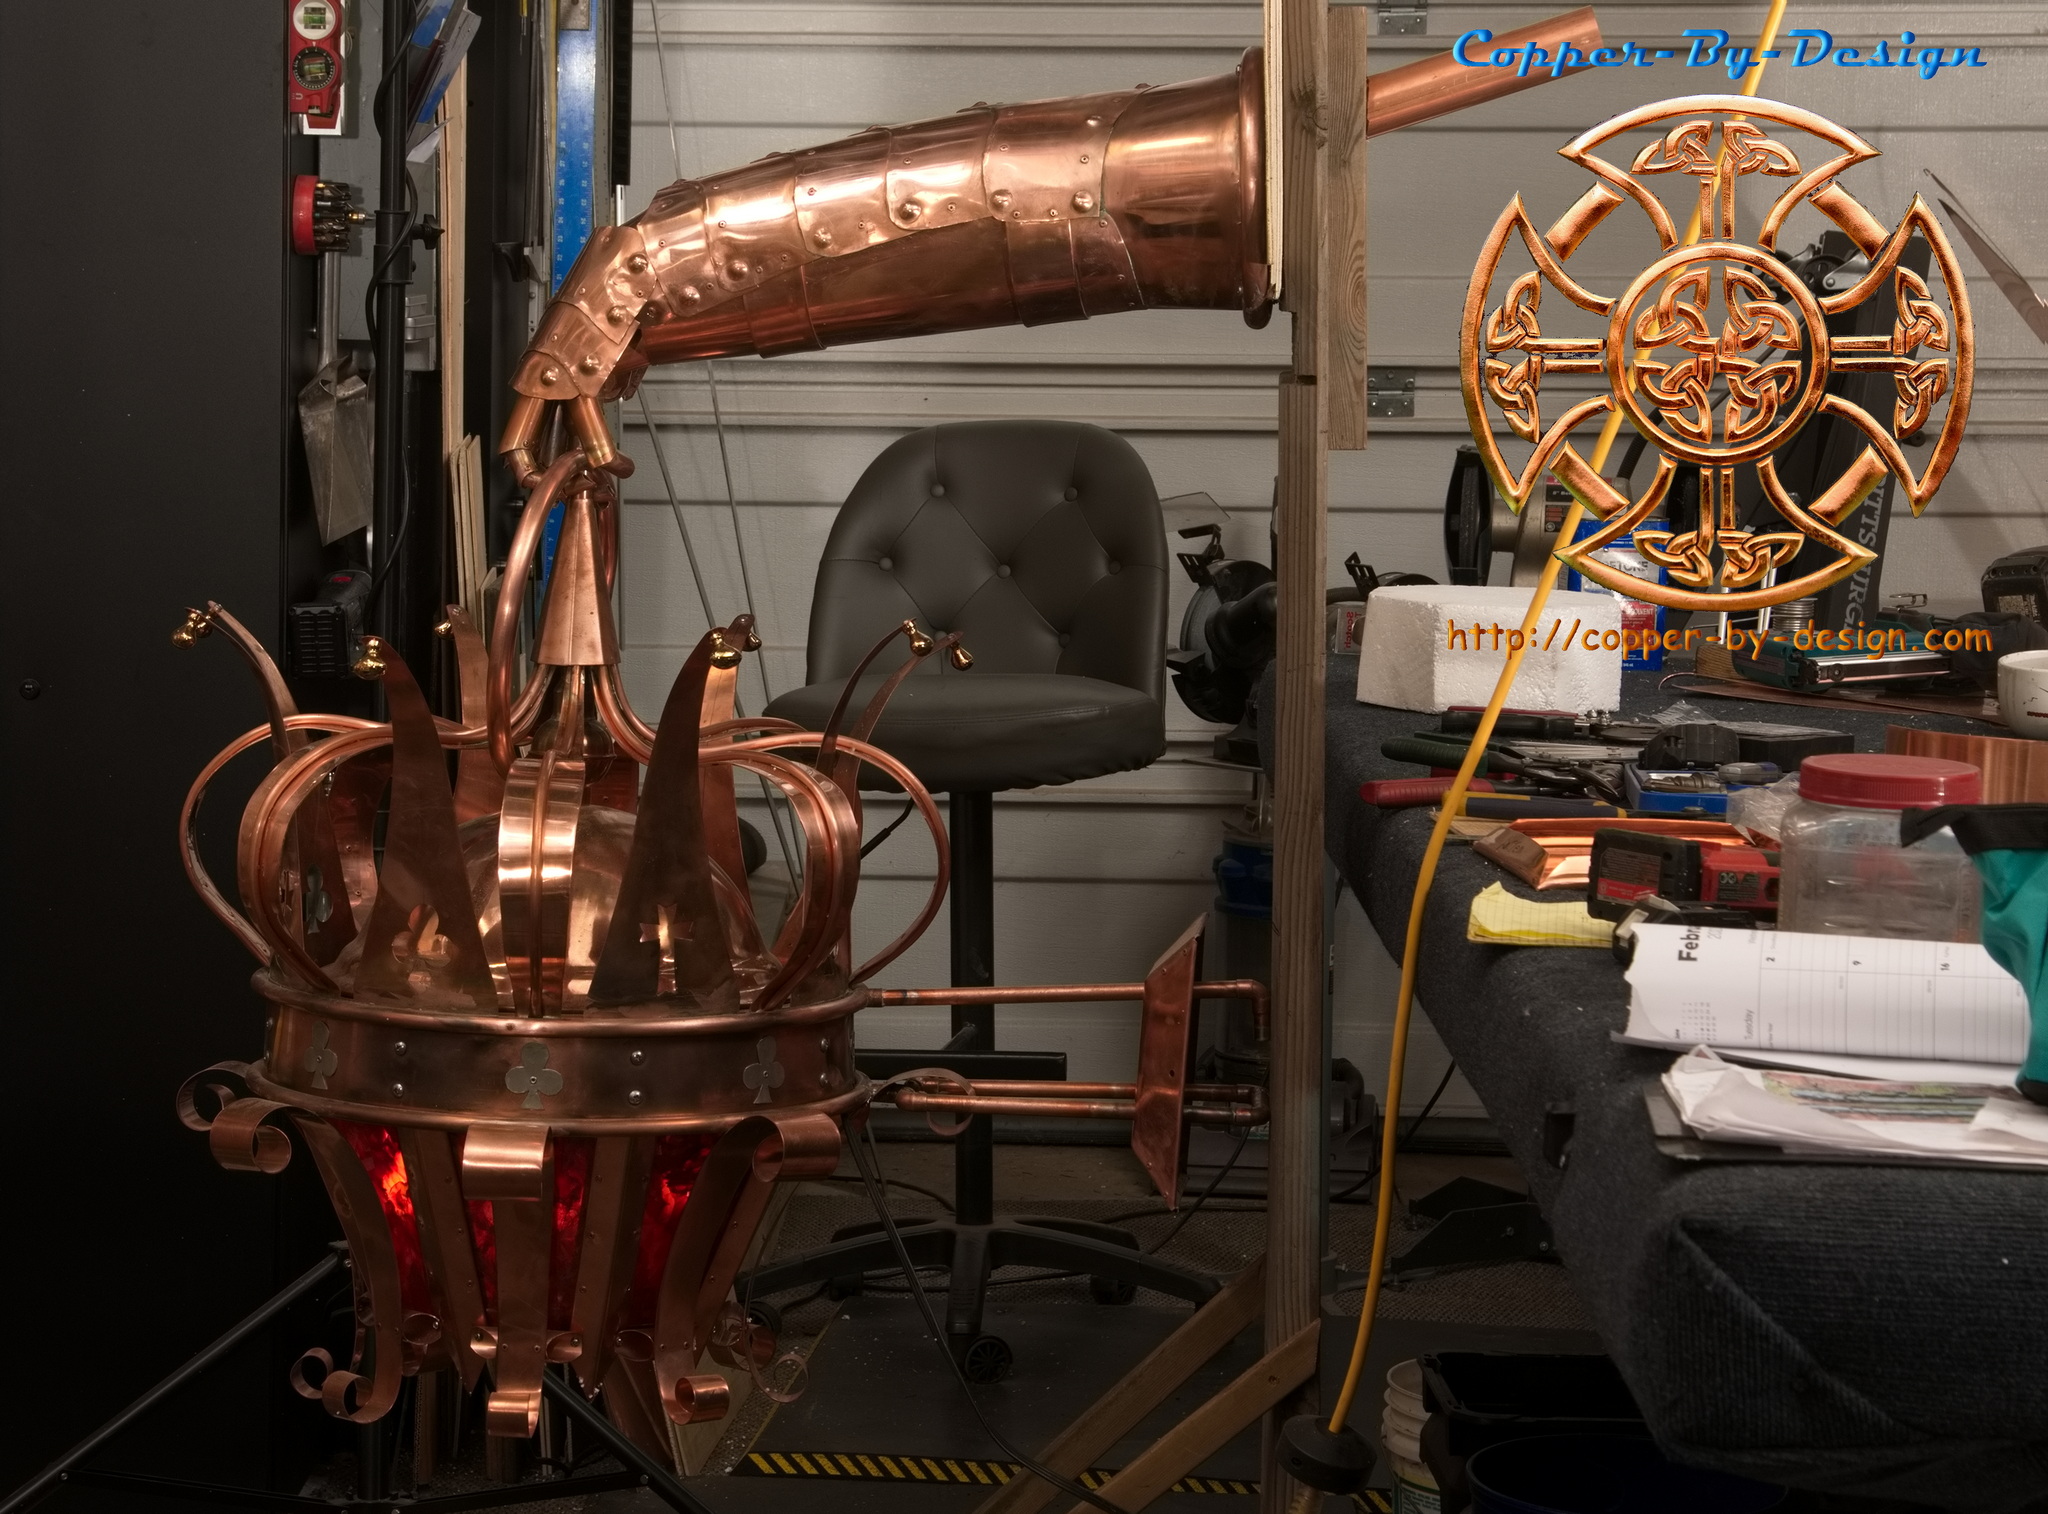
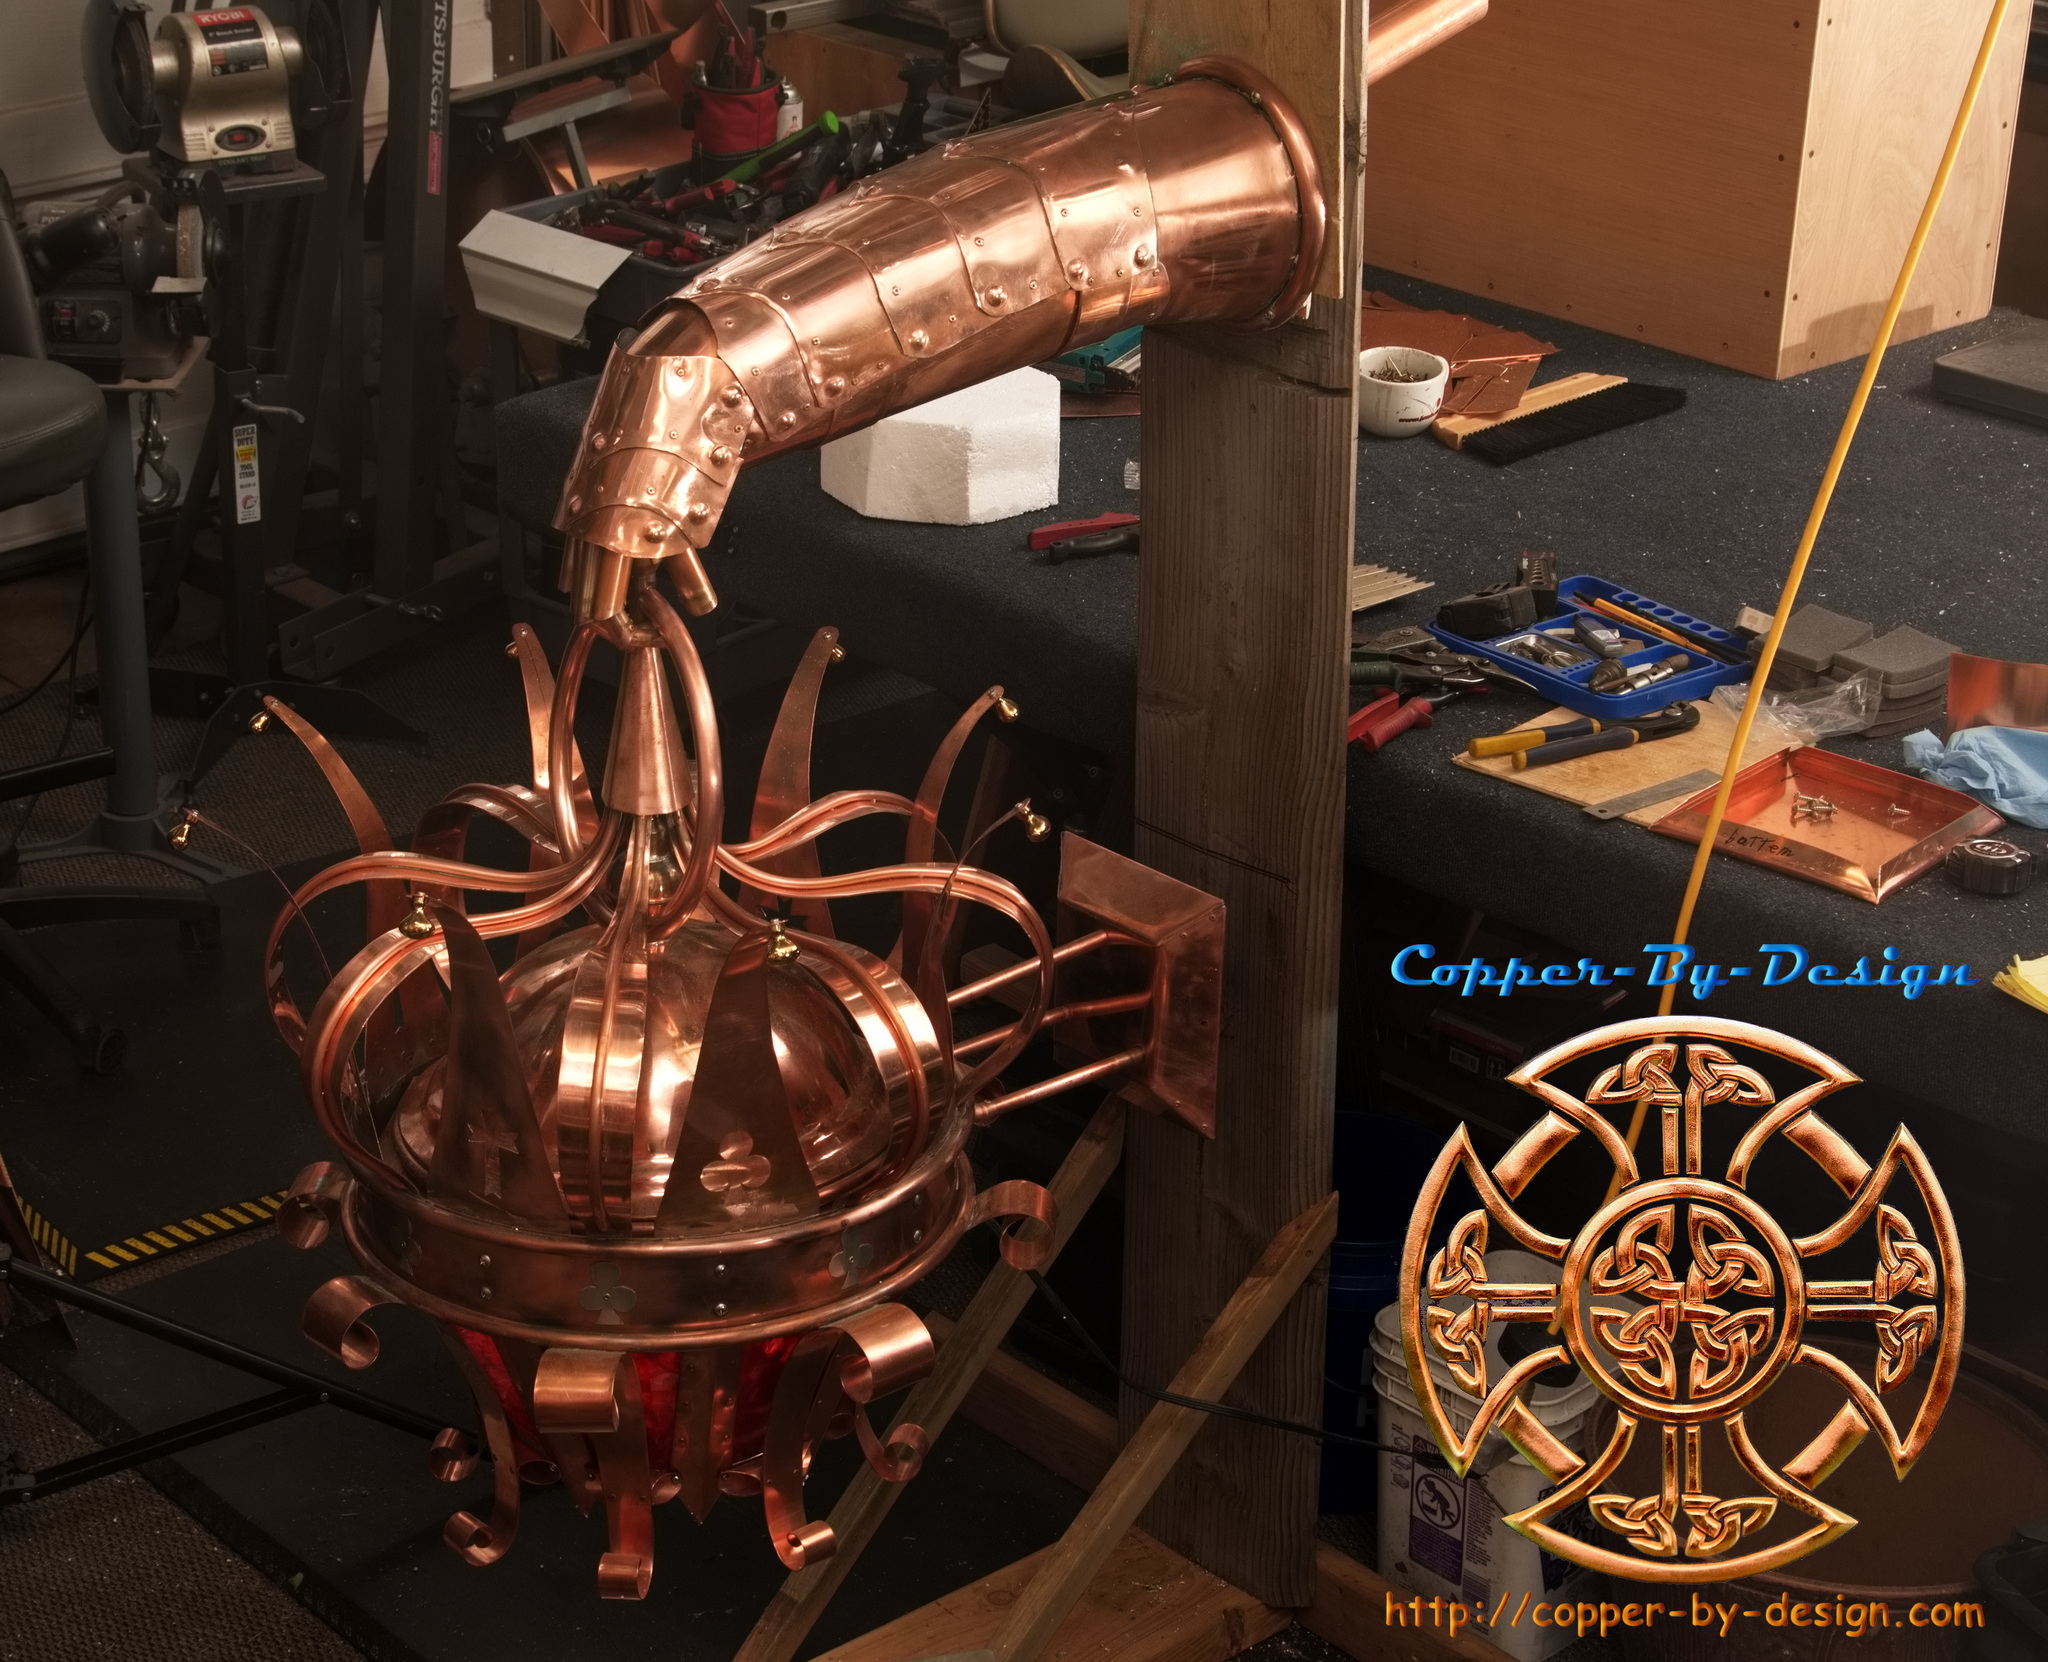
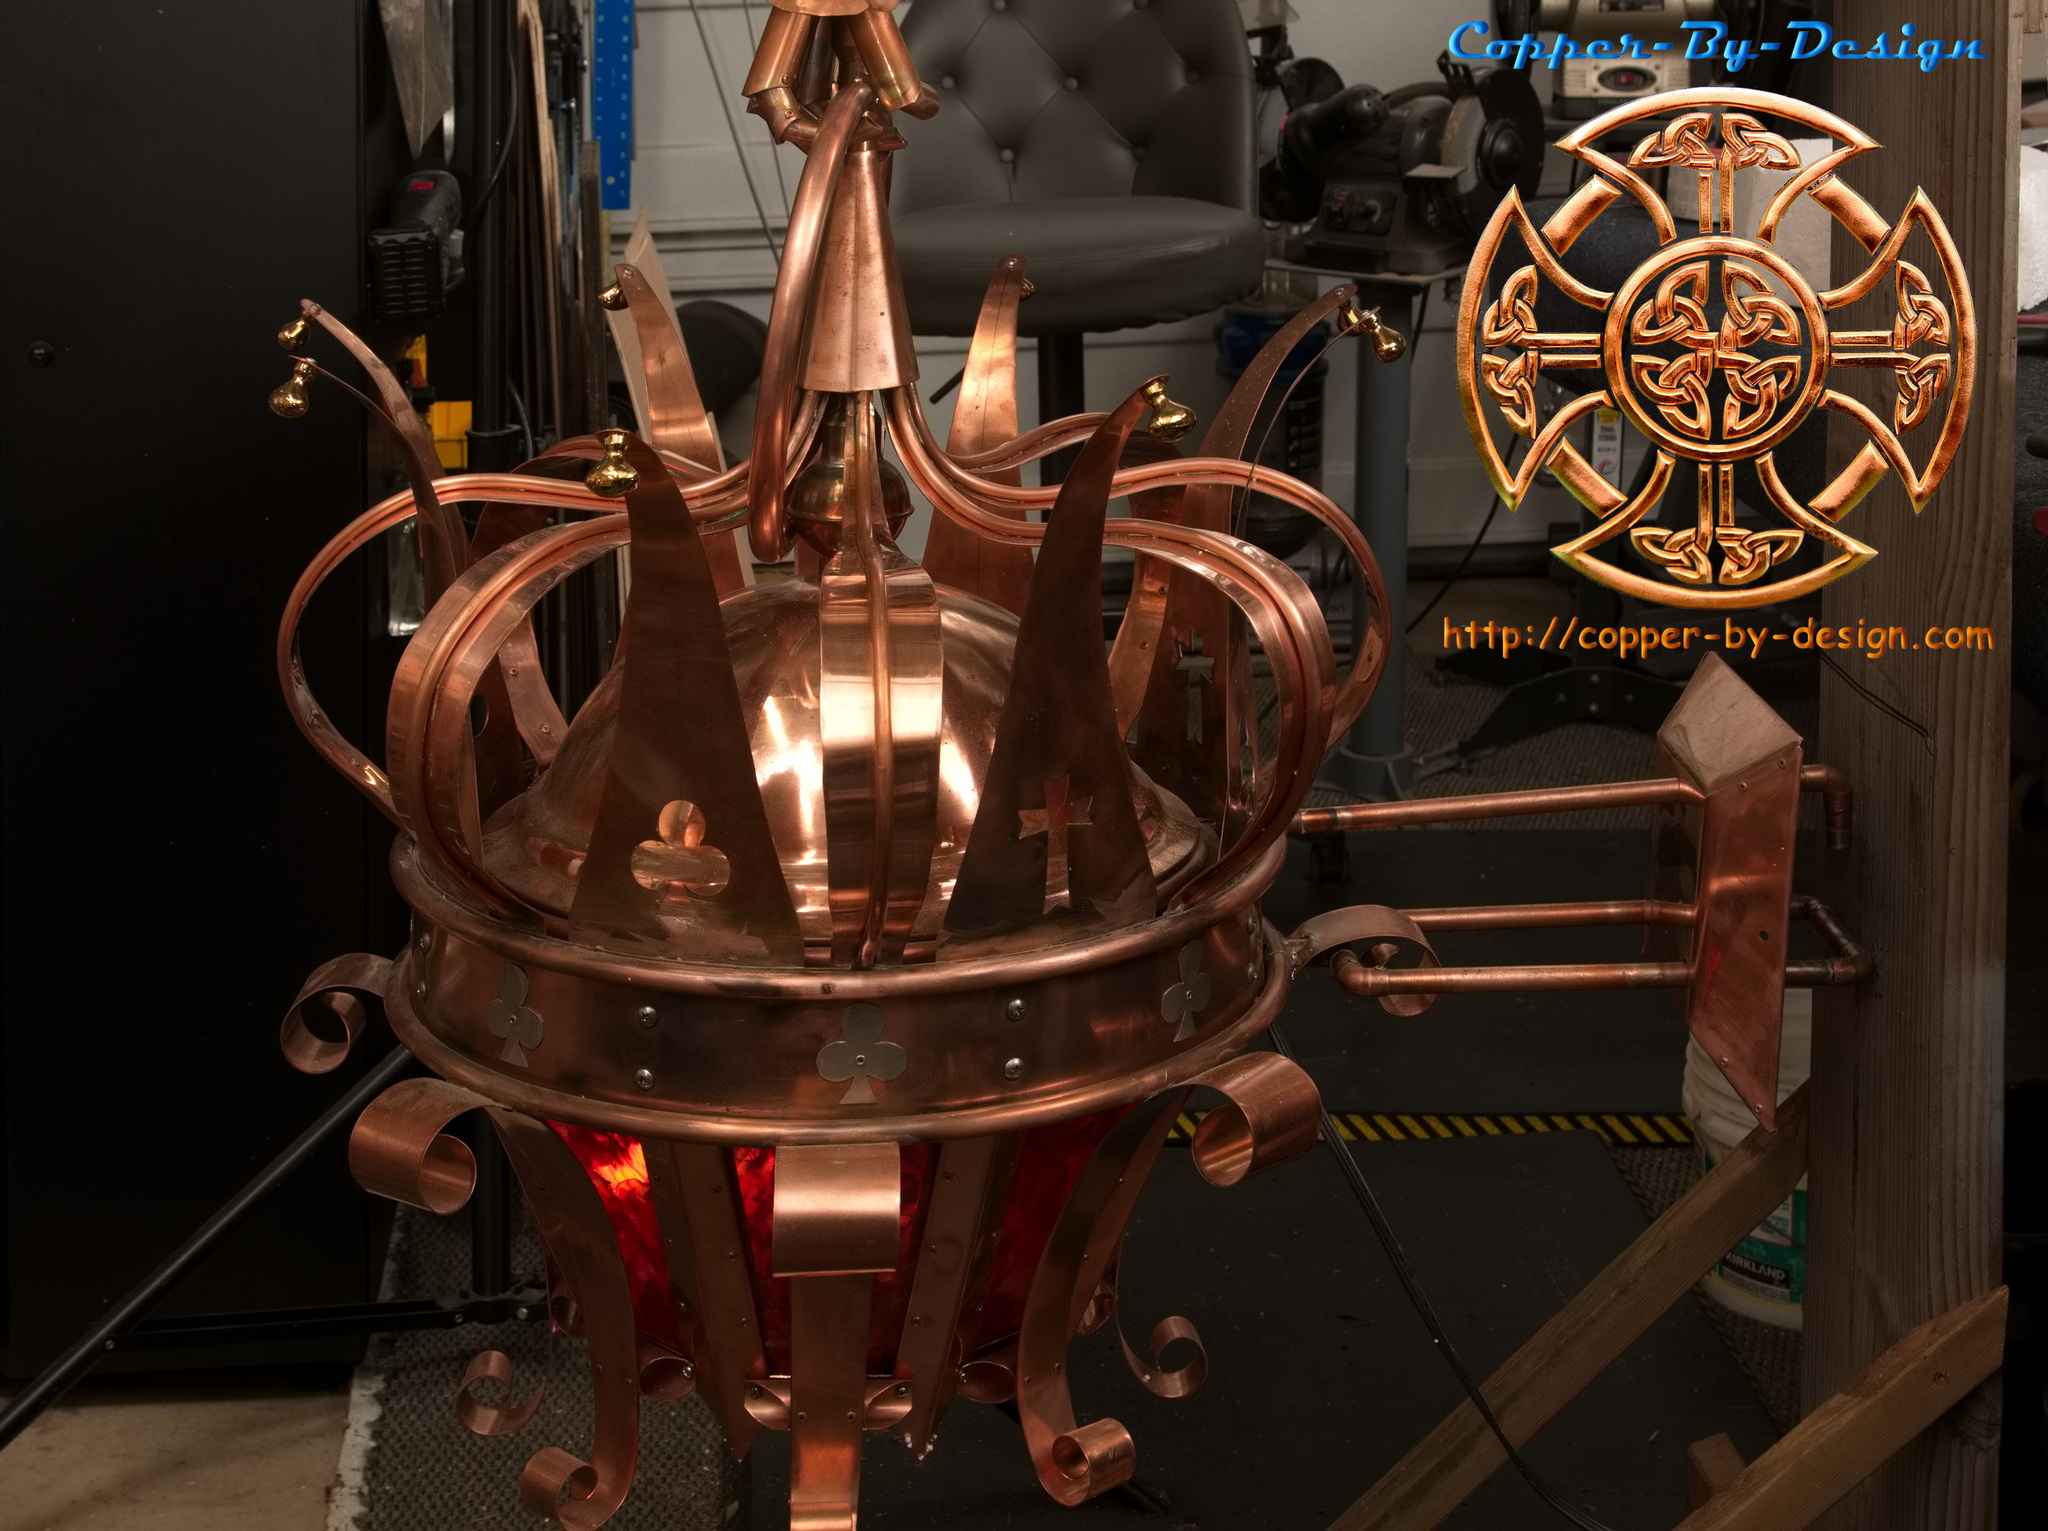
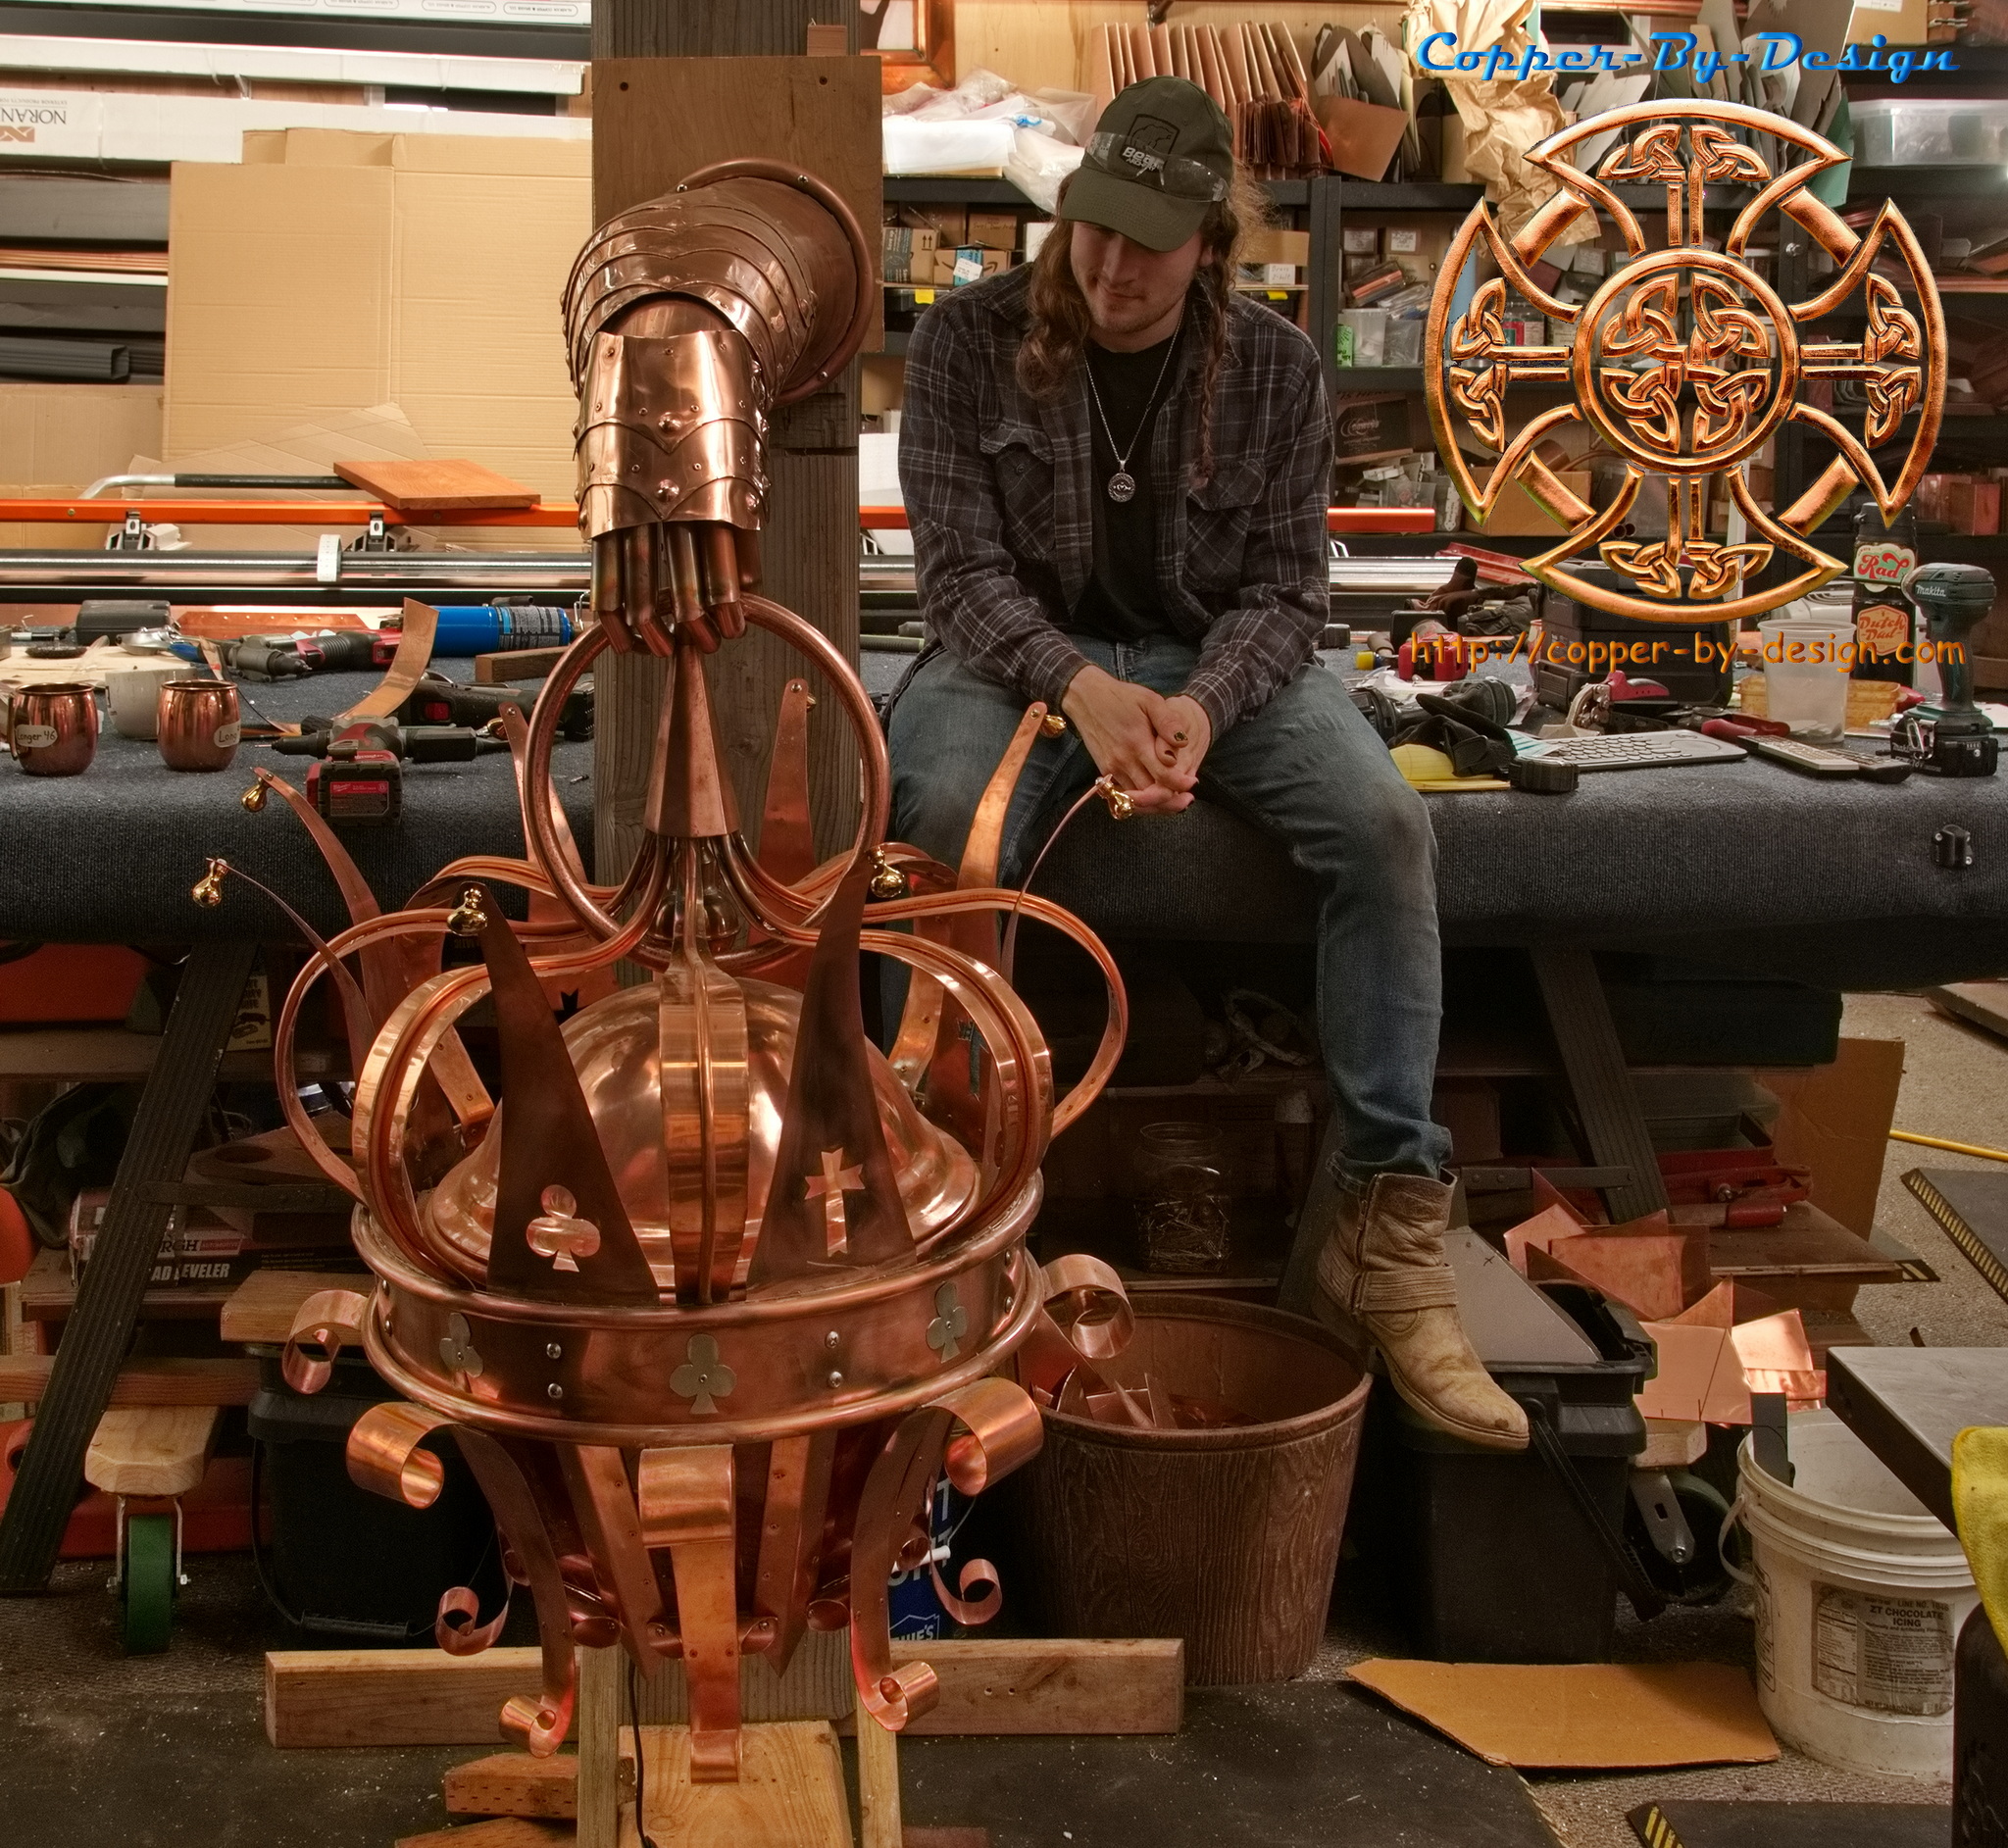
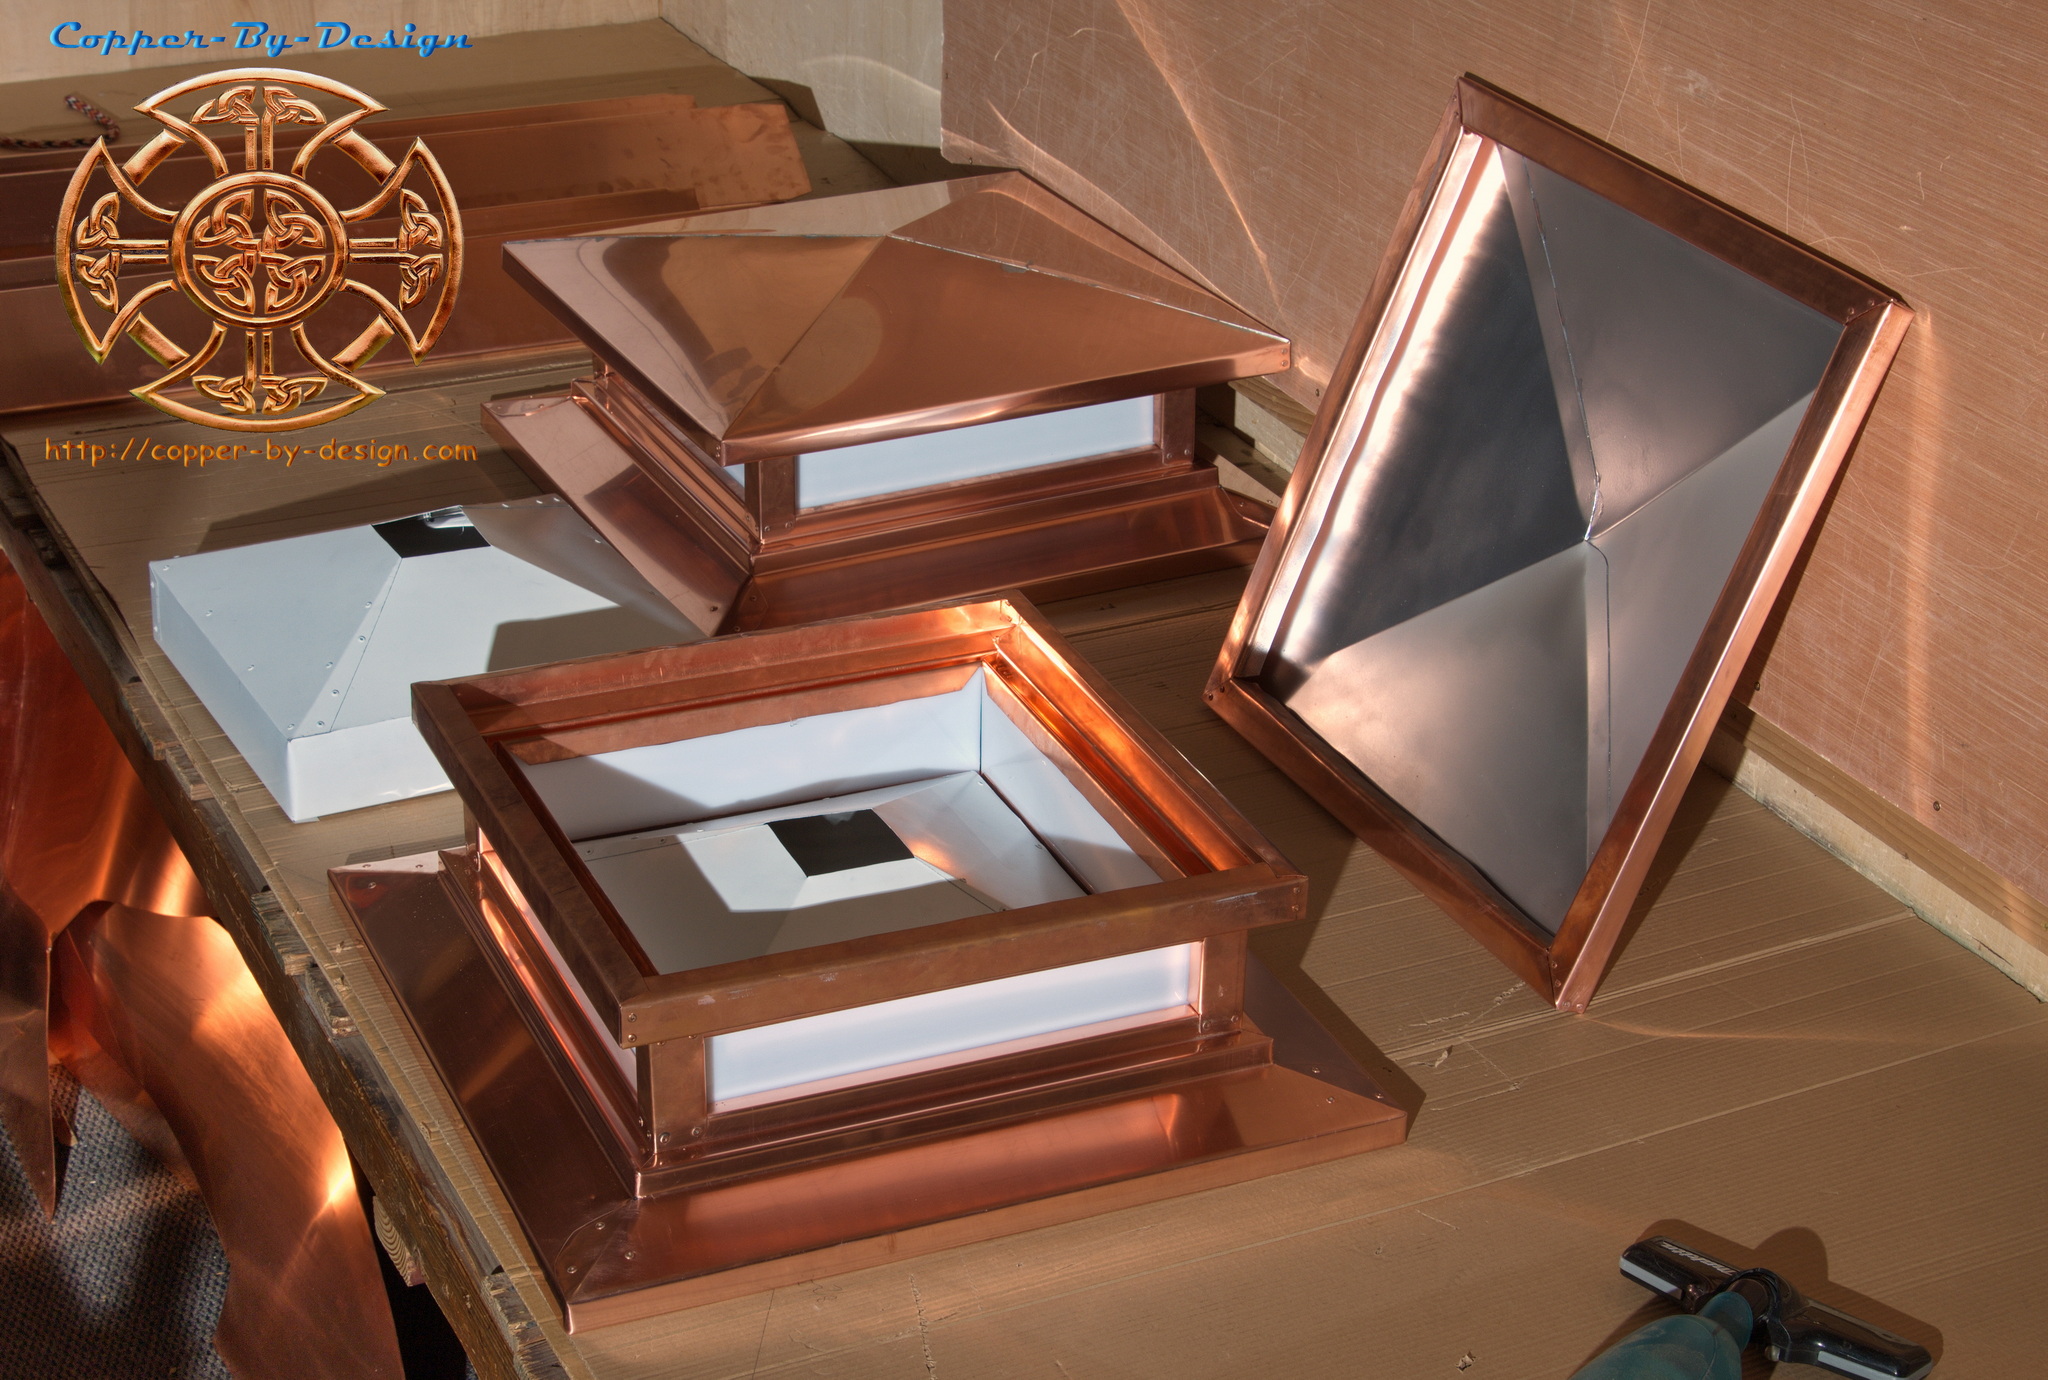
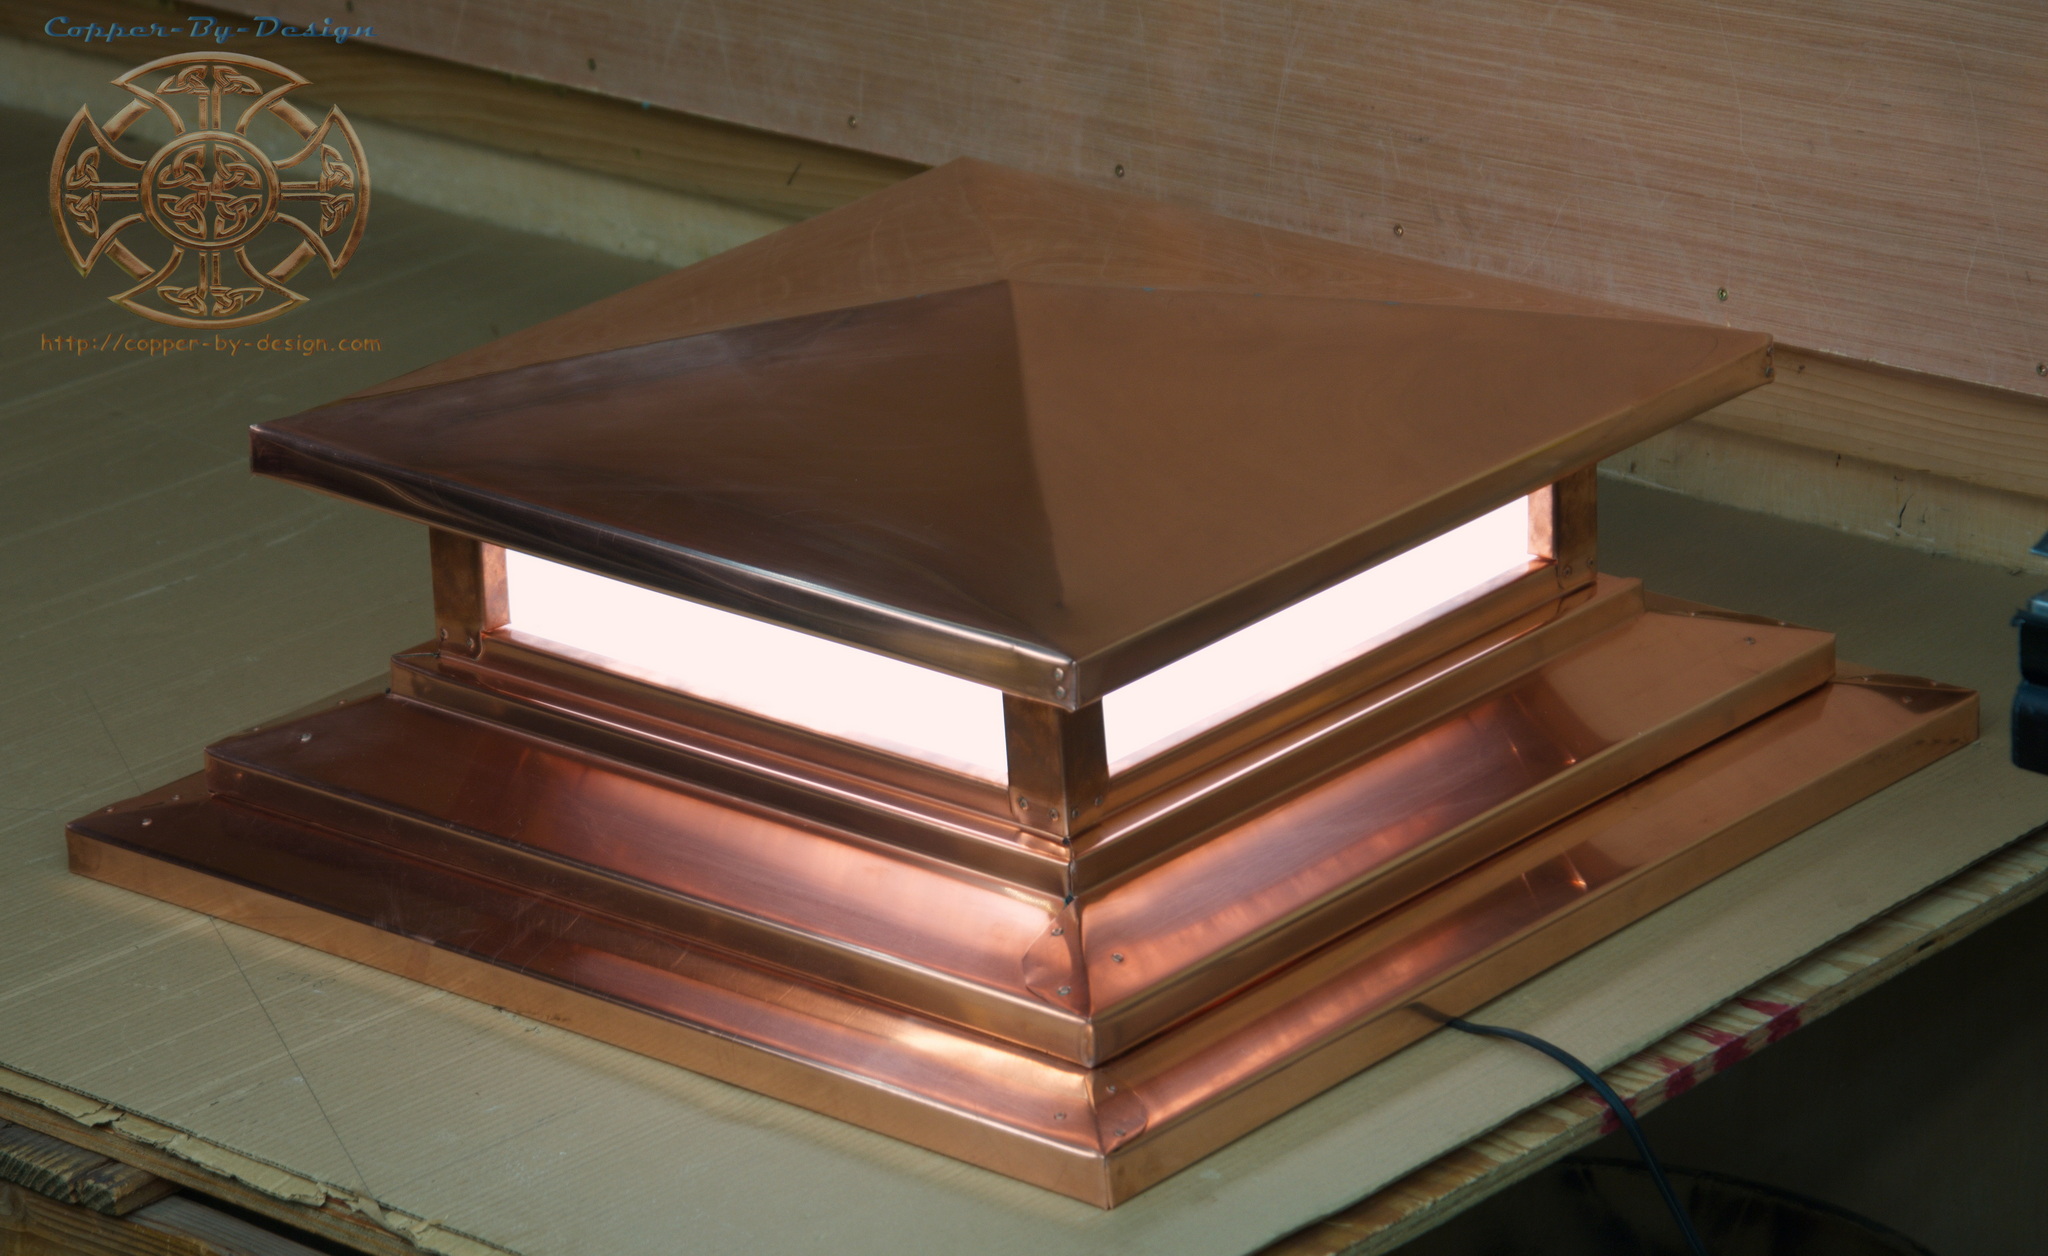
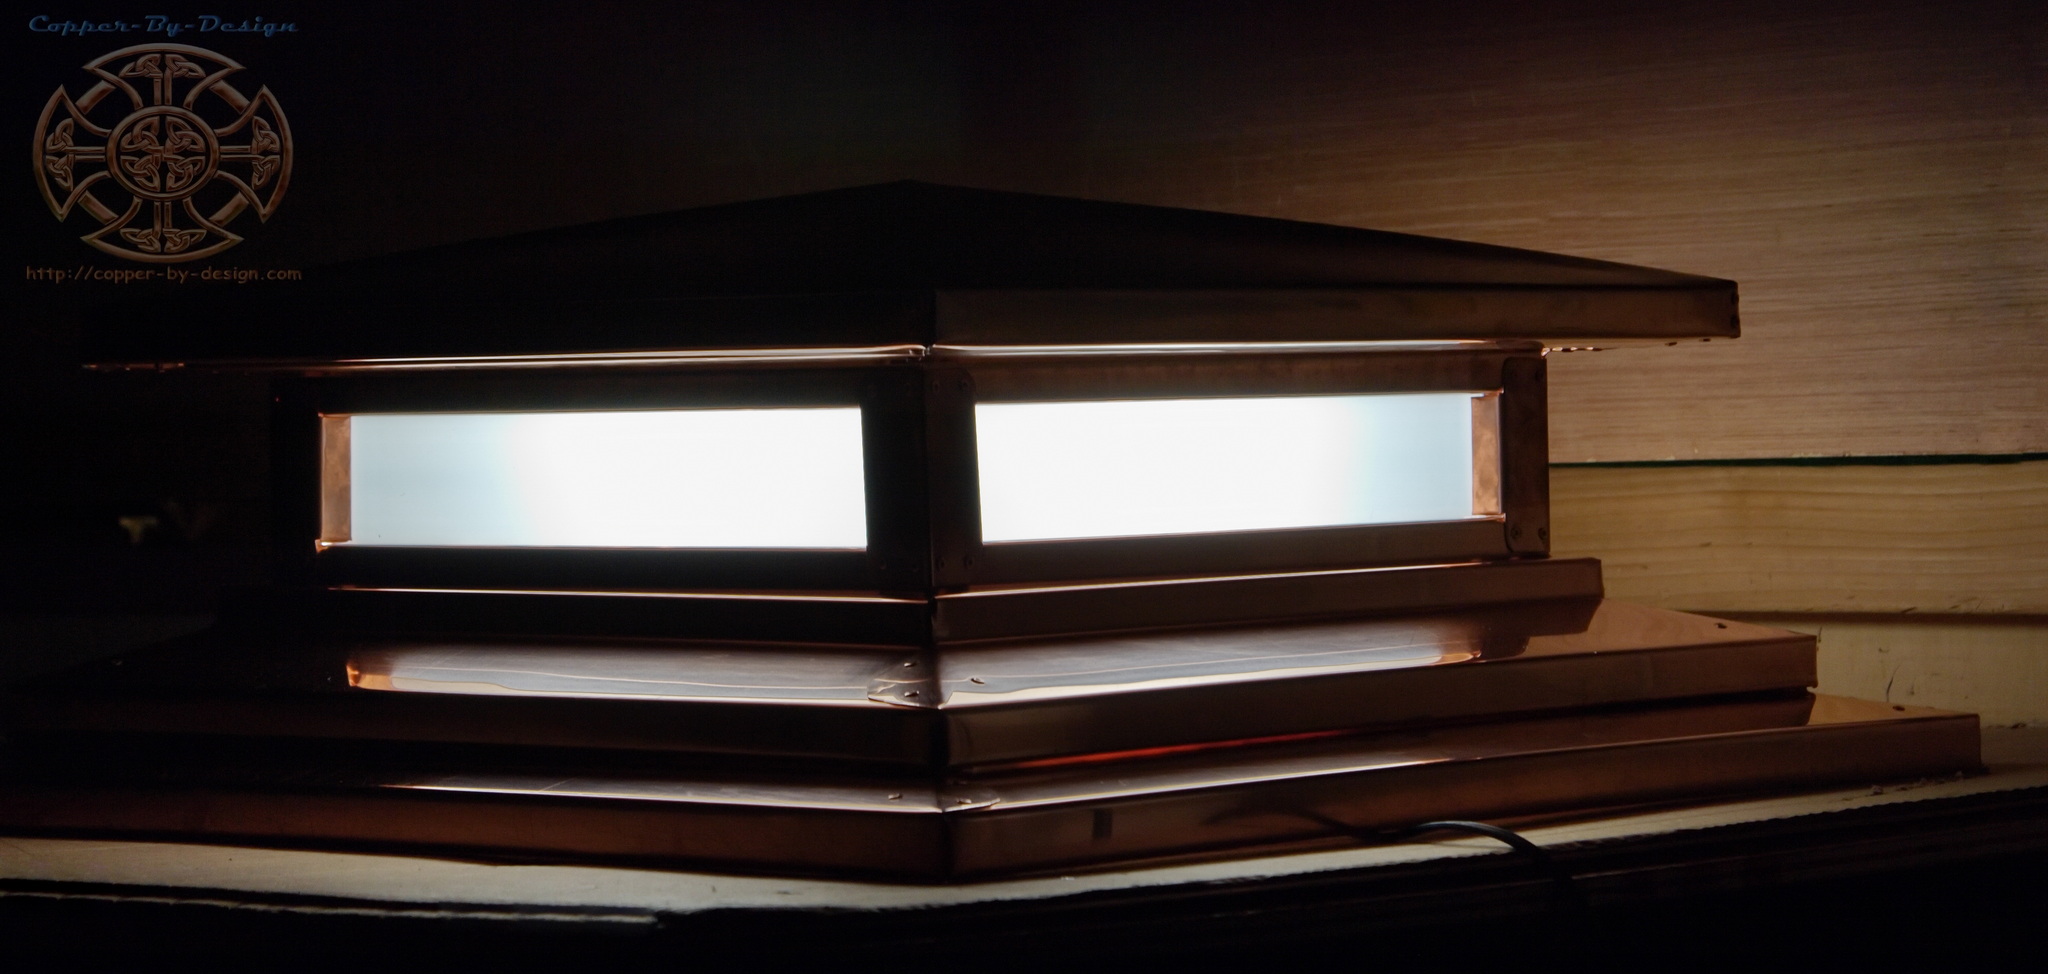
| Black's Set of 4 Crown Style Lanterns (2022) |
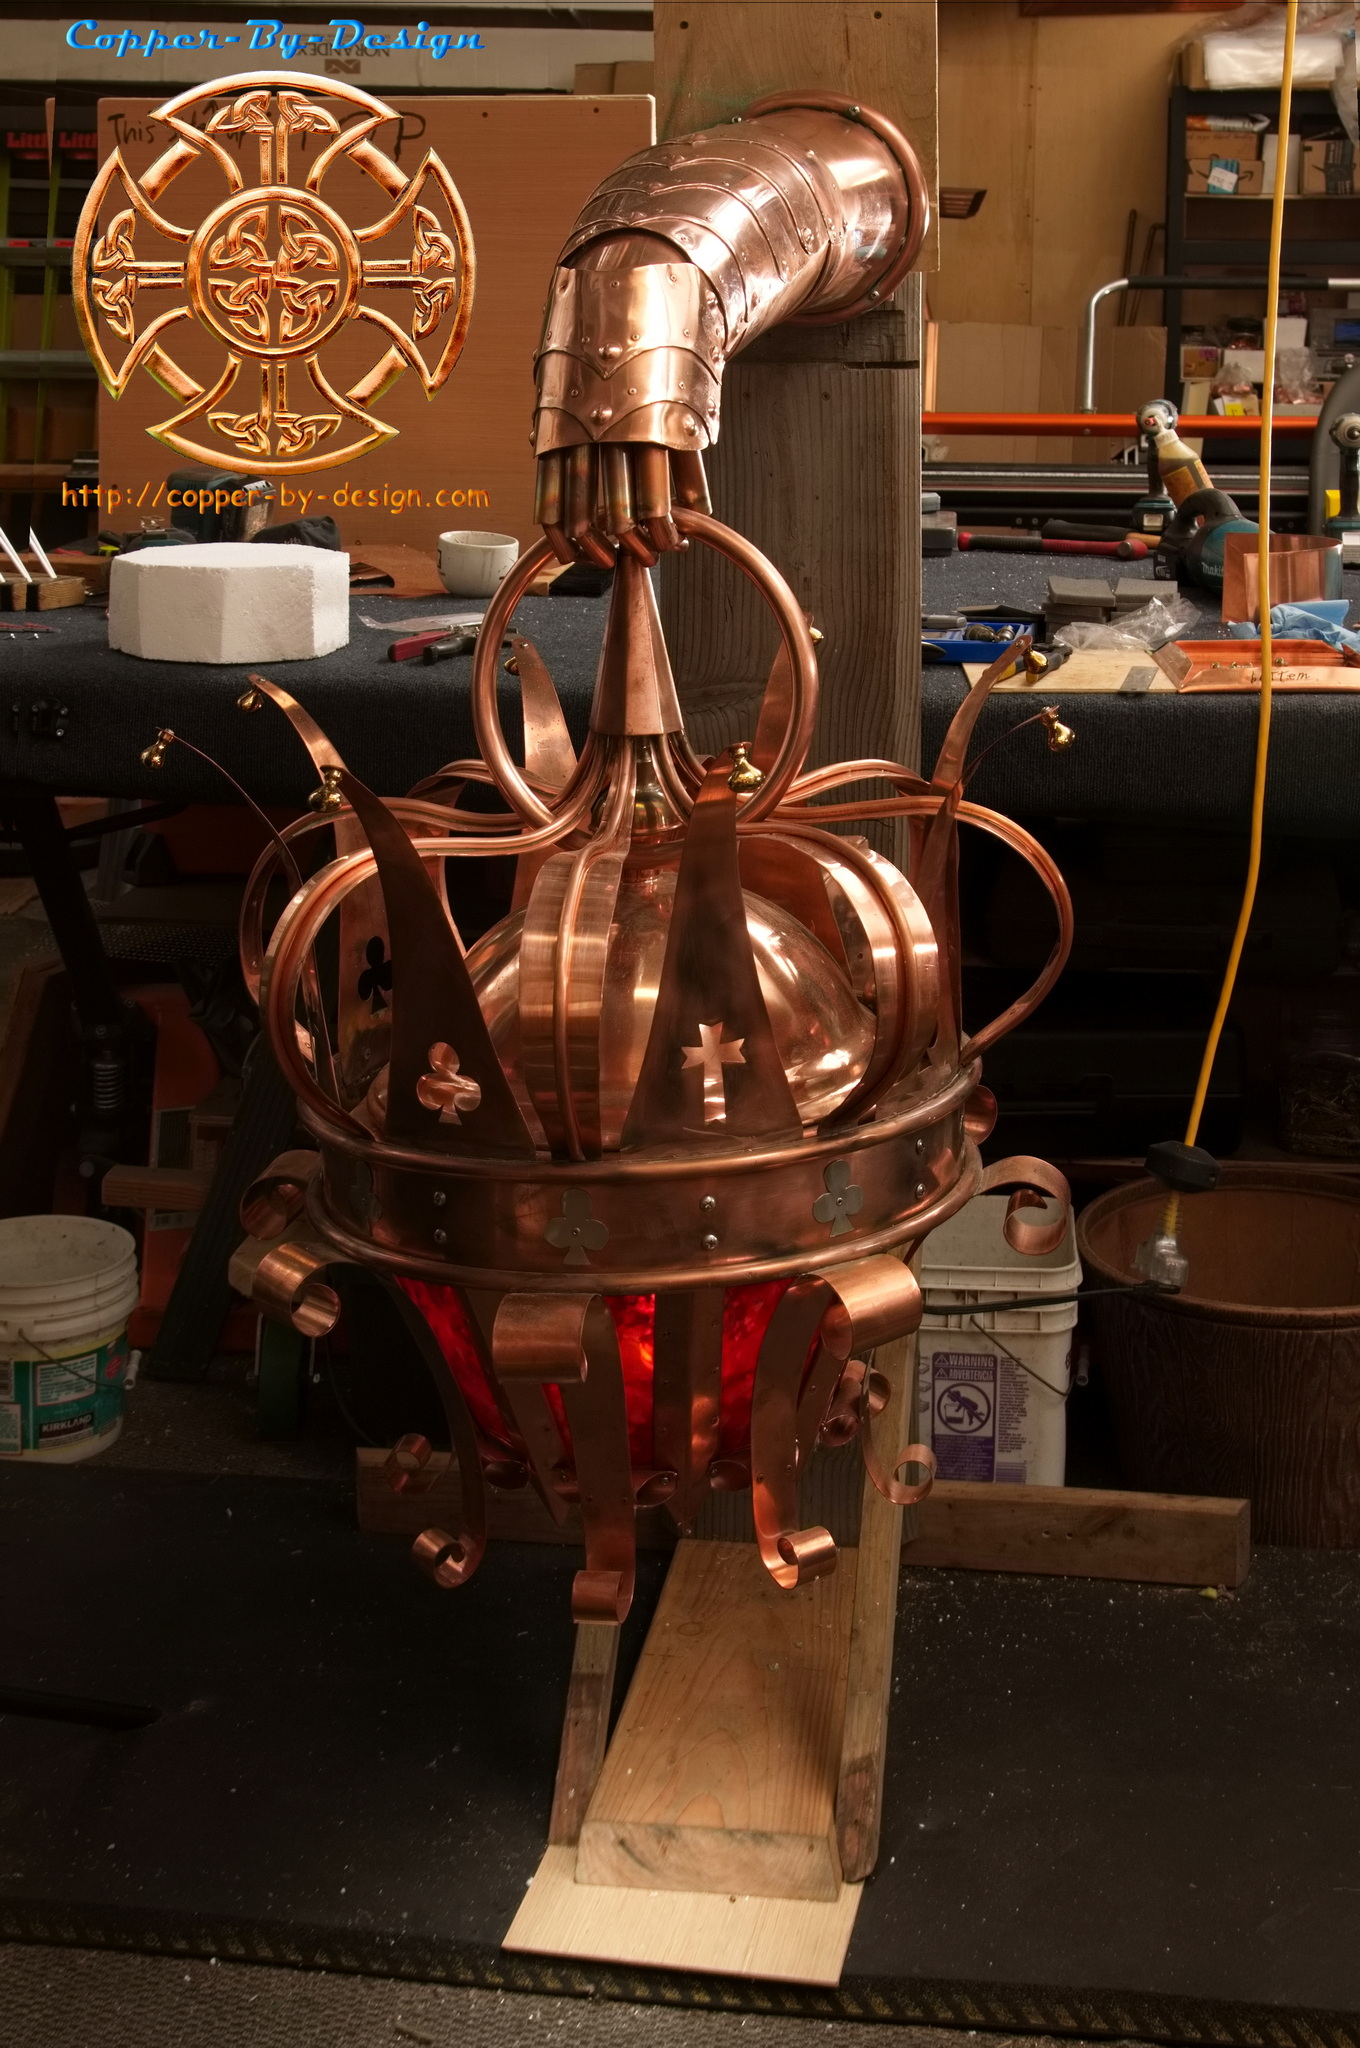 We had designed and built a custom copper chimney cap for
Kelly & Lisa Black in Skiatook Oklahoma back in early 2018, which he
reports has withstood gale force windstorms admirably. They love this
design so well that a couple years later they had commissioned for us to
do the same detailed crowns as outdoor lanterns, just scaled down to hlf
that size. For the scope of a project like this, we were looking at around
4-months to make all 4 units at the cost of $5k each including the LED
bulbs, wiring, wall mount, crate, and truck freight to Oklahoma. Although,
it dragged out much longer, while we had gutter jobs to do and other
custom copper projects to fit in. We started this project on 9/23/21 and
shipped them out on Halloween of 2022, so that was just over a year off
and on. We had designed and built a custom copper chimney cap for
Kelly & Lisa Black in Skiatook Oklahoma back in early 2018, which he
reports has withstood gale force windstorms admirably. They love this
design so well that a couple years later they had commissioned for us to
do the same detailed crowns as outdoor lanterns, just scaled down to hlf
that size. For the scope of a project like this, we were looking at around
4-months to make all 4 units at the cost of $5k each including the LED
bulbs, wiring, wall mount, crate, and truck freight to Oklahoma. Although,
it dragged out much longer, while we had gutter jobs to do and other
custom copper projects to fit in. We started this project on 9/23/21 and
shipped them out on Halloween of 2022, so that was just over a year off
and on. |
        |
  |
  |
|
The cost was $20k total delivered, or $5k each To see all 233 photos for this project go to my Facebook Albums |
 |
.
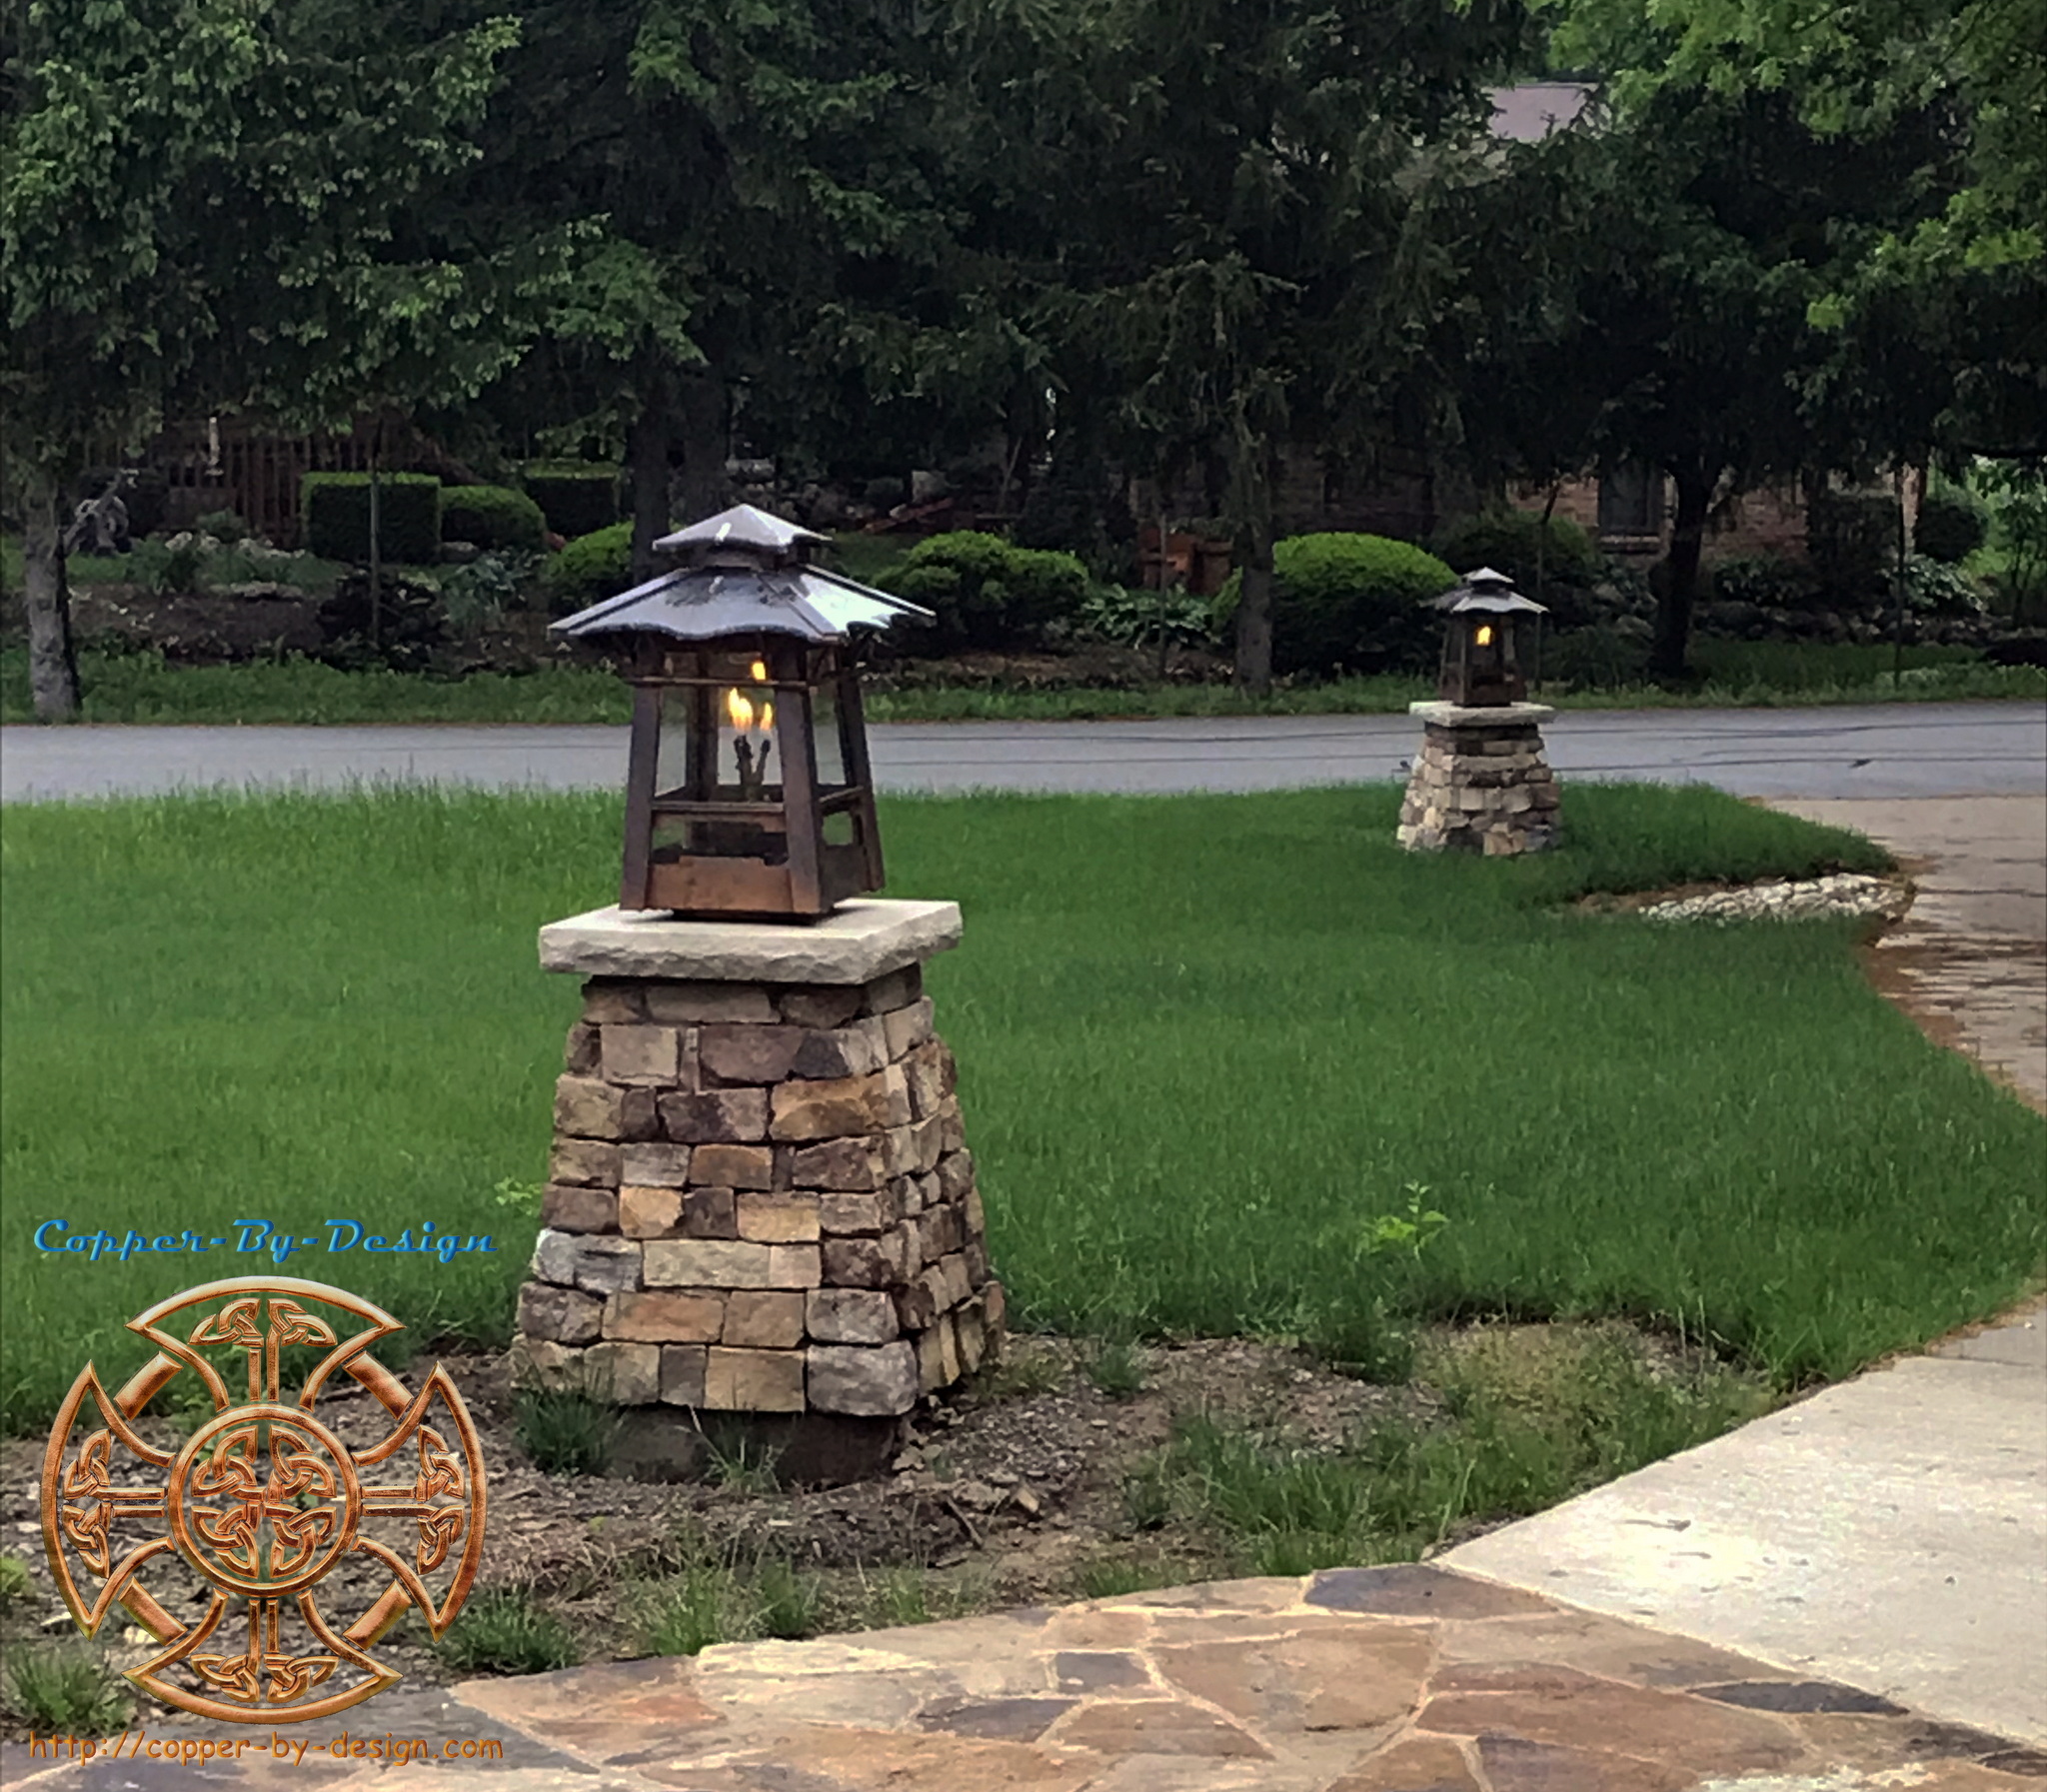
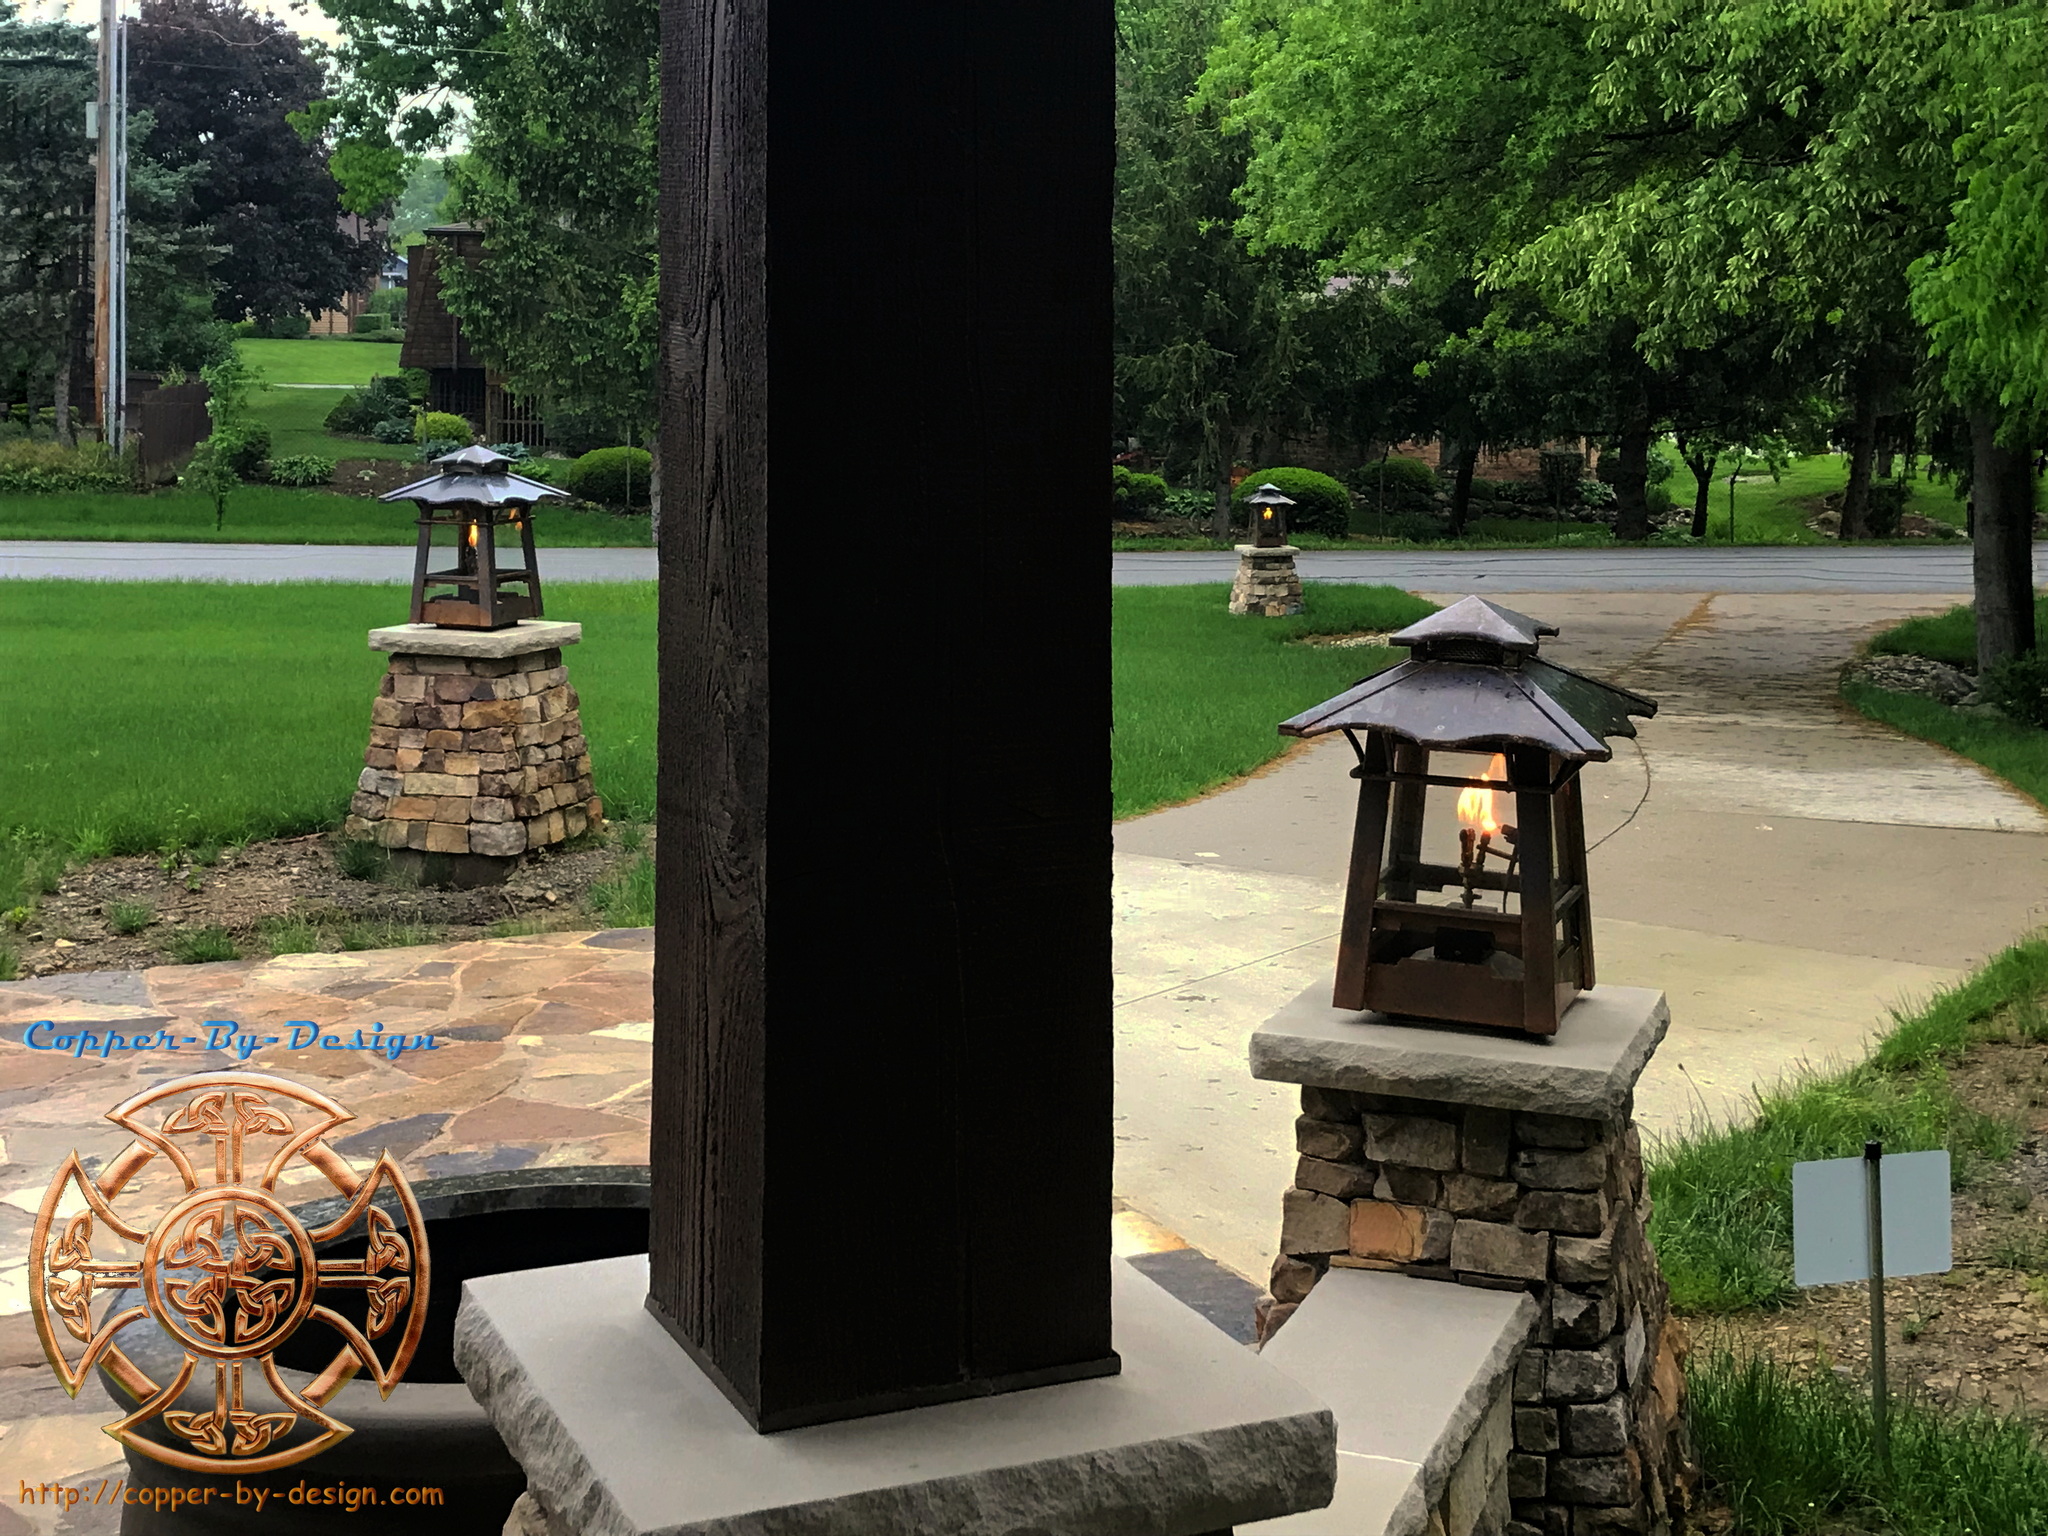
| Larsen Set of 2 Gate Column Lanterns (2019) |
| These lamp post toppers were for a past client Atom Larsen in Sandy Oregon, to cover the entry gate columns. We had replaced their gutters with copper, made them a pair of chimney caps, a fire pit cover, roof flashing, and a vented ridge. |
  |
  |
|
The cost was $2,878.72 total for both, or $1,439.36 each To see all 175 photos for their chimney cap project go to my Facebook Albums |
.
| Lighted Cupola w/Weathervane Mount (2008) | ||
|
This is a matching cupola to a set of chimney caps
made in my Tuscany arch style for Scott Matovich in Setauket,
New York. I made this with a taller base to sit on the roof. I had to do something
a bit different with working out a soft glow light inside and rig
up the security flood light in the base. You can see more photos
at:
I experimented with several different systems to see what would work best. I ended up using a set of 2 bulbs that reflected off a shield above and a larger reflector below in the base. I also made a third white reflector up in the center of the cupola. I also had to build a strong weathervane support pipe in the roof. This project took me longer to build as the larger chimney cap above.
Total cost: $2,378.75 w/crate & shipping to Setauket, New York |
.
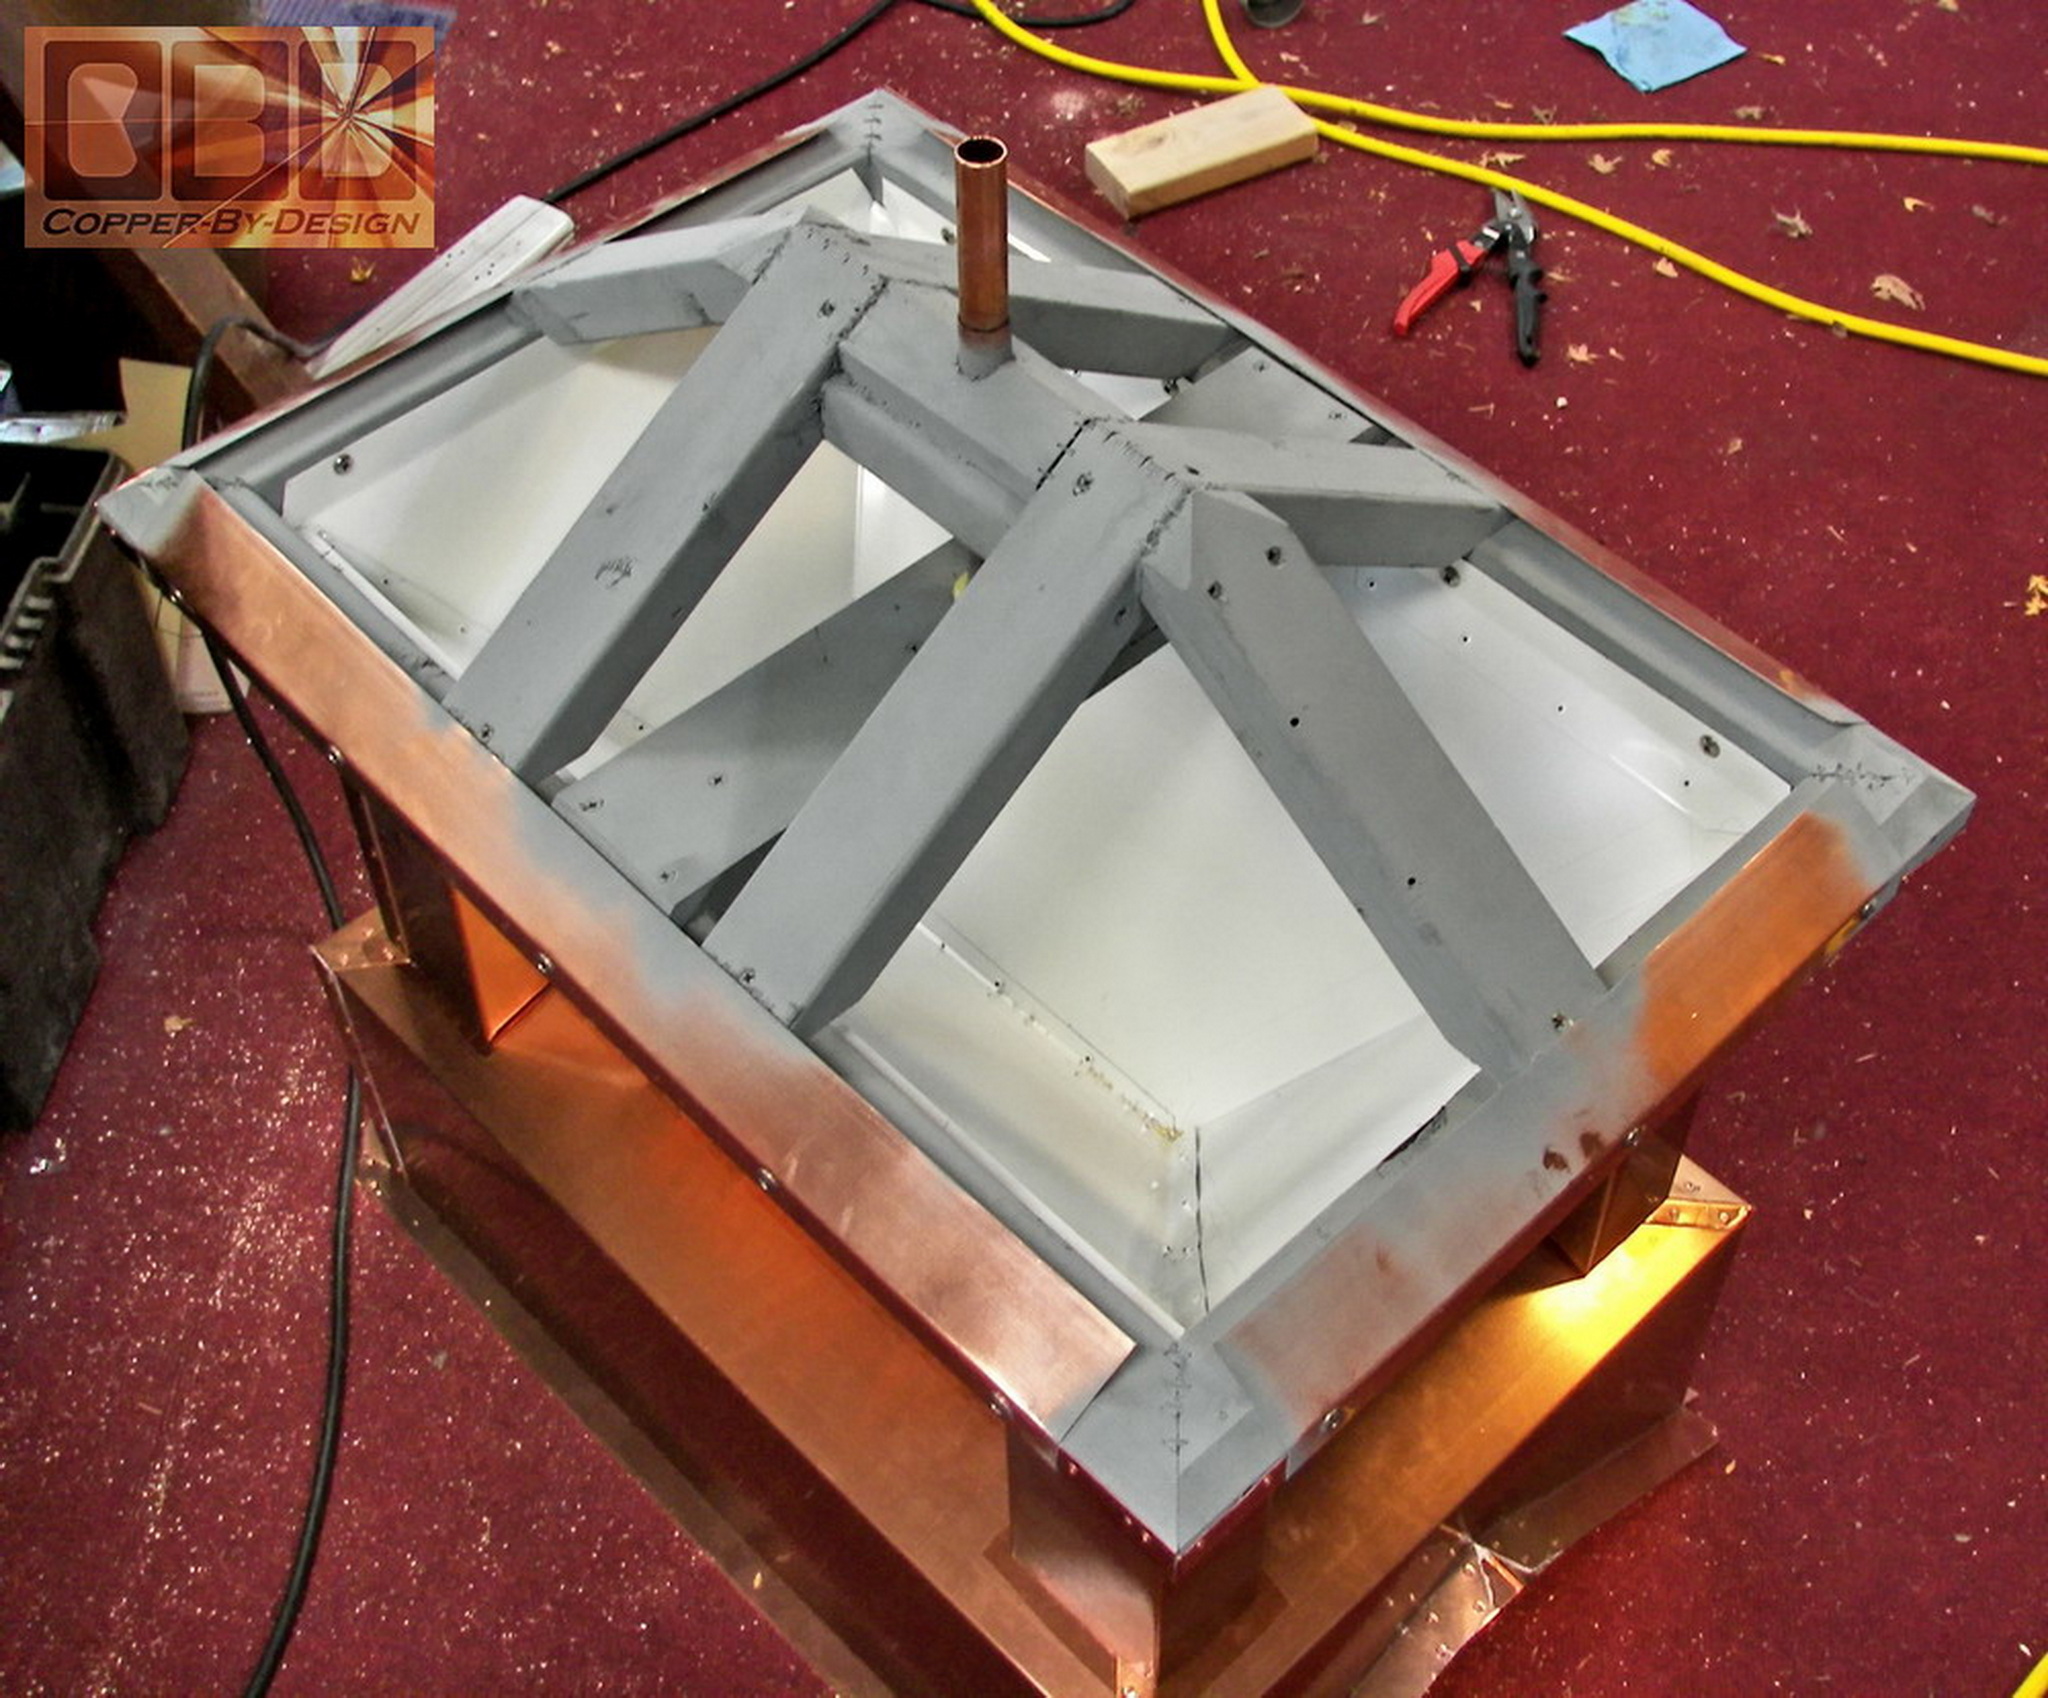
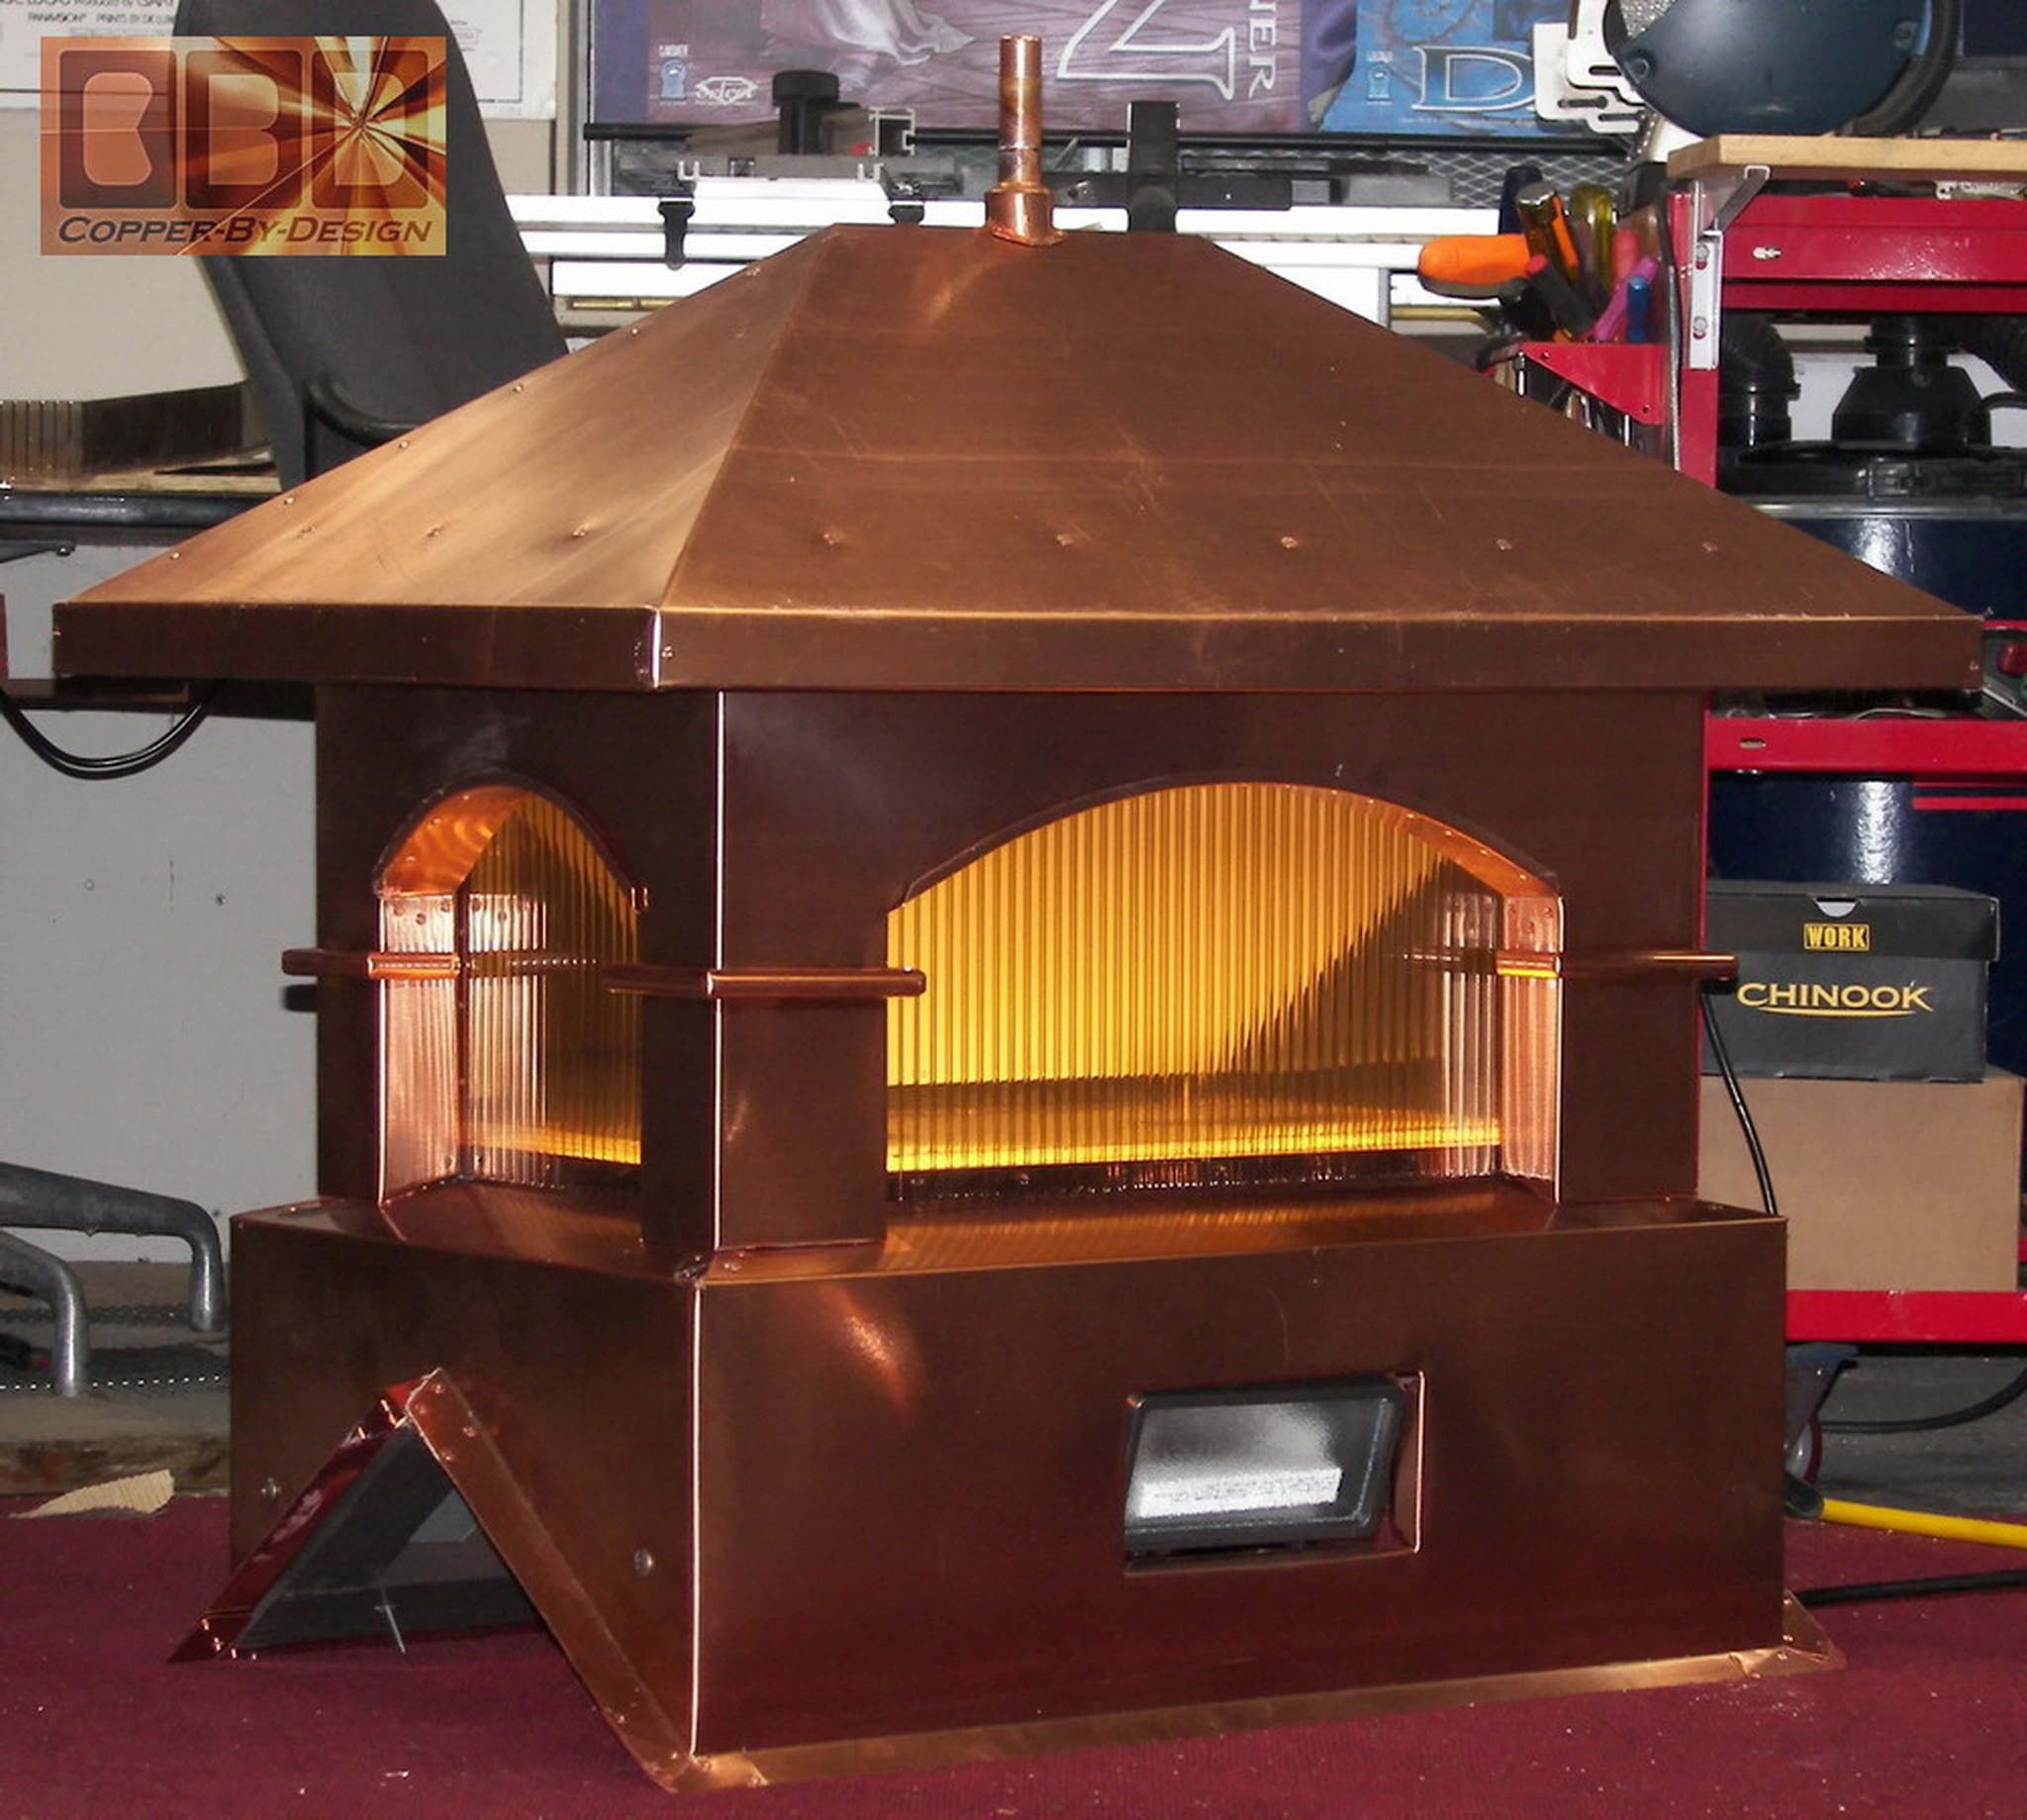
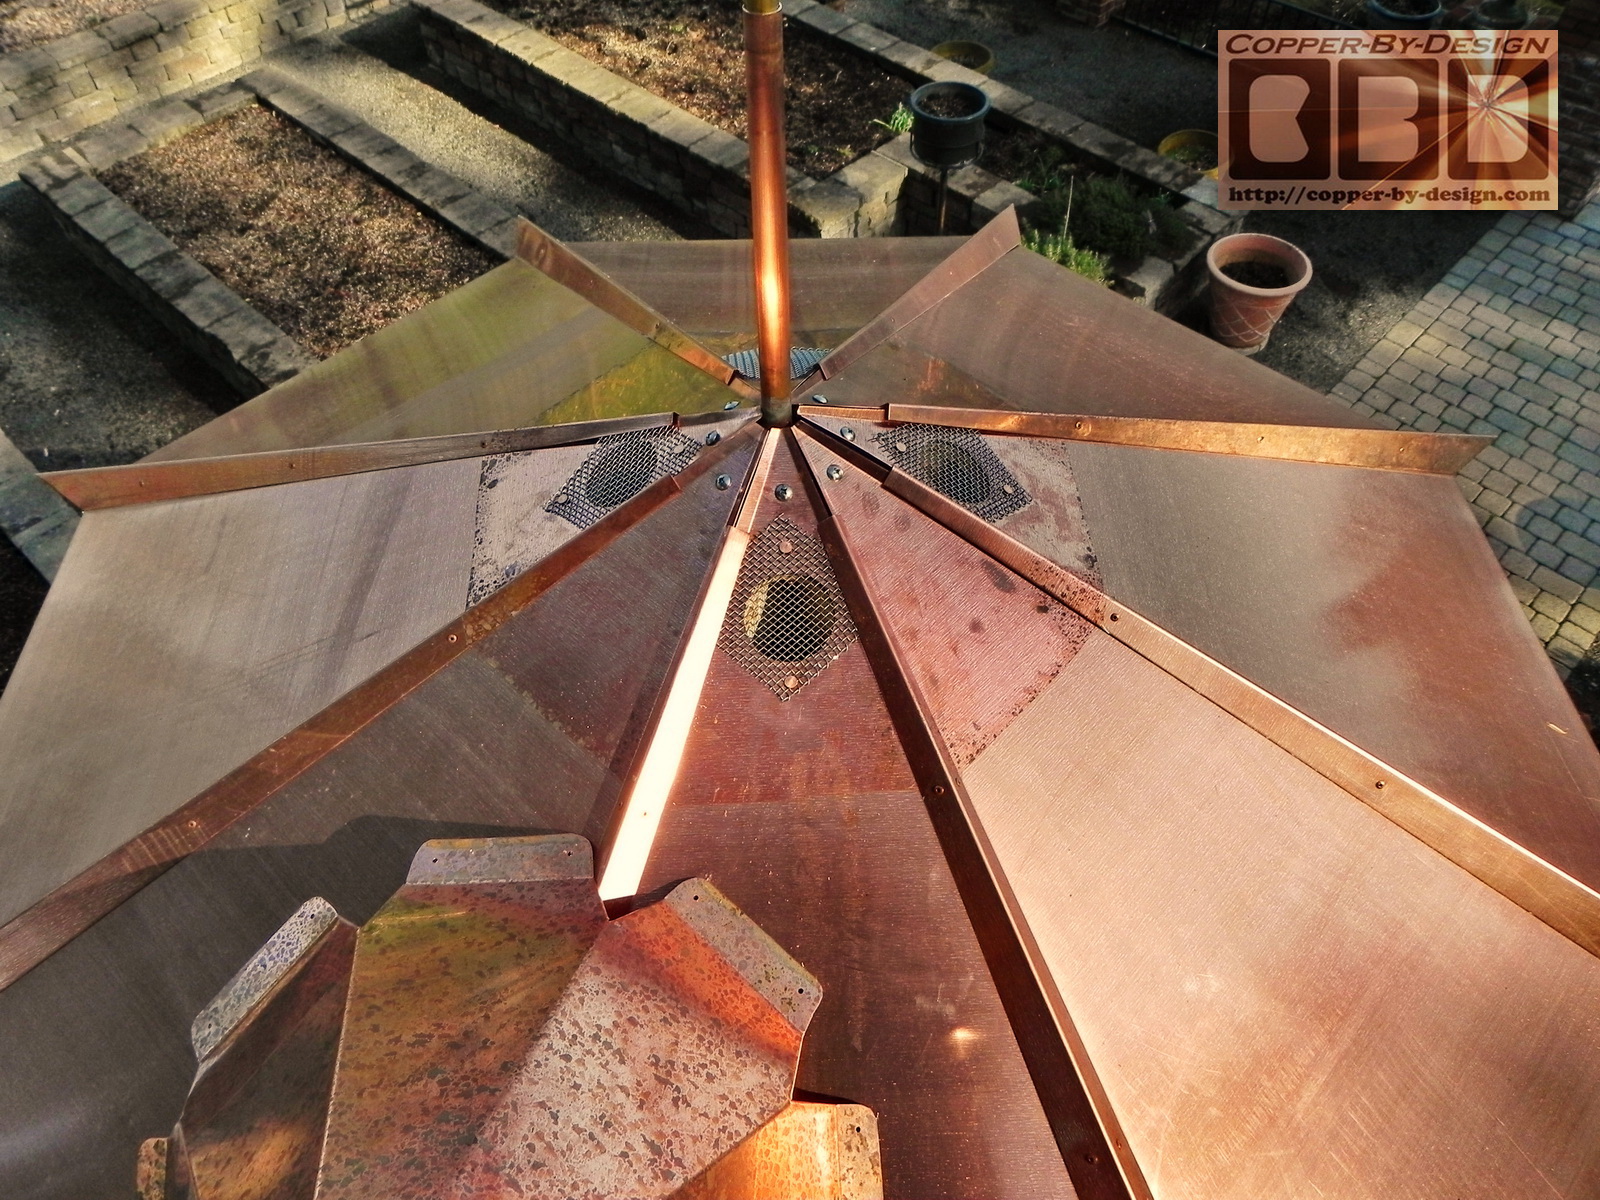
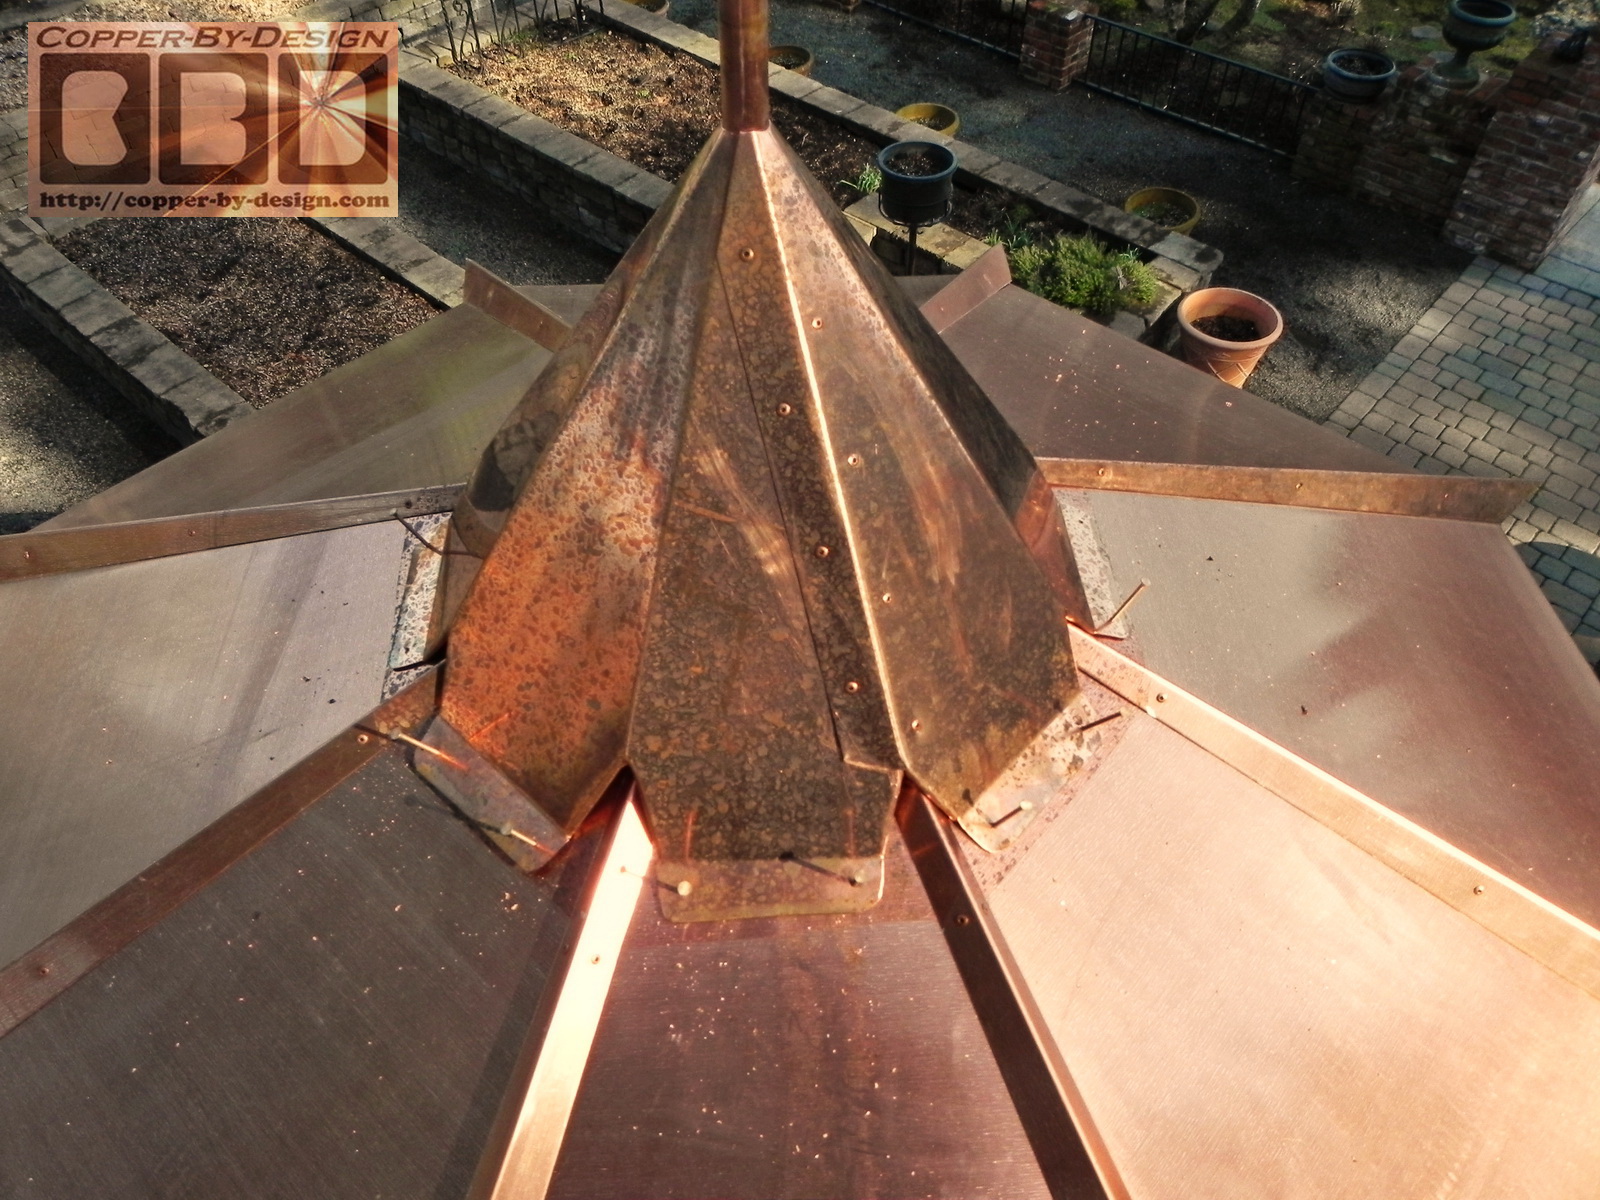
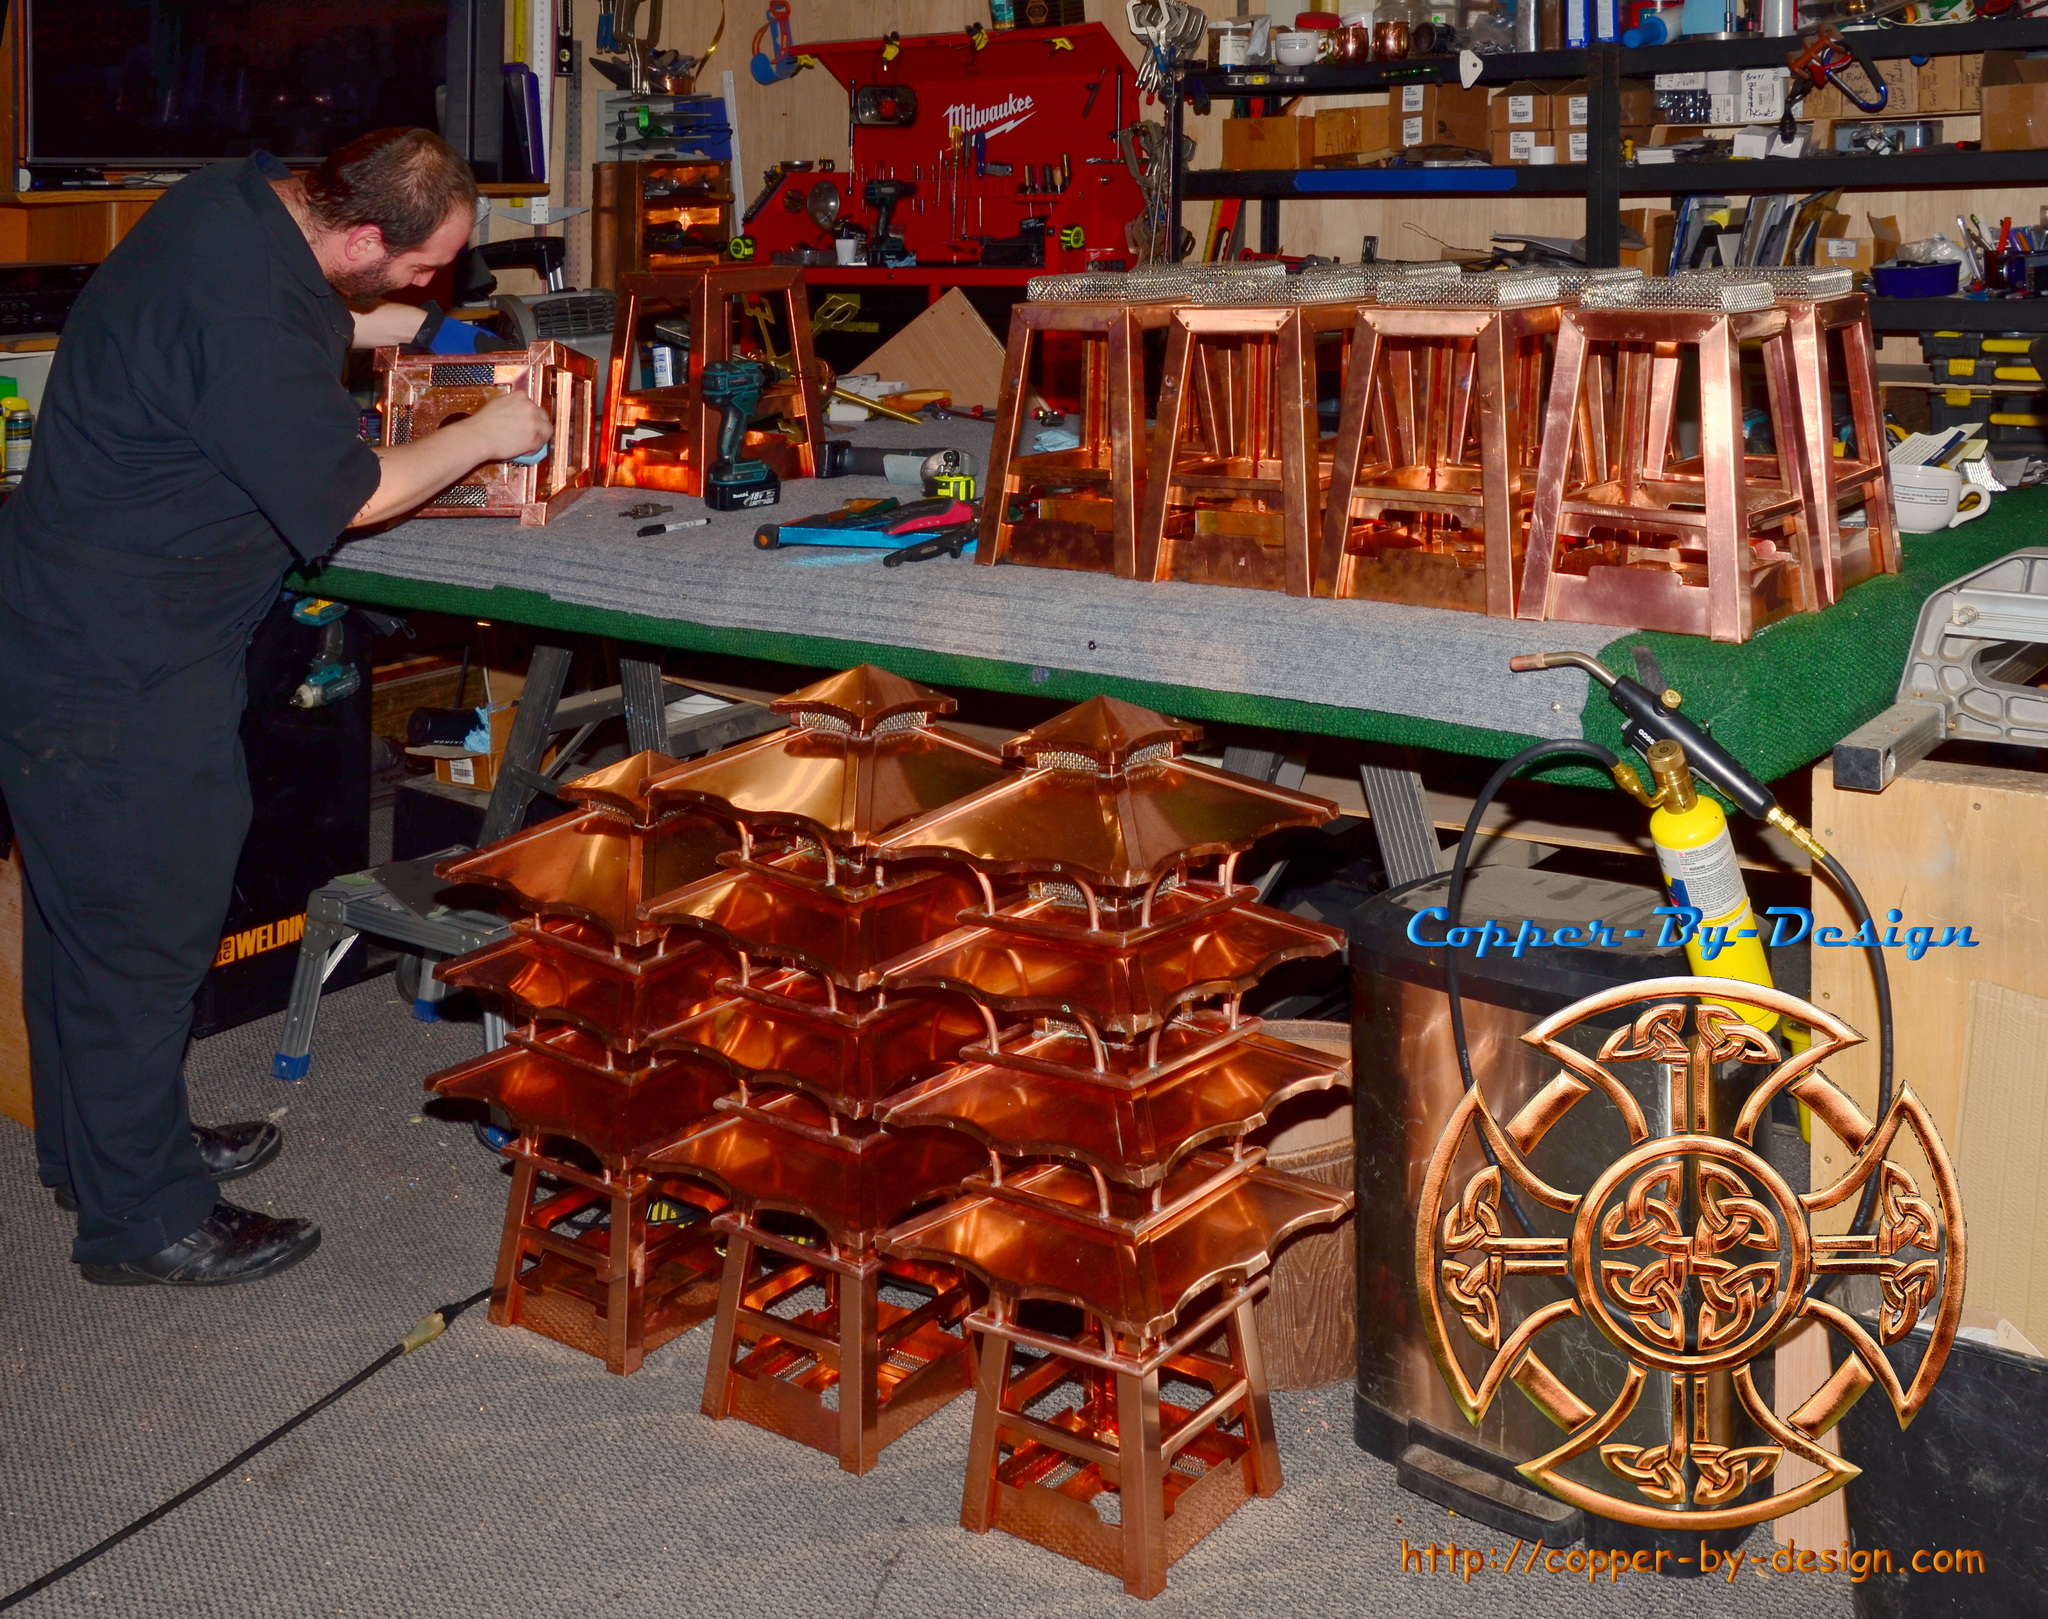
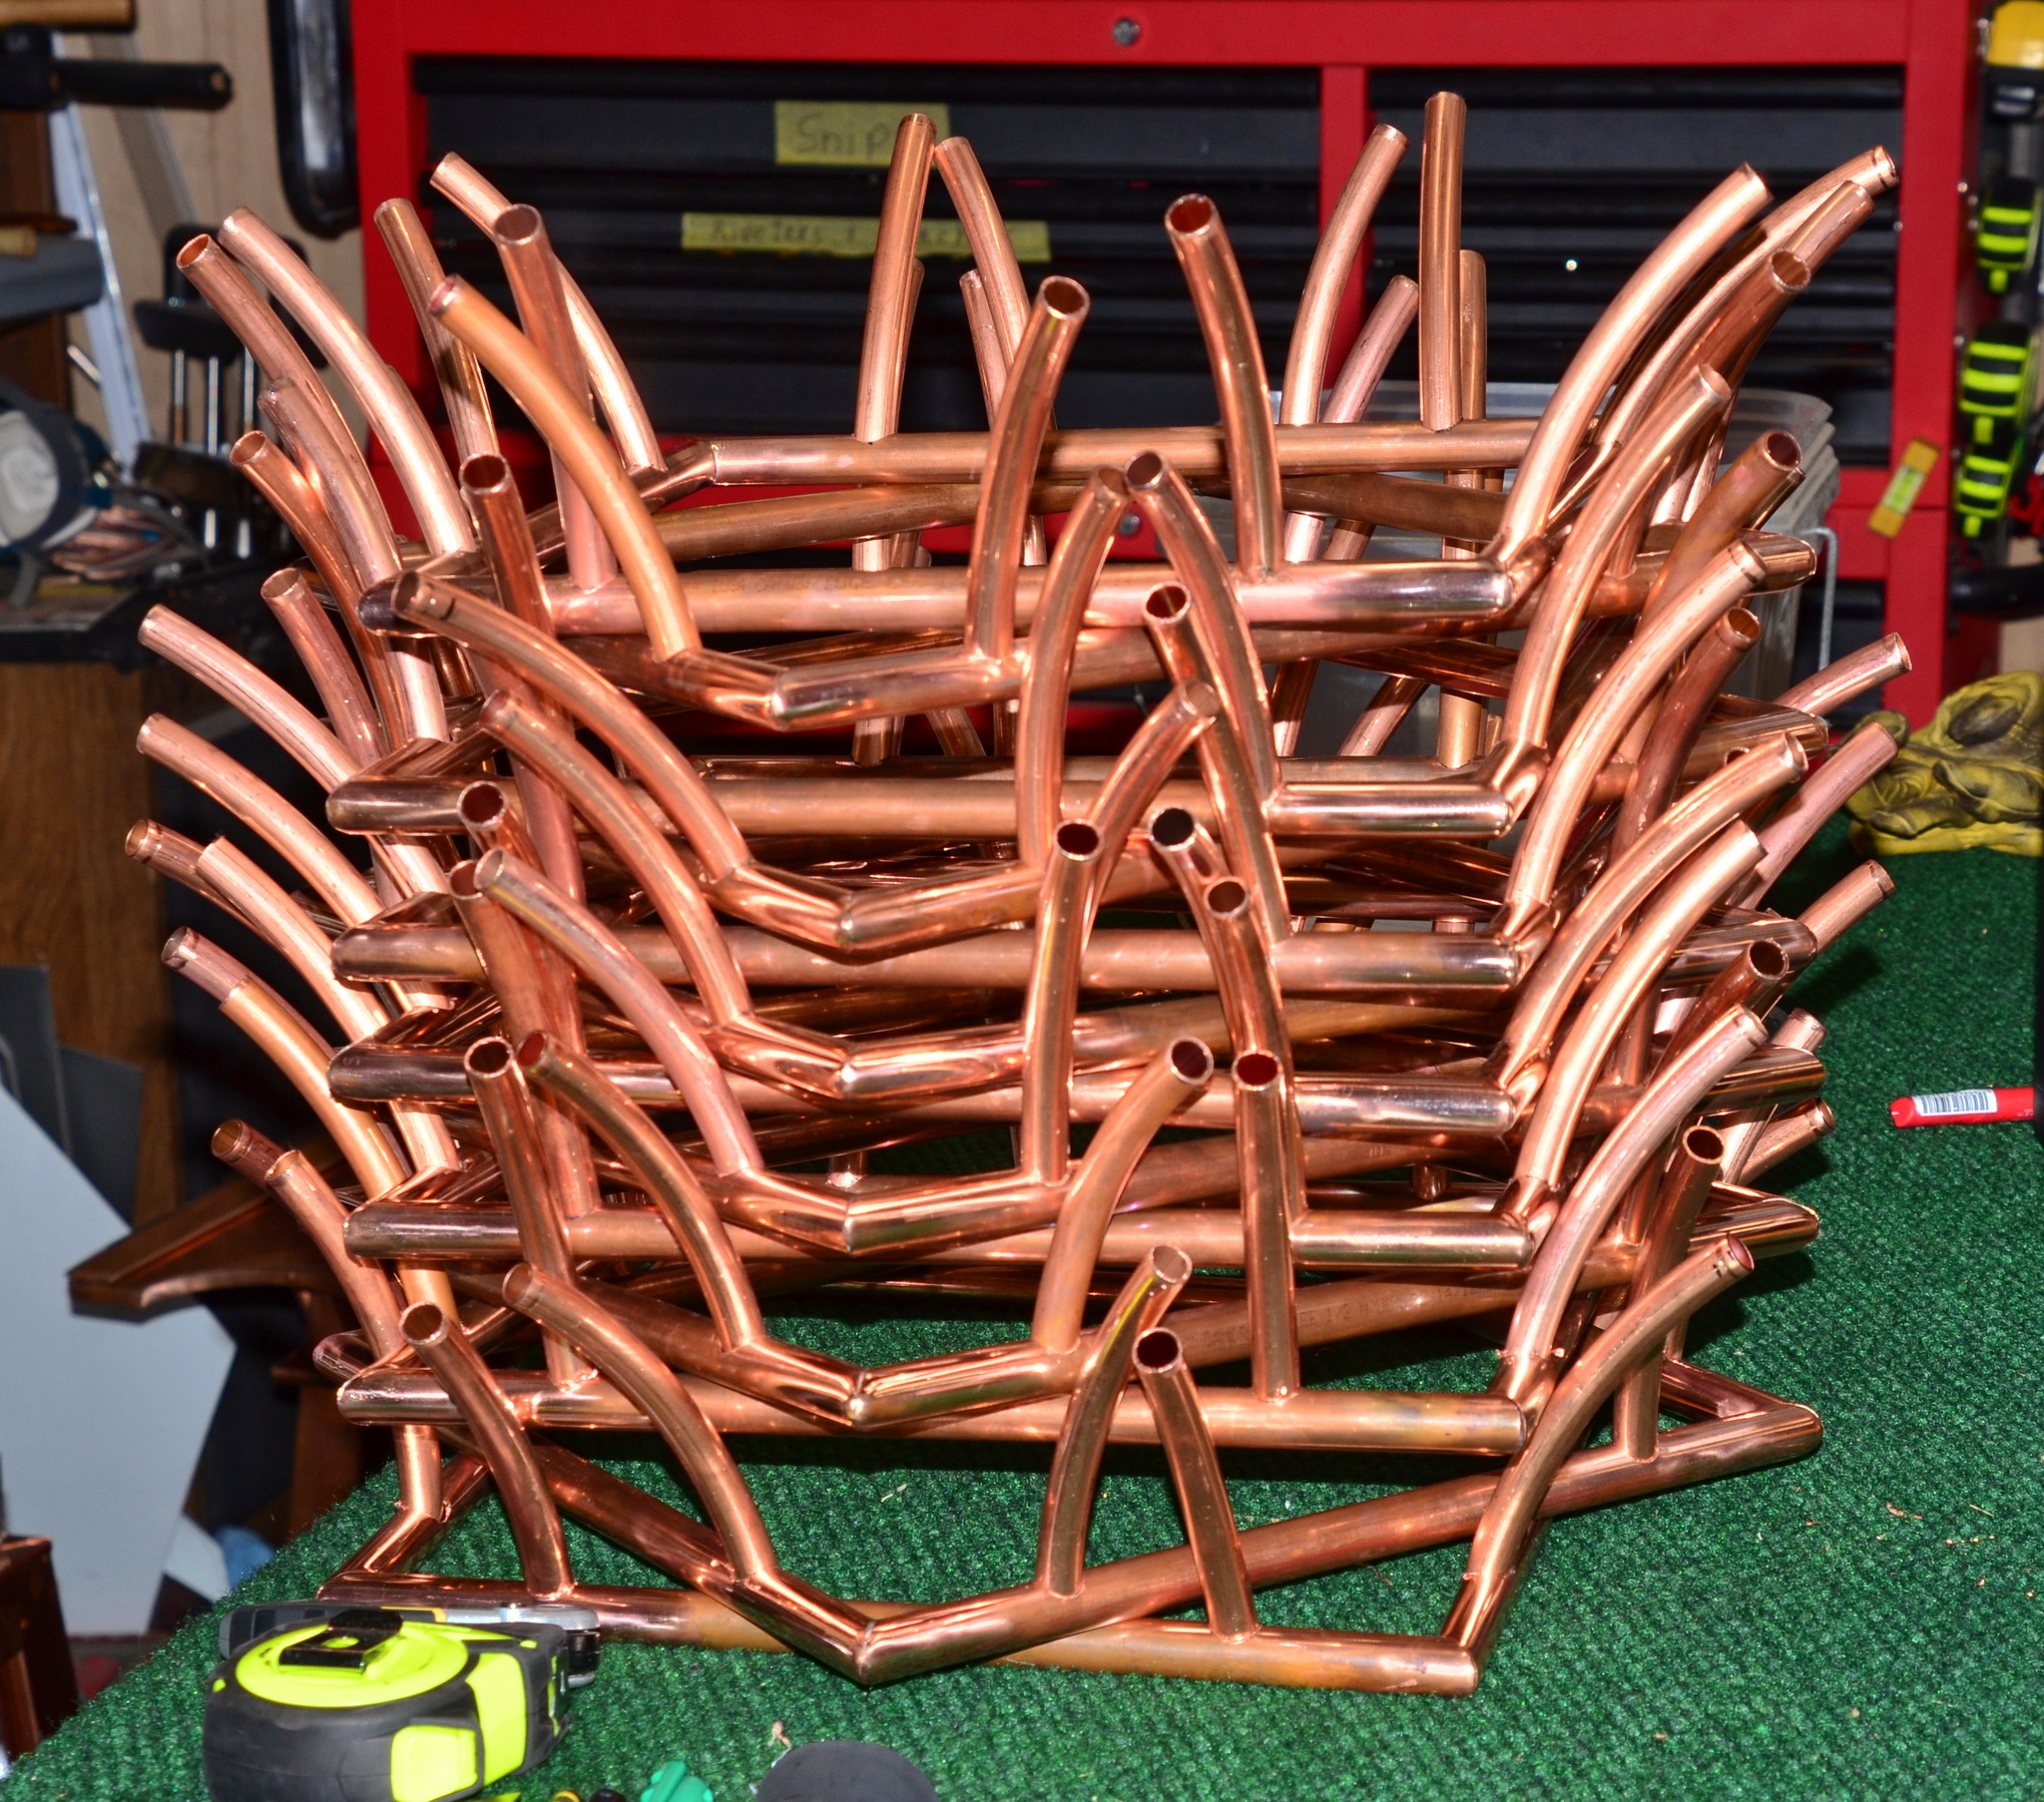
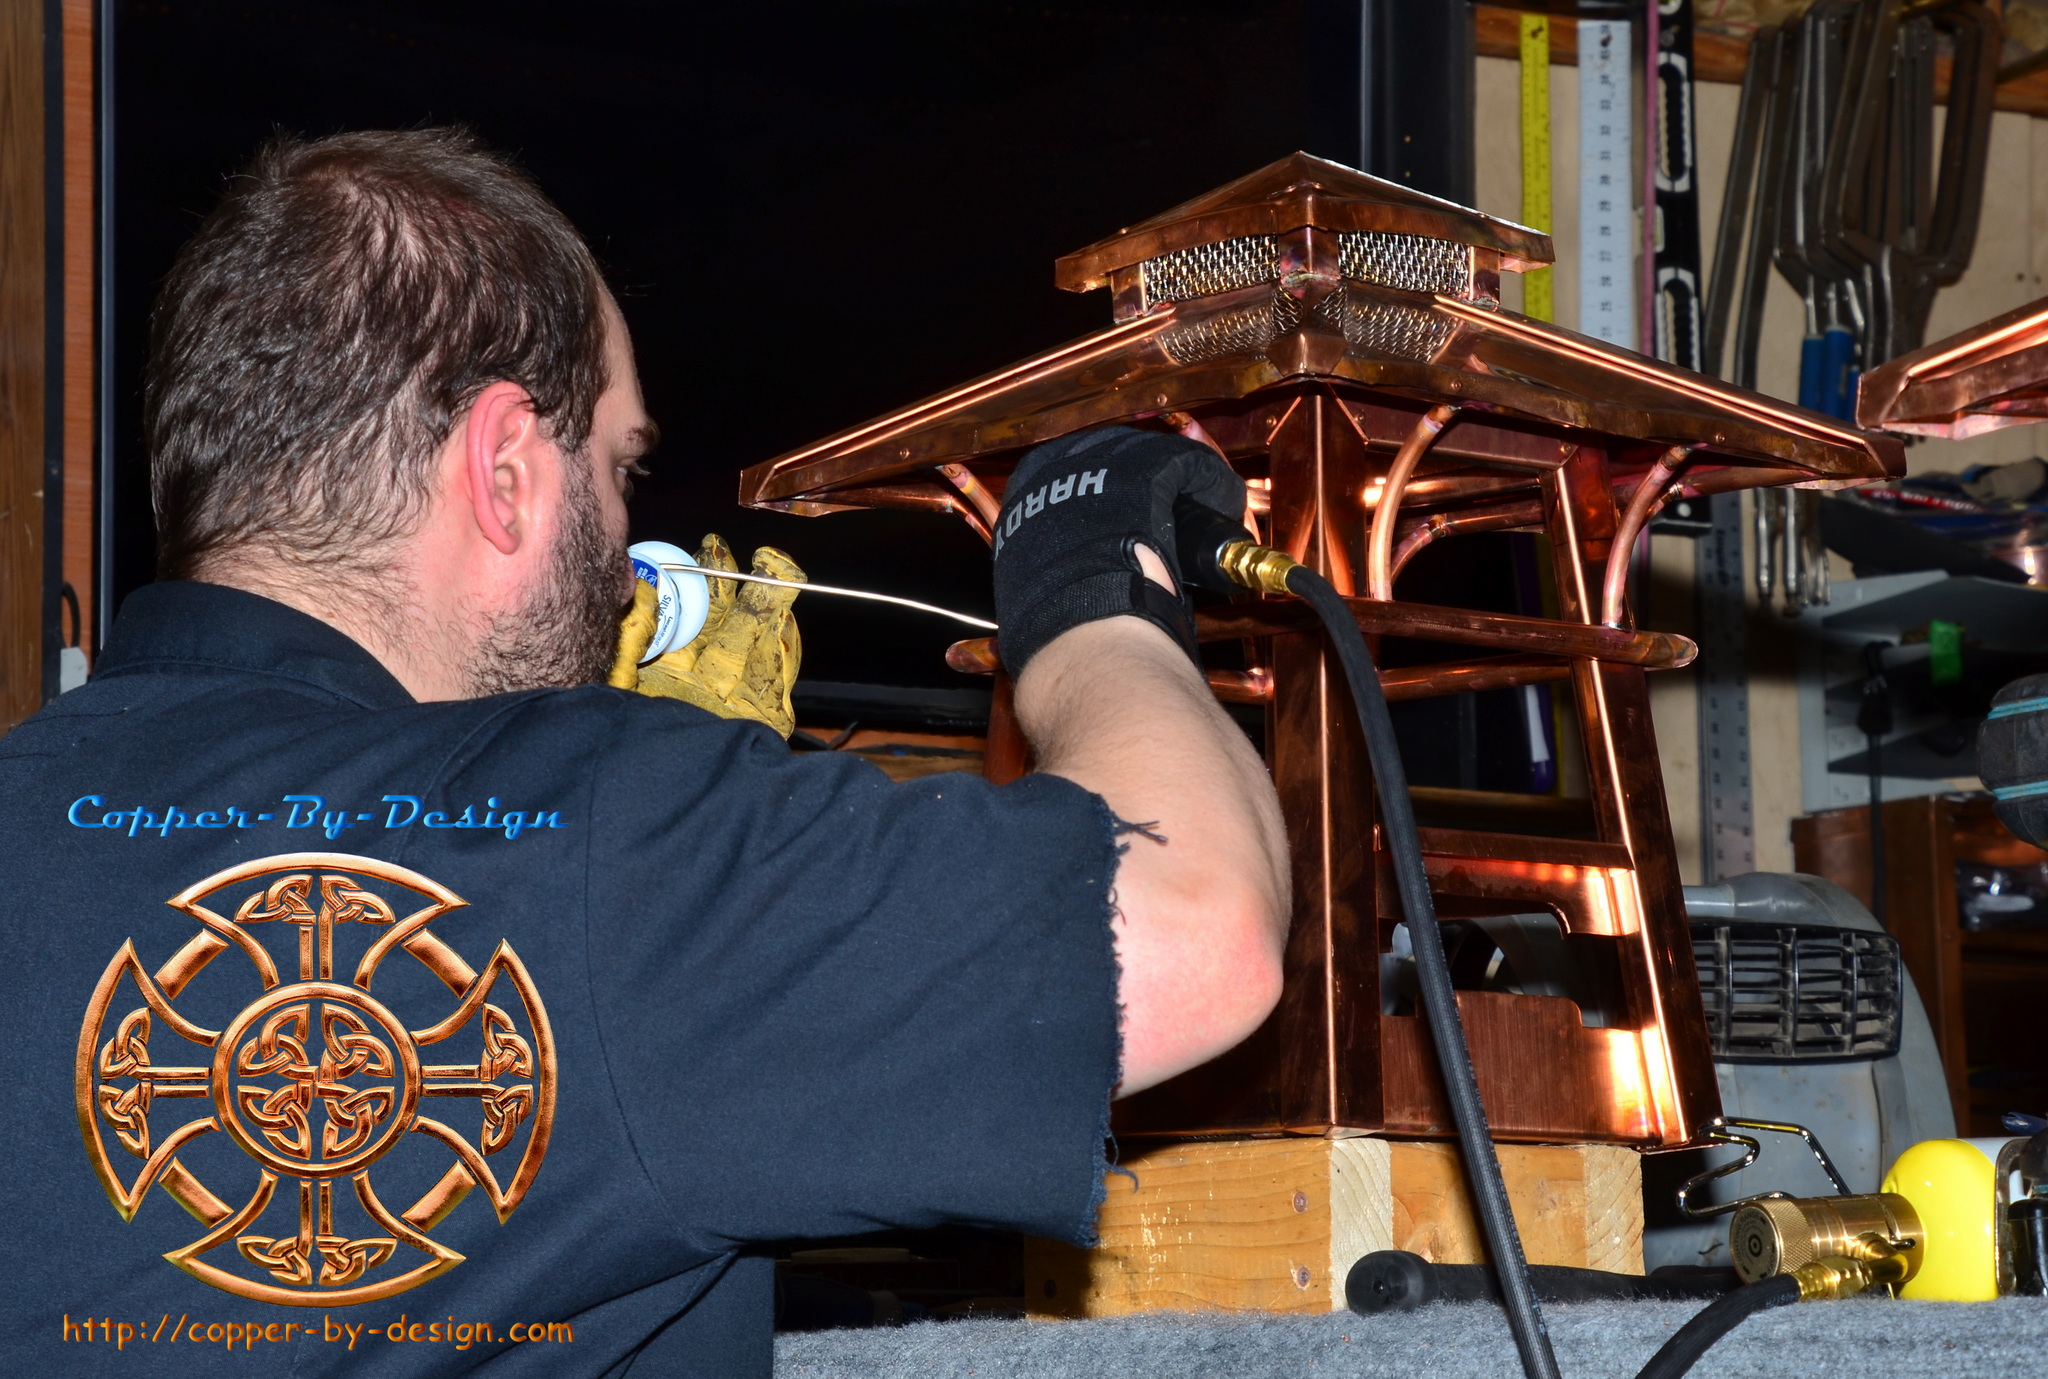
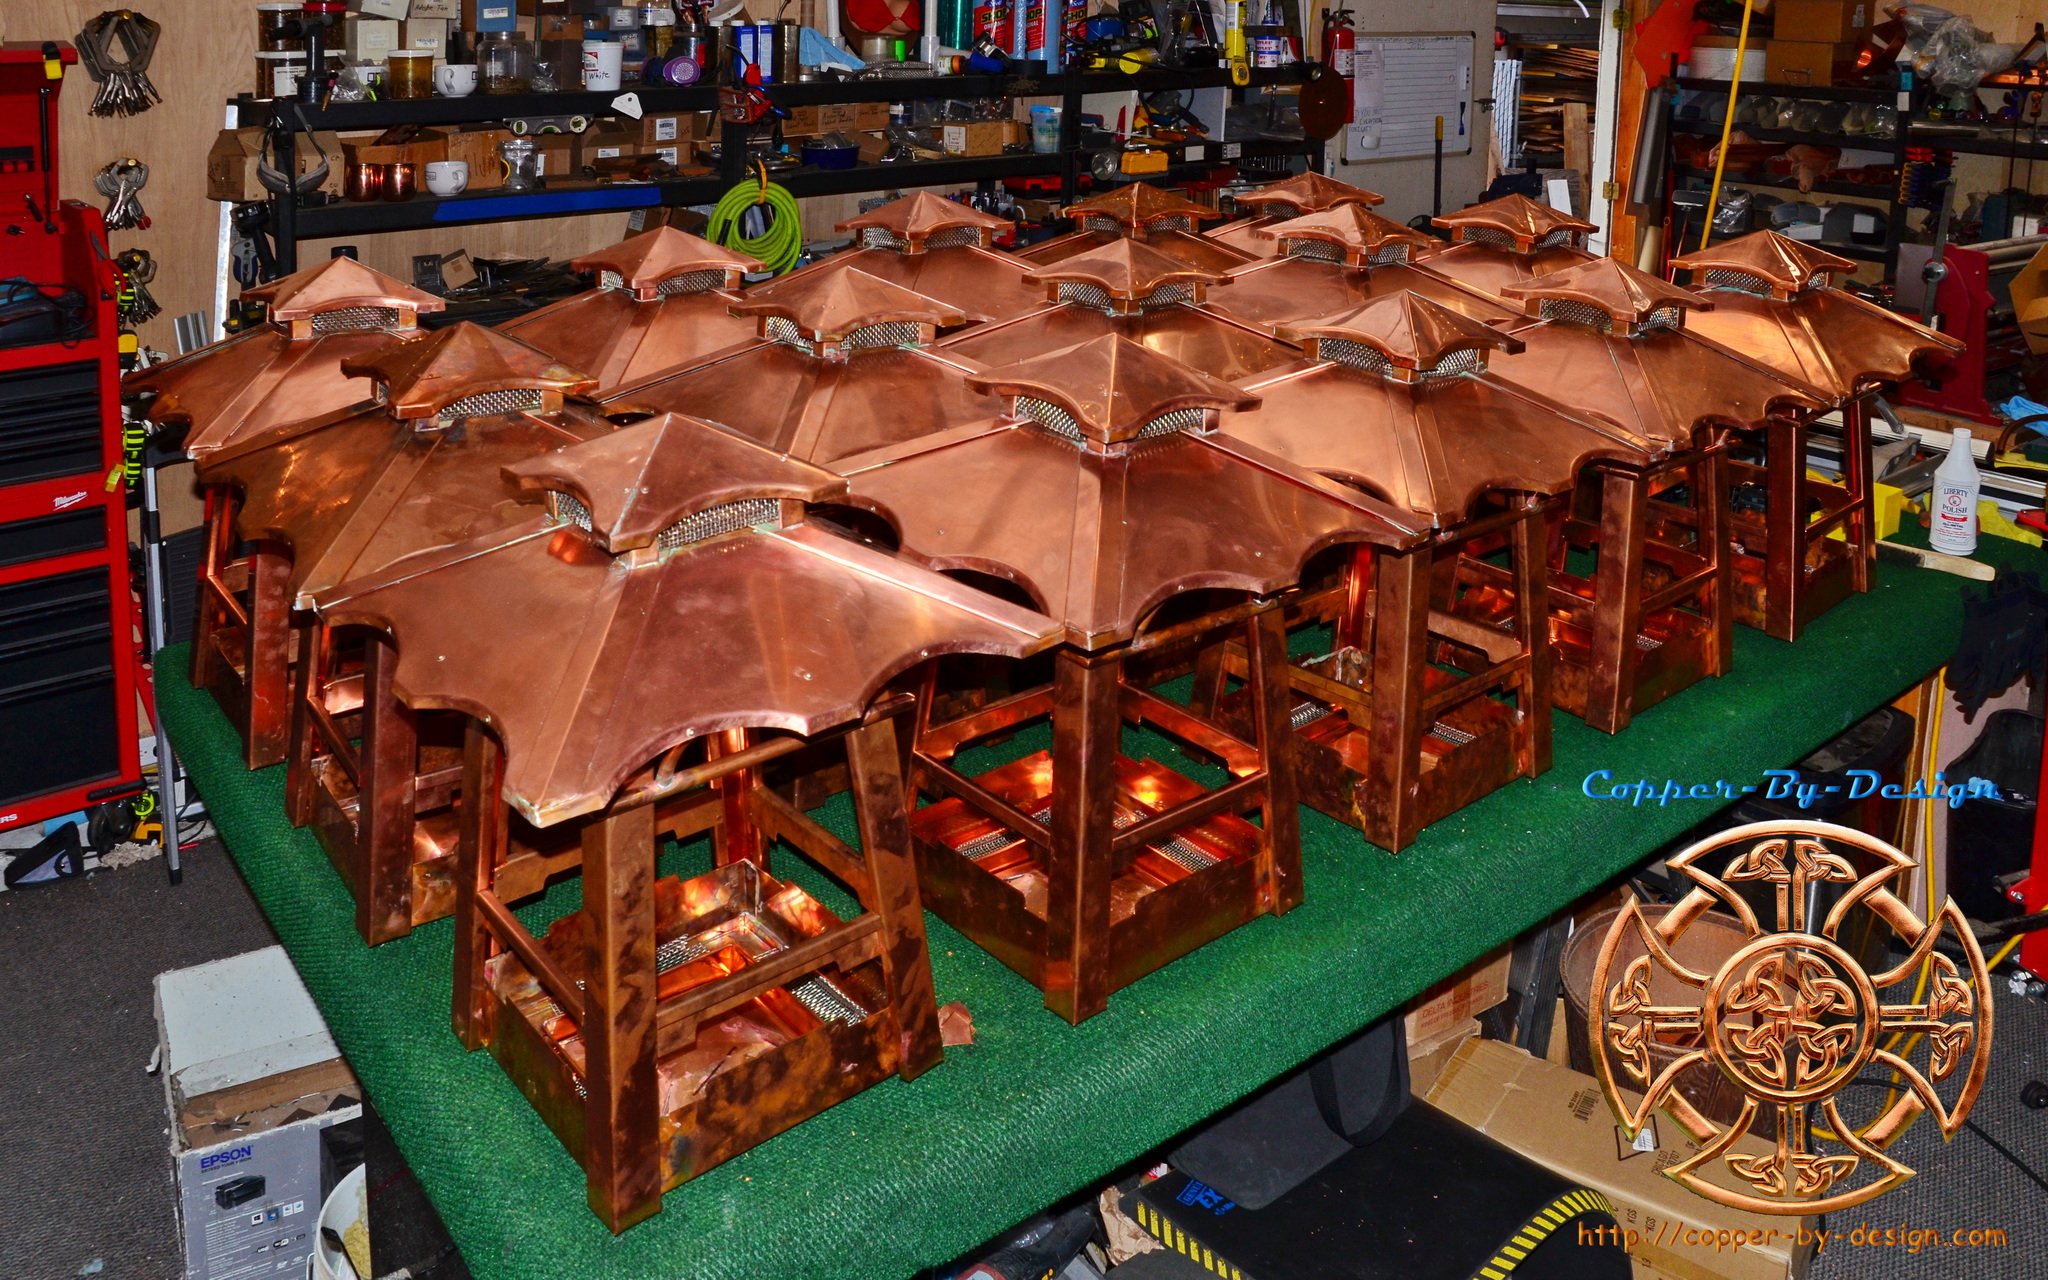
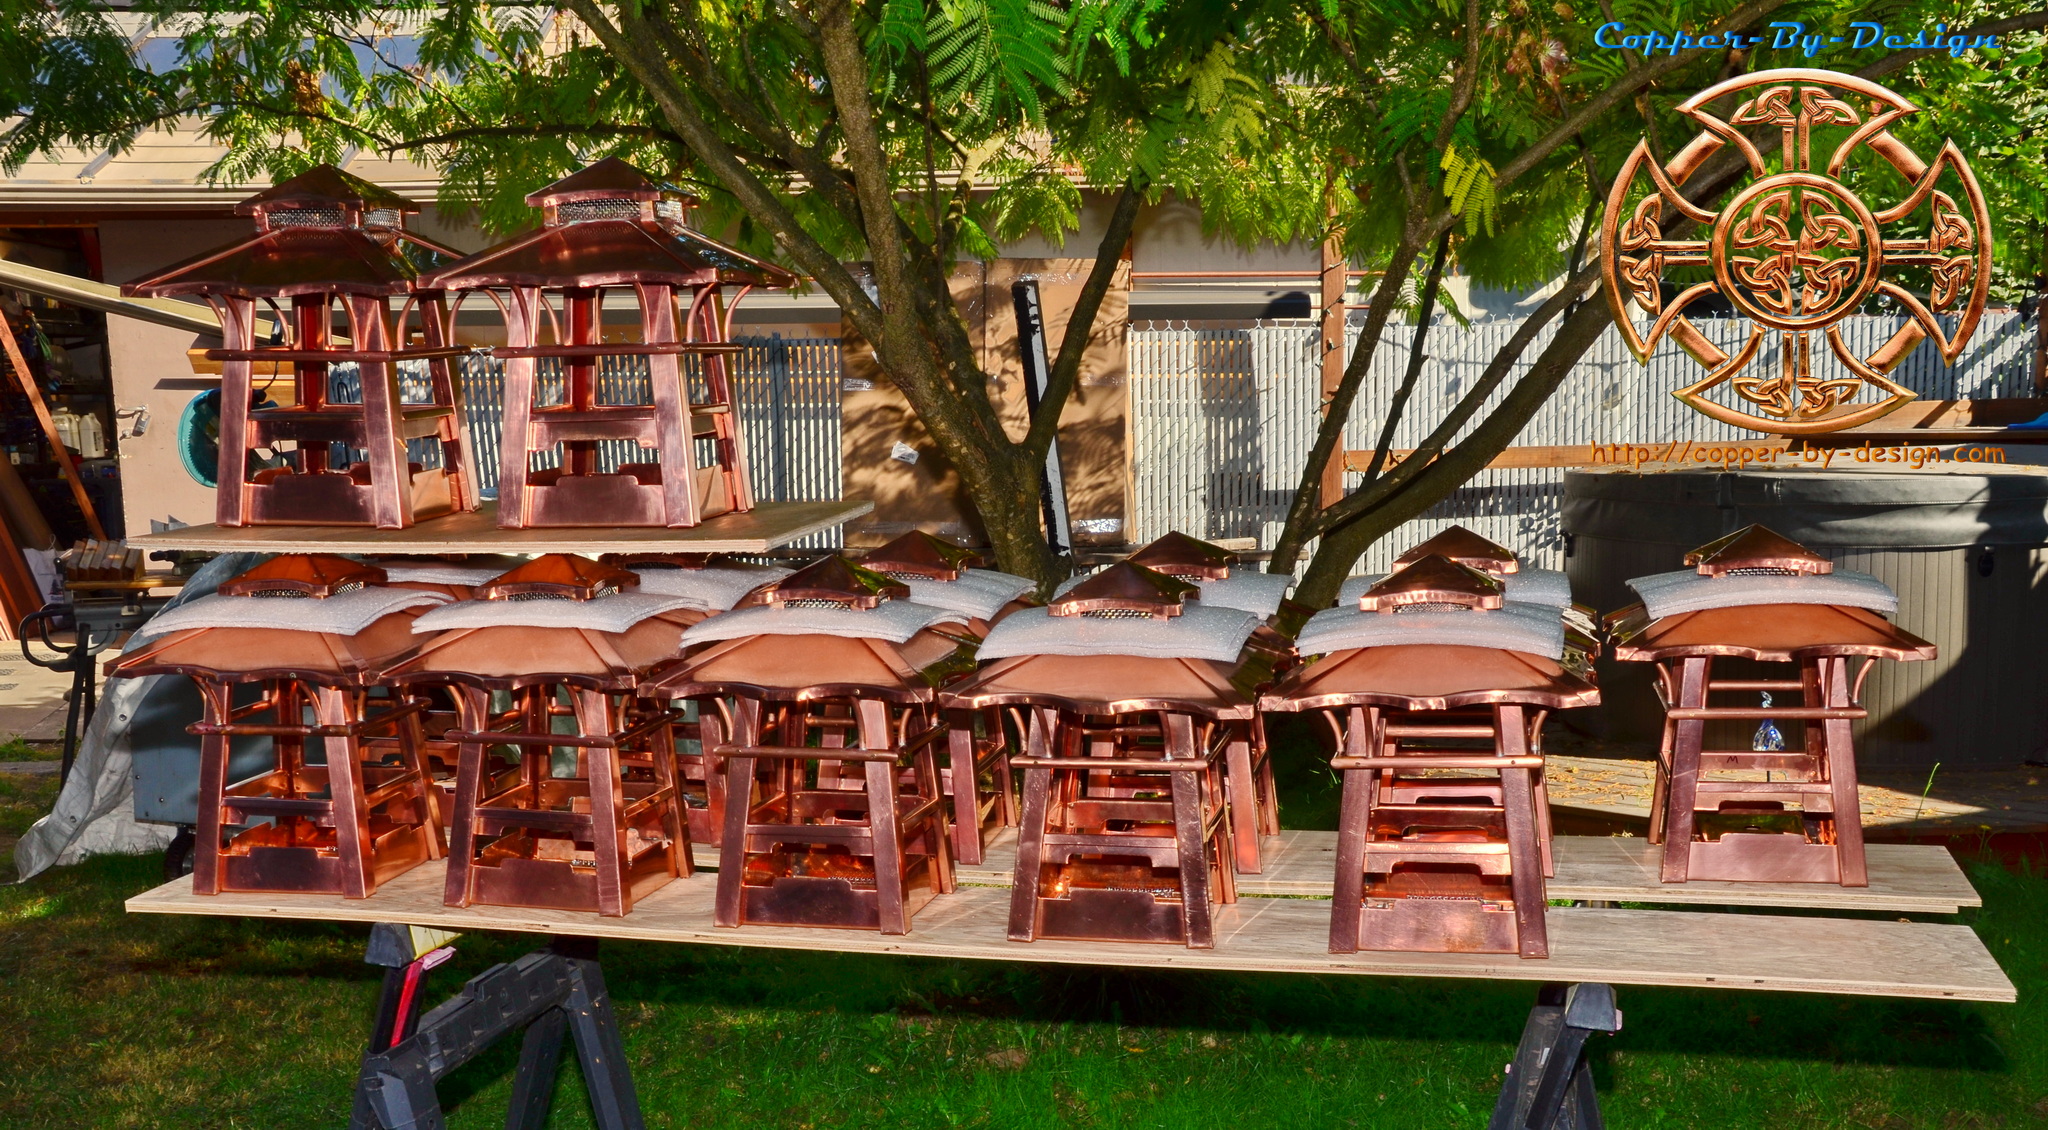
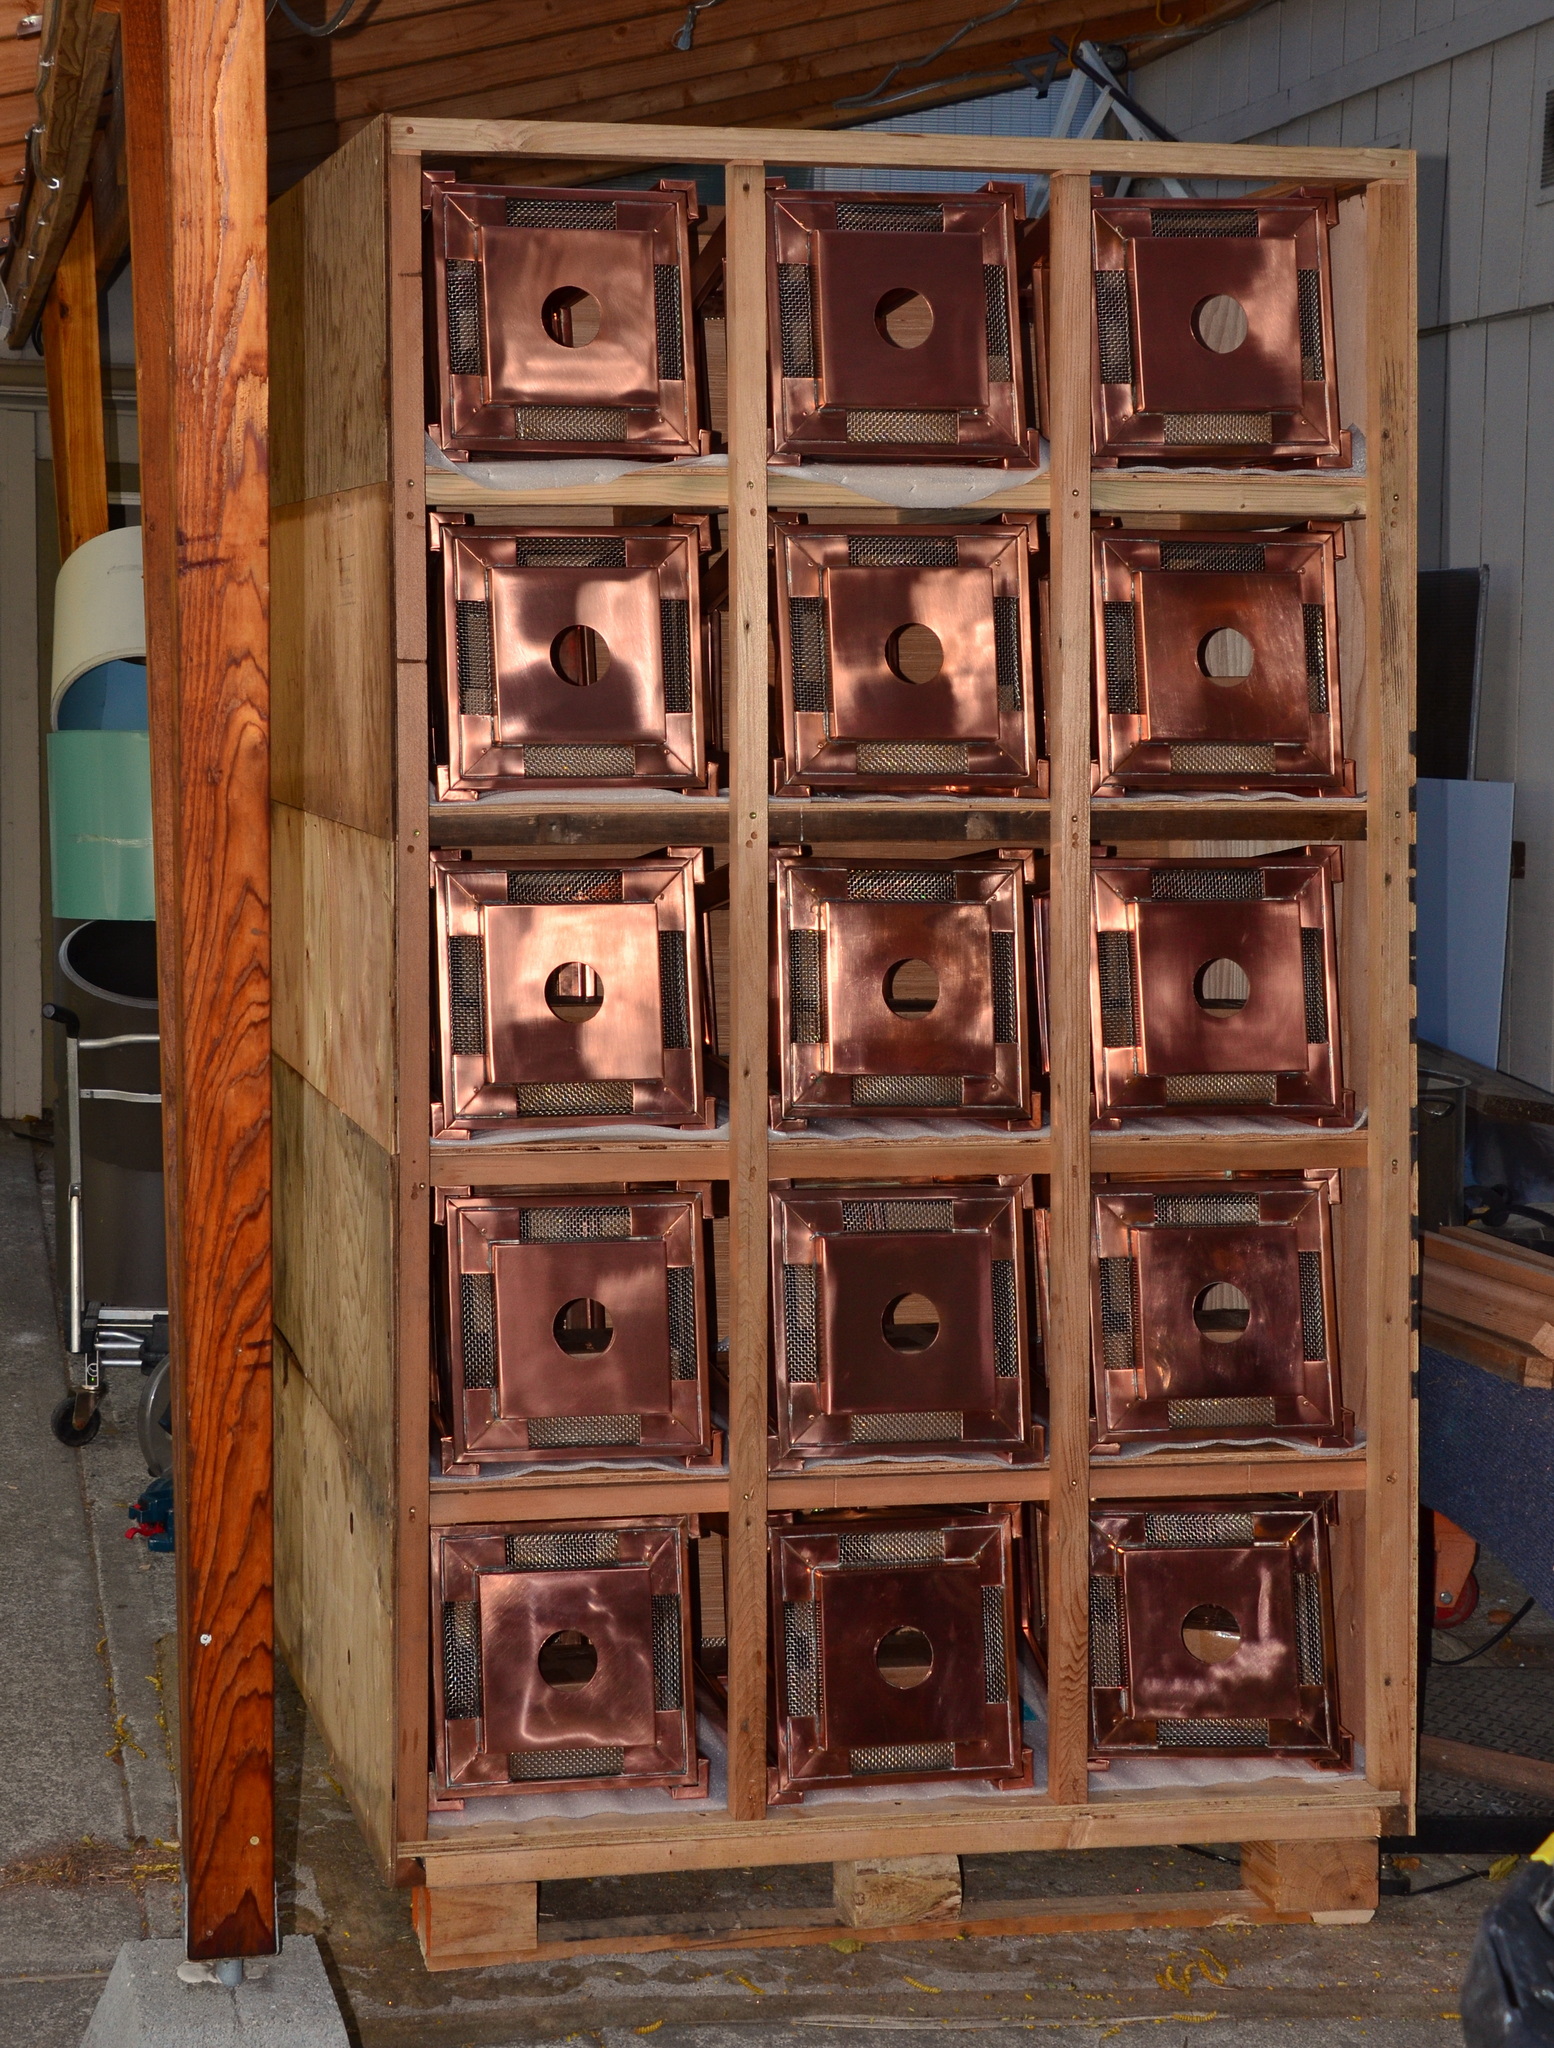
| Dr. Nicholson Set of 30 Lanterns (2018) |
| This was a collaborative design with my Client Craig Nicholson in Columbus, Ohio. They first had us to build 16 larger lanterns to be mounted on top of their columns. Then another 14 smaller lanterns for wall mounting. Each lantern has 65 pieces in their construction, plus dozens of rivets and 8 bronze nails. Then there is this multi flame burner. For this whole 30 lantern project this took 1,950 individual copper and stainless steel screen parts needing to be custom formed and assembled. So, even along with the 4 shipments this whole project at the cost of $37.5k total comes to just $19.23 average per piece designed, assembled, and delivered. This 30 lantern project took us about 16 months to design and complete along with delays for the client's schedule. There was over 5 months of full time work put into these. They will be adding the stained glass windows there on site and making special braces for the wall mounted lanterns. |
  |
  |
  |
  |
  |
|
The cost was $37.5k total delivered, or $1,250 each To see all 185 photos for this project go to my Facebook Albums |
.
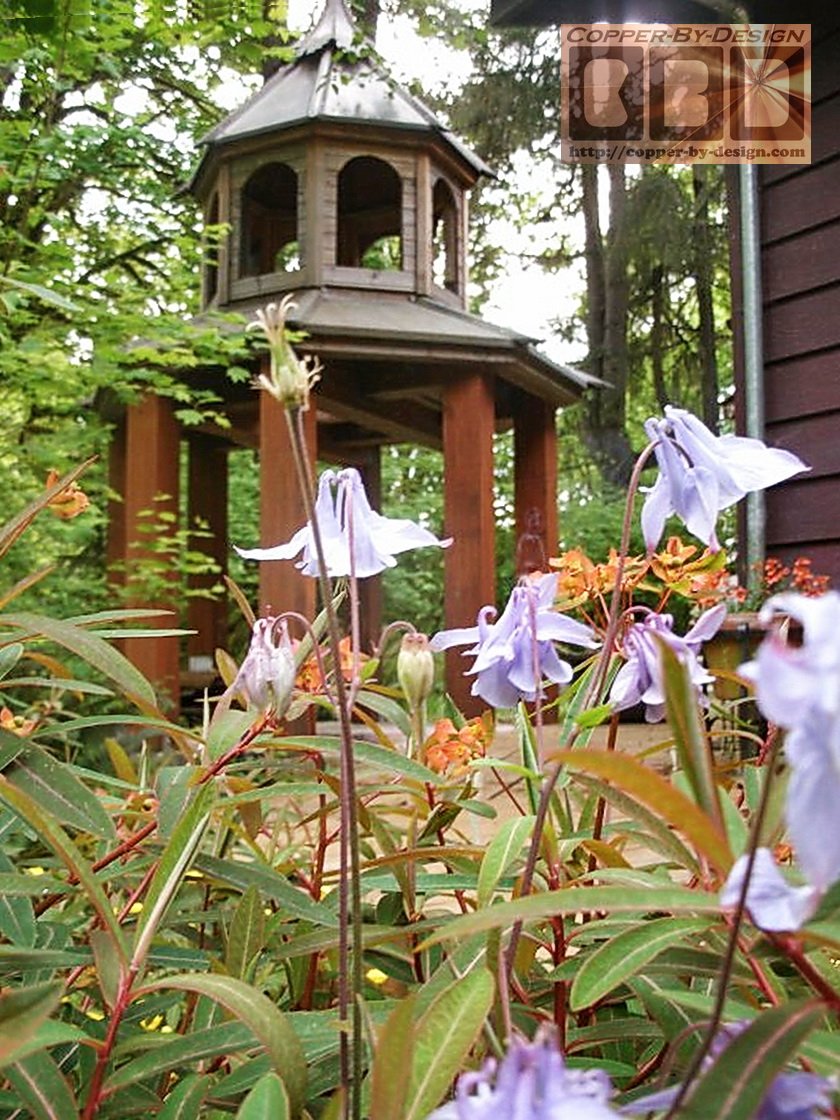
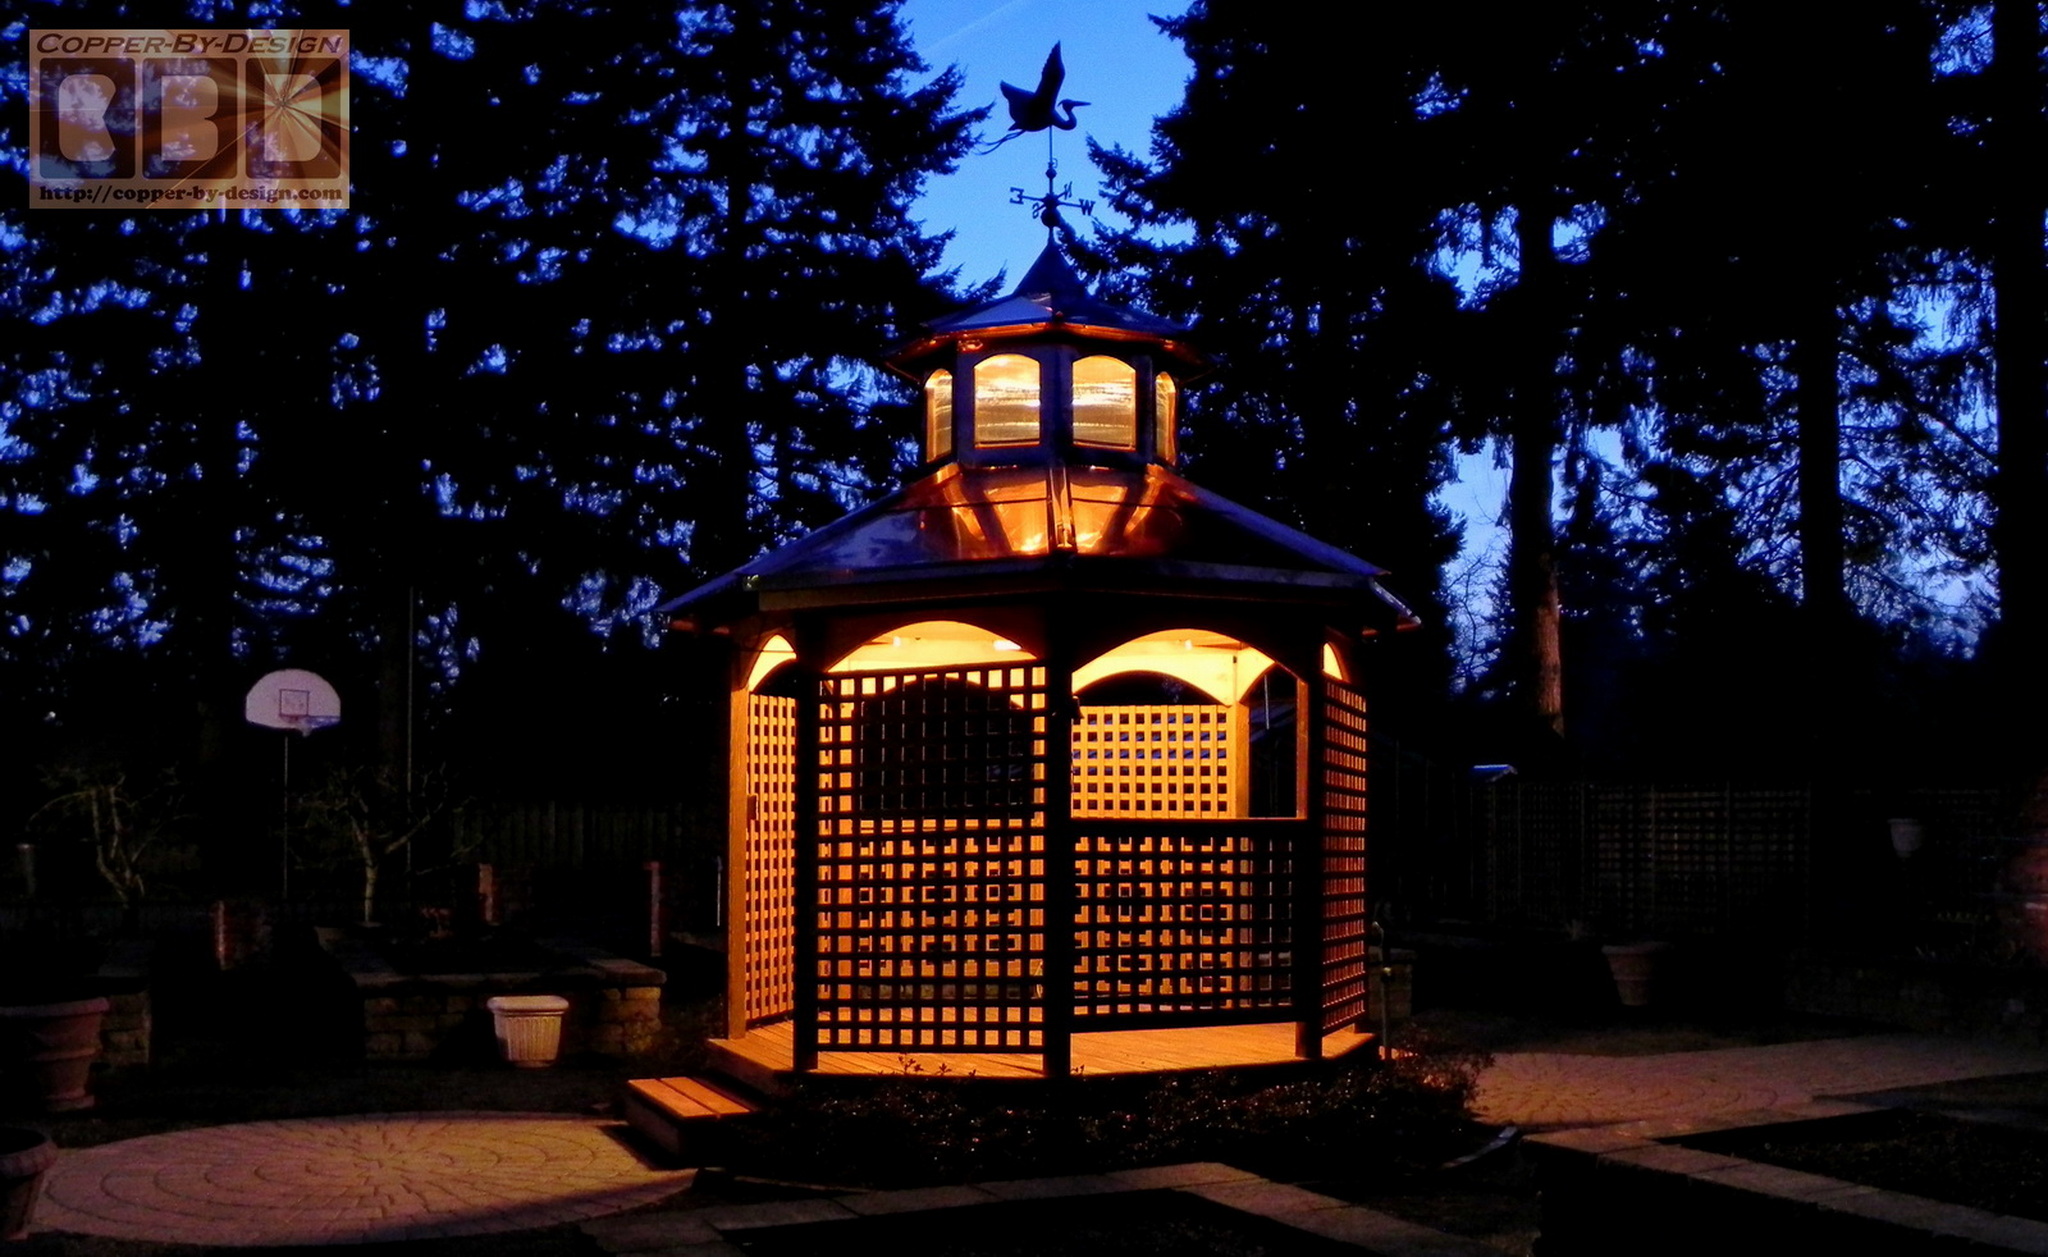
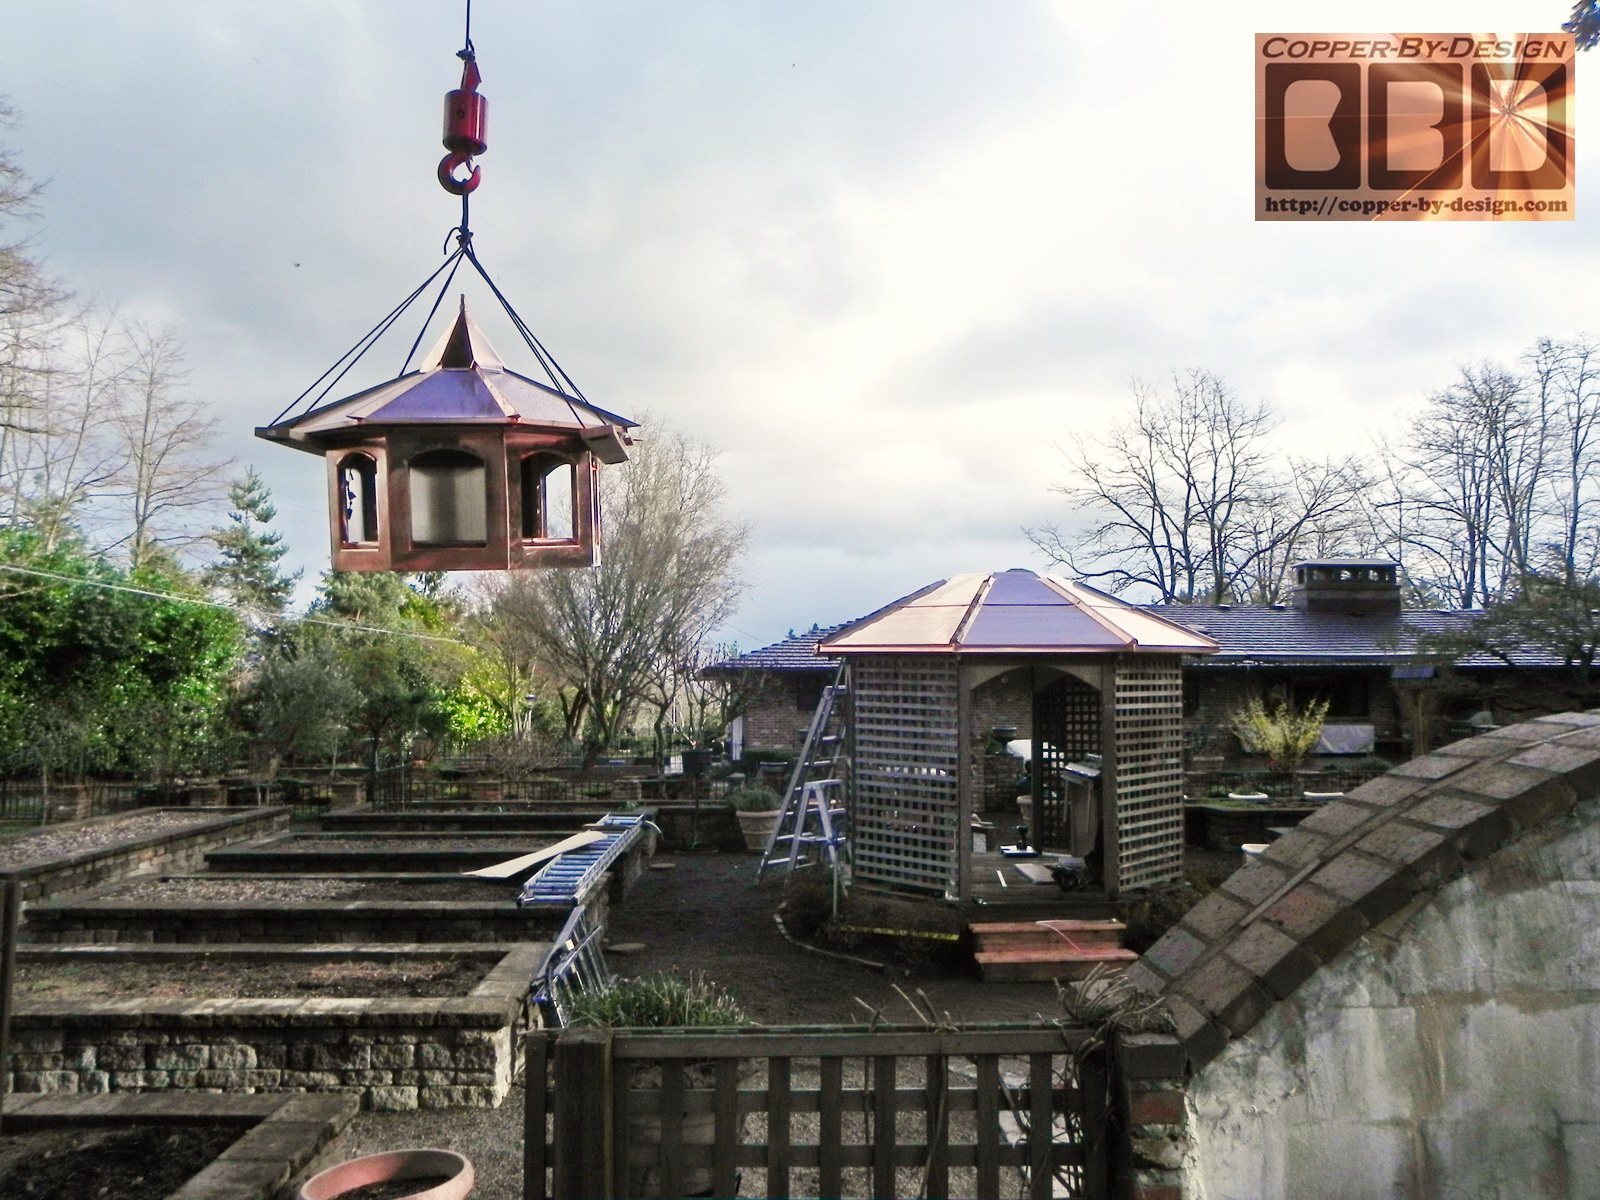
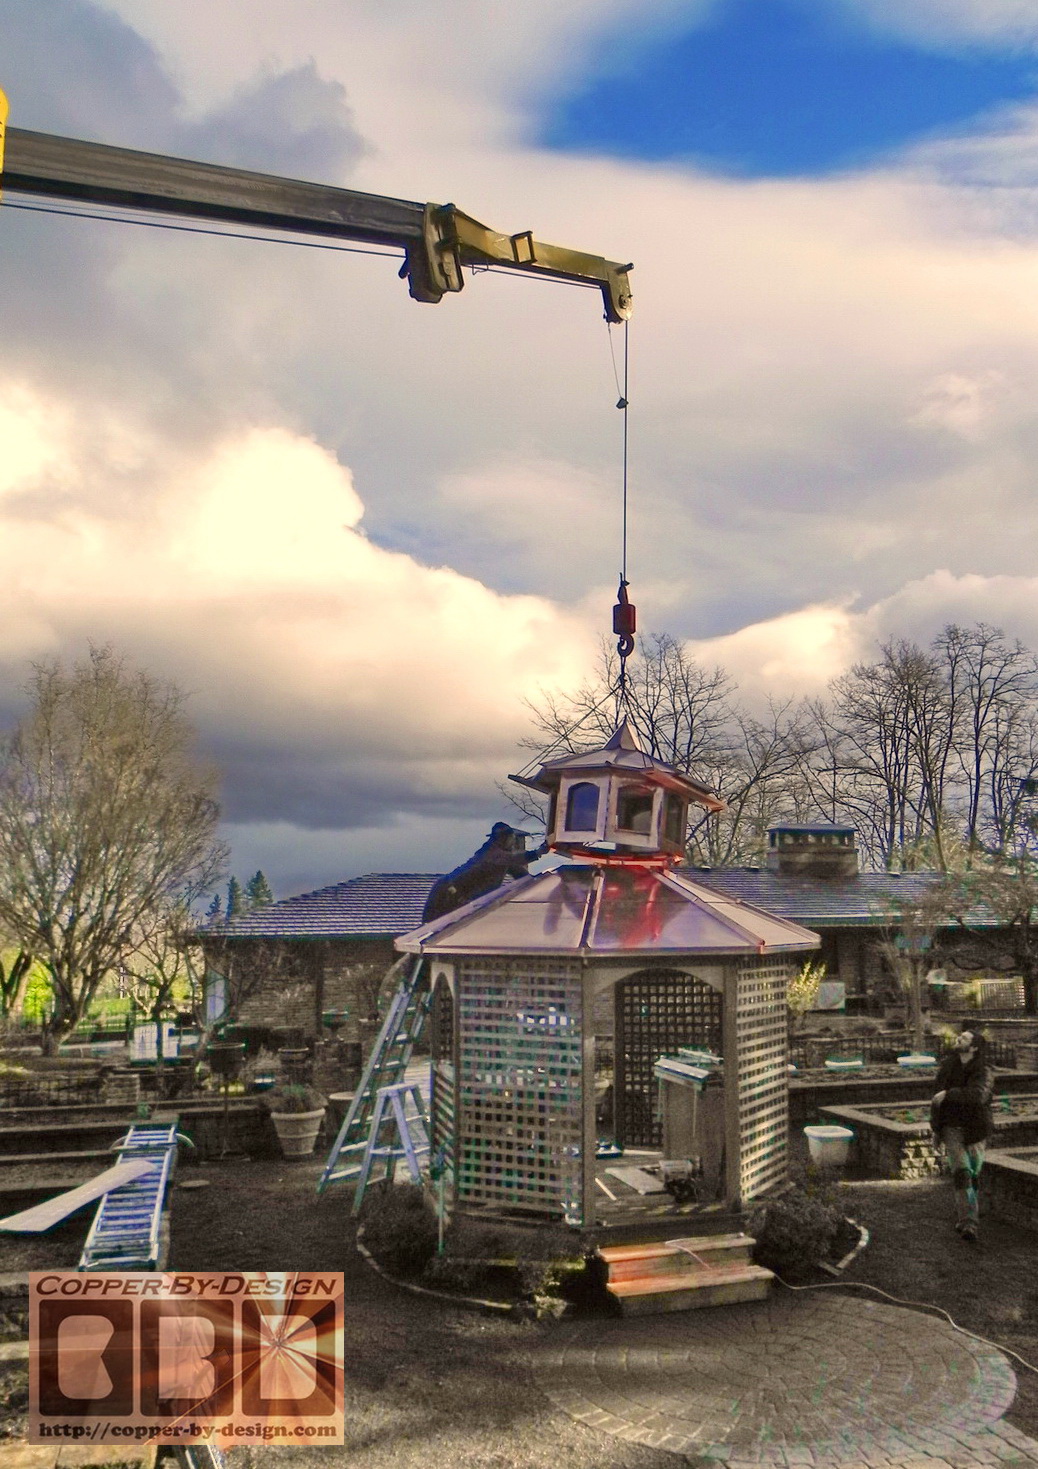
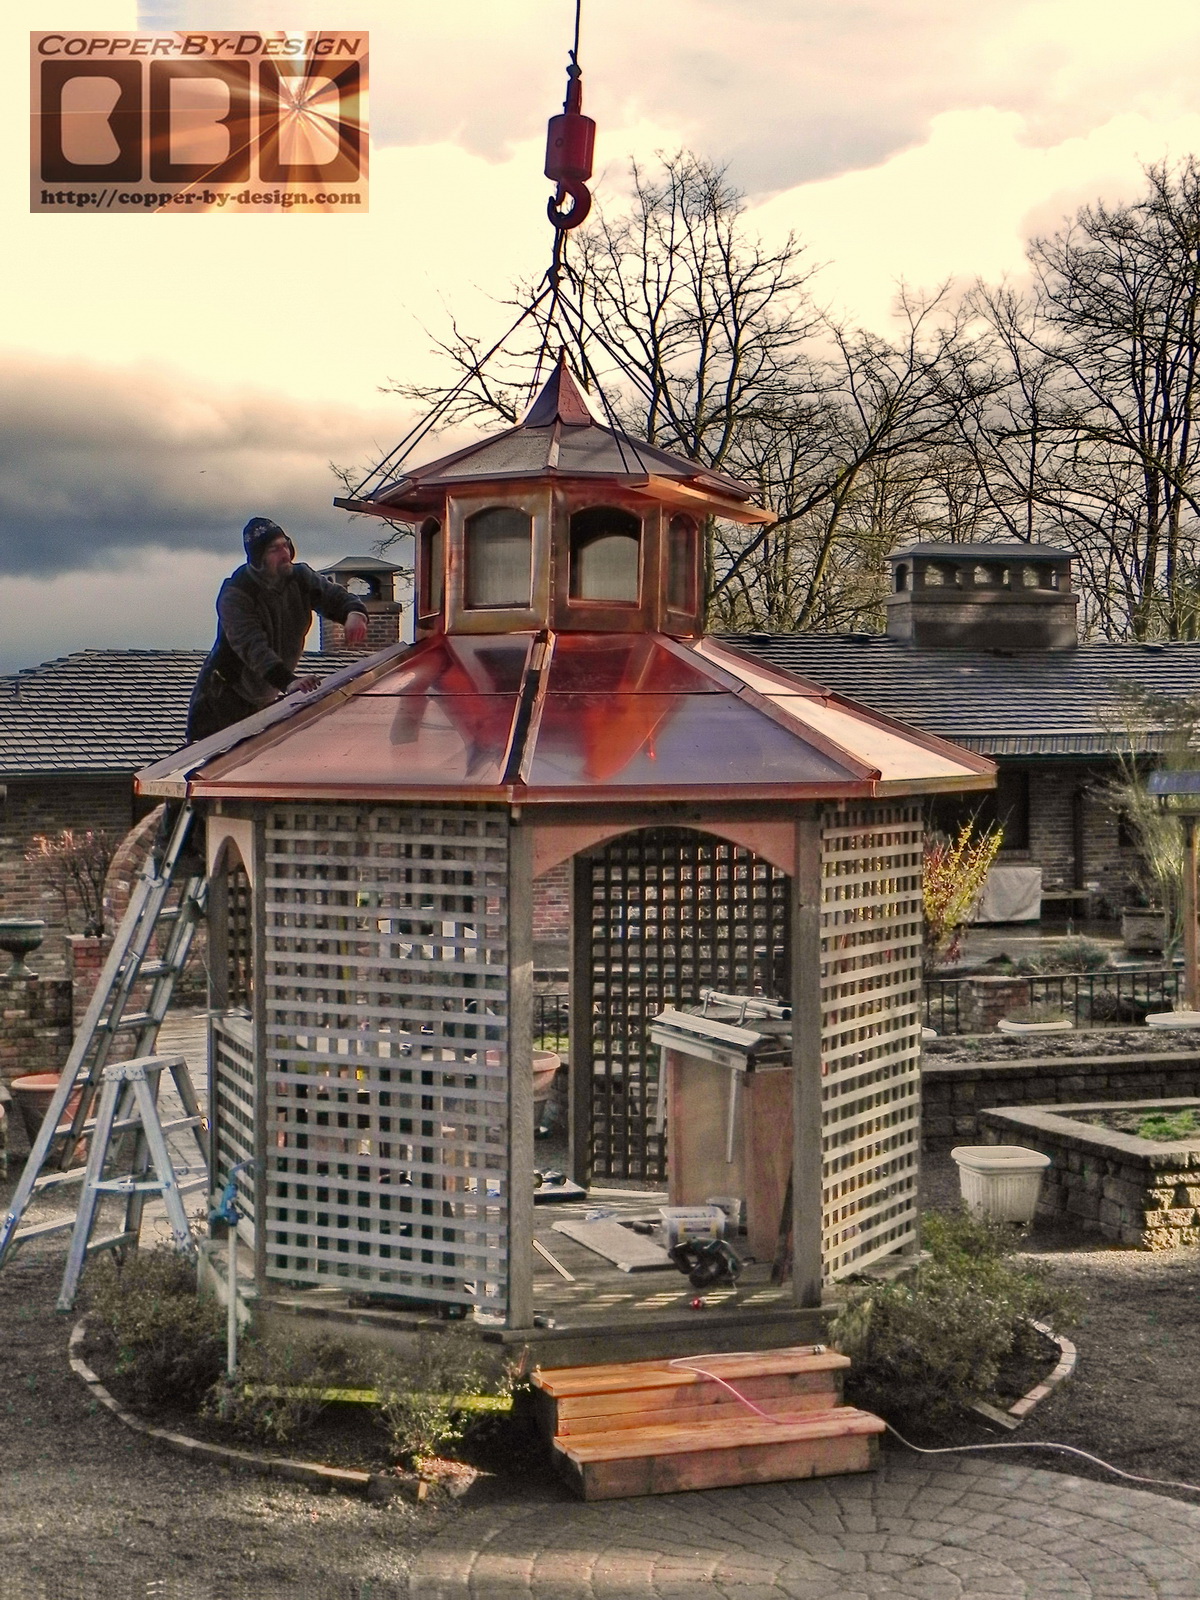
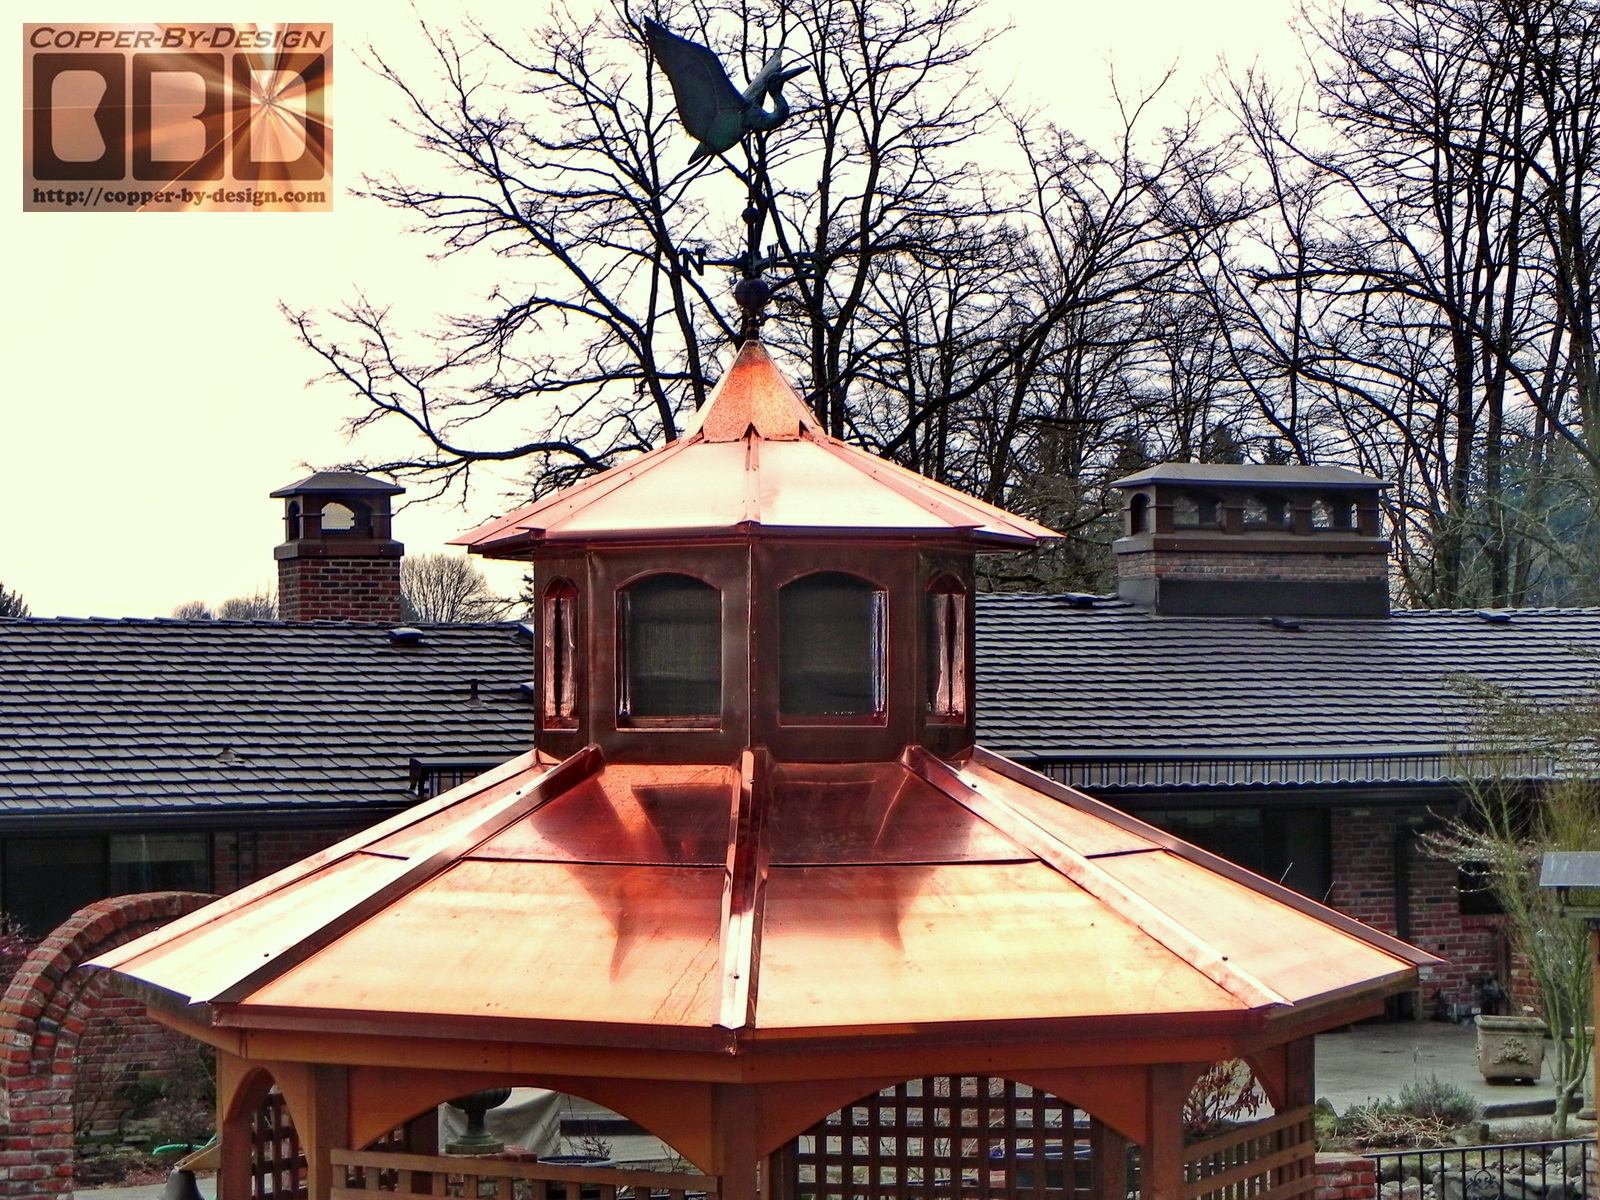
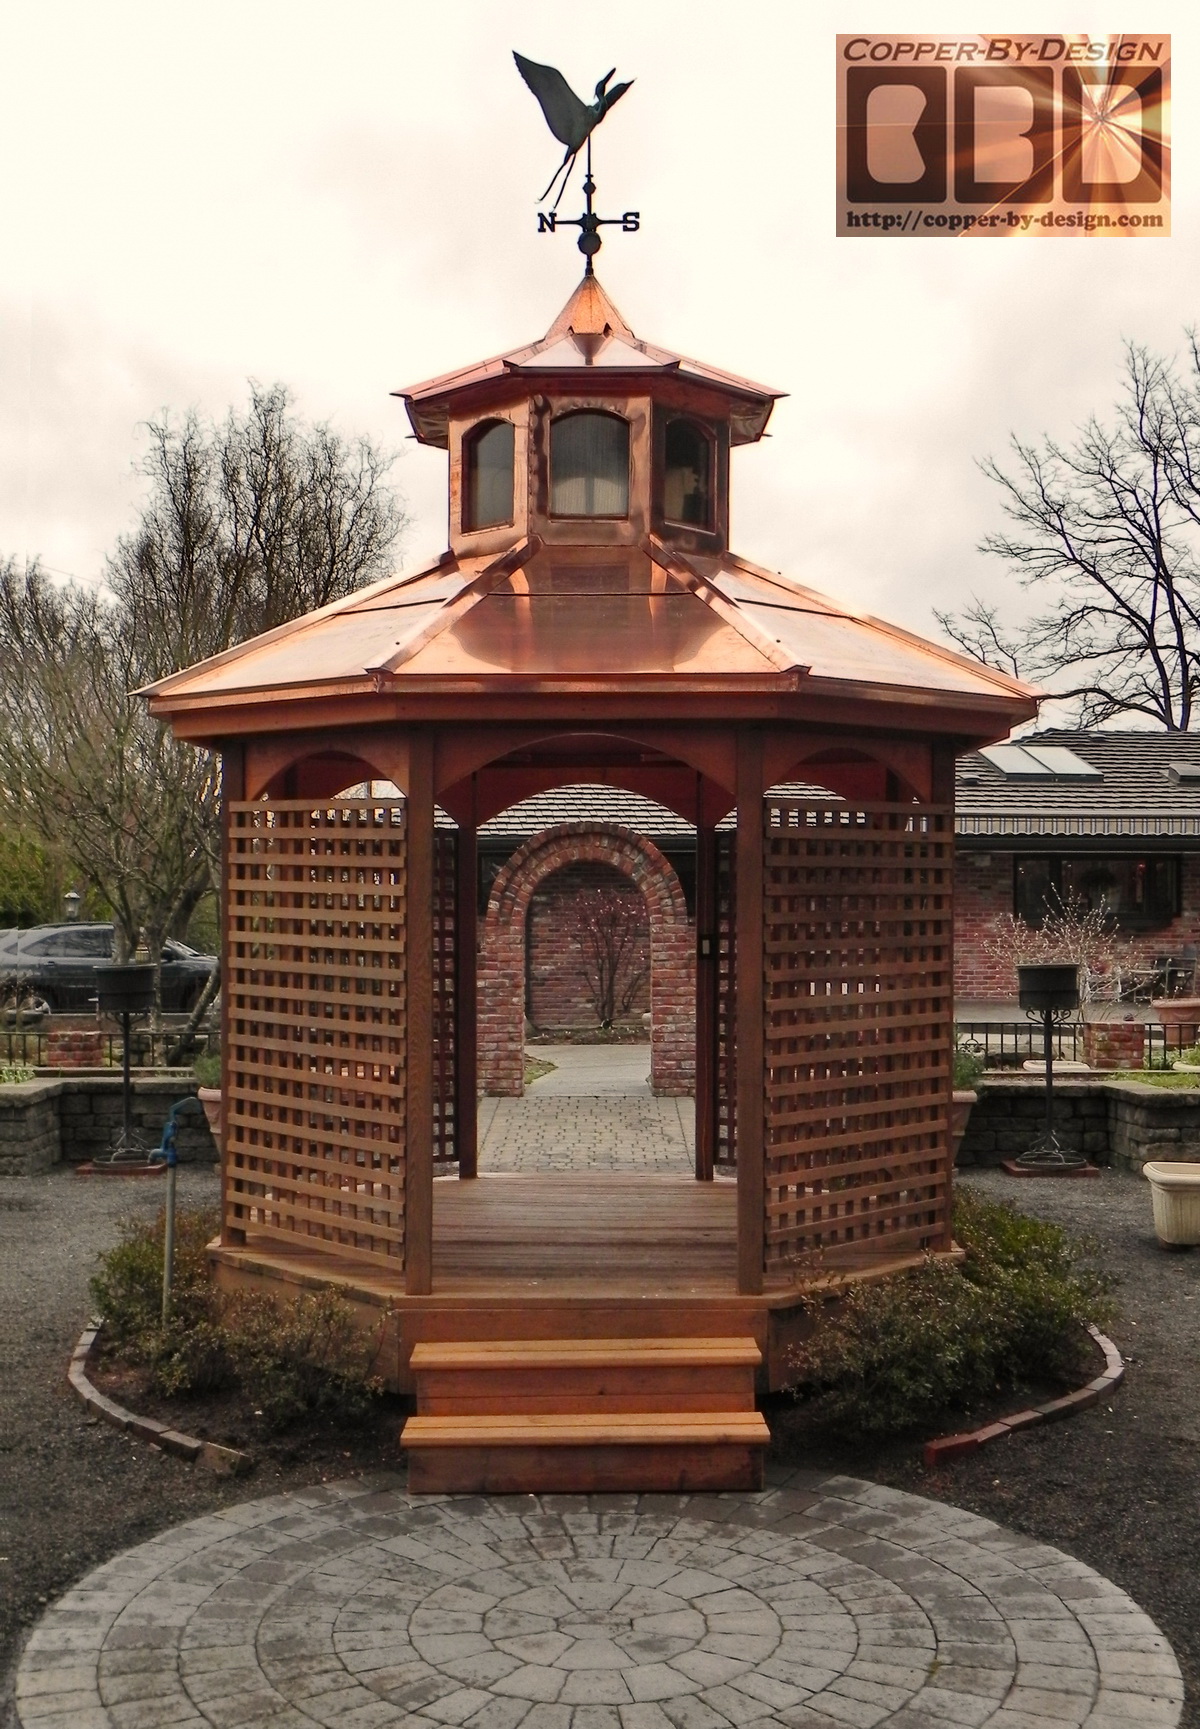
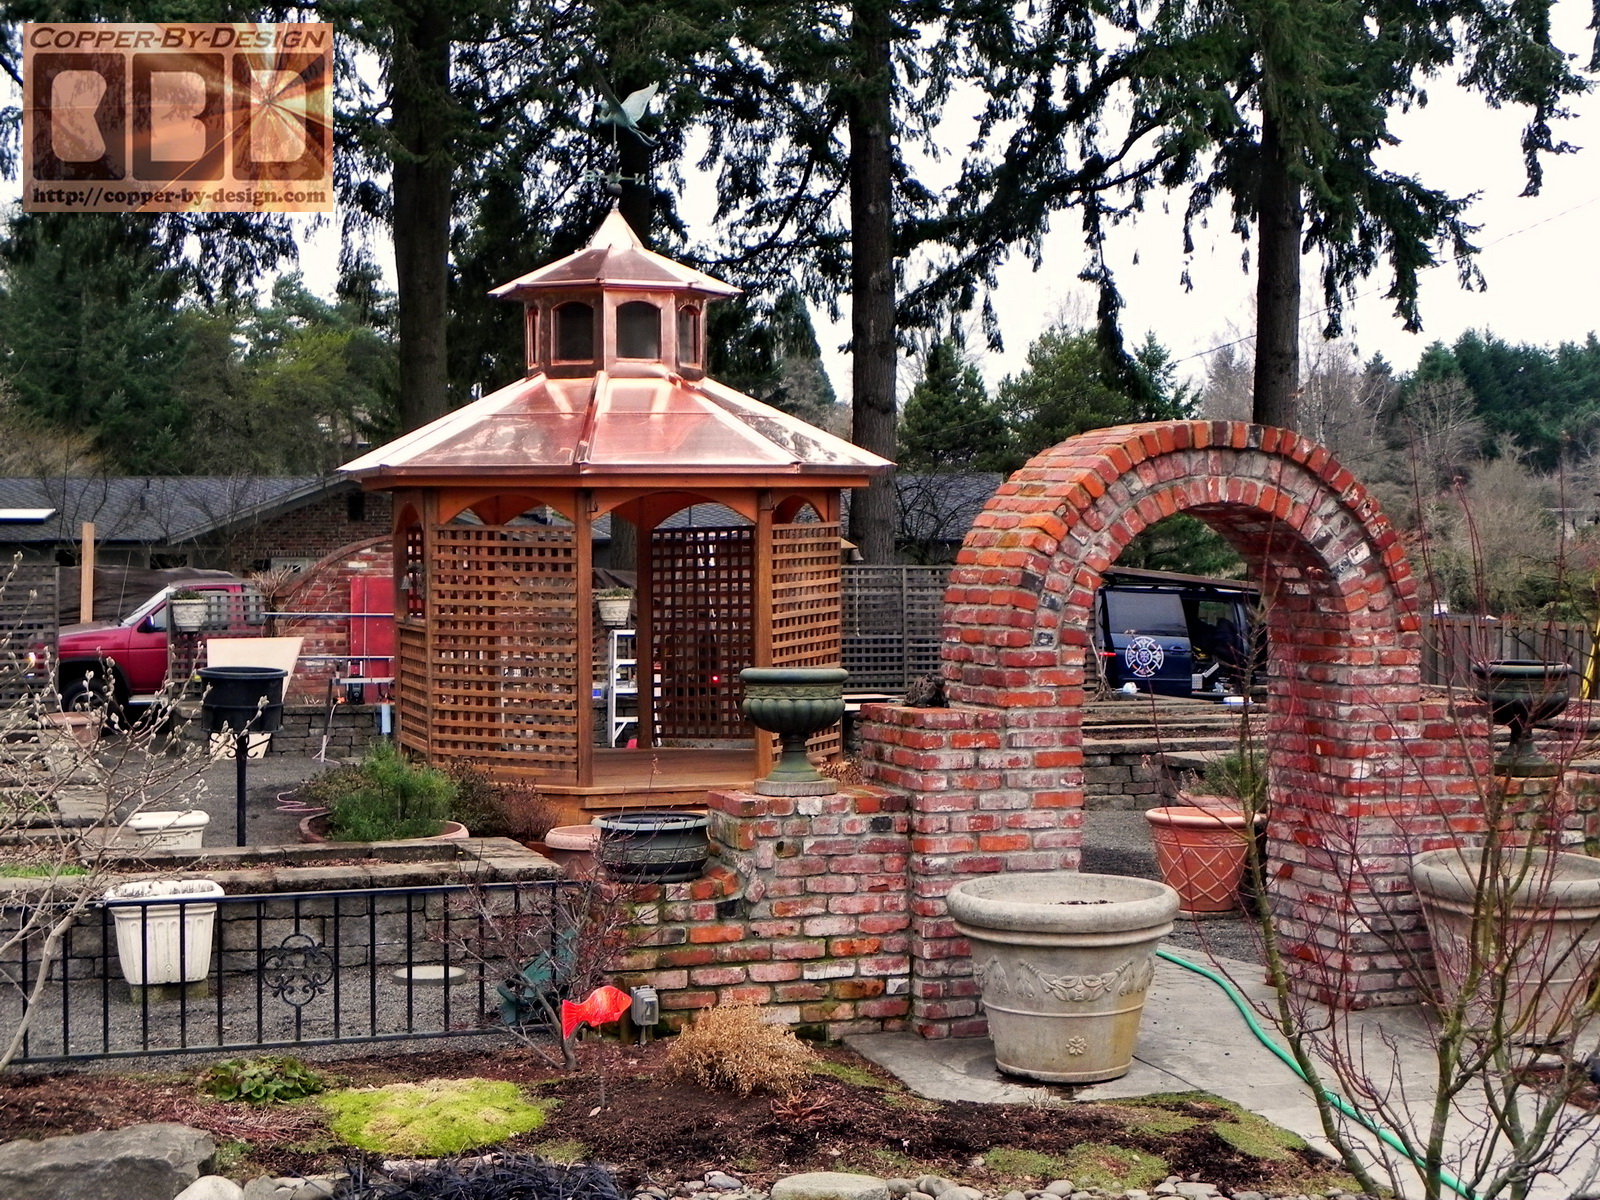
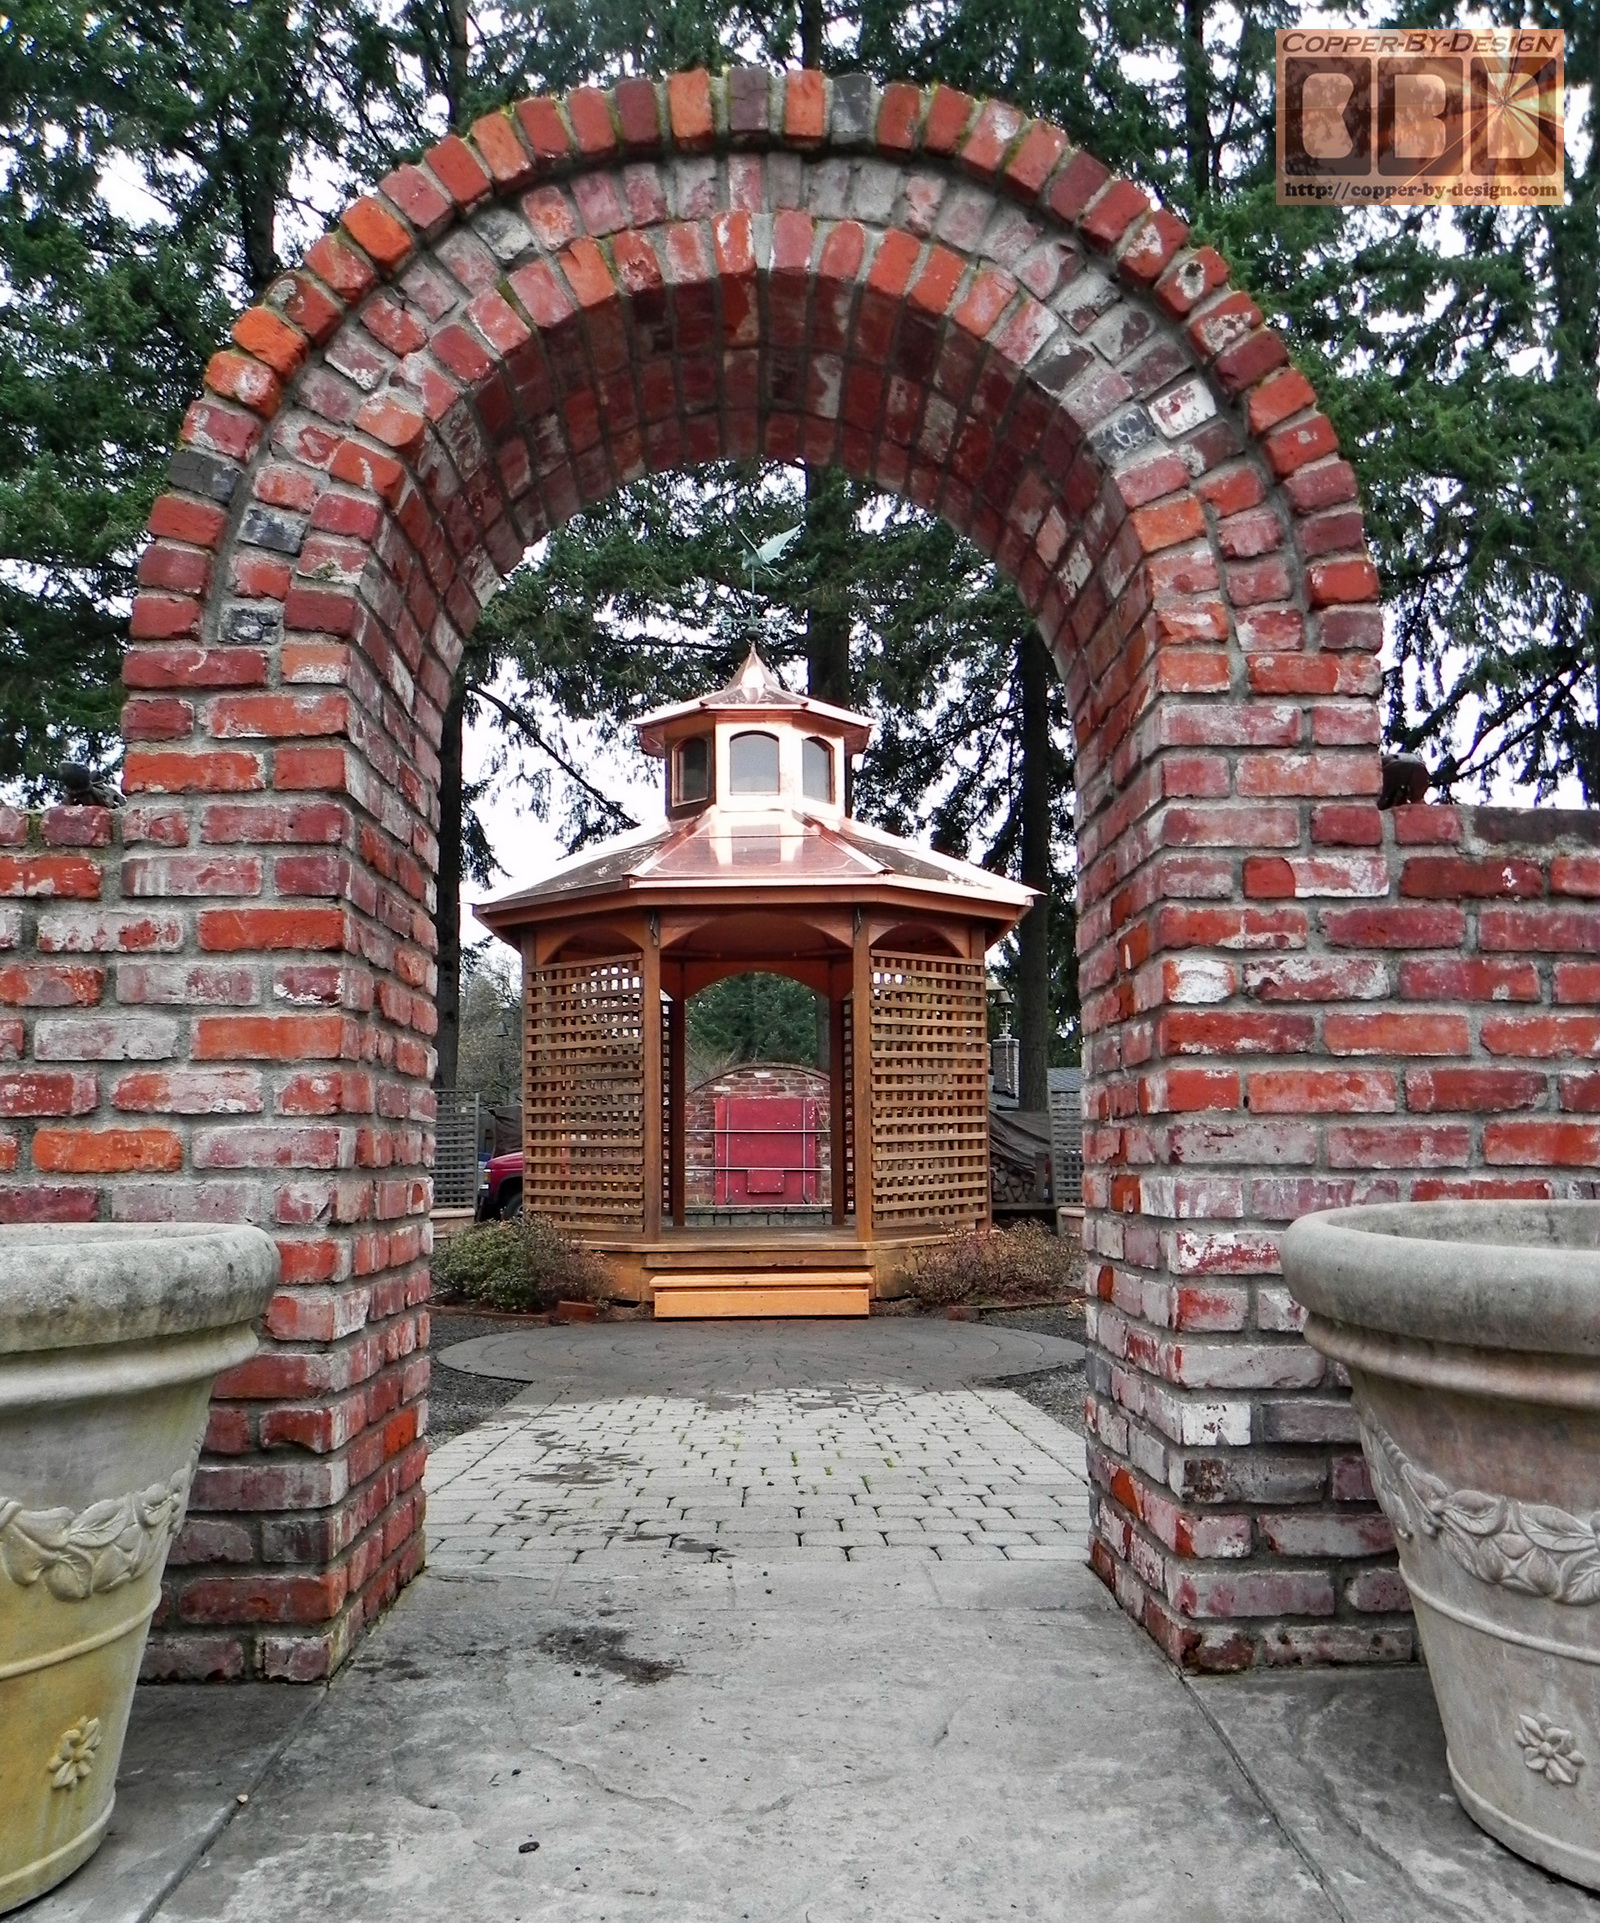
| A lighted Cupola (2011) |
|
After making these clients a pair of copper chimney caps for their house a year prior, this project was to strengthen and reroof their old gazebo with 20oz copper. This was for Emil and Norma Bardana in Lake Oswego, Oregon. They wanted it rebuilt in my Tuscany arch style with a fancy lighted cupola. Sort of like I had done for our clients Cait and Charley Jabusch:
I had taken this photo of their beautiful garden area back when I bid the chimney caps. I just suggested they could have me make them a small copper roof cap for their gazebo to hold their weathervane better, but it seems they wanted a whole lot more.
I was surprised to hear a year later they wanted the whole gazebo covered with copper and make them a cupola as well. We discussed different sizes and I made them a scaled diagram to show what is would look like. They again placed a lot of trust in me to meet or exceed their expectations with this project.
This was the coolest Tuscany arch style copper project I've worked on to date. They had first contacted me 6/12/09 and then again on 6/20/10 to discuss this second major project they were now ready for, so we swiftly worked out the details of this project on site with a personal visit to their lovely garden space again to get measurements, so I could provide them with a firm quote to do this work.
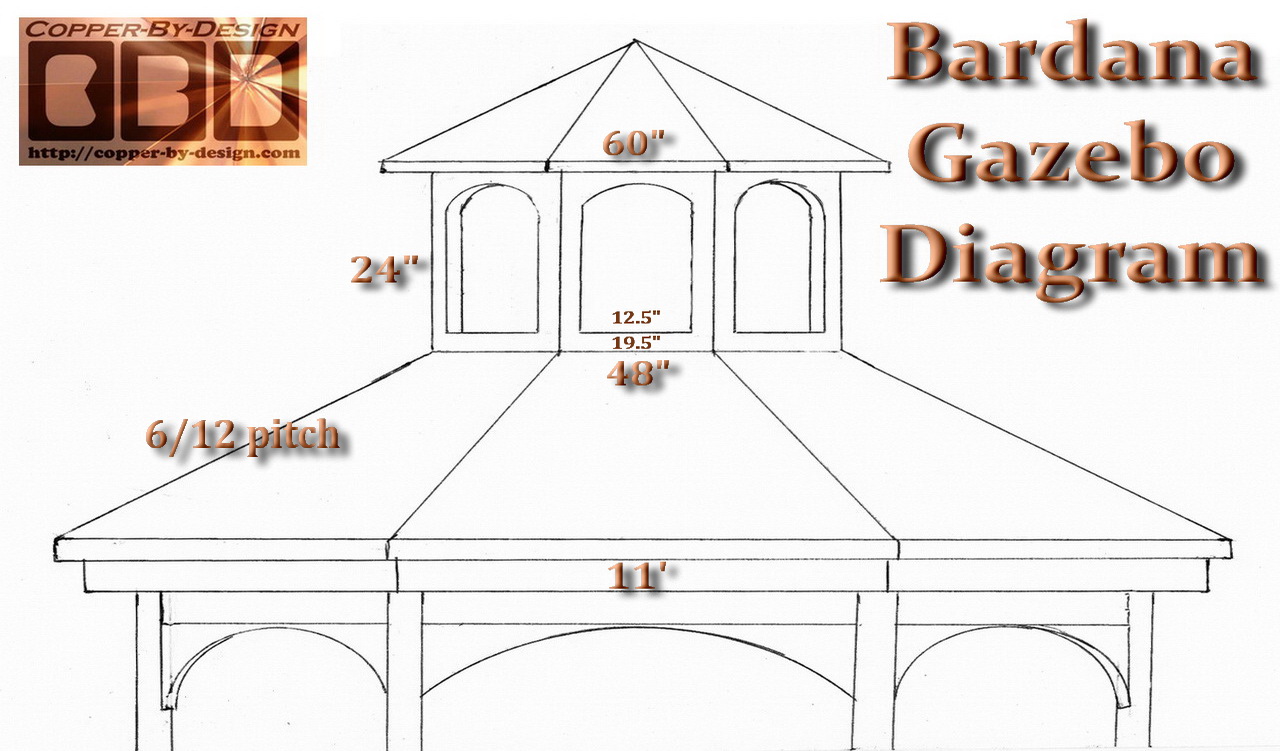
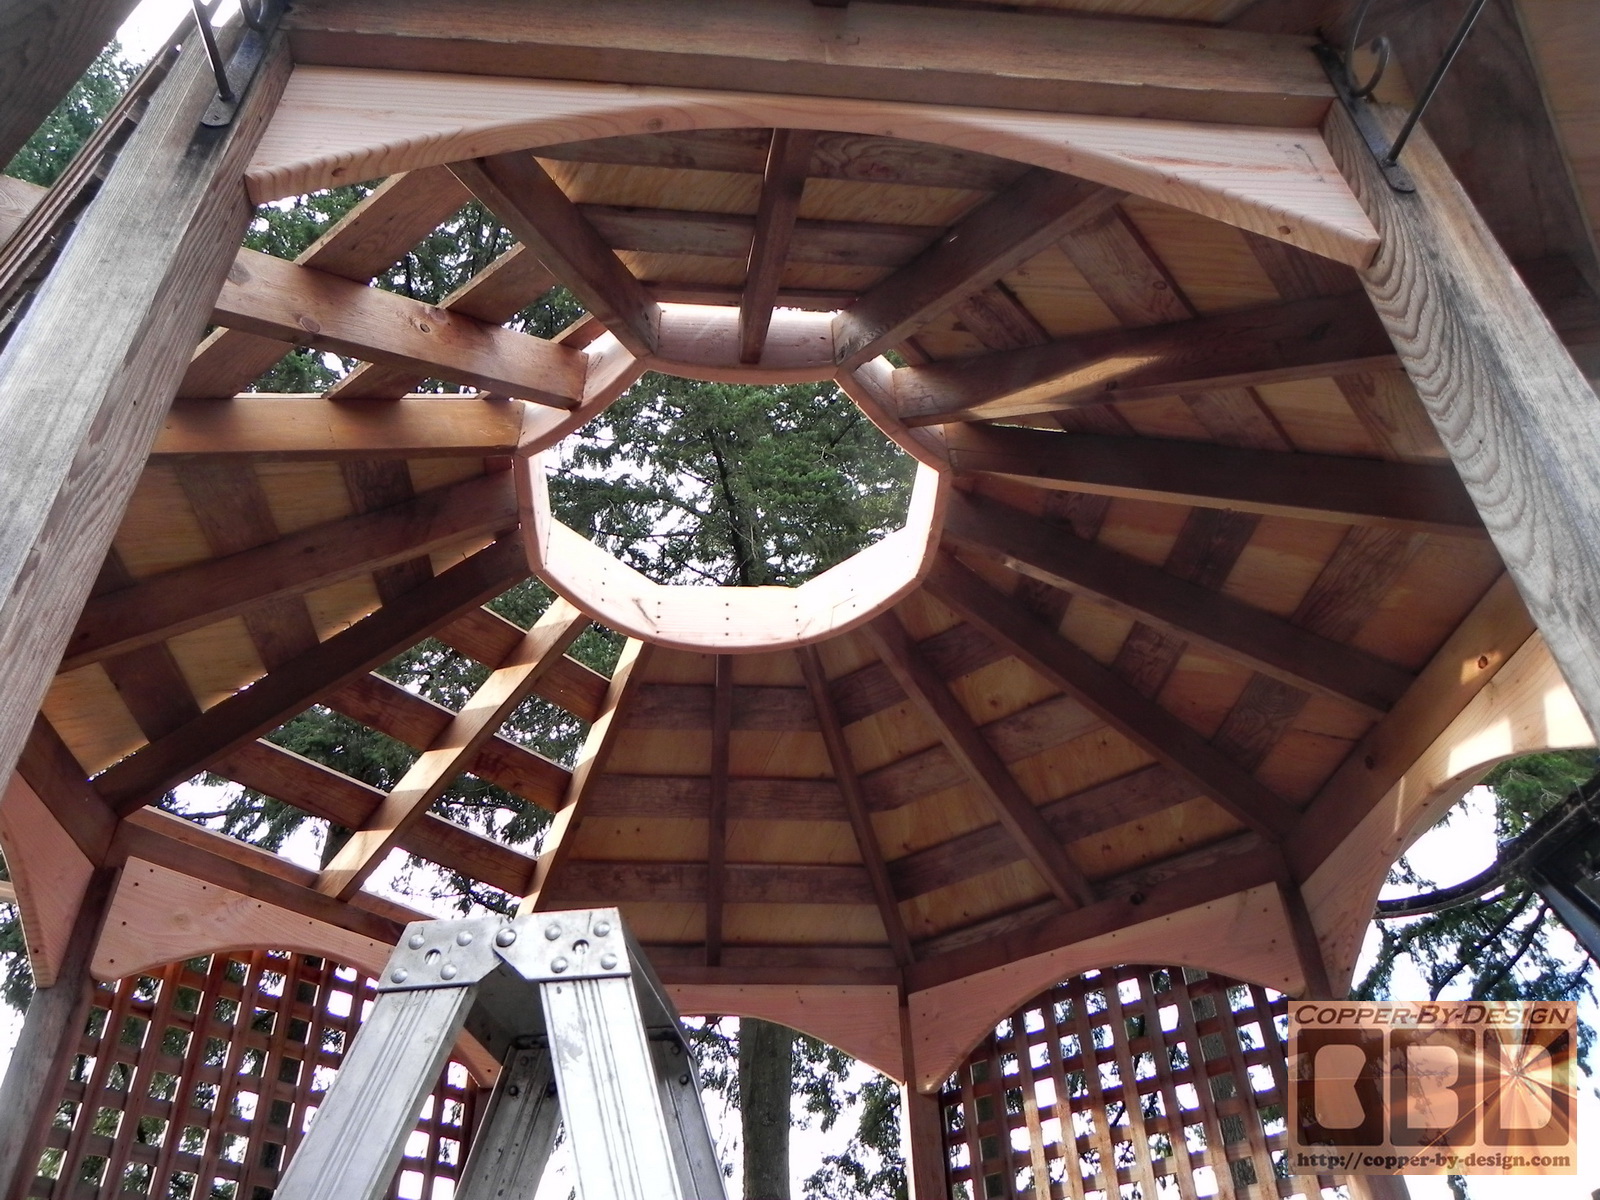
Given the width of over 11', I came up with the recommendation of a 4' wide by 2' high cupola with a 5' wide roof over that to offer it a 6" eave out past the arches. Knowing they were not looking for a cupola so big a person can sit up inside it, like the Jabusch gazebo, this was substantial enough, but should not seem too large.
I ended up adding 3" to the width of the cupola roof, and about 6" to the width of the lower roof plus the new copper gutter. The cupola roof line is designed to match the roof line of the main gazebo roof: 6/12 pitch, so this will look more like what the architect might have designed for this gazebo, had he designed a cupola for it. The client approved this design and were very pleased with the results. We discussed aesthetic options, like adding the arched detail to the gazebo below the roof, which also added a good deal of stability to the gazebo structure, so it was less wobbly up there.
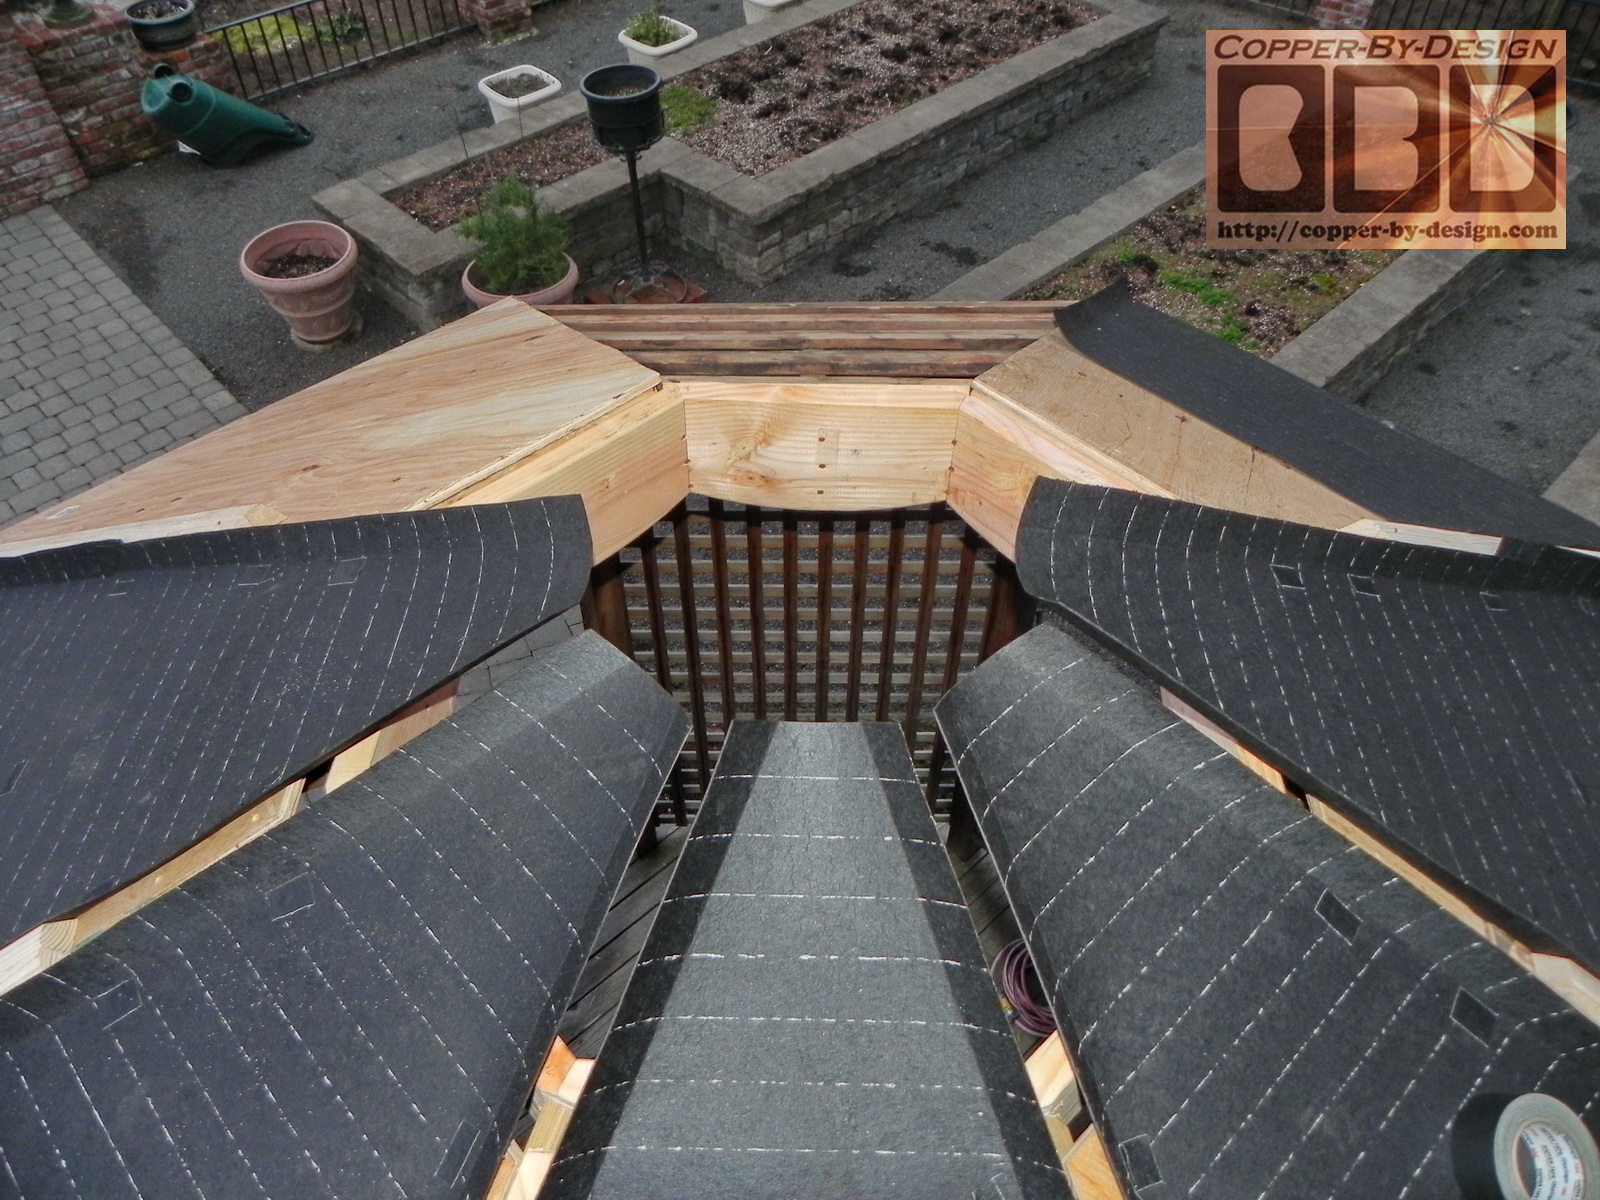
Here's the new plywood being attached with 2.5" deck screws after I had cut out the center of the roof joists to install this support ring for a 36" open gap in the middle.
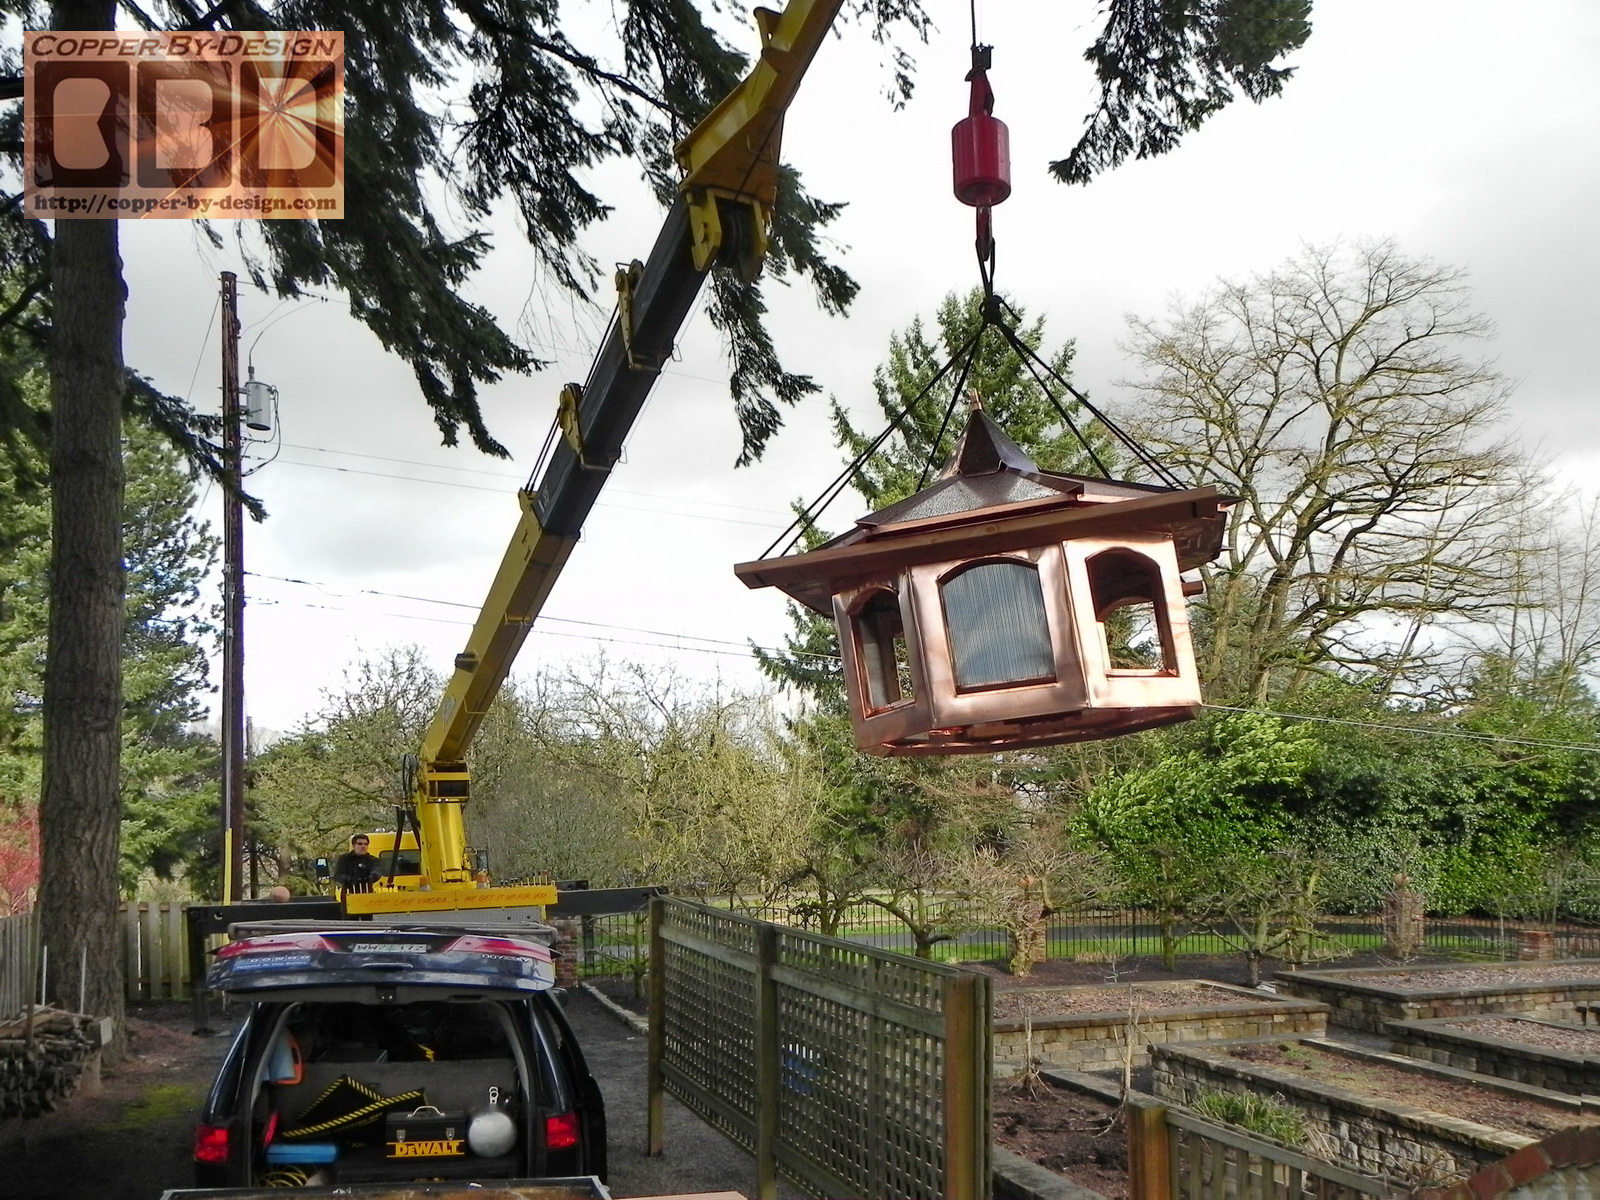
It only took a few minutes to get this set over the gazebo. It's amazing what can be done with the right equipment.
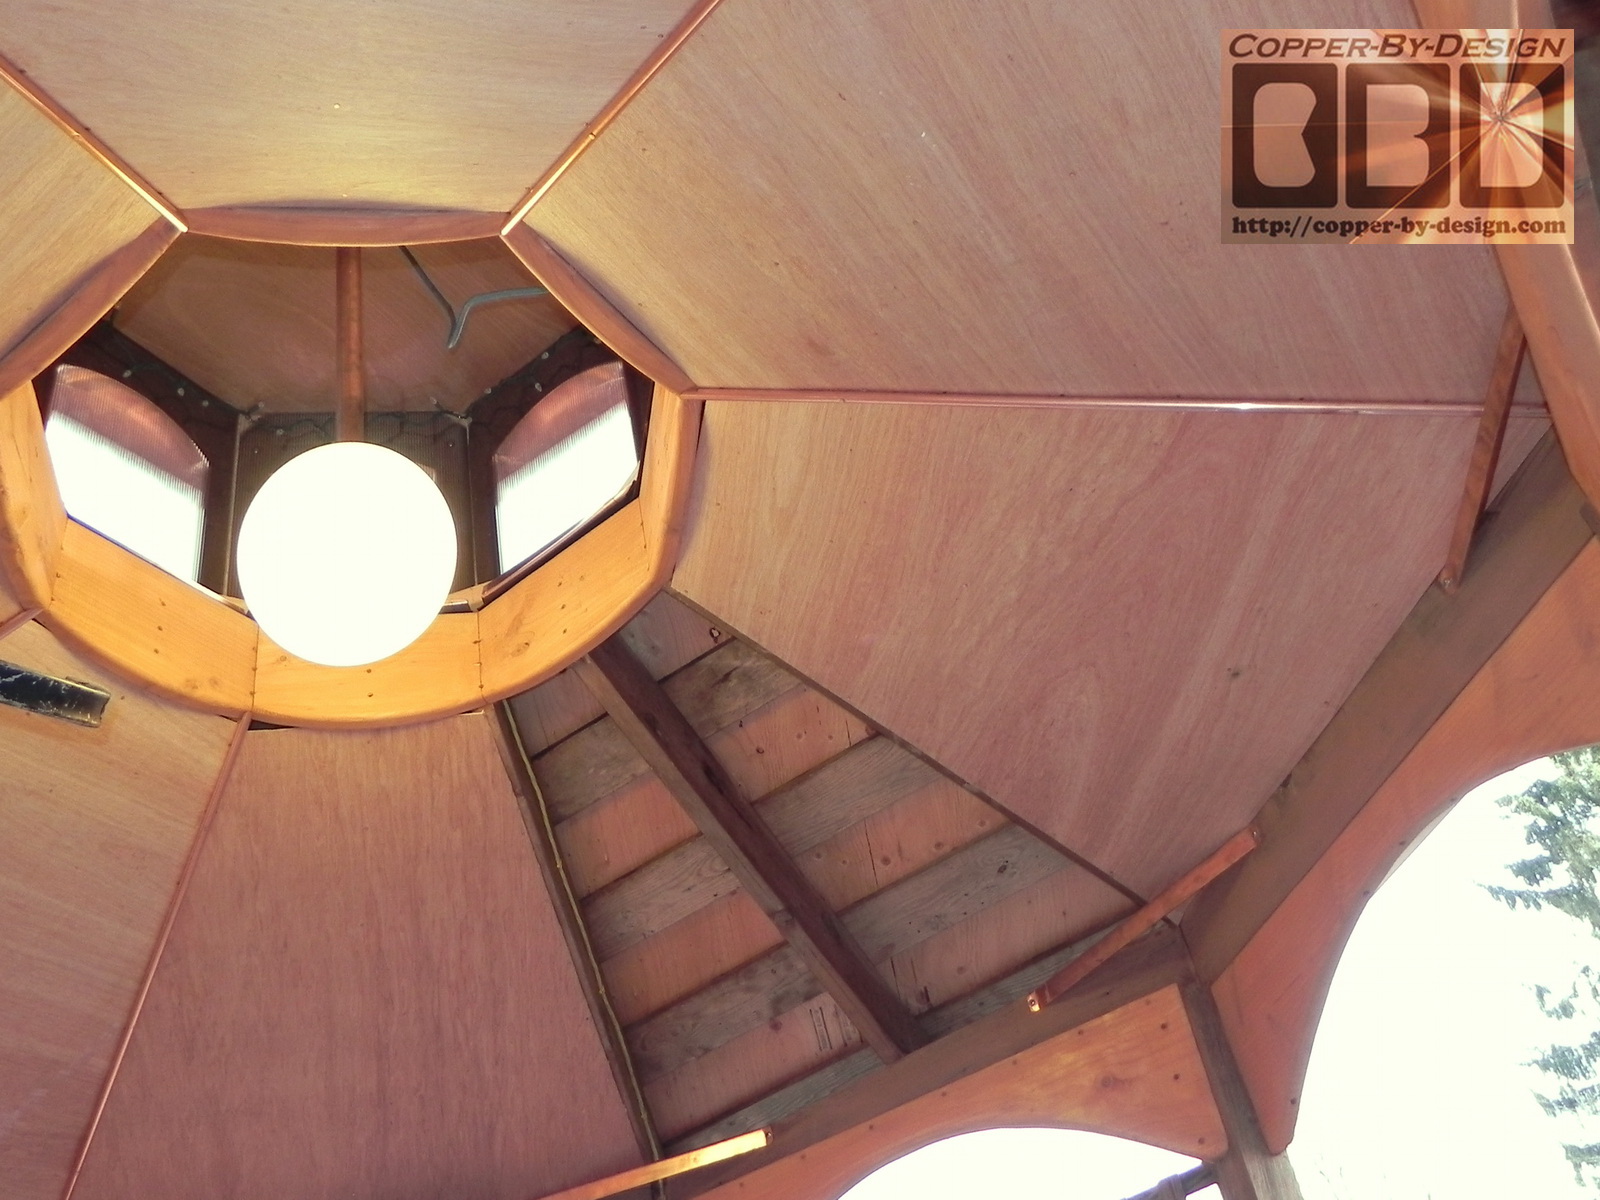
The cupola needed to be centered and bolted down with the 6" lag screws before they can be custom fitted and sealed to the corners of the cupola. The inside of the gazebo was a bit rustic looking, so I gave the clients the option to have me install a nice hardwood plywood soffit up inside. I knew with all the odd angles for each side I was not going to get these fitted perfectly, so I added some 1/2" copper piping over each seams for a very clean look.
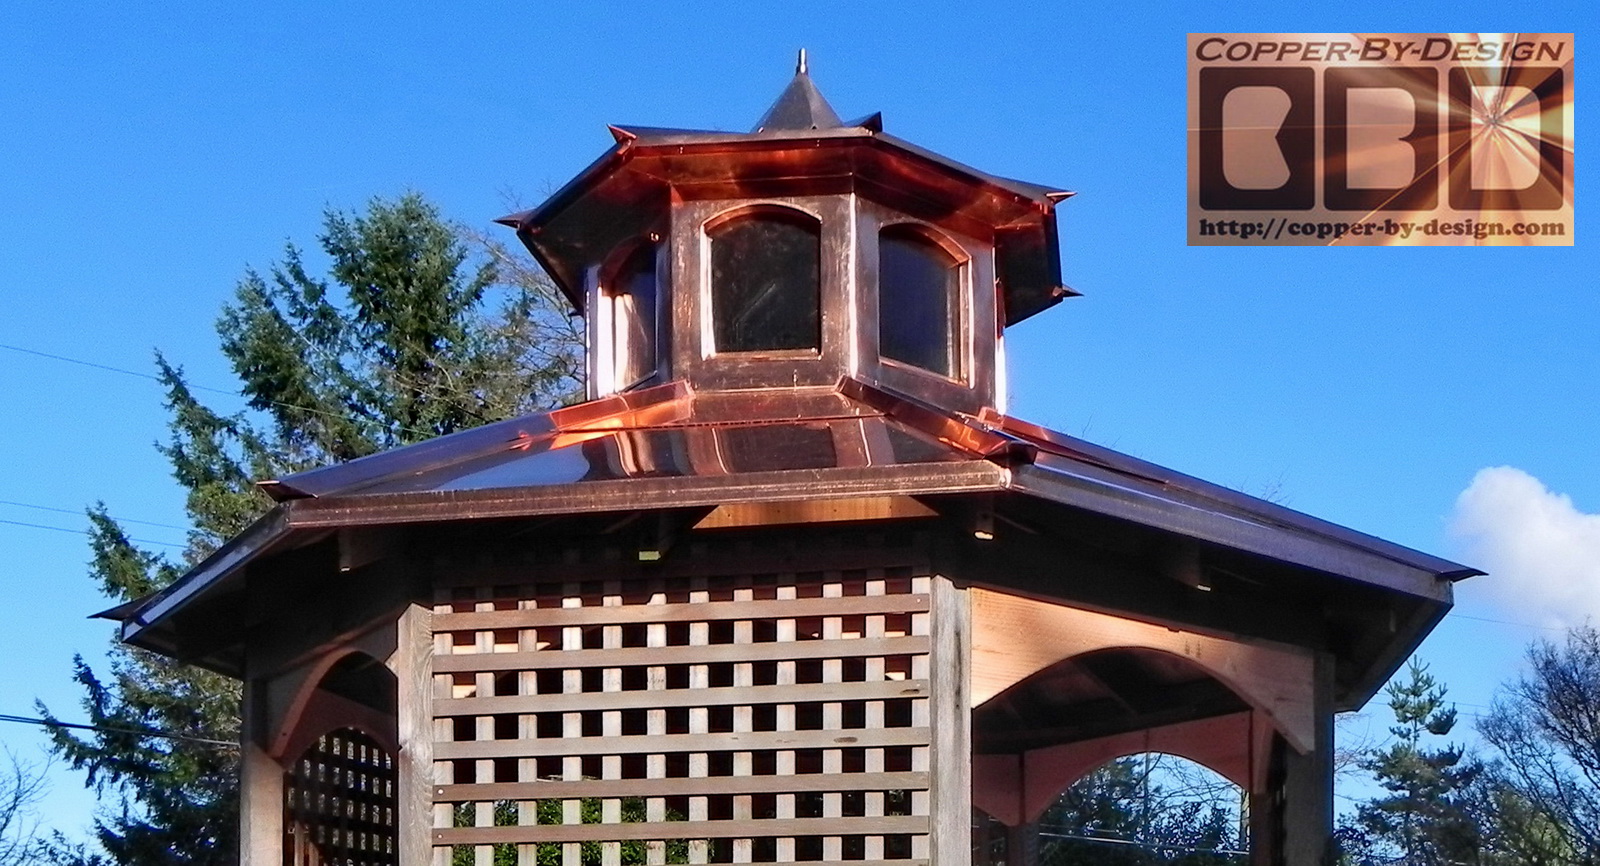
I was able to hide most of the new wiring under the floor and up in the rafters above the new soffit. The soft LED lights in the cupola are on a timer that turns them on at dusk and off 6 hours later. It also has a wireless remote control, as well as a separate light switch down below. The 12" globe has a 18 watt LED bulb that equals a 150 watt incandescent, and has it's own switch near the entry.
The support pipe in the top of the cupola had to be set vertically level, so their Blue Heron shaped weathervane would rotate properly in the wind before the steeple cone could be locked down. You can see the 2.5" wide vent holes in the roof of the cupola to release the heat that would build up inside in the Summer months. It is screened with stainless steel mesh.
|
|
The cost was $10.5k total installed To see more photos for this project https://copper-by-design.com/rc/cp/Bardana.htm |
| Cost Breakdown (back in 2011) |
|
I had given them a substantial discount for this being a large project and I was rather excited to restore this unique arched version gazebo w/cupola. I kept track of the weights for these different parts. The weights and cost breakdown of these pieces were as follows. Lighted Cupola was 290# in all:
|
|
Helpful Roofing Information For some valuable advice with regards to roofing and rain management issues check out our:
(a)
Gutter Installation web pages for answers and solutions that could save you thousands of $ and a great deal of anguish. If you do find this information very helpful, feel free to send us a $ tip for the assistance we so freely have published on the web here for your benefit, like you might tip a waitress. Heck, send us a gift certificate for a candle lit dinner for two. |

.
|
Below is a
photo of our |
|
|
|
We were also a 1997 & 2018 finalist for this same award. See our referral web page to see how we managed to be honored with this special award |
.
 Homepage |
custom sheet metal fabrication
|
|
Company Profile |
|
Roof Caps |
|
Chimney Caps |
|
Scuppers |
|
Gutters |
|
Shipping |
|
Contact Info |
custom sheet metal fabrication
custom sheet metal fabrication
custom sheet metal fabrication
custom sheet metal fabrication
custom sheet metal fabrication
custom sheet metal fabrication
custom sheet metal fabrication
custom sheet metal fabrication
custom sheet metal fabrication
custom sheet metal fabrication
custom sheet metal fabrication
custom sheet metal fabrication