|
|
Chimney Flashing Photo and Description Page Updated 2 / 13 / 2012 |
|---|

|
|
Company Profile |
|
Roof Caps |
|
Chimney Caps |
|
Scuppers |
|
Gutters |
|
Shipping |
|
Contact Info |
|
|
Chimney Flashing Photo and Description Page Updated 2 / 13 / 2012 |
|---|
|
|
Company Profile |
|
Roof Caps |
|
Chimney Caps |
|
Scuppers |
|
Gutters |
|
Shipping |
|
Contact Info |

.
.
|
General information about chimney roof flashing
Below are a few examples of masonry work & chimney flashing I've done |
|
Common Problems
With Roof Flashing Work I've Seen: I've done several tear-offs where I removed 2 layers of composite shingles and the bottom layer of wood shakes, where the only flashing I found around the dormer was under the wood shakes, and of course it was very rusty and deteriorated. That means the last 2 reroofings they had done had not bother to reflash the dormers at all. I have yet to see evidence of a decent roofer in this area. No joke. One of the problems stem from these workers come more from a hammer and nail mind-set. Not from a sheet metal worker's perspective like me, so these area of roofing escapes their private logic. Sadly ethical responsibility seems to be a thing of the past. I understand this is not just a local issue either, Improper roof flashing using just cheap steel is the standard across the Country. This thin steel flashing will not even last as long as the most inexpensive 20 year roofing shingles. Even if it does not rust all the way through it will cause unsightly rust stains down the roofing. From what I have seen chimney flashing is the most neglected area of the roof, if re-flashed at all. More times than not it was never re-flashed during the last re-roof. I have personally seen thousands of examples of this close-up. In most cases they will just bend the old counter-flashing out and slip the new step-flashing under and just bend that rusty counter-flashing back down over it. Even if it were not rusty at all it is not going to last through the life of the new roof. Even though they were not willing to replace the old flashing they are not likely to bother notifying you the Homeowner of these rust issues that still need fixed, so you don't have a clue that the roofing job was never finished until you notice a leak, which means damage has already occurred.
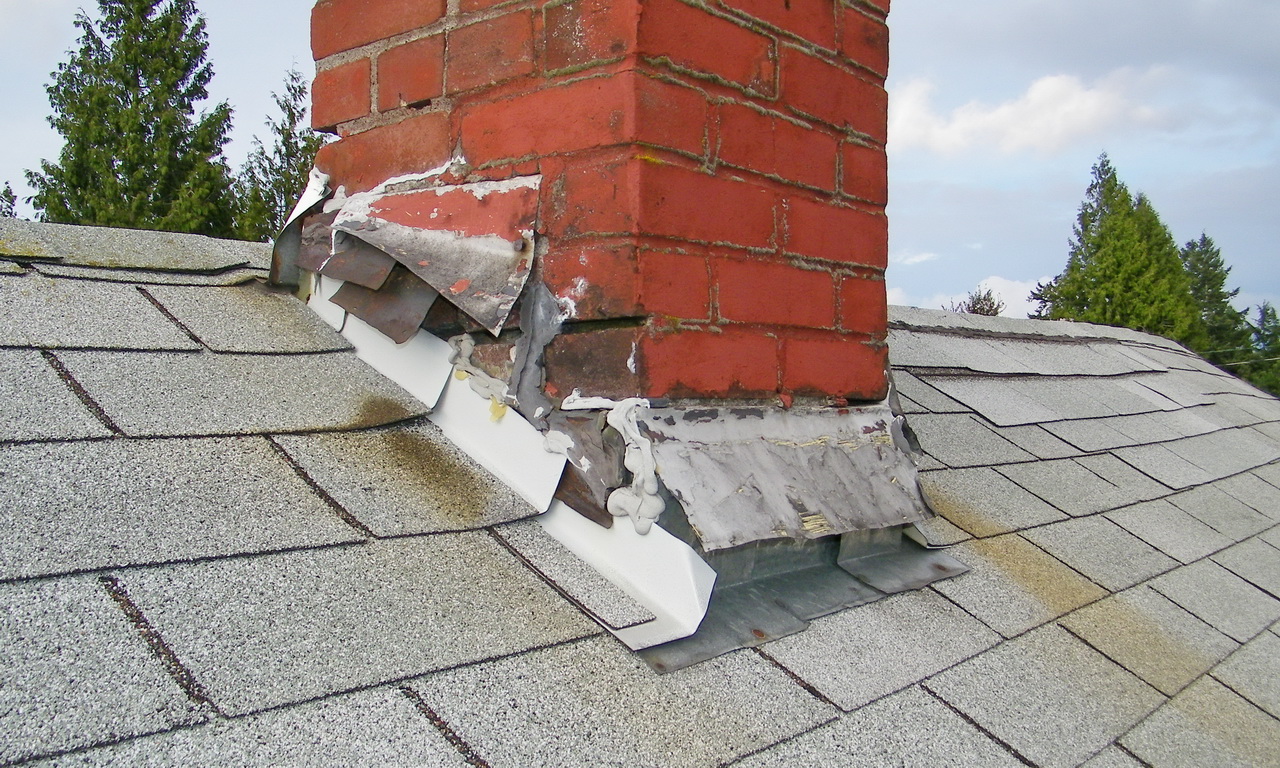
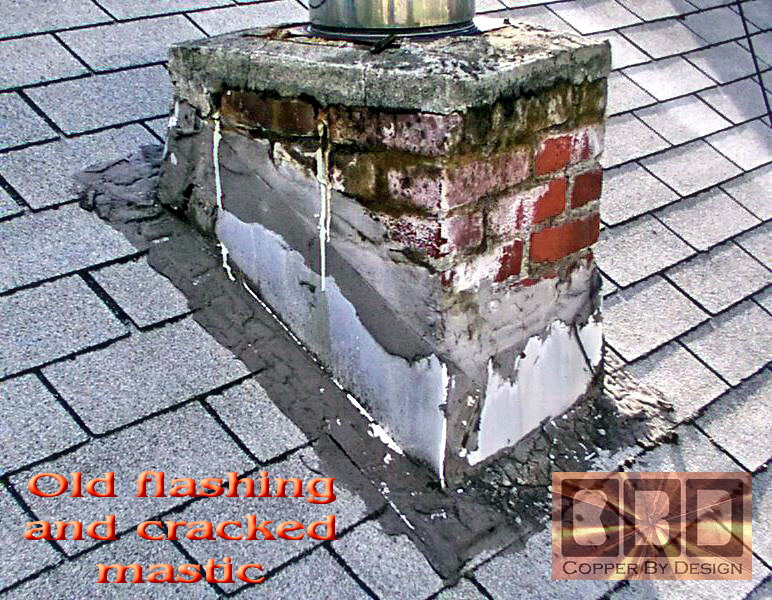
Worse yet is how many homeowners are conned into paying to fully re-roofing their house because of these flashing leaks, instead of just replacing that flashing. These fancy talking salesman are much more motivated to sell a whole re-roofing package to unsuspecting Homeowners to make that big ticket sale, where in most cases even if they do actually replace that flashing they again will do this new work without the benefit of using rust-free metal like aluminum or copper. In many cases not even bothering to re-flash the problem areas as they had promised, and failing to solve the actual problem. This is one of the main reasons liability insurance for roofers is very hard to get and extremely costly these days, being around 500% more than any other type of construction work. That is very telling in it's self demonstrating irrefutable proof of what I'm saying here. Most of roof flashing can be replaced without re-roofing the whole house (as seen above), but of course that is far less profitable for a Roofing Contractor, so that is rarely offered as an option for your consideration. These roofers know better, but they still do the same kind of roofing with this cheap steel flashing that they just tore off of your house. They know will fail in short order, but they just don't care. It is said how this is the definition of insanity: doing the same thing and expecting different results. Sadder yet is how they are only saving around $200 on the average reroofing by not using aluminum that is about twice as thick and will not rust even if all the paint were to flake off decades later, still protecting your roof. If that were not bad enough; Instead of flashing areas with metal; they will often use the cheapest caulking sold; called mastic. They just smear it around those problem areas. Mastic is just fibered tar with no UV protection. This will usually get the roof past their minimum required 1 year warranty that the Construction Contractors Boards require of any contractor, but not much more. This mastic tar will become brittle, crack, and peal away within a few years. If their work were to be inspected by a State Code Enforcement Inspector, it would not be approved. They are not to use mastic anywhere on a roof. That is a clear sign it was not properly flashed. Mastic is only to be used as an emergency patch to pacify the leak until a proper fix can be made, but it makes for a very messy clean-up. The roofing needs to be replace after a mastic attack, as seen in these photos:
We know this to be a very common intentional crime of Roofing Contractors, since pretty much any roofer has seen the evidence of these common issues when doing a tear-off of an old roof; i.e. very rusty steel flashing on the roof and mastic failure. When they tear into a bad roof for replacement it tells a story of why this roof failed. They would have to be complete morons to not see this clear evidence in front of their eyes. Yet, they continue to ignore this evidence and do the same shoddy work, since in most cases they are not required to file for a building permit to replace your roof year after year, and have not had to worry about an inspector double checking their work.
What about Lead Flashing? Here is an example
of a Client installed chimney flashing kit I made for them:
Common signs of shoddy workmanship:
Even high quality silicone caulk should never be used to attach counter-flashing, because it is just rubbery and adds no structural strength to your compromised chimney. Just as with the useless effort of tuck-pointing a chimney to make the mortar grooves look nice again; the new granulated caulk in such a shallow groove has only the old crumbling mortar to stick to, so it will simply fall out within a few years. These groves need to be ground out a lot deeper than just 1/2" in order to have the upper and lower brick surface to adhere to, and only be filled back in with real mortar. The groove needs to be at least 1.5" to 2" deep. Anything short of that is a waste of time and money. Over the last several decades so many roofing contractors were too cheap to spend a few extra dollars on aluminum flashing that all the suppliers in our area decided not stock aluminum flashing any more. It can be special ordered from a fabrication shop like mine, but of course that makes it just that much more expensive than mass produced stock. My Roofing web page at: http://dmr-gutters.com/rf/roofs.htm goes into more detail about these terrible issue. So don't leave without reading it over. It will help to save yourself a great deal of wasted cost and anguish down the road.
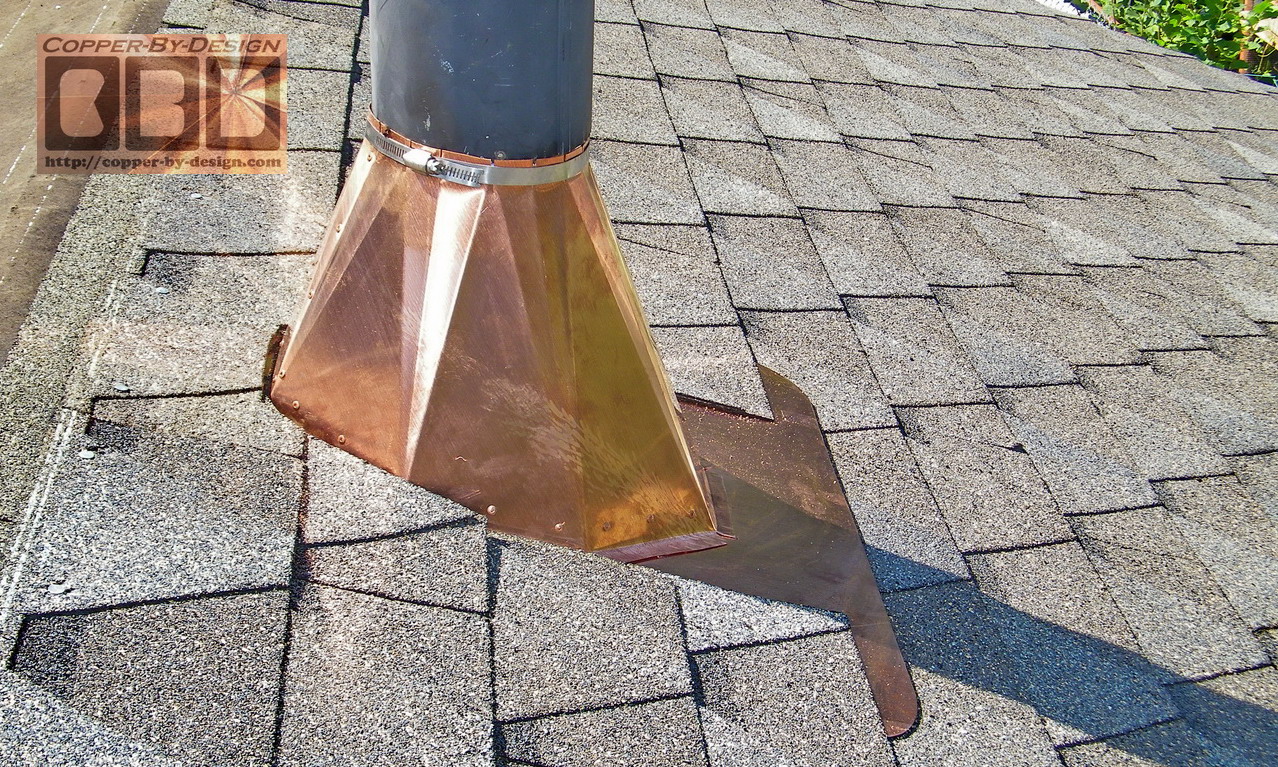
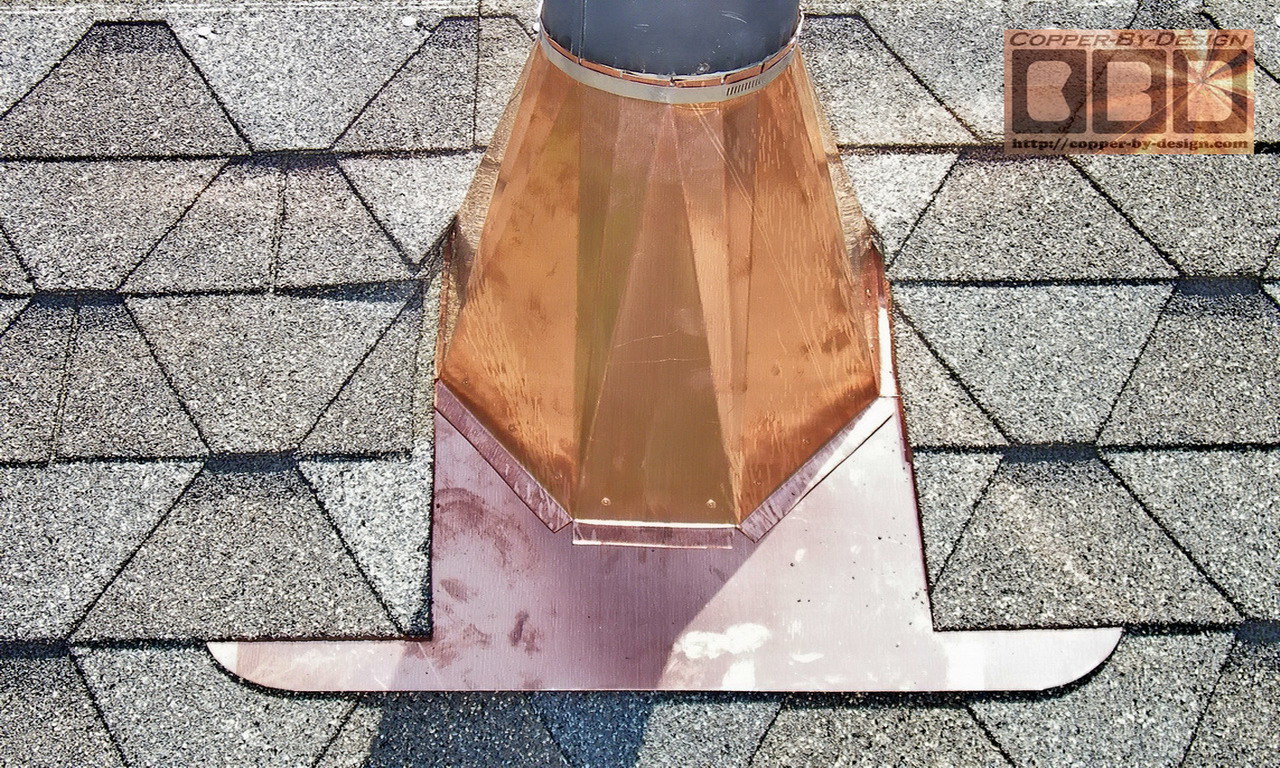
Can you make us a custom copper chimney flashing kit?
For more information regarding custom chimney flashing kits I make for clients across the Country go to my Flashing Kits web page for more details: http://copper-by-design.com/cc/cf-kits.htm What about chimney flue pipe flange and
other flashing?
What If
I Already Have This Kind Of Shoddy Workmanship On My House? Do not let them talk you into any other alternative, trying to minimize their damage. They will try to discredit me and say I do not know what I am talking about, but it is simple logic they cannot BS their way out of if you stand your ground. Roofers will claim that it can only be done this way when the chimney was first built by the brick mason, but I prove here that is simply not true. Below are examples of jobs I've worked on that show these shoddy practices I've worked to repair. |
.
.
|
Step-By-Step Copper Chimney Flashing
Replacement |
|
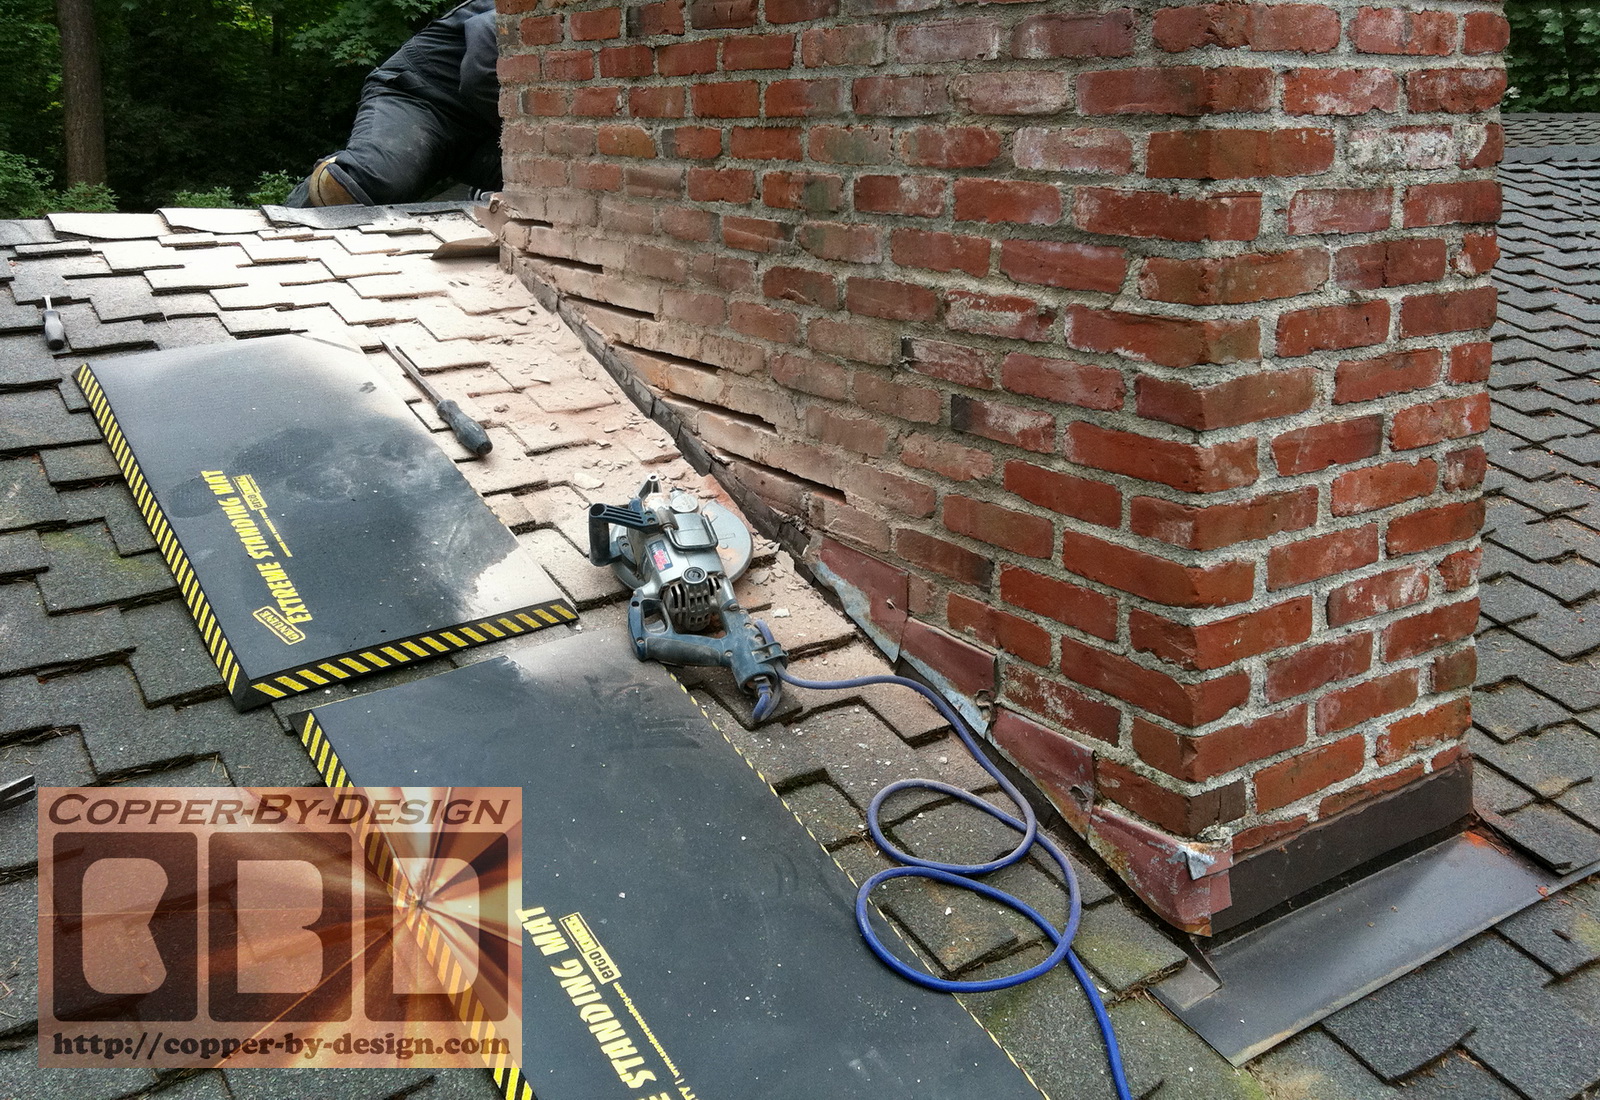
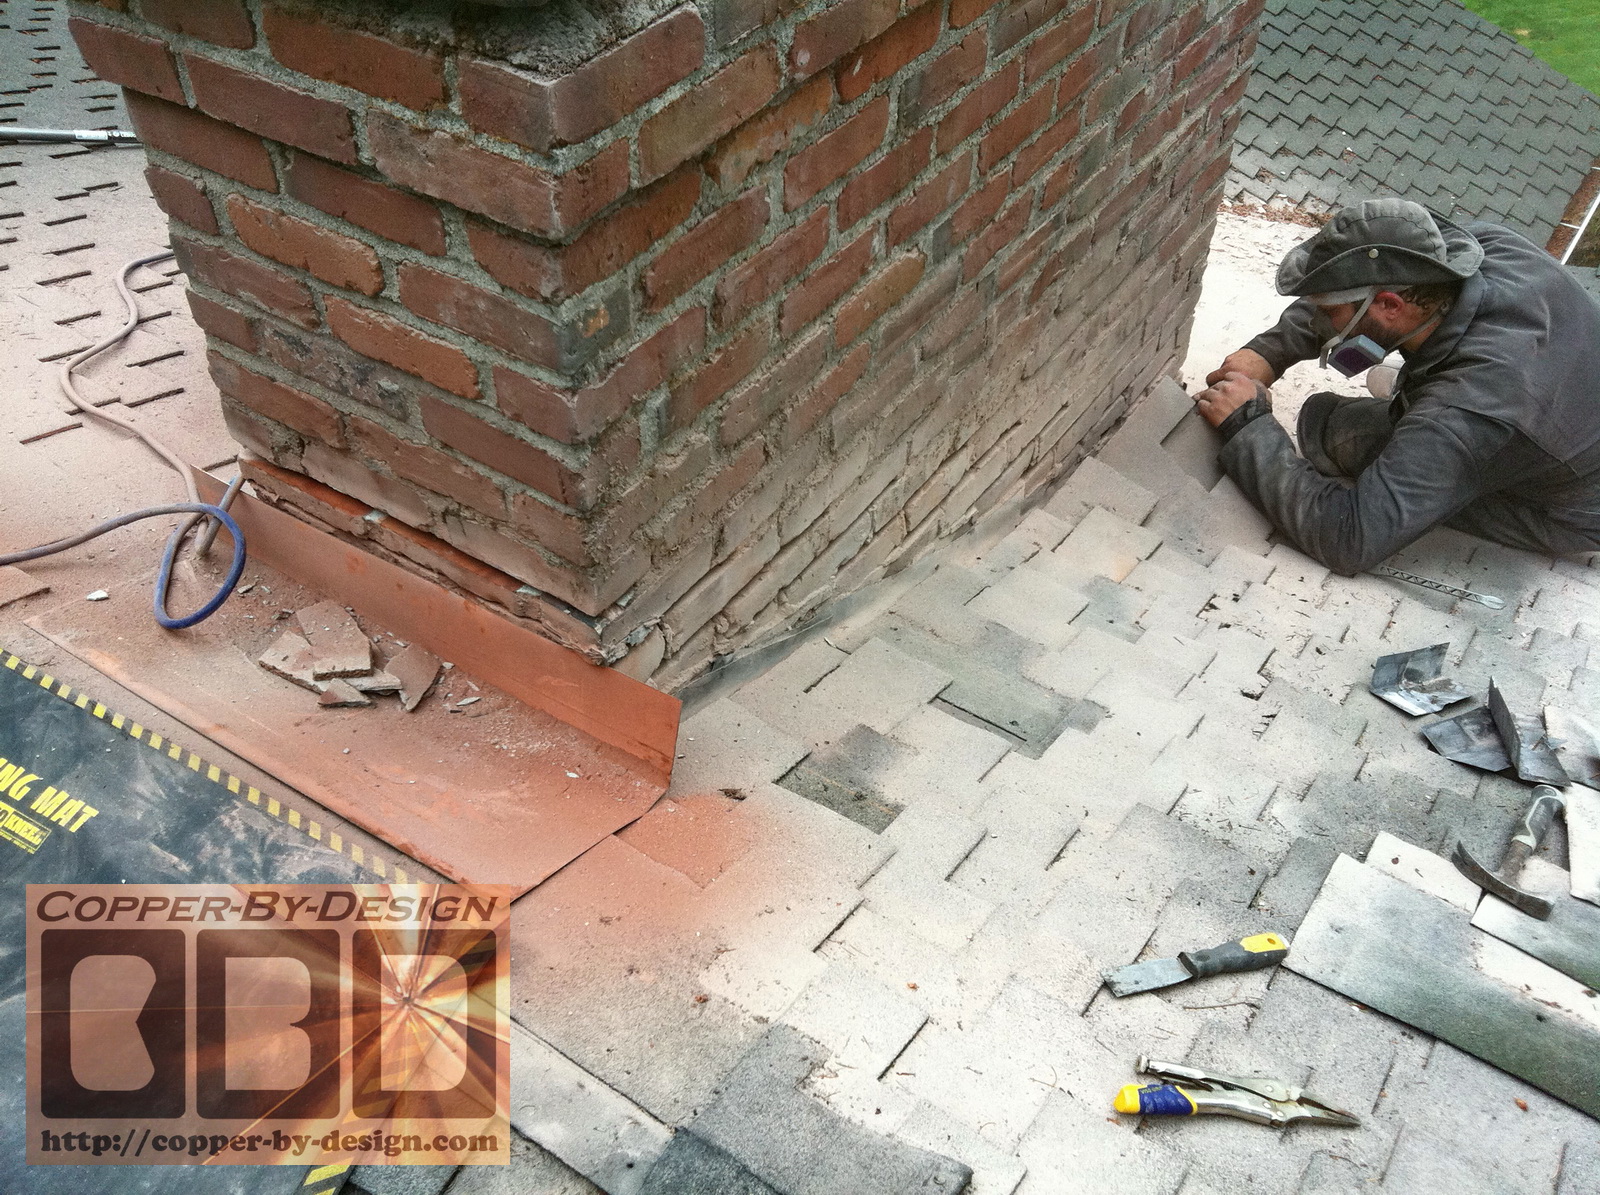
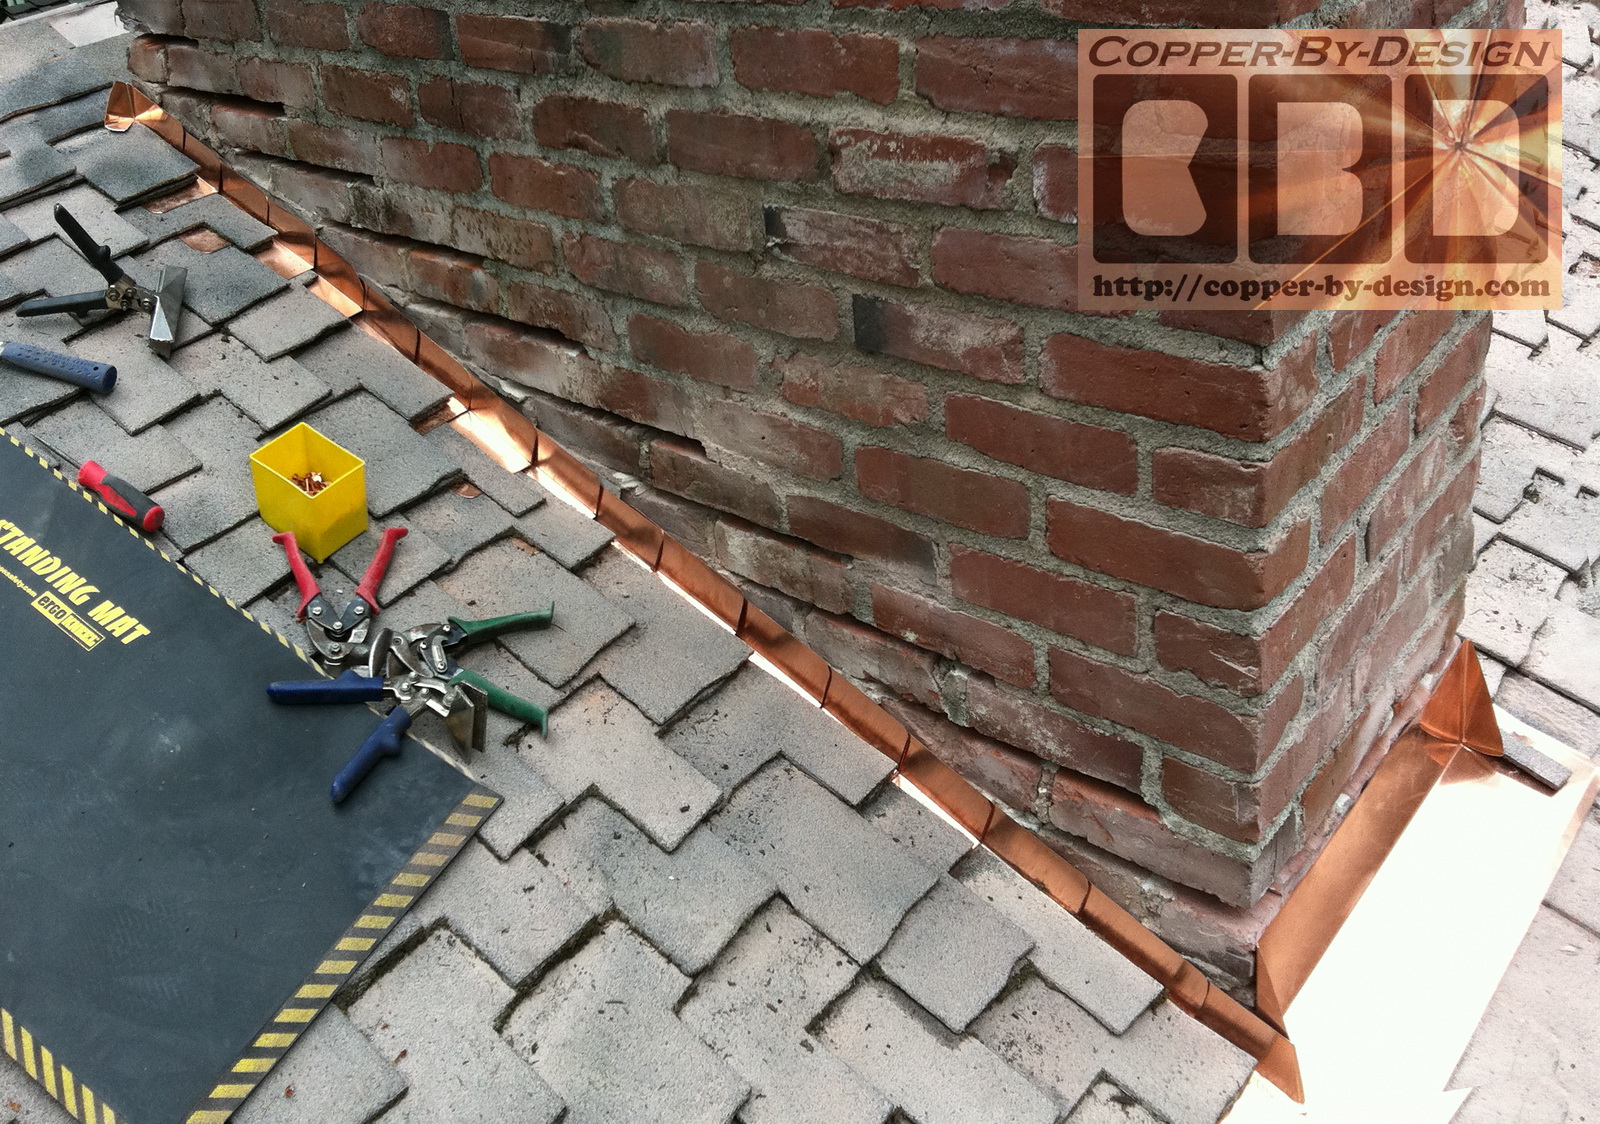
Old Flashing Removal: We had to wait for a spot clear weather, which can be hard to come by here in the Northwest, since the roofing needs to be torn up for a time to rip out the old rusty steel step-flashing. These photos show as I'm in the process of striping out the old steel step-flashing.
These high density sealed cell foam cushion pad you see on the right are to sit on while I work. It is not that I am so spoiled I need this comfort. It is because it protects the roofing shingles from my work boots chafing the shingles, especially on a hot day. It also is a safety issue, as it make me a lot more stable on the angled roof. Another added benefit is how it keeps me from wearing holes in my work clothes so fast. Shingles are very abrasive, just like sandpaper. It can be just an old common foam cushion, like a couch cushion w/o the cloth cover or camping pad.
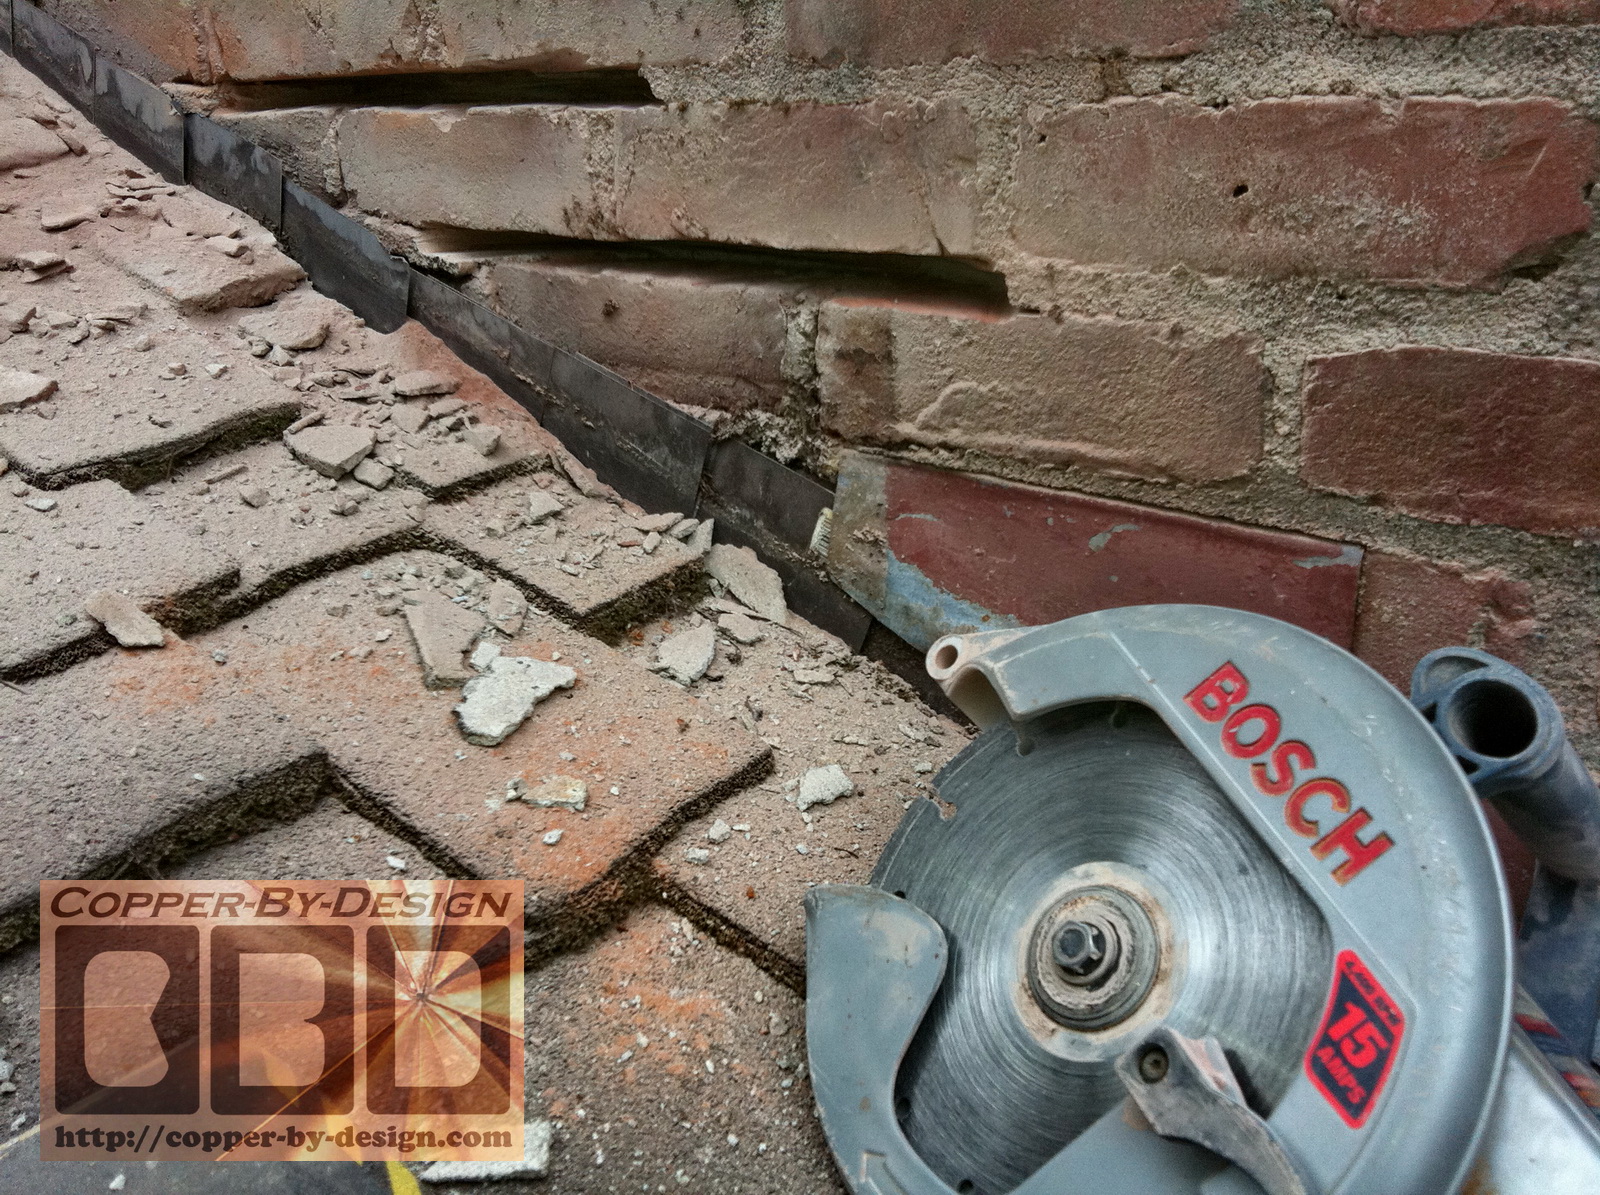
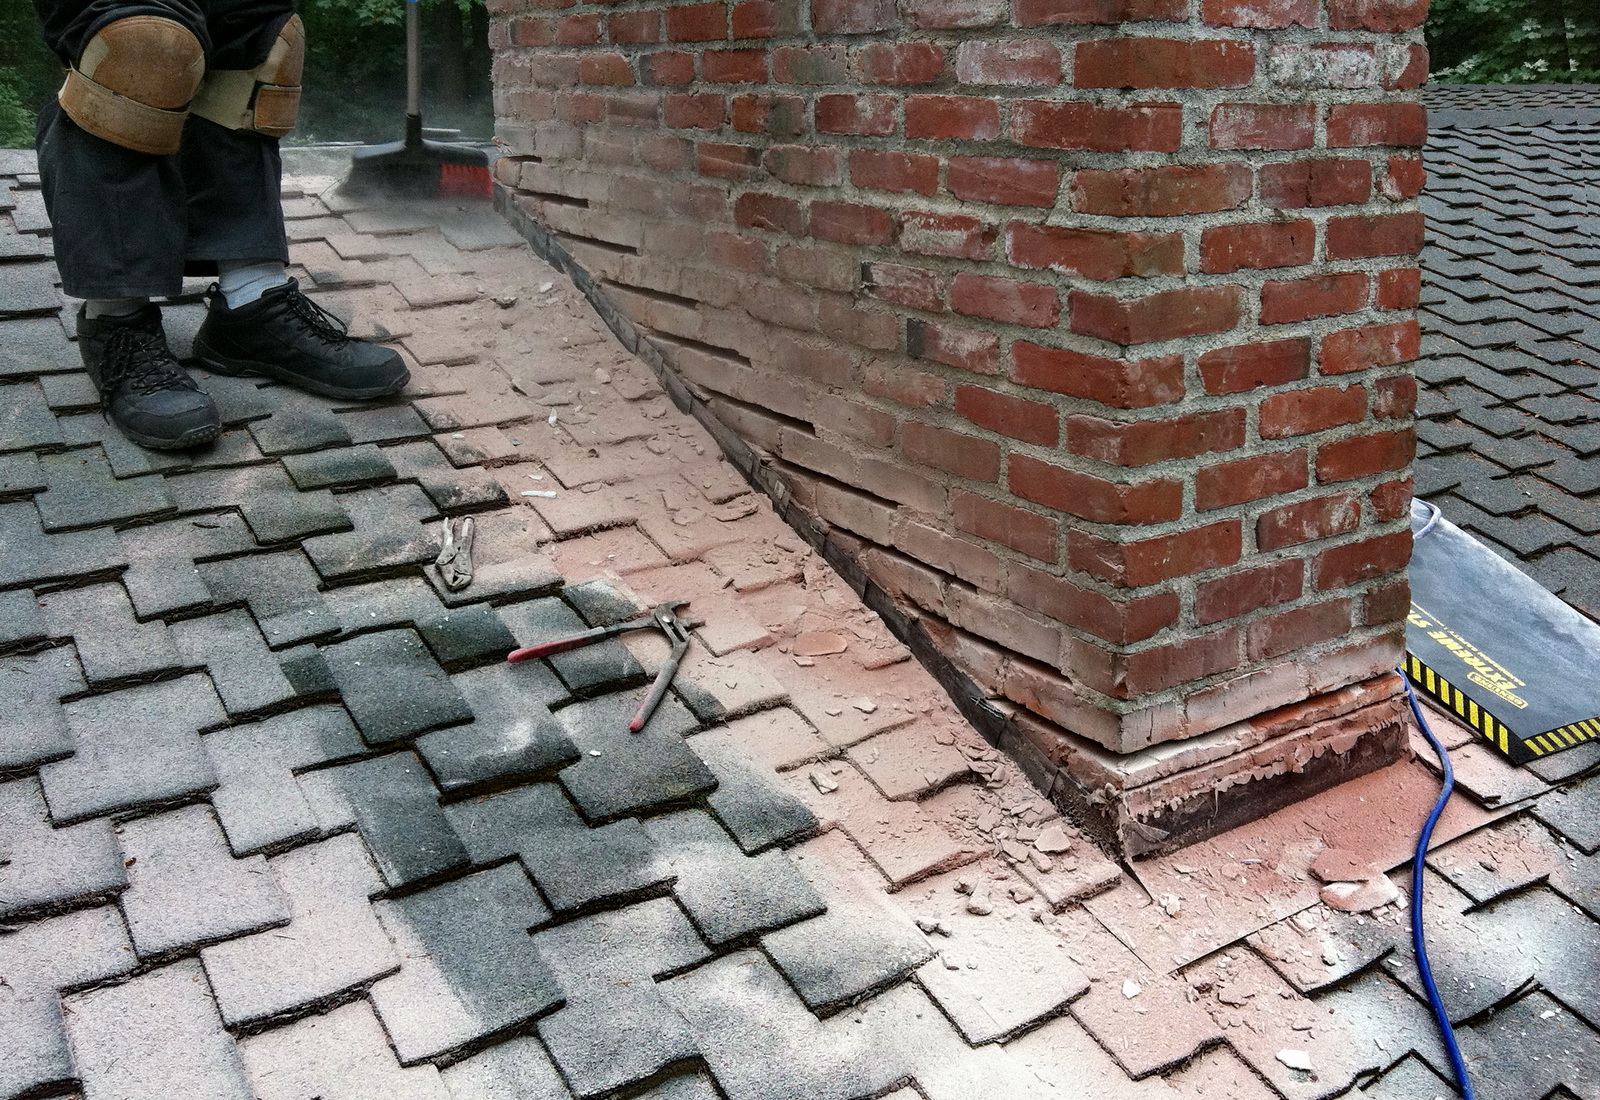
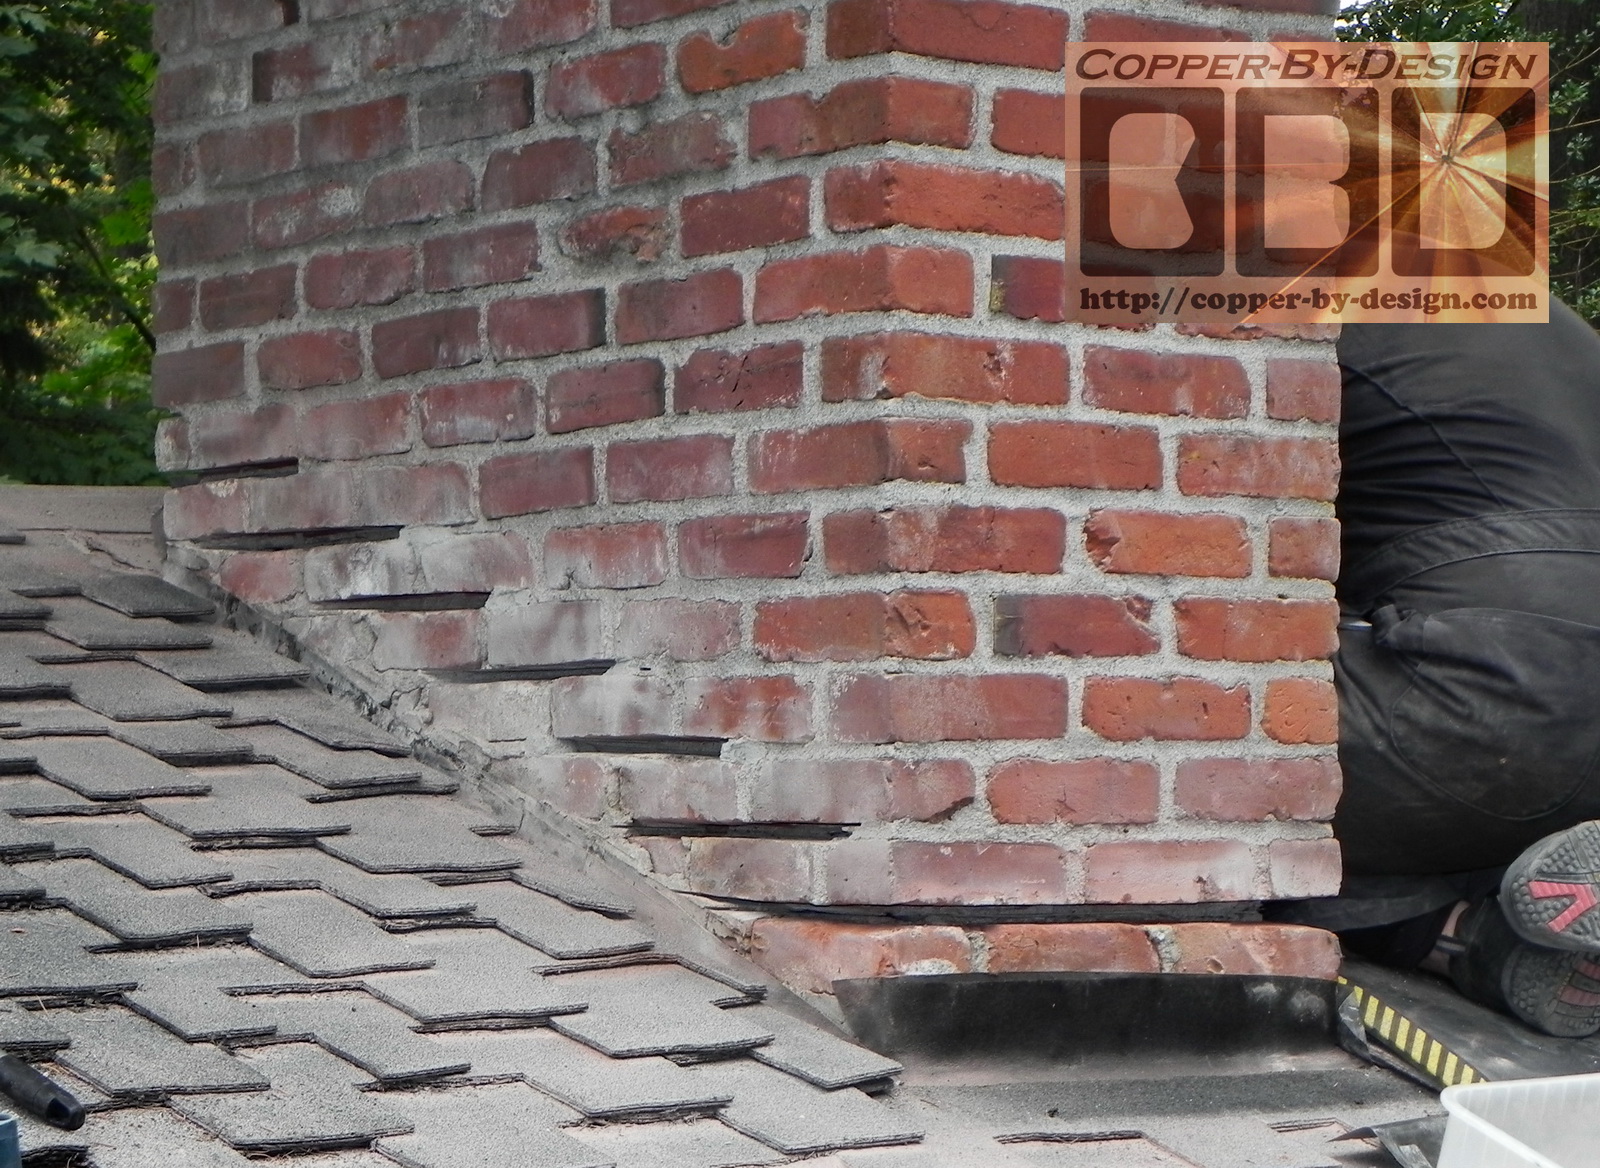
Even if parts of the original counter-flashing were still in the mortar joints, but had rusted so badly that it had broken off and still needed to be removed, so it does not interfere with the new copper flashing. These right photos show close-up shots of the mortar grooves ground out in between the bricks in preparation for the new copper counter-flashing. It is very important to not cut into the brick. Just the mortar joints. I use a 7.25" worm drive circular saw, with the flat work plate removed, so I can grind in tight to the roof and deep with these cuts into the chimney mortar joints.
These cuts need to be about 2" deep. Enough to remove the old rusty flashing out of the chimney, but not further. Remember the bricks are only 4" wide. You must be careful with this or the chimney could collapse under the weight of the bricks above. So far I've not had any chimney collapse from this extraction work, but I imagine it could happen when I've see old mortar that was so rotten that I could dig it out all the way to the inside with just a pencil, so it's best to be mindful of that possibility. Especially if the mortar is that soft and crumbly. Standard bricks are just 4" wide, so that still leaves at least half of the old mortar to continue to support the weight of the bricks above these cuts while I am working on this.
As you can see it makes a huge dusty mess that can be dangerous under foot and harmful to your lungs. You'll have to wear a filter face mask and safety goggles while doing this grinding work. This dust will settle in your hair and you'll not be able to run a comb through it (ick), so it is best to wear a hard hat or a bandana. It will wash out just fine with ordinary shampoo, but it will seem dirtier than you have ever known your hair to be. |
|
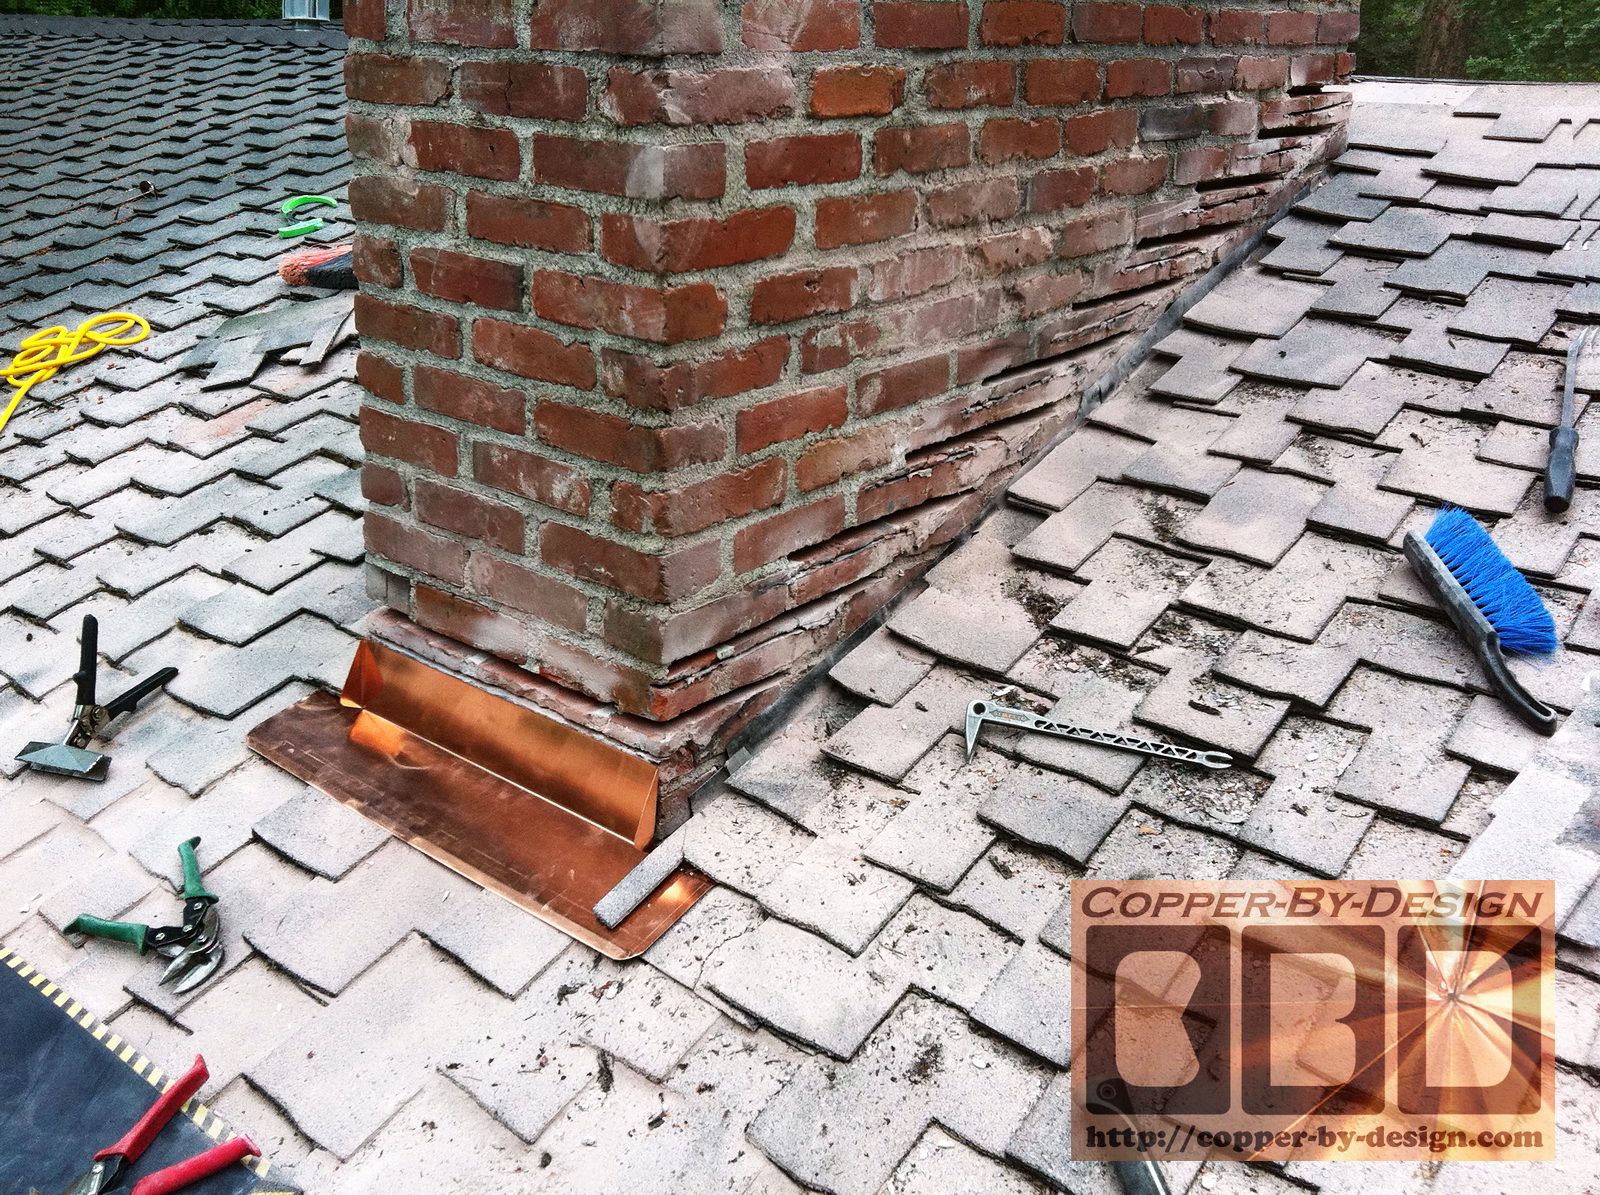
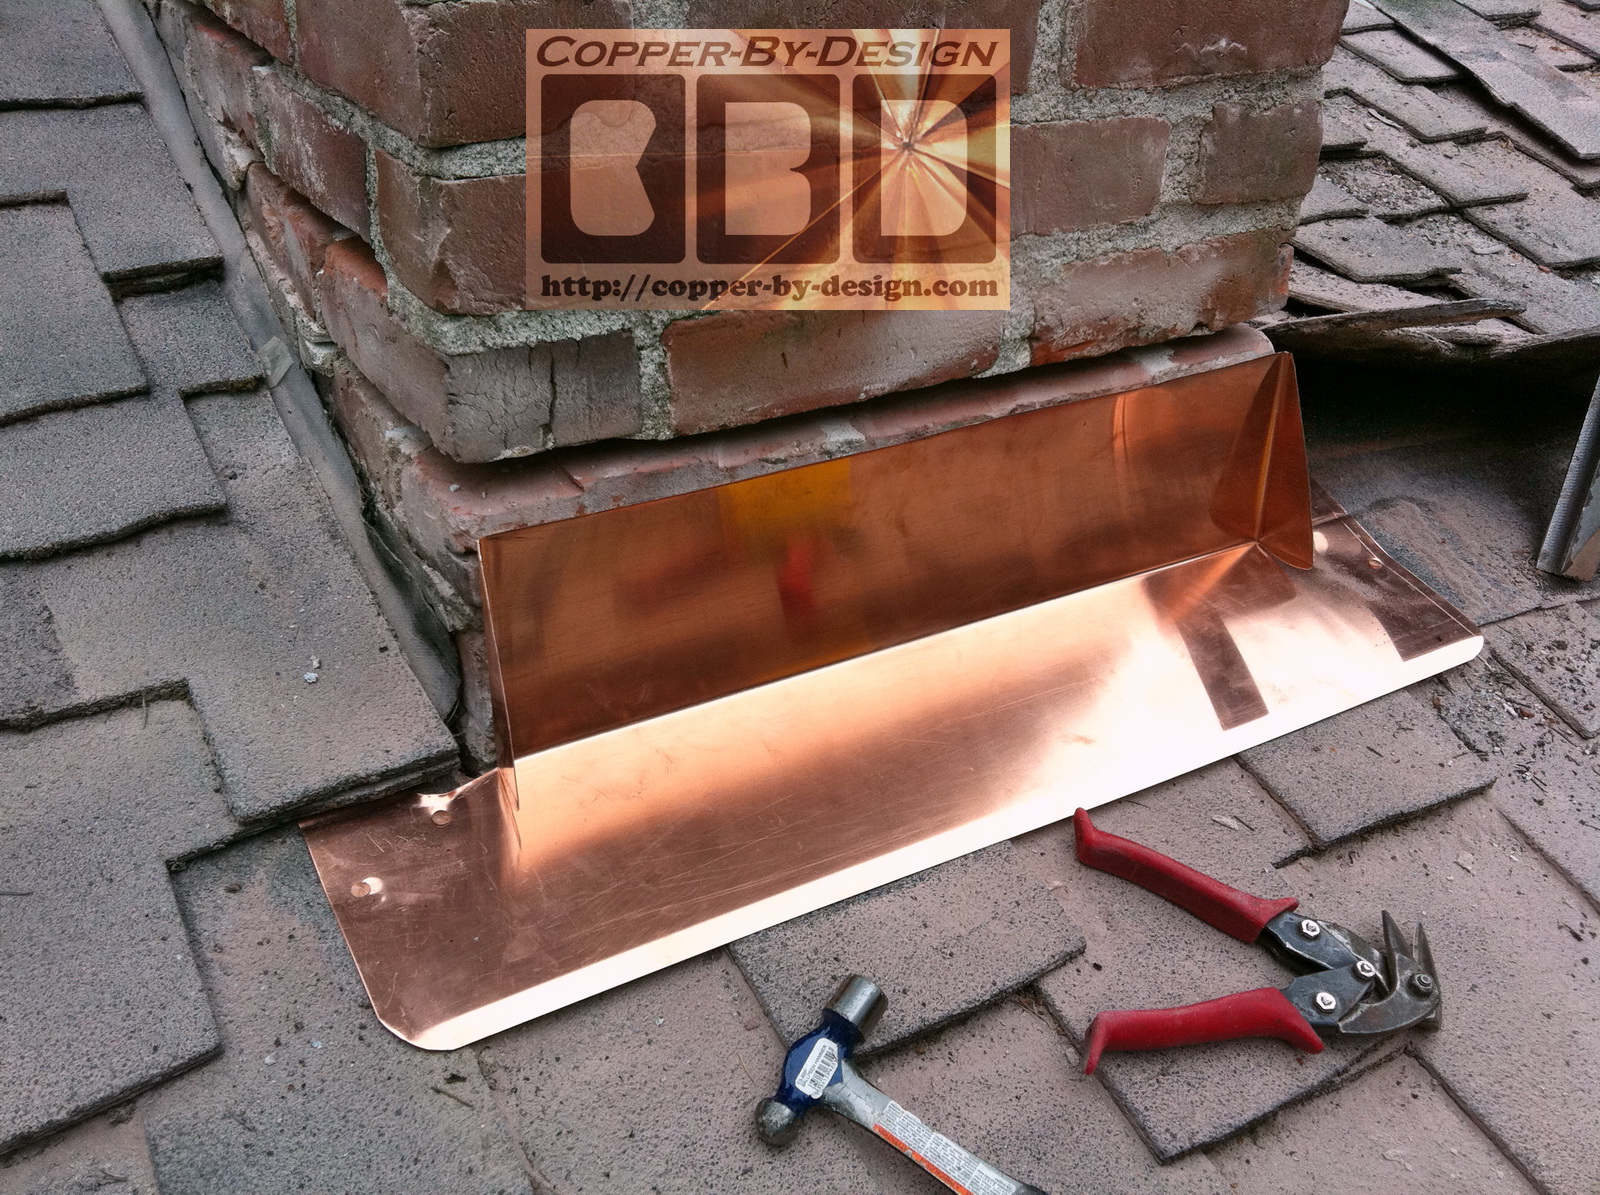
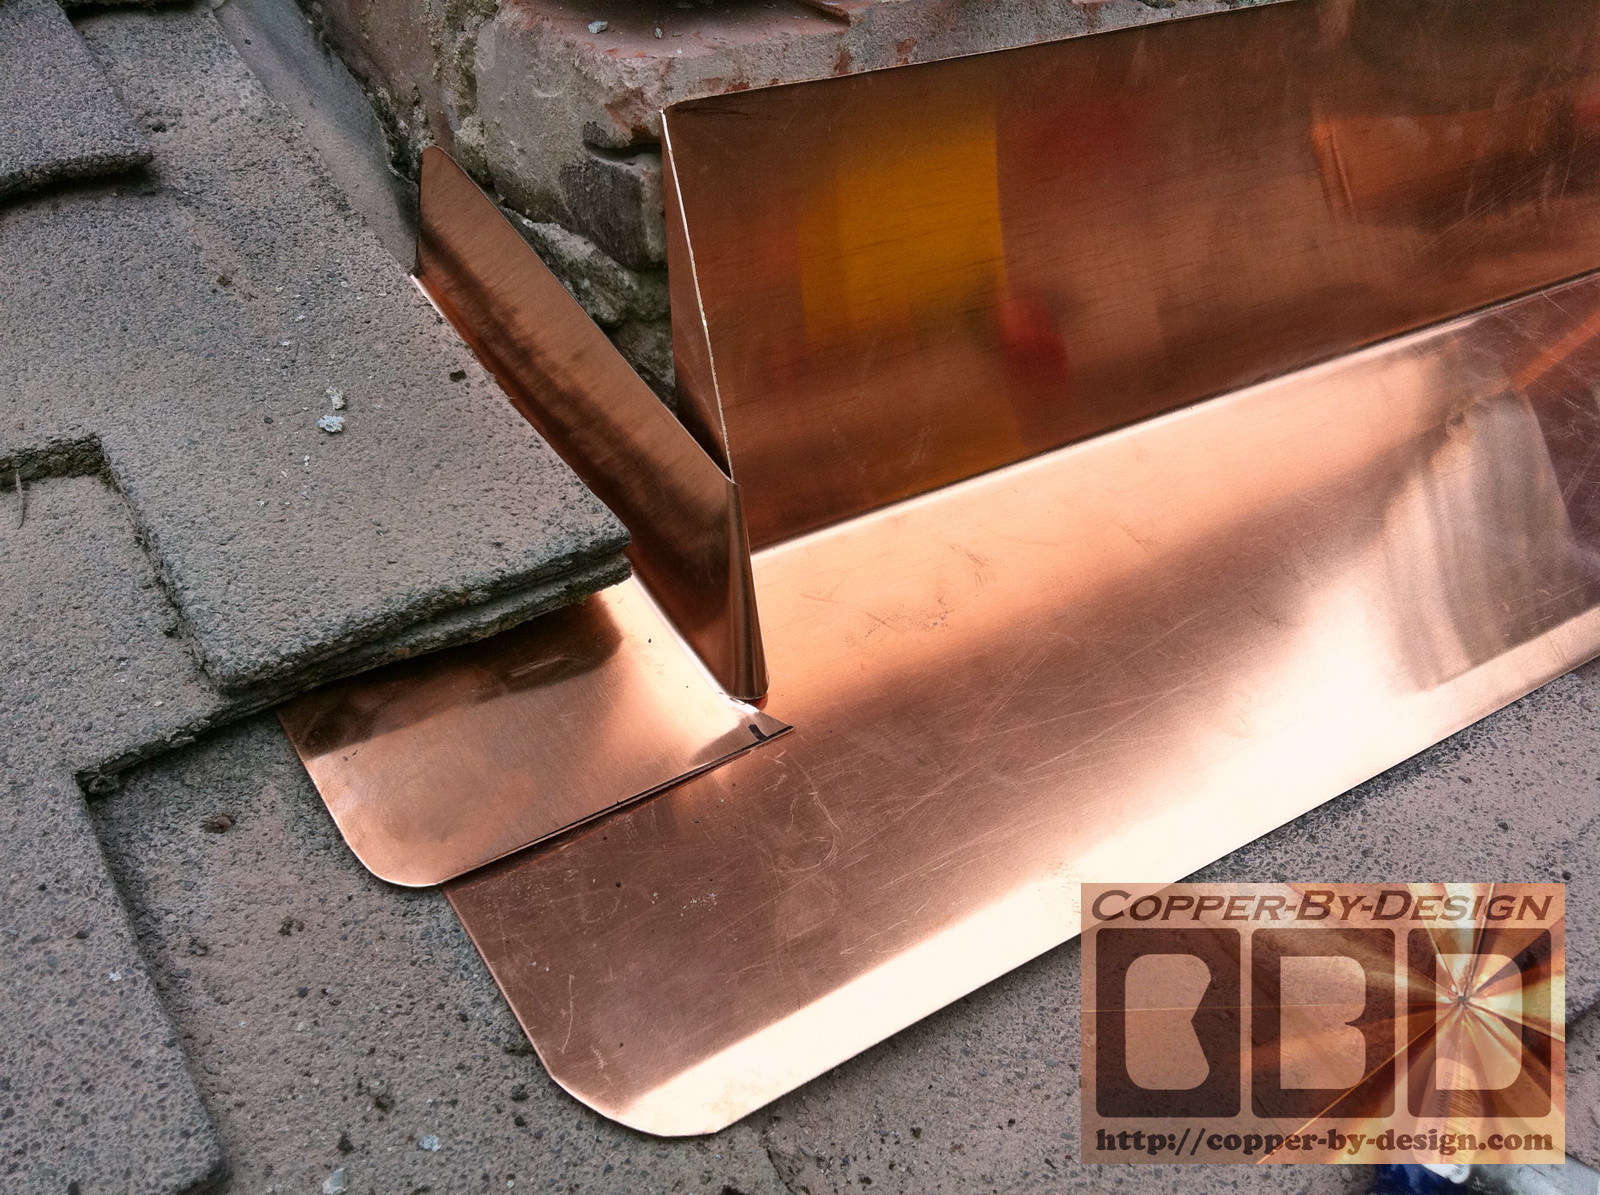
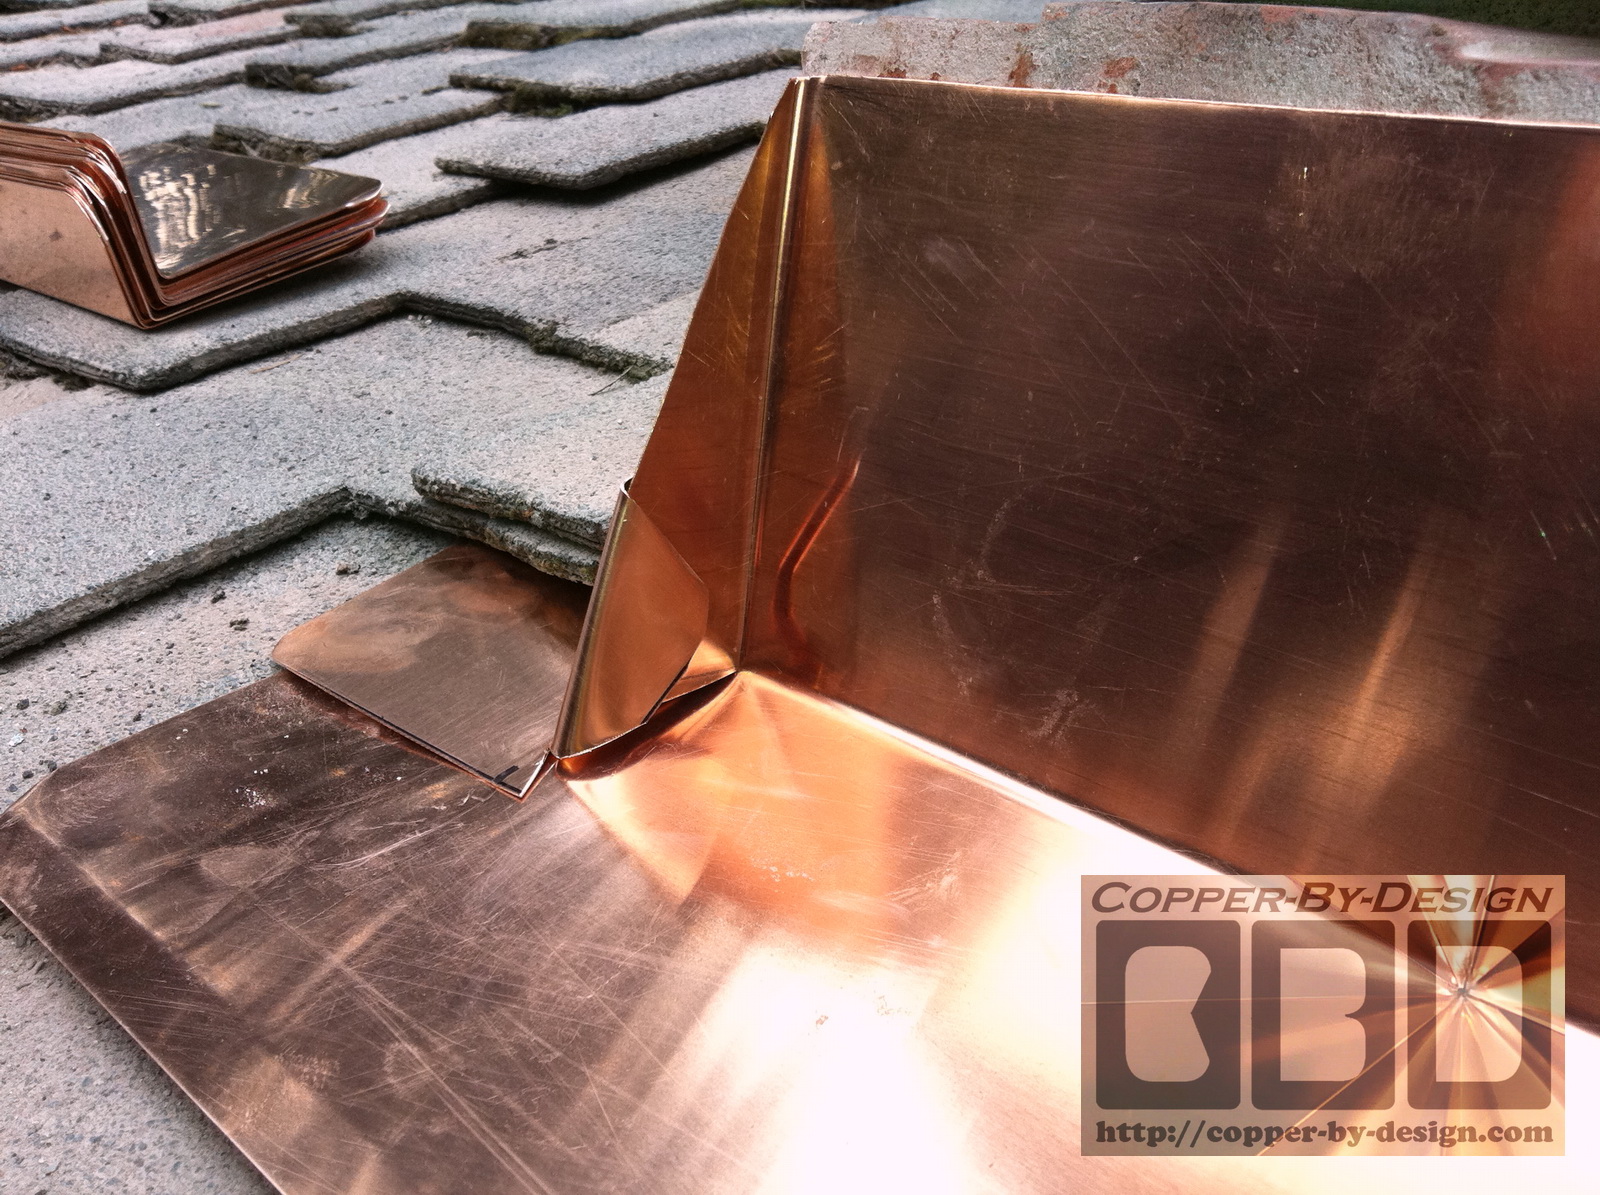
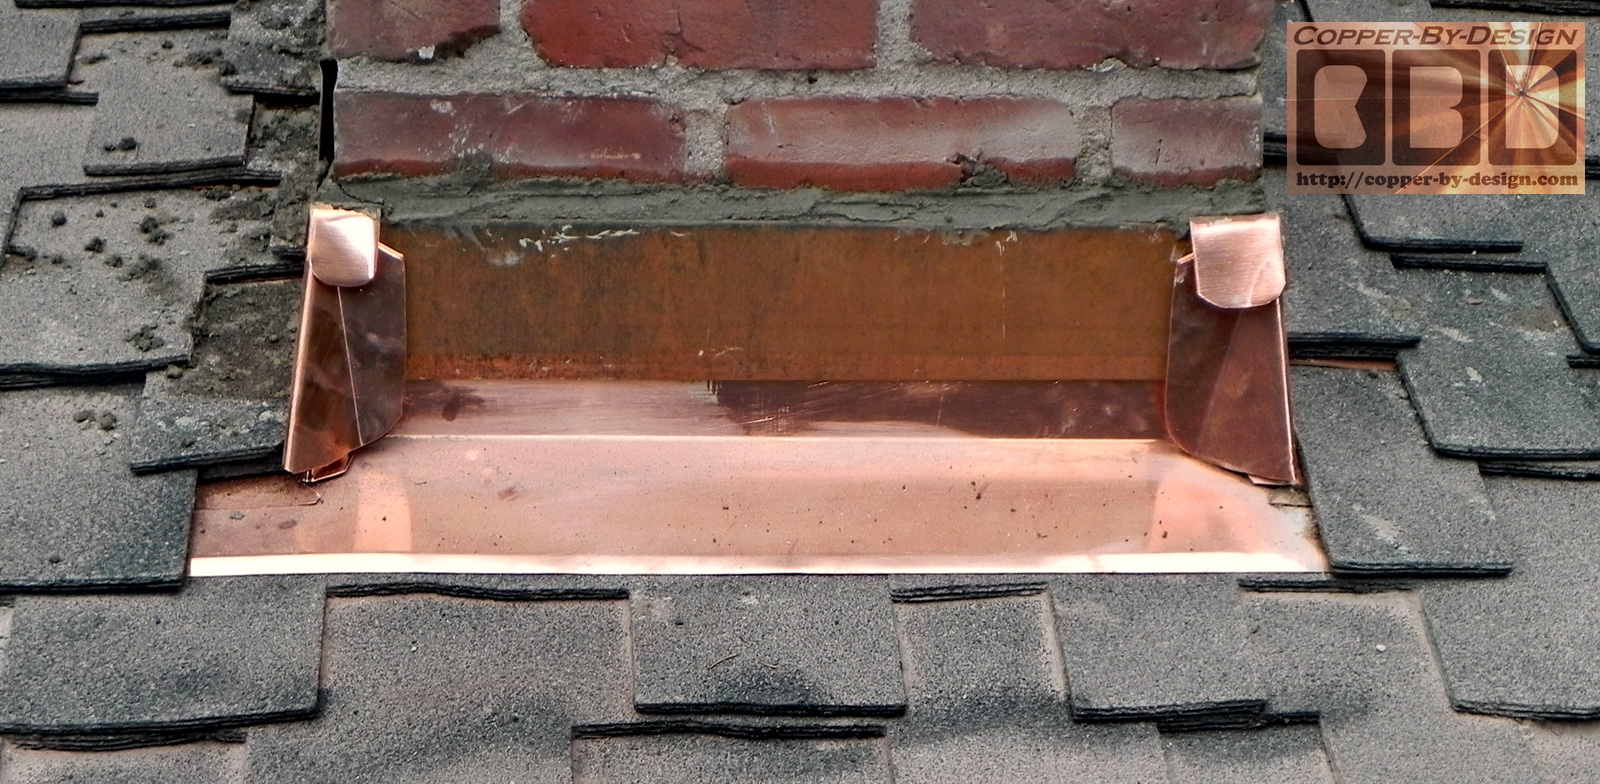
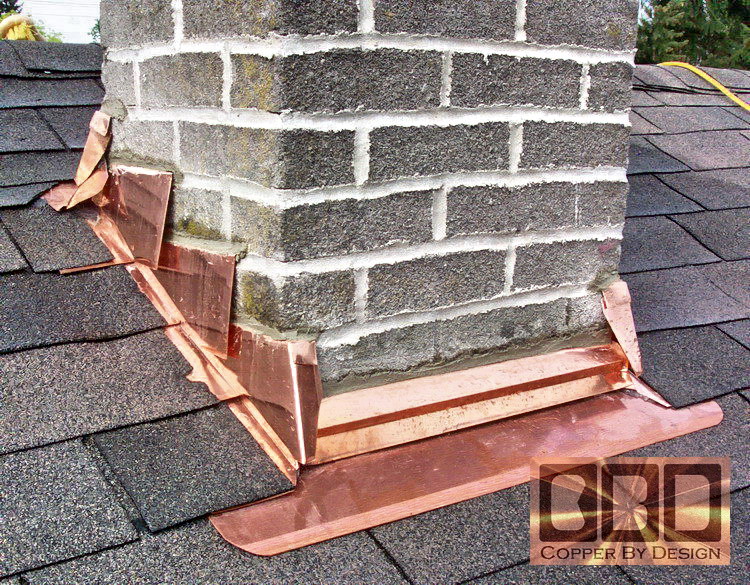
Step Flashing Installation:
This shows the 20oz solid copper sheet metal base step-flashing in place, nailed down and hidden under the shingles on the sides. You should use 1.5" copper roofing nails. I also add some clear caulk in the corners and the copper is folded over these corners to shield the caulk from the Sun. When this is complete there should be no visible nails or caulk. Roofing is all about hiding the fasteners. I was careful enough to not need to replace some of the shingles around the chimney, but that is not common. You should have some matching shingles handy to replace any damaged shingles from this re-flashing work.
|
|
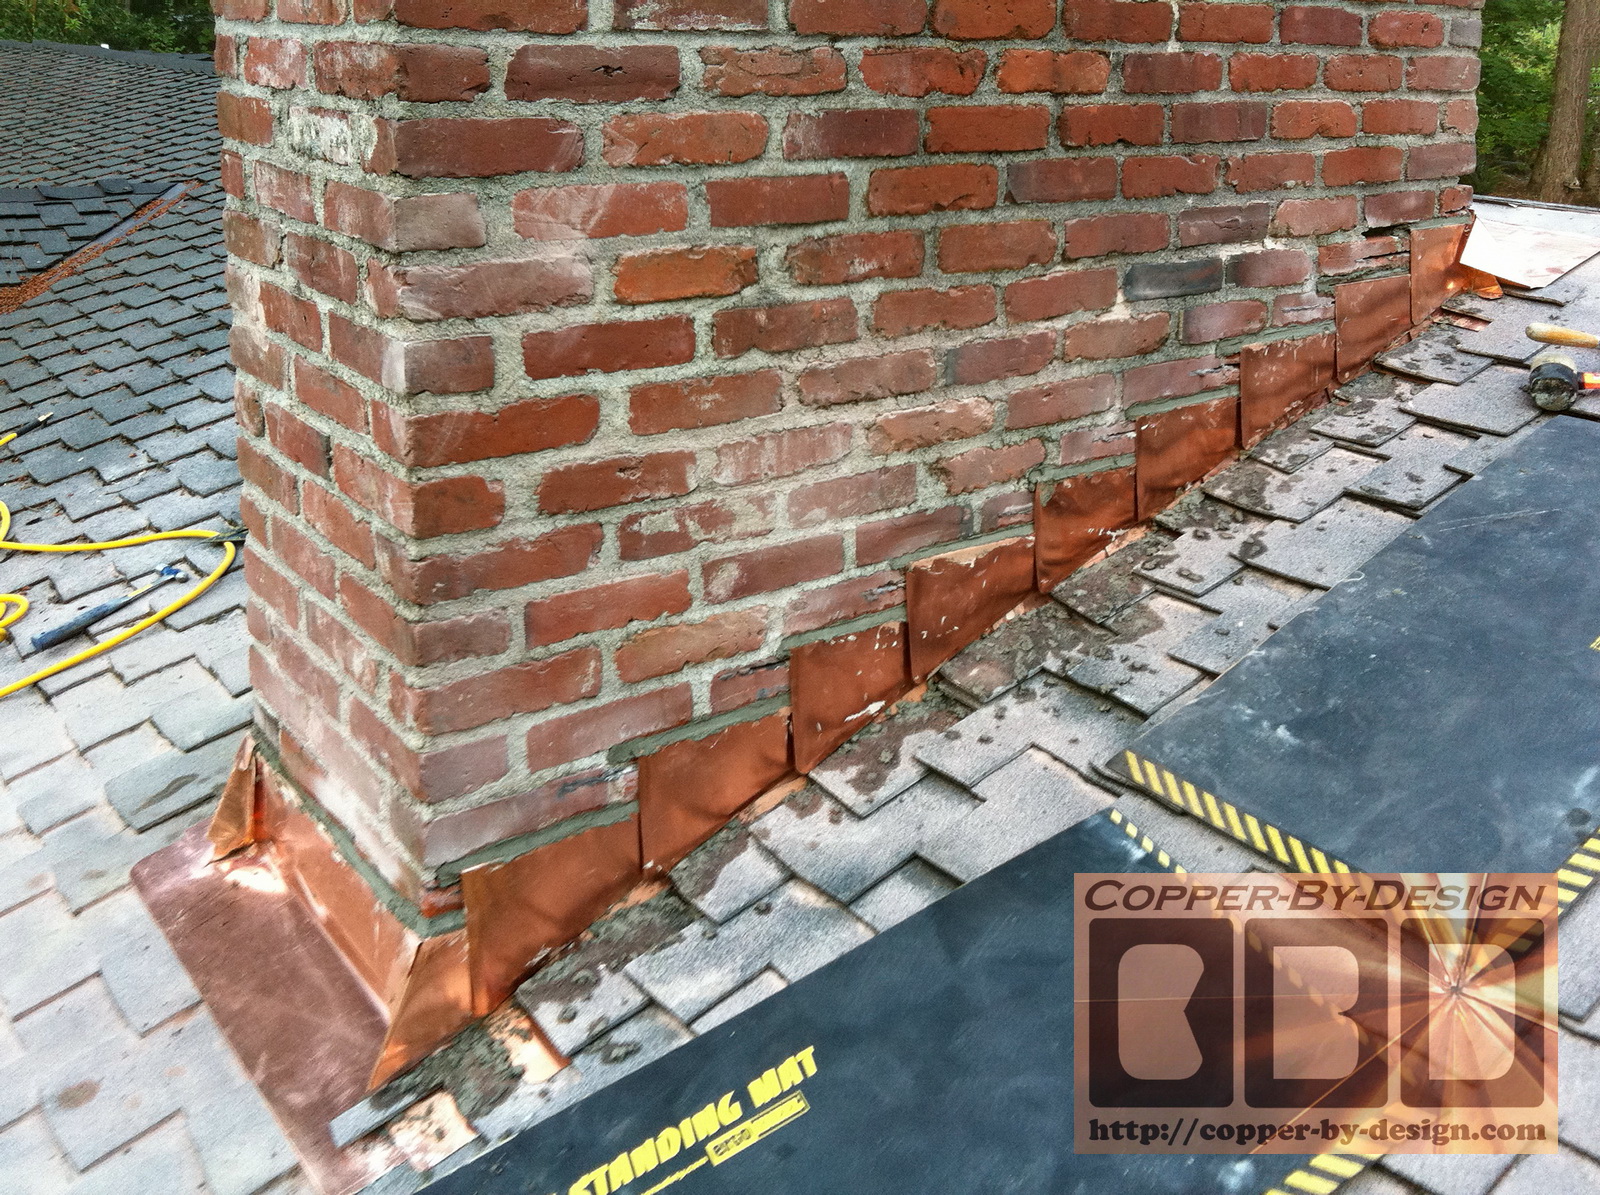
Counter Flashing Pre-fitting: The image on the right shot show the counter-flashing test fitted in the grooves and custom shaped and set into place before it is going to be mortared in. Some customizing will be needed. Make sure this is all prepped and ready before mixing the mortar, as you will not have time to make many changes after that, so this is an important step. 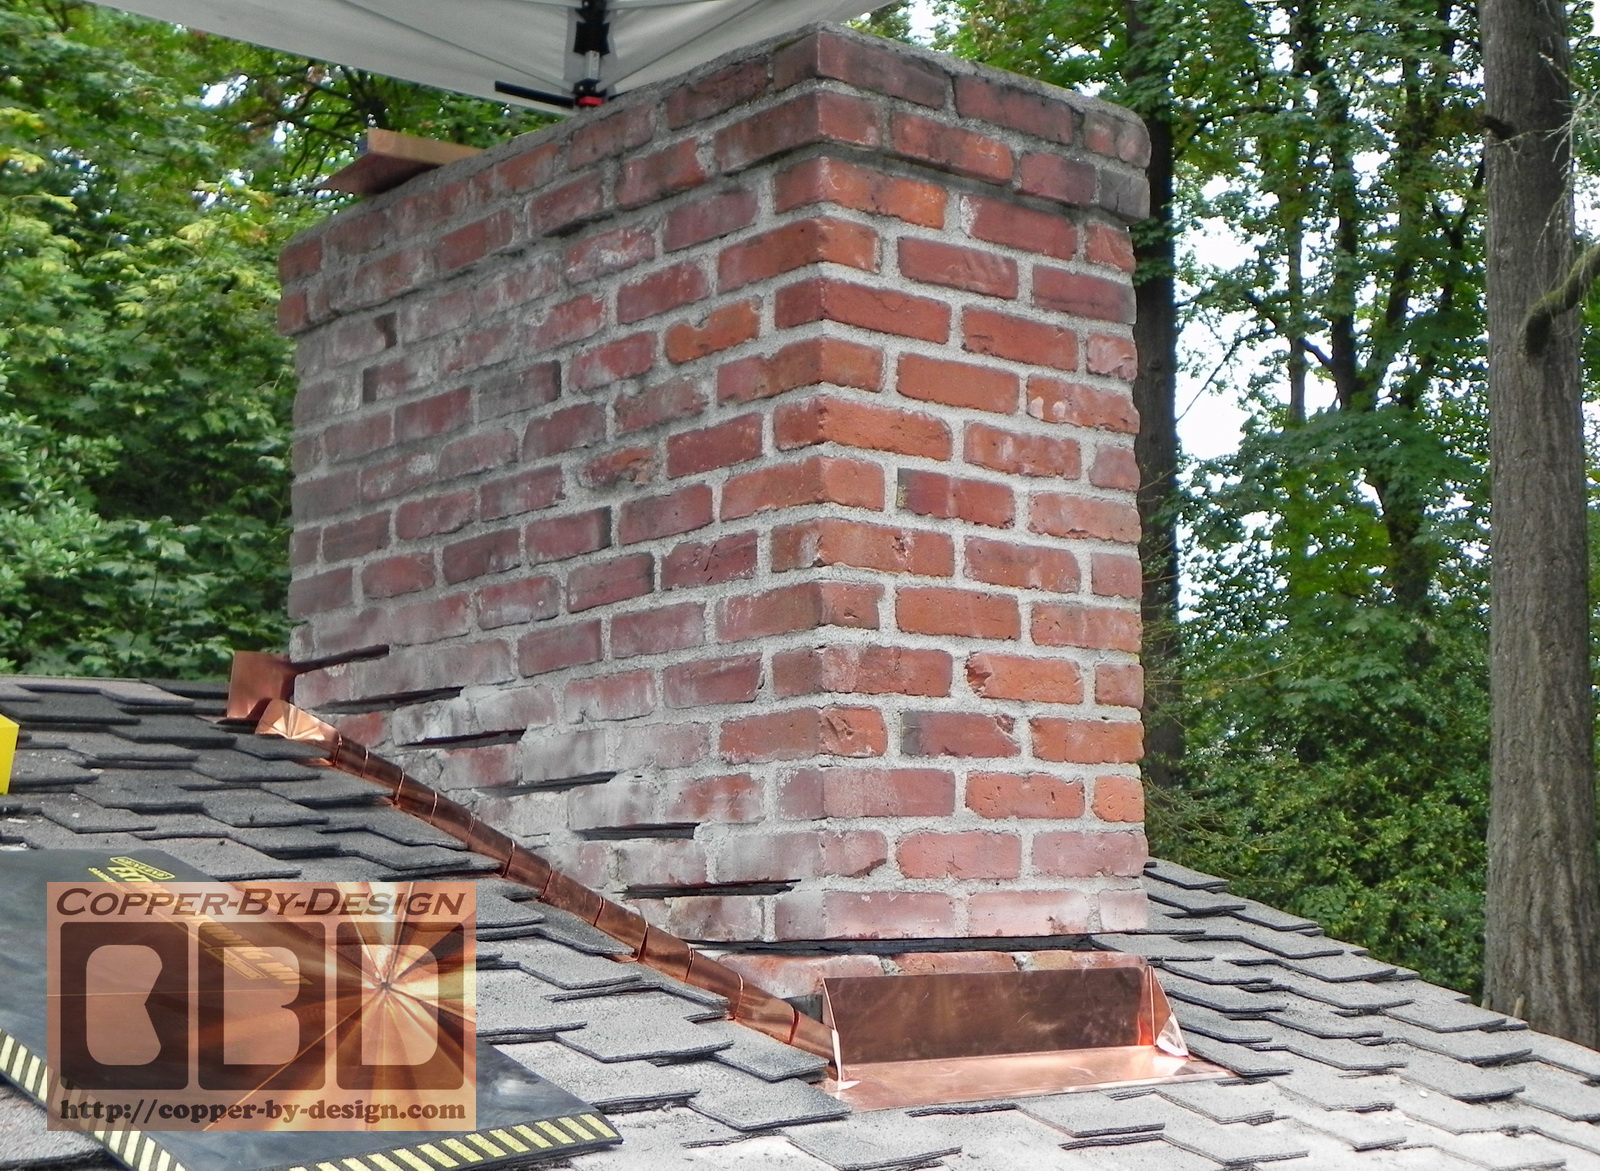 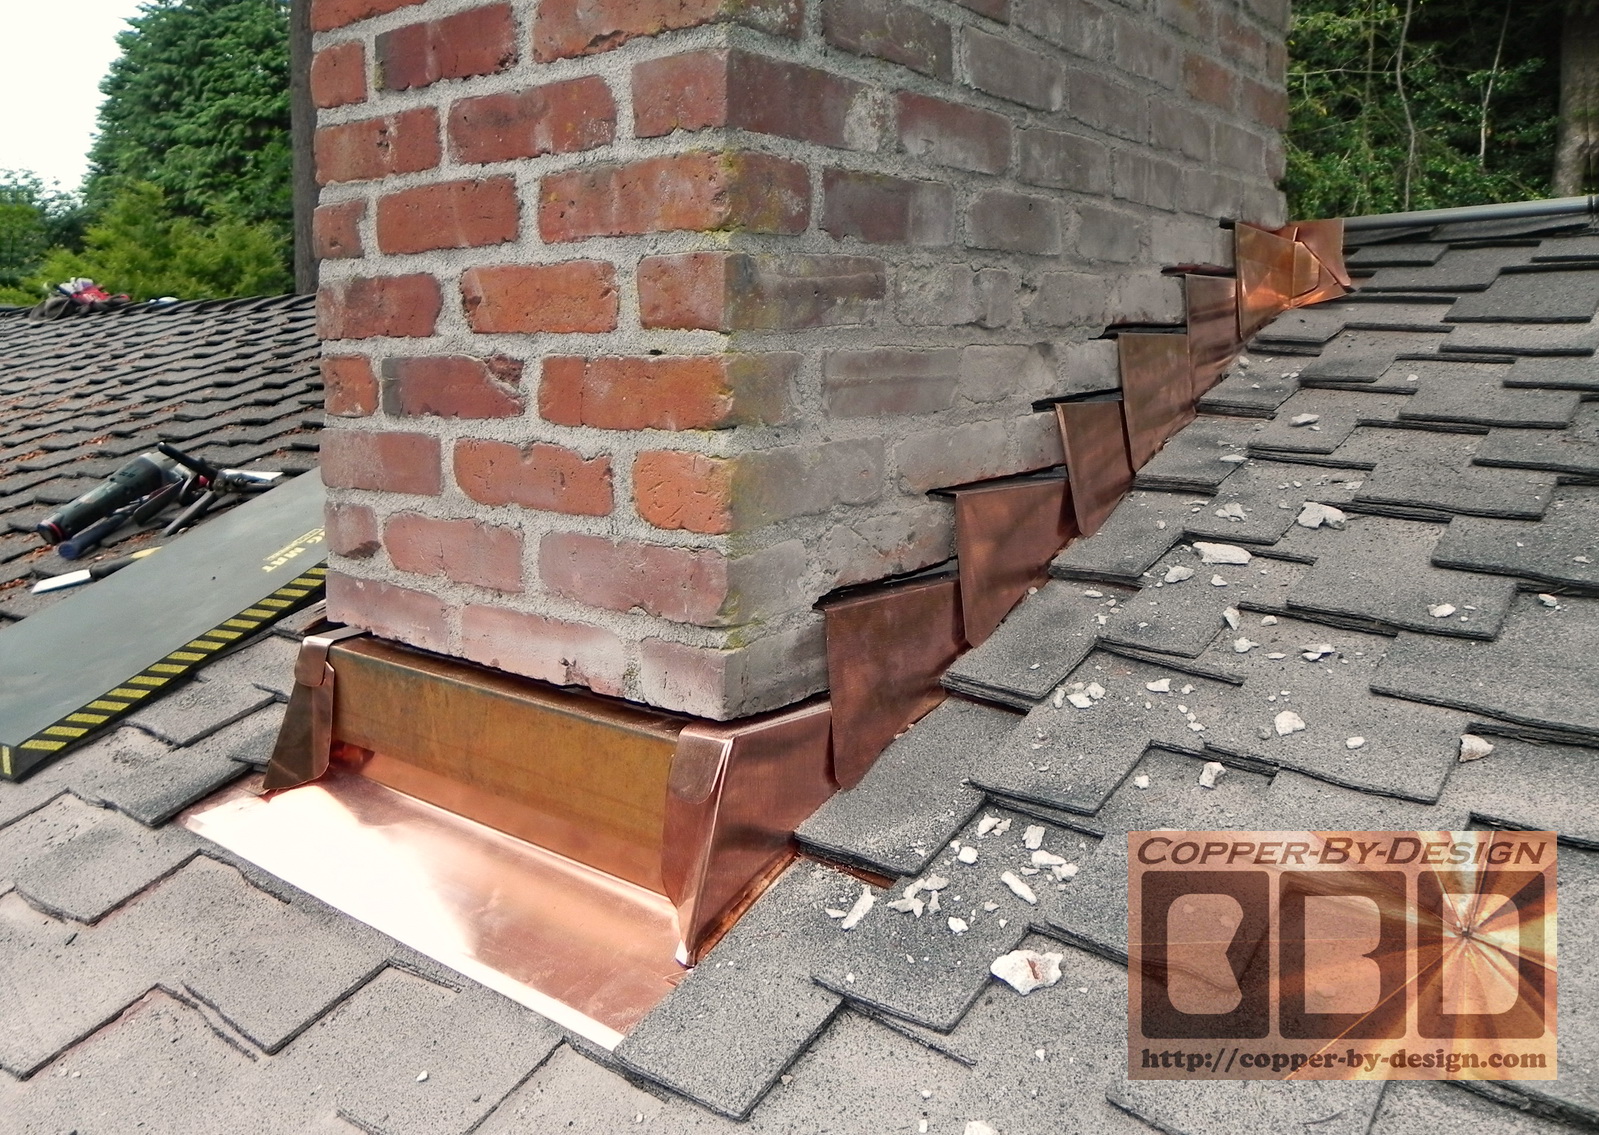 There should be a 1/2" gap between the counter flashing bottom edges and the shingles to allow for the expansion and contraction of the chimney in relationship to the wood structure of the house. You will not want this to bind up and get bent out of shape if it is set too close. |
|
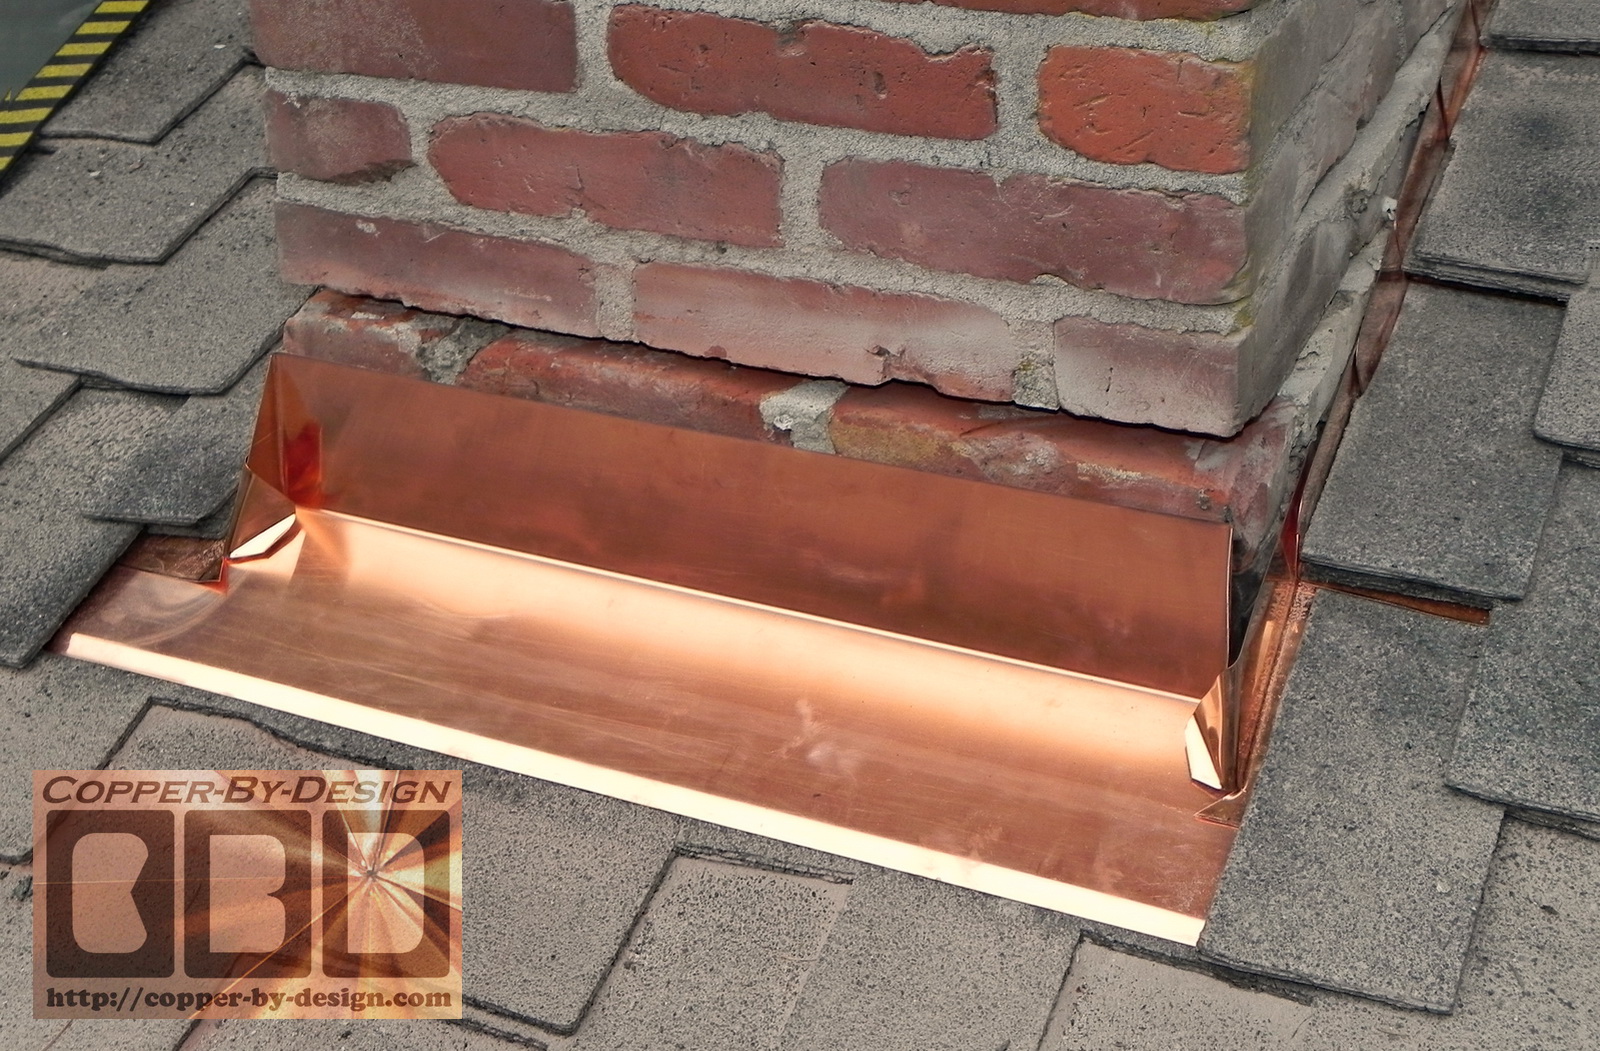
When you are ready mix about 1/2 gallon of mortar. The counter-flashing is then quickly mortared into the gaps I had cut in the sides of the chimney. I first shove the mortar into a joint with mason tuck pointing tools starting with the bottom sections working my way up only one grove at a time shoving the flashing into the mortar as fast as possible before the mortar quickly sets. The dry bricks will such the water out of the mortar within seconds, so be ready with each piece as you work your way up.
The wider top and bottom joints are especially hard to do quick enough before the mortar gets too stiff to be able to press the whole counter-flashing piece in. I often have to tap it in with a rubber mallet even on just a small single flue chimney like this. You may even need to spritz these groves with a water bottle before shoving the mortar in the longer groves to keep the mortar from setting up too quickly, or use 2 shorter pieces to install one at a time. If it does not work out you will need to scrape out the stiffened mortar and start over, so don't try to force the metal in the grove and denting it up and ruining that piece.
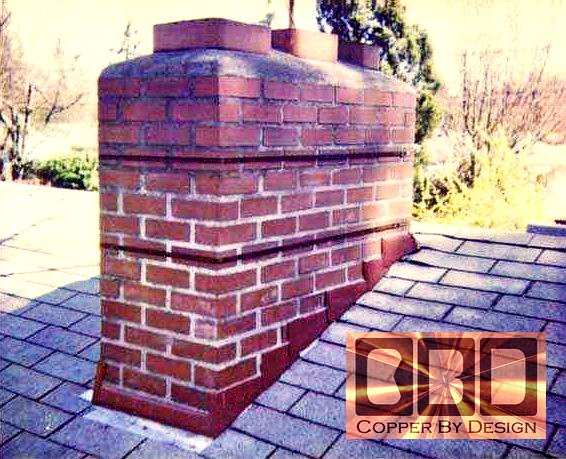
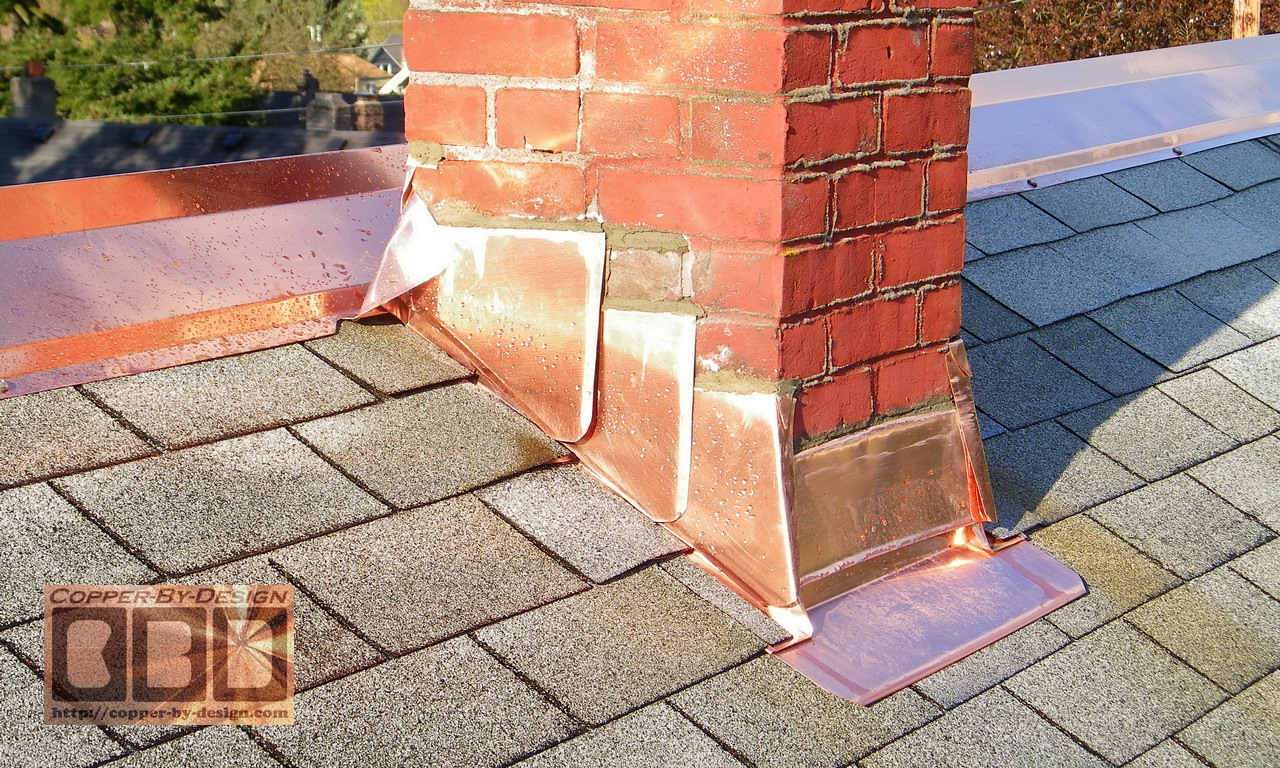
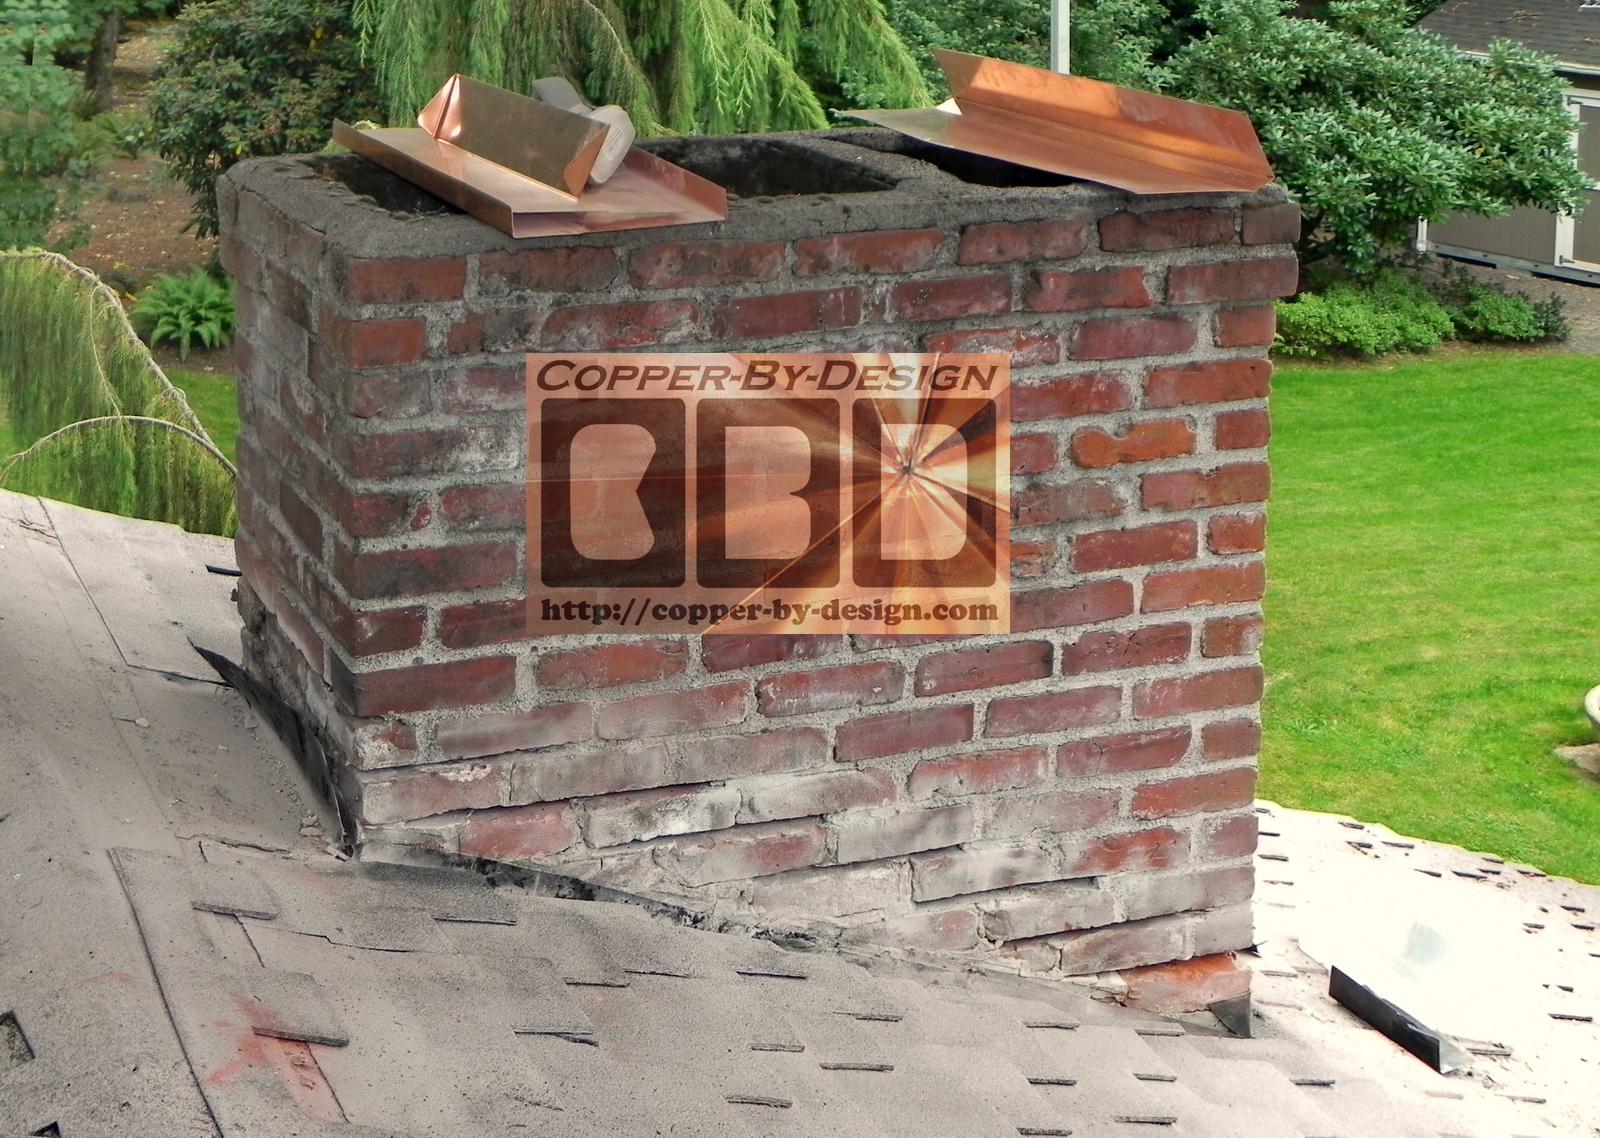
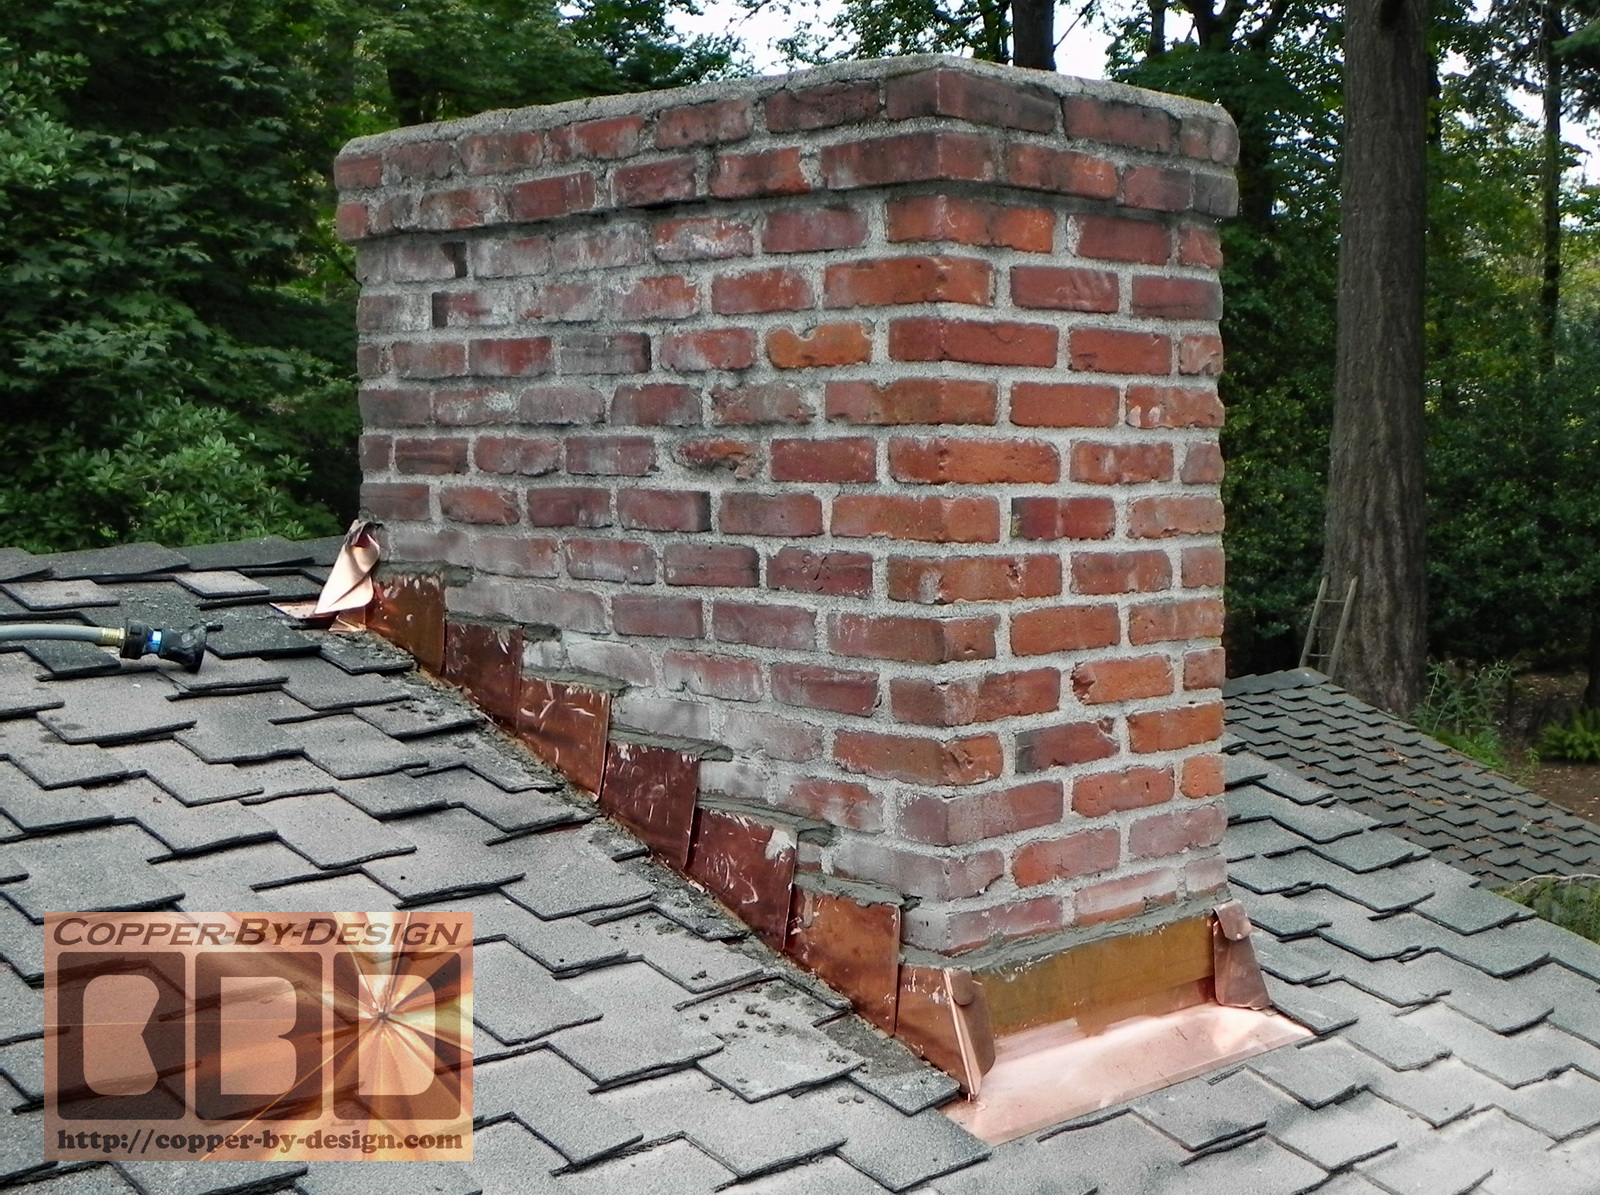
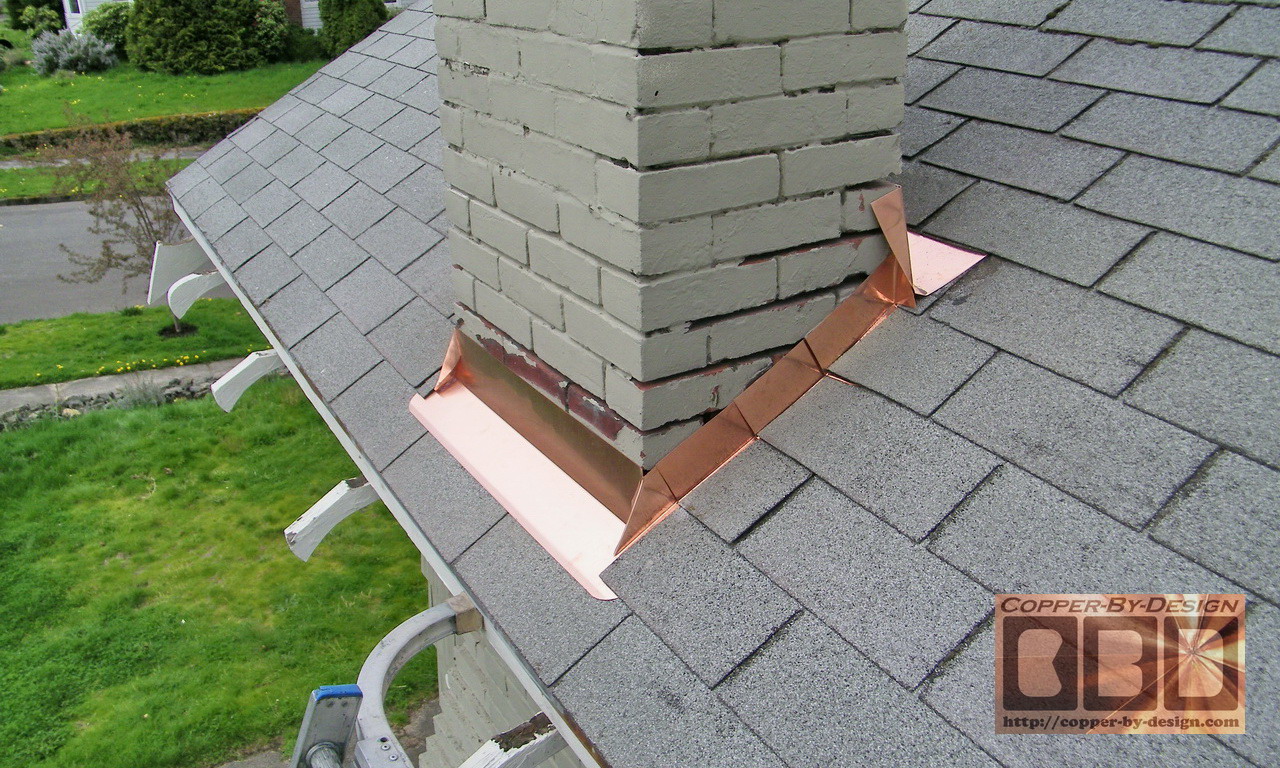
As you see here this chimney has just a simple horizontal tray along the top side. It is best to have a cricket or saddle made to divert the rain water and debris out to the sides of the chimney. It is a bit trickier to make and install, but makes a big difference. It should be made to the same roof angle out to the sides. Not very simple math to calculate t6hese angles. It should also have a wood support under it, or it may get dented when some other worker is up there and did not know it was just hollow underneath.
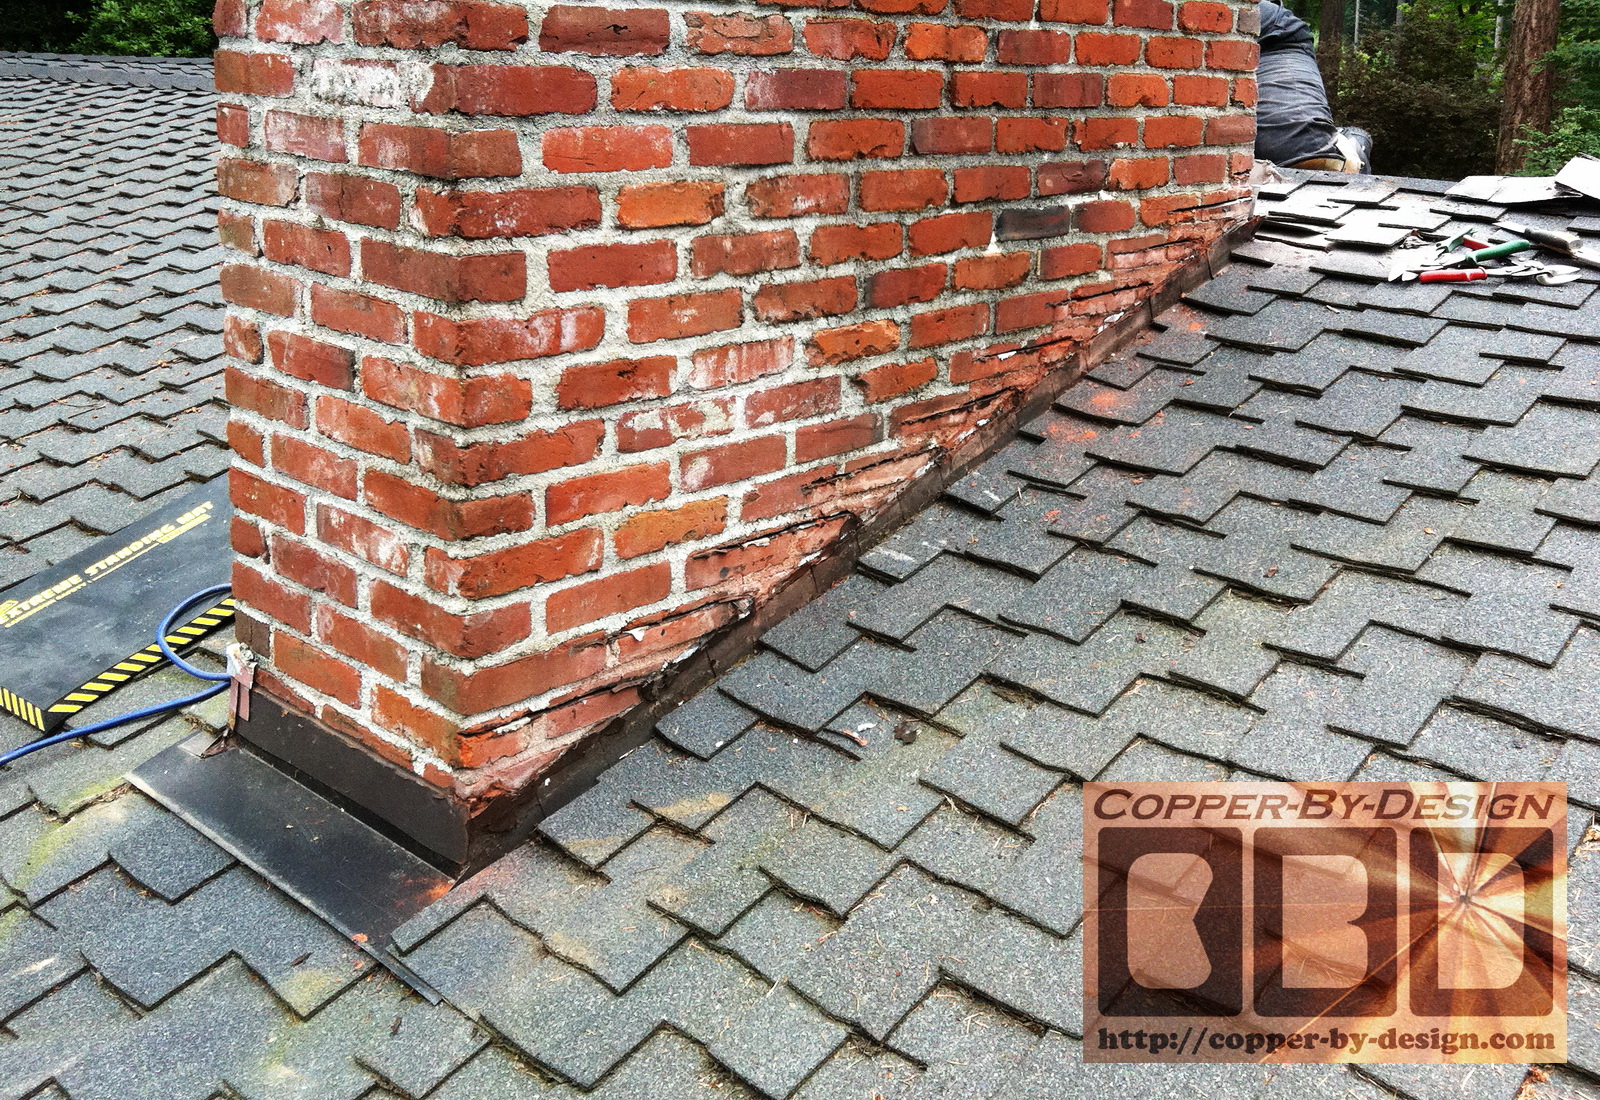
This is the chimney from the back side. It is important that there is this two part flashing with a good 1/2" gap along the bottom edge of the counter-flashing, since the chimney is founded in the floor of the basement, and it will be expanding and contracting differently than the wood structure of the house, so it needs to be able to move in relation without binding up. As listed above, it would have been best to have built a cricket to divert the water and debris off to both sides of the chimney, but that would have added another $150 to the cost of this flashing project. Since this was just a rental I knew she was not wanting to invest any more than she had to.
The worm drive saw seen in the roof valley below to the right is what I use to grind out the mortar joints. The base plate has been removed to be able to get in close the the roofing. Side motor saws will work fine on one side, but the motor would be in the way on the other side. The grinder tools they sell do not have a larger enough blade to get in deep enough for this work and too thick to cut above and below the old metal flashing that has to be removed. The shingles are wet from hosing down the mess after I had broomed of the bulk of it. A plastic and or a wire brush with hydrochloric acid can be used to clean up left-over mortar smears to leave a nice clean job. The acid will need to be diluted, or it will be too caustic to the worker for use. One part to ten parts water is plenty strong still. It is also helpful to clean the mortar off of the shingles. Be sure to use protective rubber gloves. |
|
Buyer Beware: You will even need to double check their materials before it goes in, or you are likely to get a thinner copper or just painted steel used, and by then it is too late. I have seen contractors use a steel that is just painted to look like untarnished copper. If it attracts a magnet at all, it is not copper. I've never seen copper plated steel sheet metal, so do not fall for this ploy either. The Sun will bake off that thin layer of paint and it will rust within a decade or so. One of the only ways you can know for sure the right material is used is to have me make up a solid copper flashing kit for you, and have them use that instead. Then discount you for the difference in cost. It is a sad state of affairs, but it seems few experienced roofing contractors even know how to do this right, or are willing to. The basic logic of rain management seems to escape them. Even when they have an example there in front of there face to see how it is to be done on most chimneys they come across. Most roofers will claim that it can only be done that way when the chimney was first built, but as you've seen here I prove that is simply not true. You would do well to compel your local roofing contractor to read over these web pages and finally learn their craft. They may take offense to this suggestion, and especially this web page, but that is very telling of their lack of character and you would do well to take that as evidence they cannot be trusted to have your best interest in mind and you should not hire them. The overwhelming evidence here shows this is a simple fact of reality that cannot be debated. Here is a Word 'doc' file to print out with the recommended list of tools and more detailed instructions: |
.
| Examples of Other Copper Chimney Flashing |
|
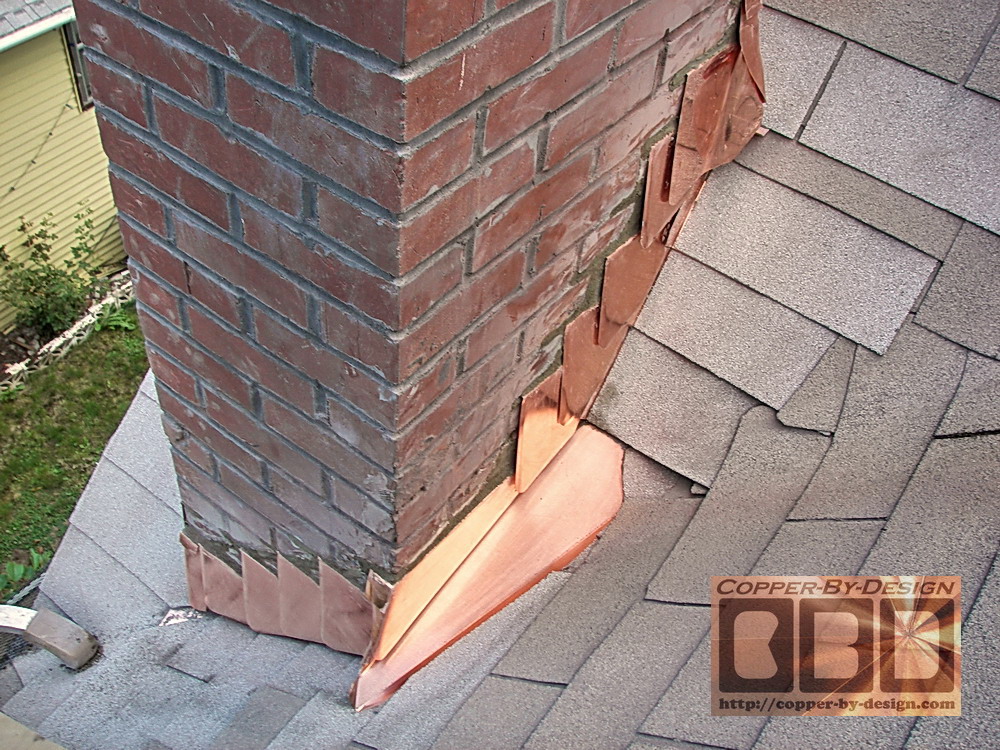
Here is a step-by-step chimney re-flashing job I was hired to do along with the gutters on this rental house back in April of 2004 for a client Named Toni Ferro located at 3953 S. E. Grant Street in Portland, Oregon. When I was replacing the gutters on the house, I noticed that the two chimneys were not flashed correctly and must be leaking into the house. As you can see here the caulk they had used to try and seal the step-flashing to the bricks is not only peeling off and cracking from Sun exposure, but it could not have lasted even a year with even a slight difference of expansion and contraction between the wood structure of the house and the clay of the brick chimney that extend from the dirt floor up to the roof. Due to temperature changes it would break apart any sealer. There was no counter-flashing to be seen here at all. I took a few digital photos of the chimney flashing to send to the Landlord through e-mail to advise her of this problem and go over different options to solve these issues. Besides the failing caulk, you can see the flashing is rusty and would not have lasted much longer, but the most serious problem is the missing counter-flashing. She saw the wisdom of re-flashing it as soon as possible and mailed in a half down deposit to schedule this in.
|
|
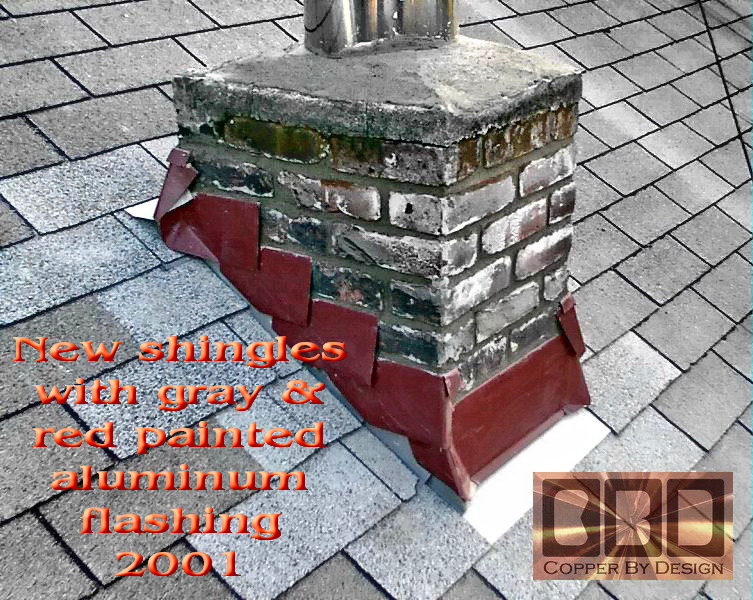
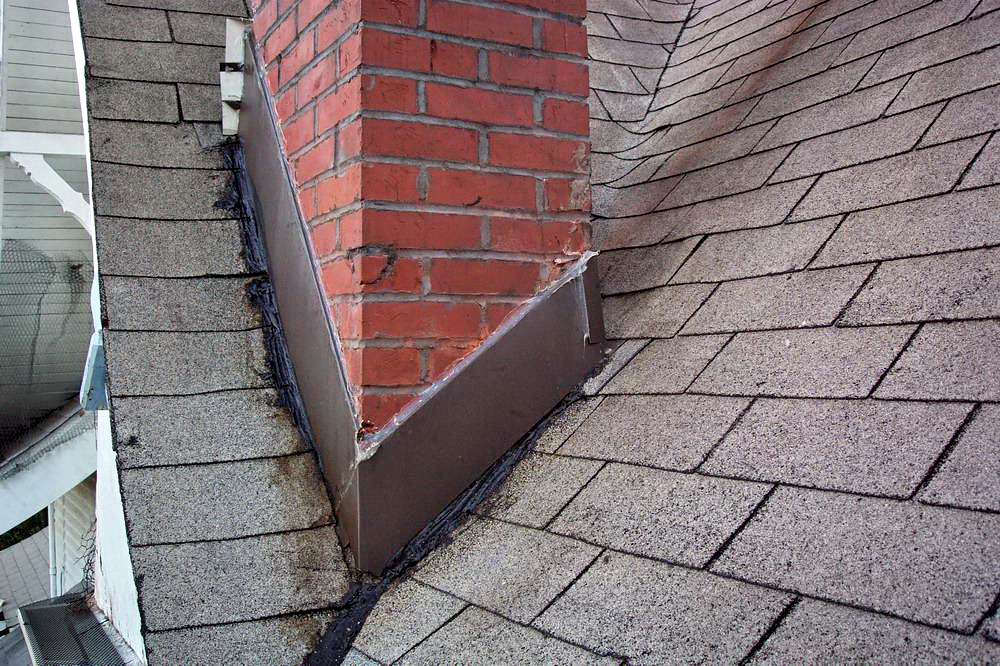
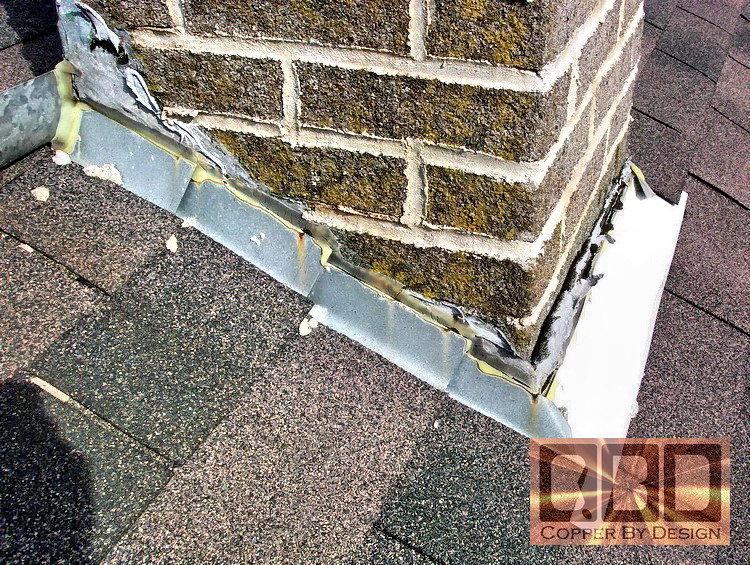
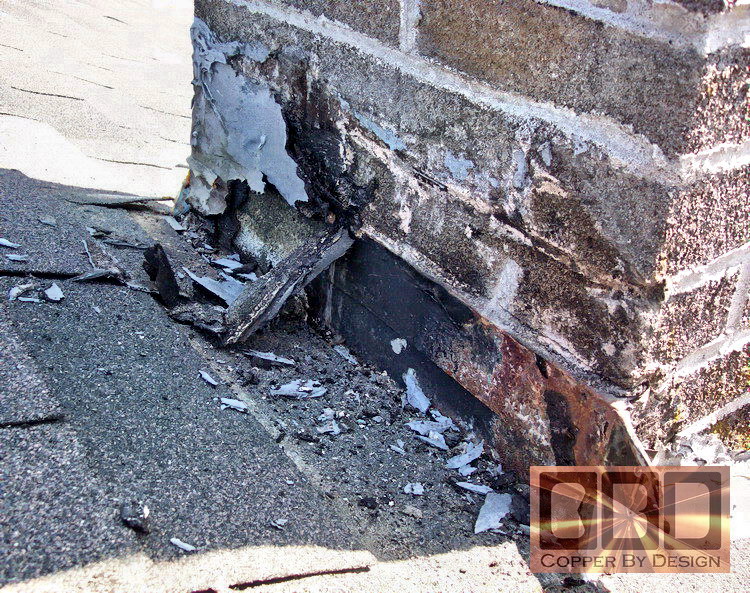
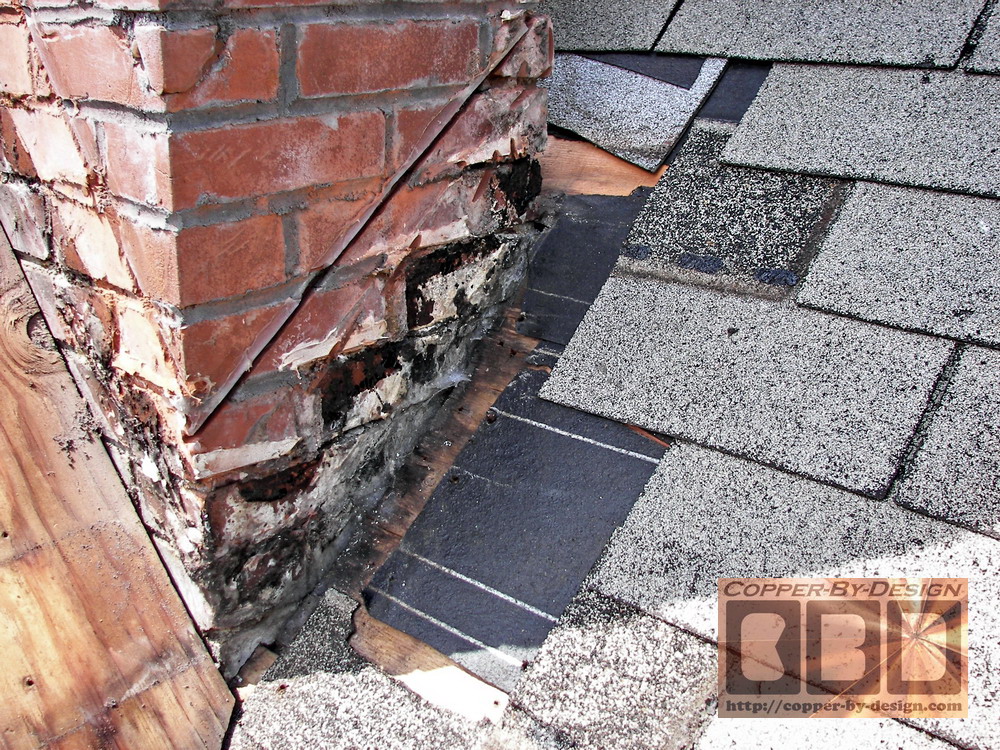
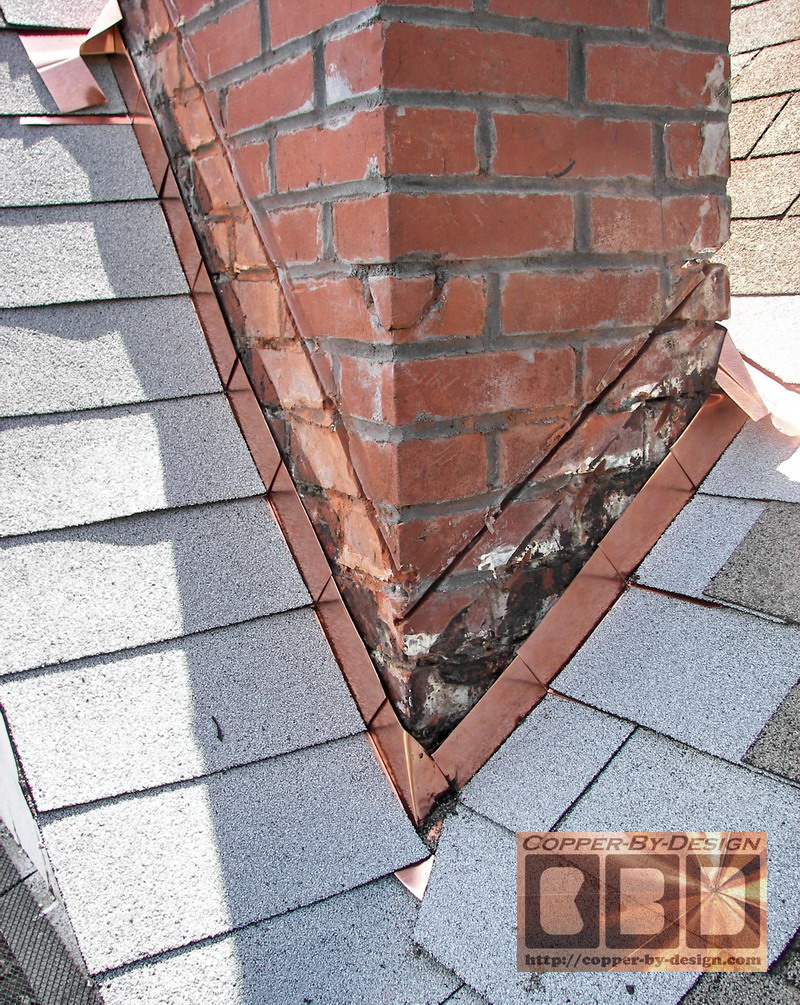
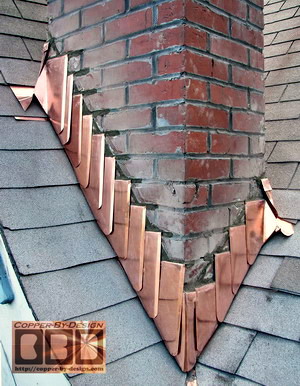
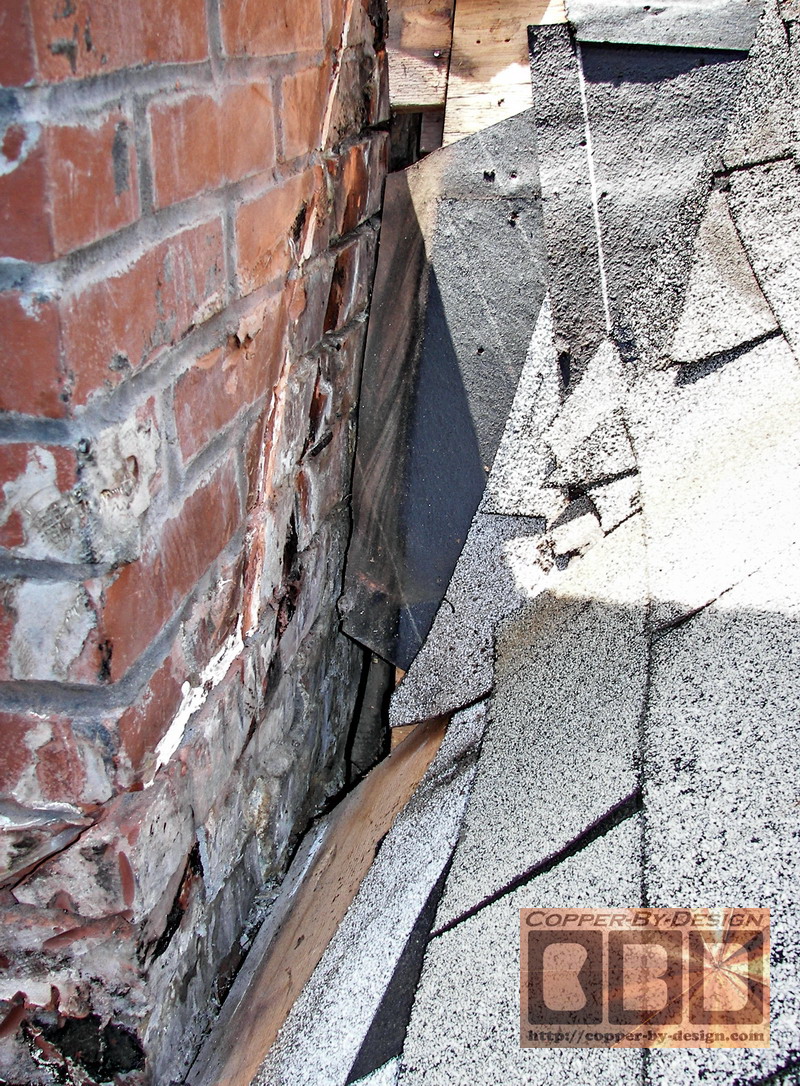
I was just contracted to replace the old rusty gutters with new aluminum gutters, but while removing the old gutters I got a closer look at the horrible chimney flashing job they just had done. This brown painted steel counter-flashing may look nice and clean, but it is just a good example of atrocious flashing work.
Let me explain. Beside the issue of leaks and dry-rot, which is plenty important, when they cut a diagonal line like this through the bricks they have damaged their chimney and set a fracture point. This will crack during an earthquake, which had caused thousands of chimneys to come crushing down in this area back in 1993, which had smashed cars parked below, and lots of other damage. That rusty pipe brace will not stop it. There is over a 2 tons of bricks over this roof line. How much damage do you think that could cause?
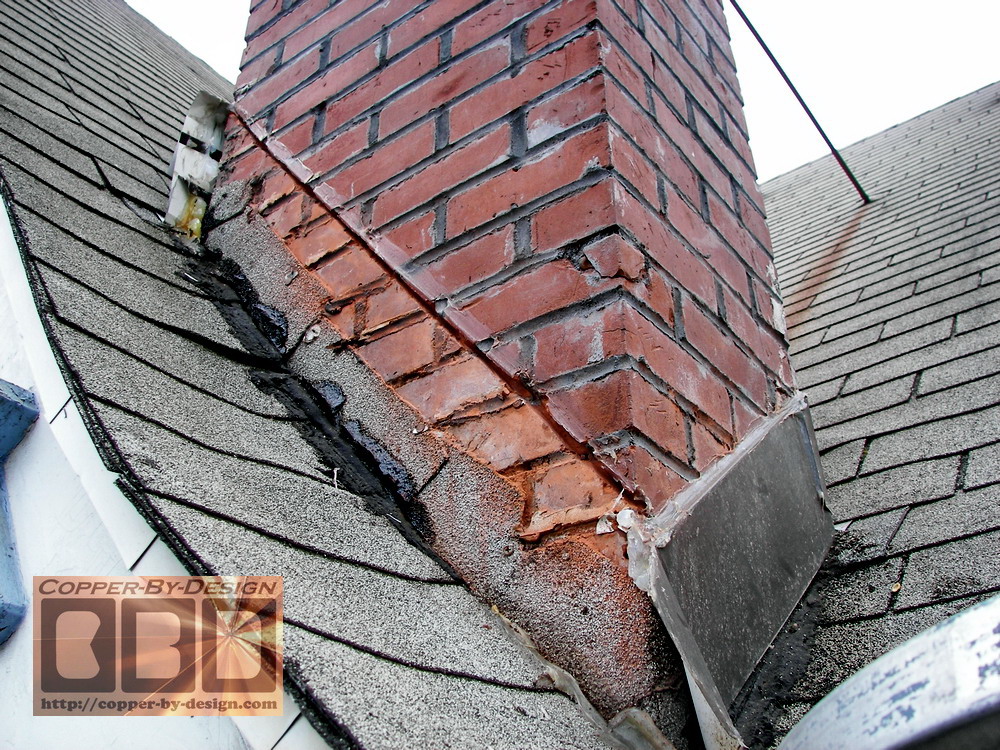
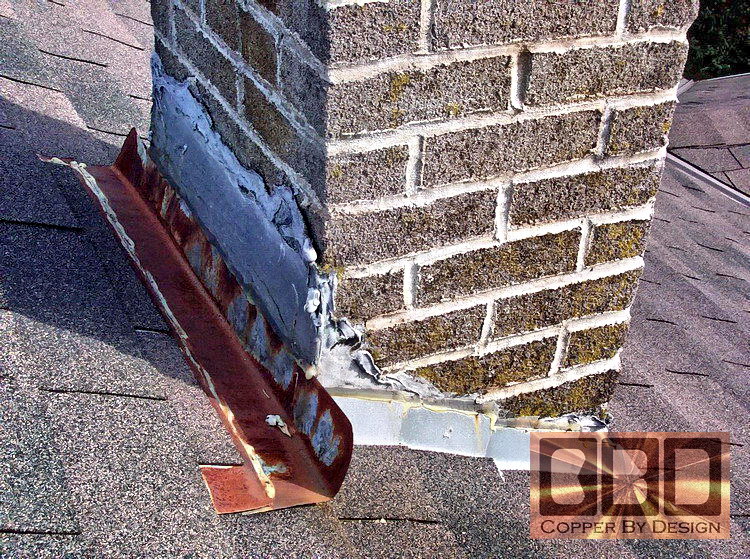
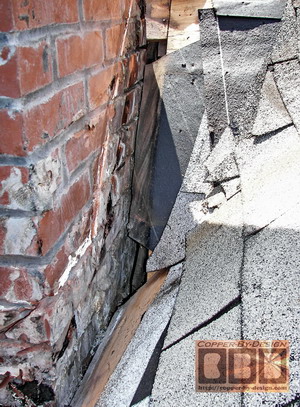
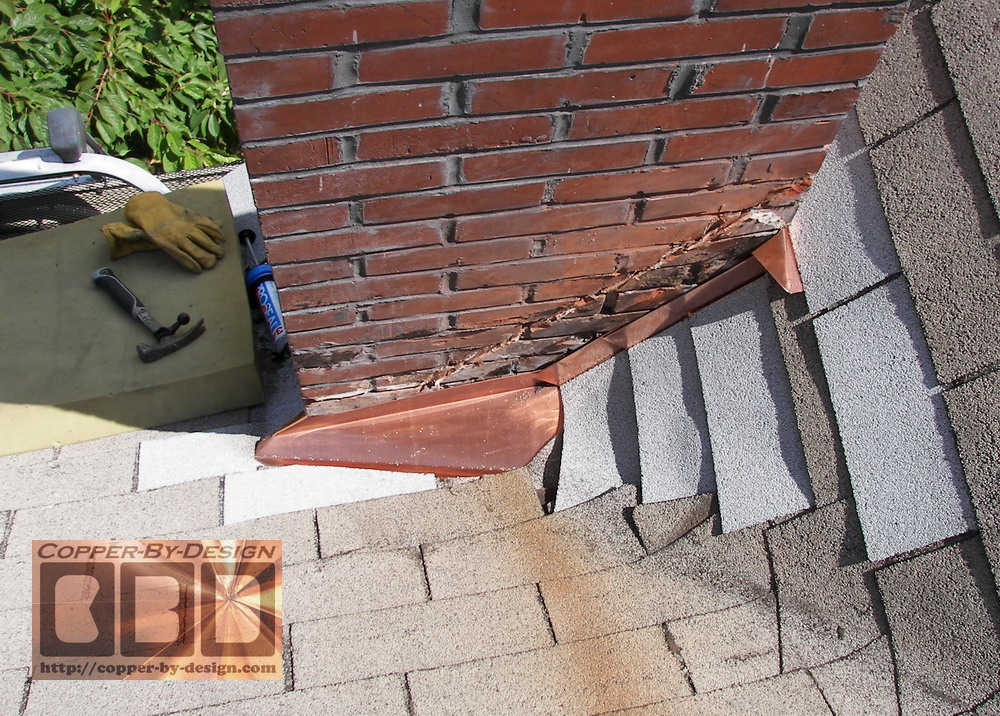
These clients were not in a financial position to have the whole chimney rebuilt from the roof line up, so I did what I could to salvage this mess. It was surprising how easily the caulk came off the bricks when I pulled these flat steel panels off the sides. It clearly would not have lasted very long. Even a strong wind storm could have ripped them off. I then found out how the roofer had not bothered to even step-flash around this chimney. I stripped it down and scraped off the tar they had used to seal the roofing to the bricks. It was quite an ugly mess, but I did the best I could up on top of a 2 story high ladder leaning over this steep roof. The shingles on this side had to be completely replaced with new felt paper and shingles before I could start to attach the new step-flashing pieces. As you can see in the right photo this chimney placement was not planned very well. It was set right at the base of this roof valley. It had collect a great deal of debris below this 15' long valley above. It was very hard to get my grinder in this area to cut the groves for the new counter-flashing. Heck, it was a challenge to just get my hammer and crow bar in there just to remove the nails holding the old shingles down. I should have charged them twice what I had quoted for all the trouble I ran into.
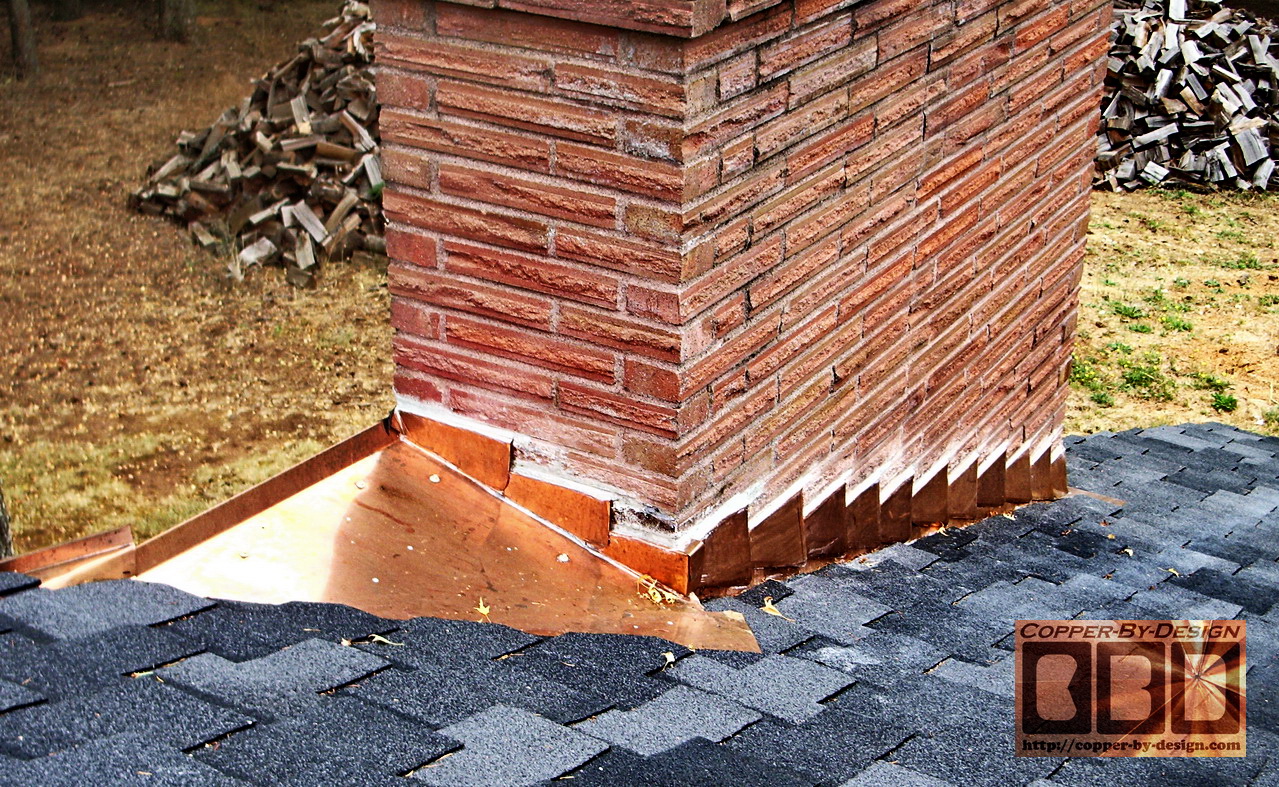
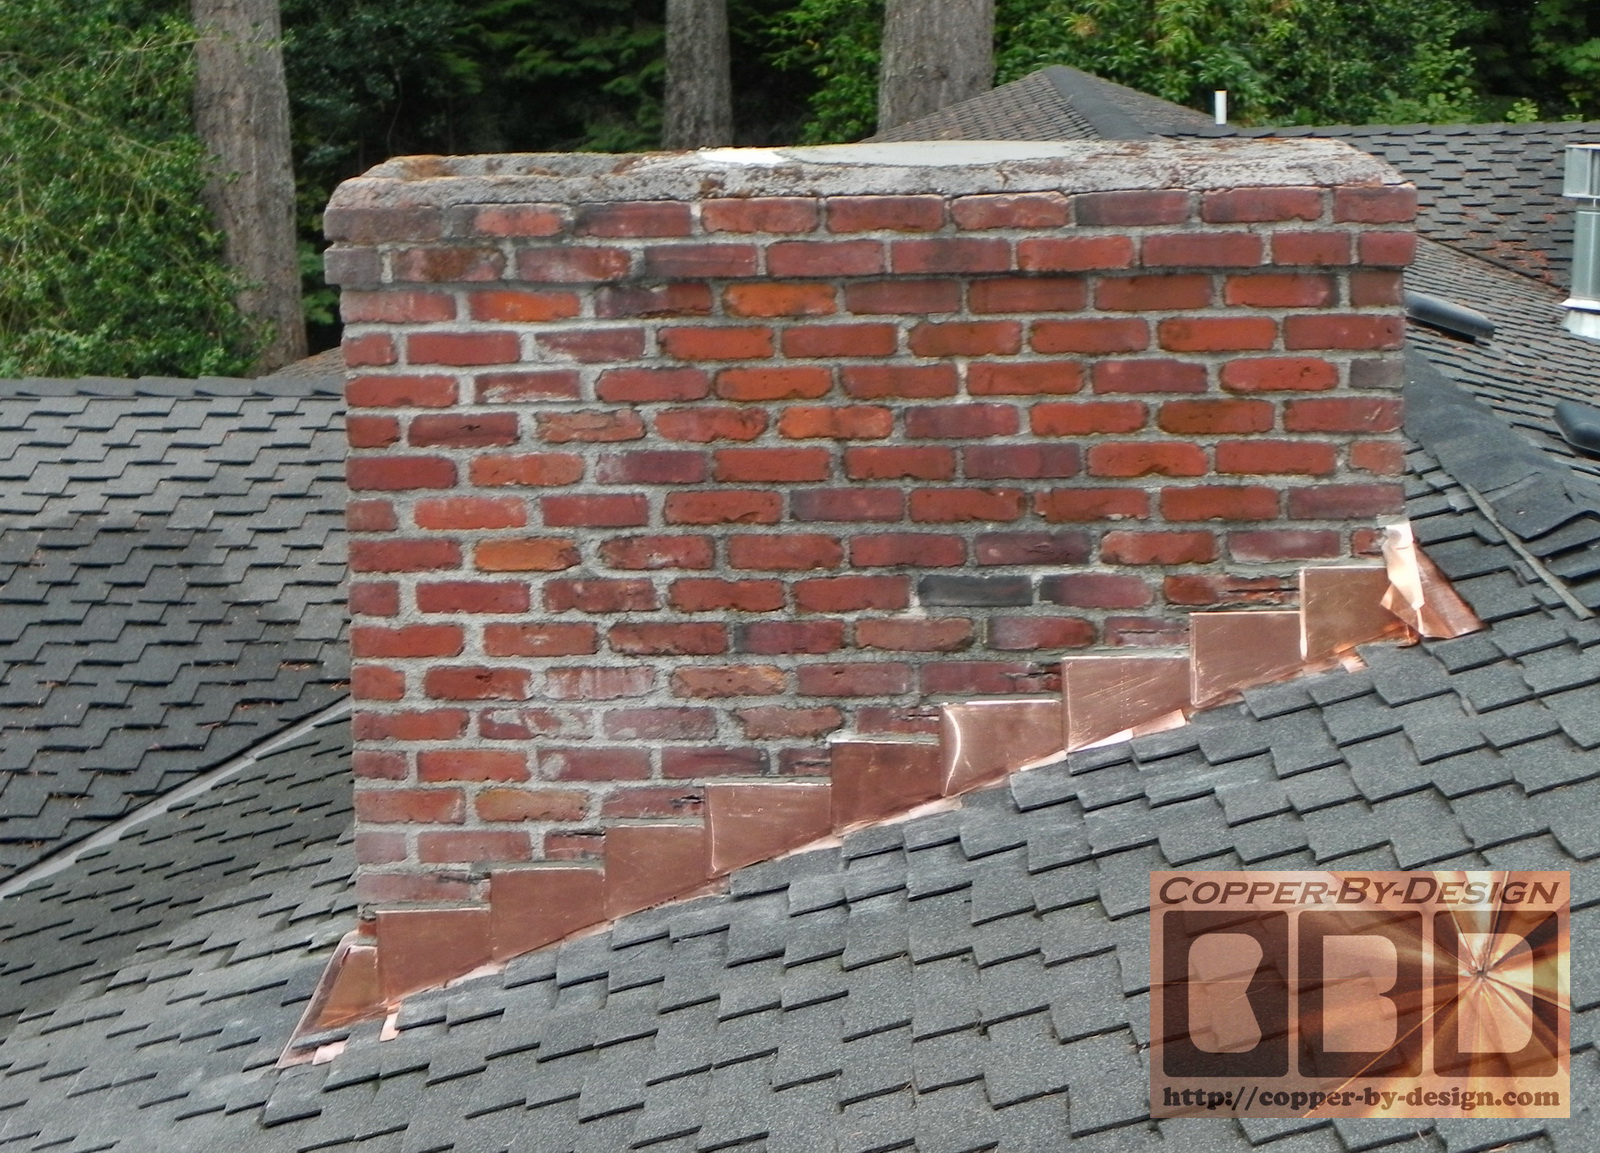
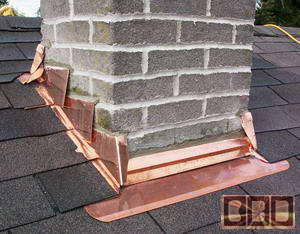
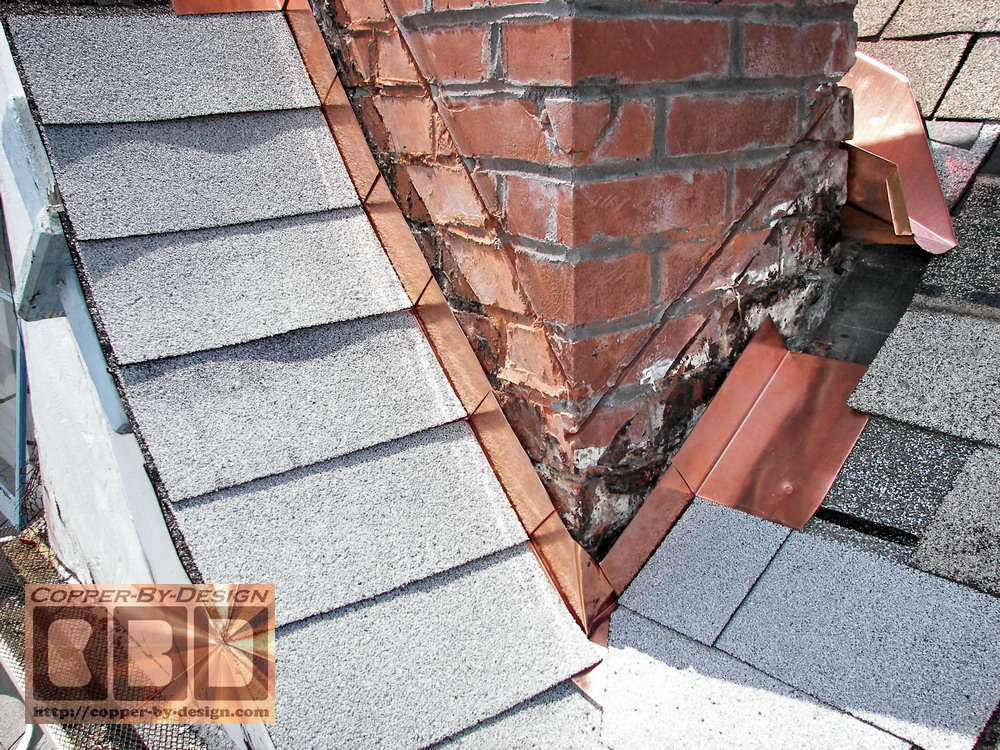
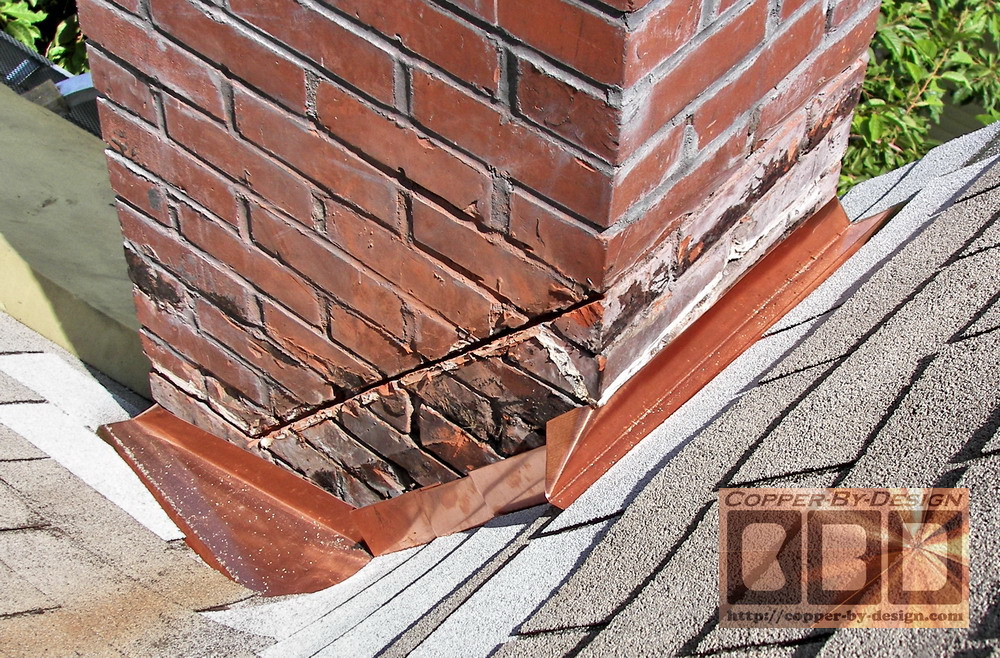
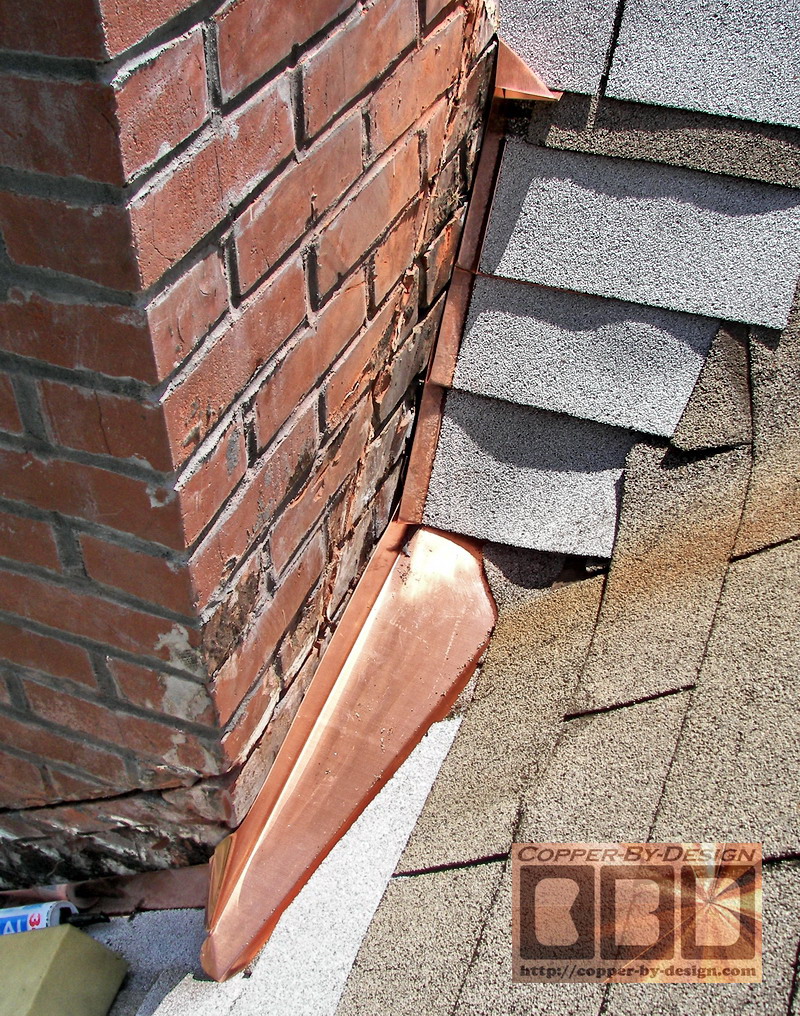
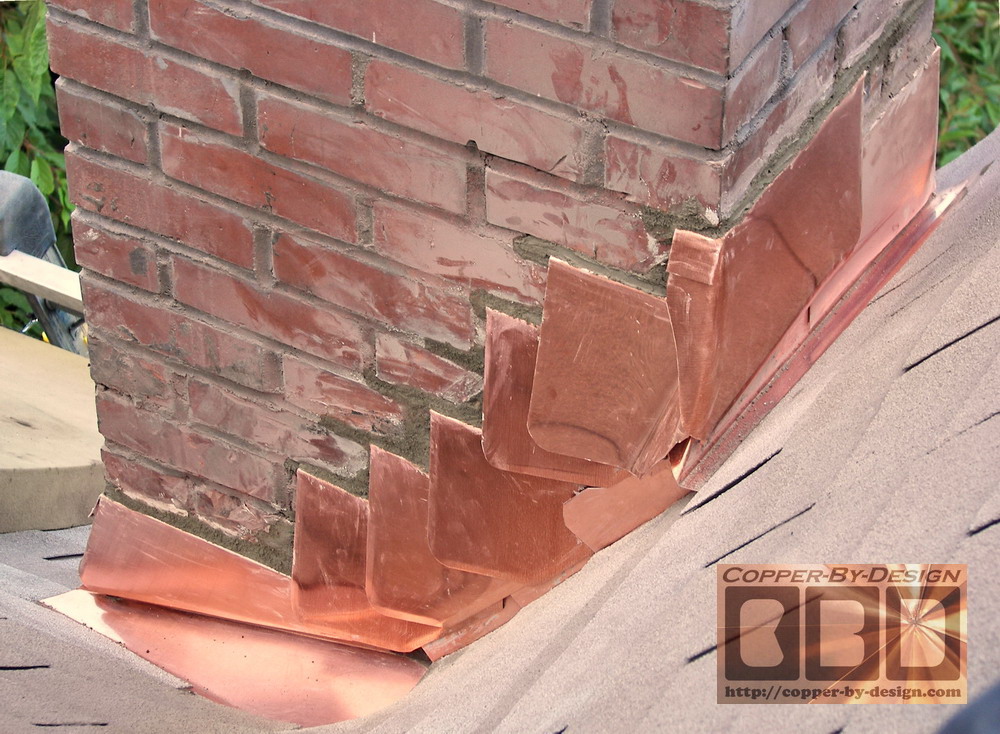
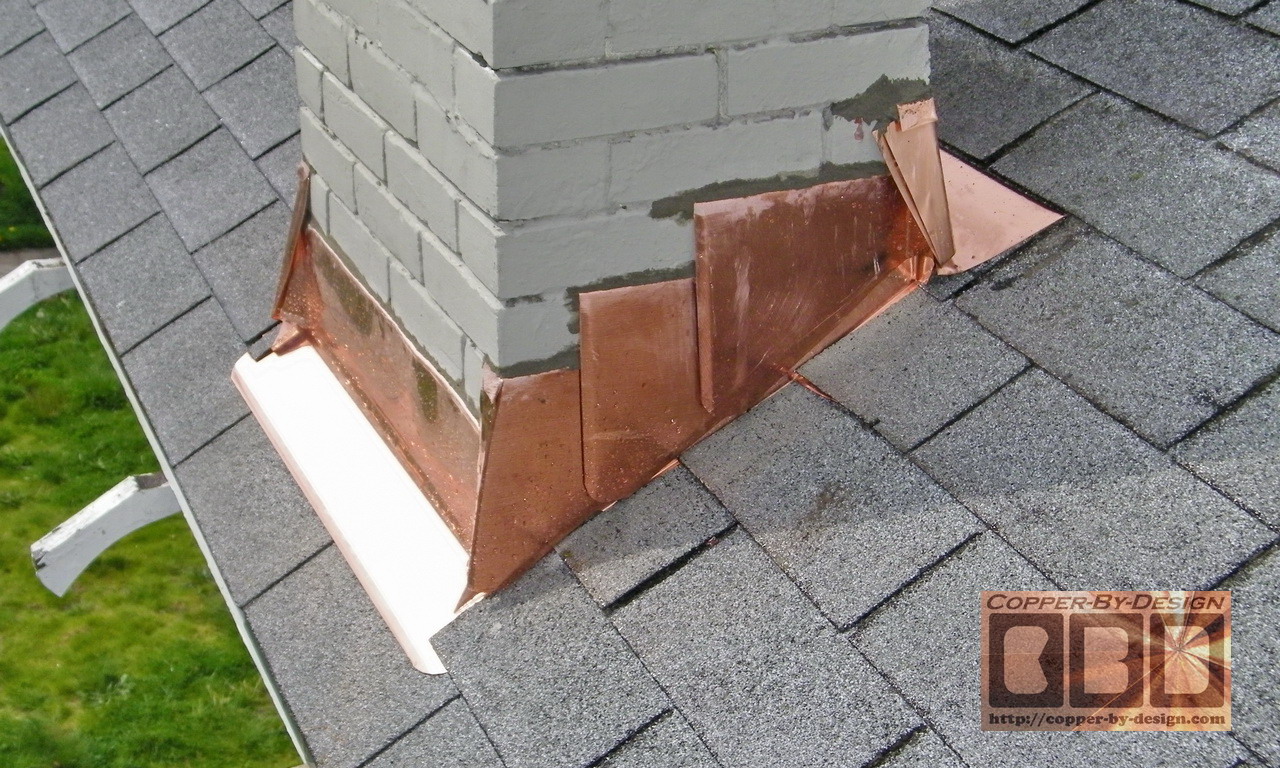
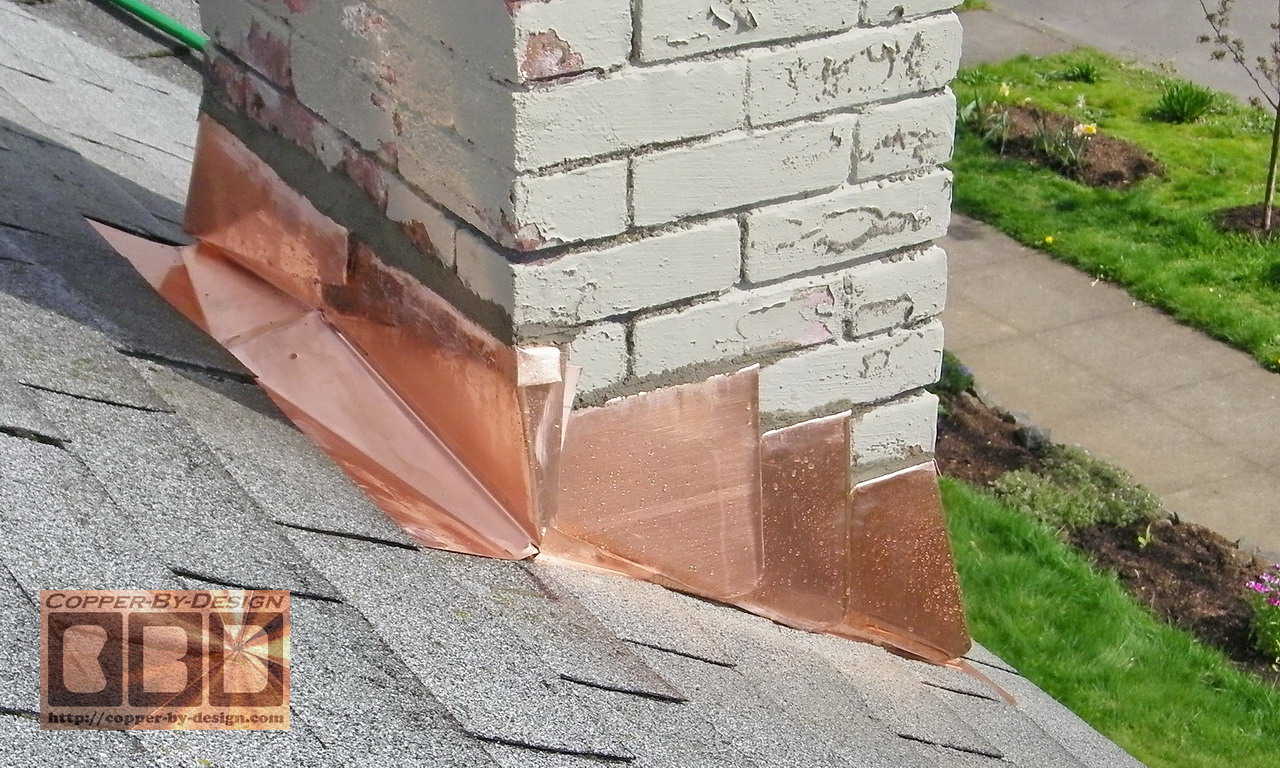
These shots show the new shingles and copper step-flashing in place. You can see here how I made a special custom tapered pan at the base of the valley to help channel the water and debris off to the side of the chimney.
I did my best to fill in the diagonal cut with mortar and cover most of it with the new copper counter-flashing pieces. This may not look as smooth as the other steel flashing was, but it is a huge improvement functionally speaking. They were pleased with the work I did at a lower cost than the other chimney flashing. The later had me replace the gutters on a rental they owned.
|
| Another Example of Copper Chimney Flashing Work |
|
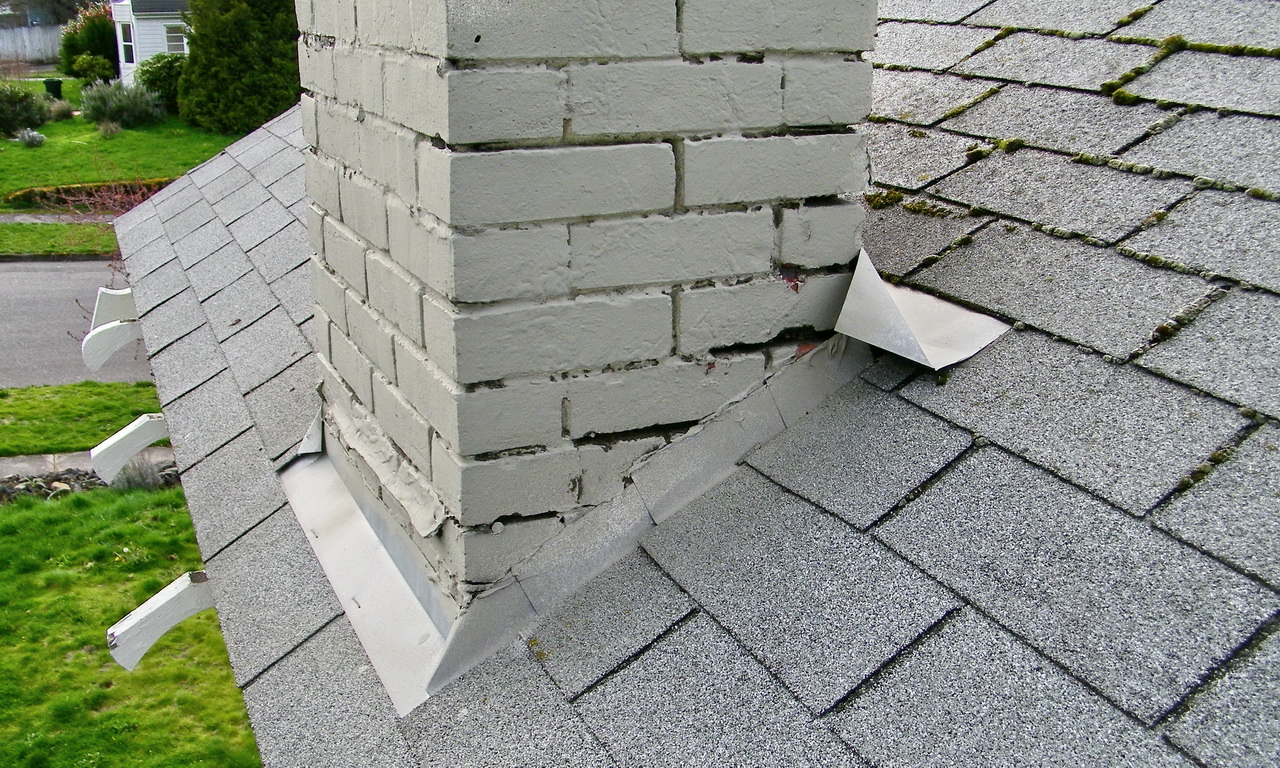
This was for a local client at 2505 N. E. Jarrett St, Portland, Oregon. I was contracted to replace the old aluminum gutters with new copper gutters and a roof cleaning w/copper ridge caps. While up there working I got a closer look at the chimney flashing and shared photos I got with this clients advising they get both chimneys re-flashed. Naturally they asked if I could take care of it.
These shots again show terrible flashing work. The chimney below also was missing the counter-flashing.
I just made a minor tapered cricket or saddle for the upper side of this chimney to help divert the water and debris off to the sides, but it should have had a full cricket that matched their 6/12 roof pitch, but I had added this detail at my own expense after I had bid this work w/o a cricket. I didn't want to bother this client with any more expensive repair costs, as this whole project was already over $10k. |
| Aluminum Counter-flashing Work I Use to Do | |
|
I rebuilt this chimney from the roof line up with all new bricks and clay red painted aluminum counter-flashing. I thought it looked a lot better than the galvanized or brown painted steel that most roofers use (if they use anything at all). The mortar was so crumbly that I was able to lift the bricks off with my bare hands. Now days I would only use copper flashing. The black strap is to hold the television antenna up. |
 |
|
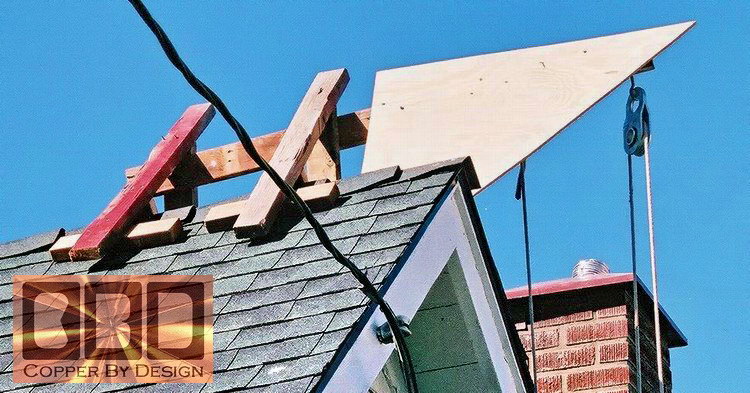
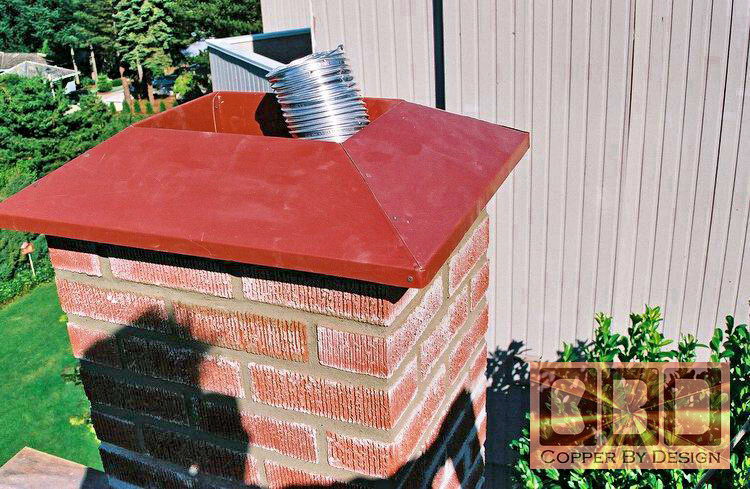
This is on a house in West Linn on Rosemont and Suncrest. Tia and I also replaced the gutters and rebuilt this chimney from the roof line on up. We later did the gutters on the house in the back ground as well. It is important to make sure the top of the chimney is at least 2 feet higher than any thing flammable that is 10 feet or less away.
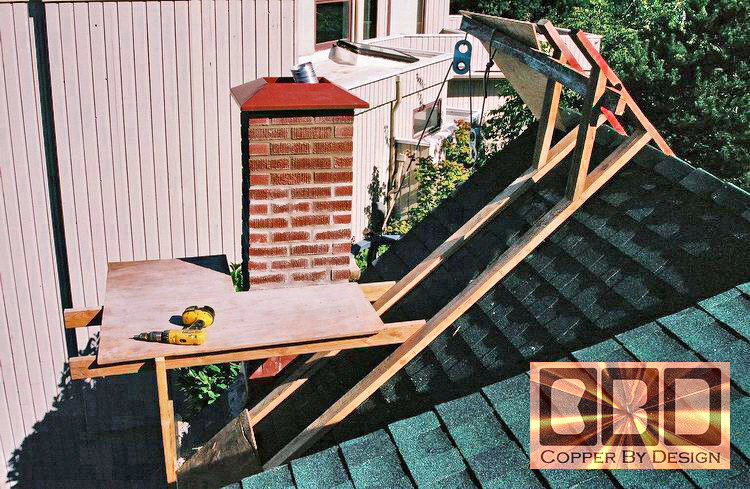
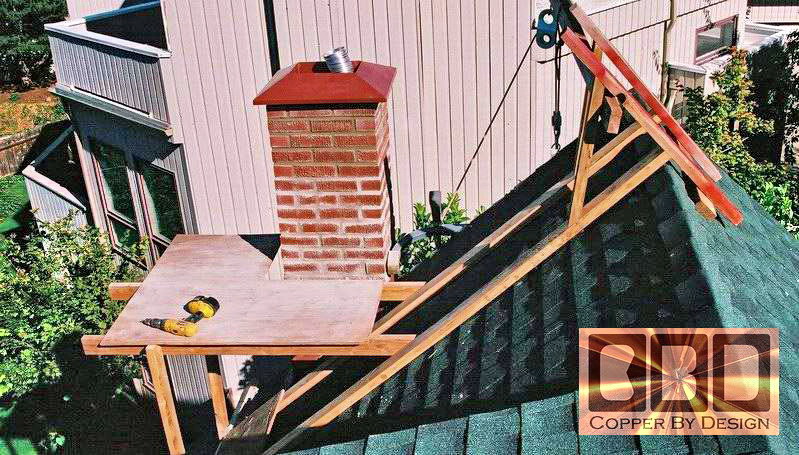
It is common that we have to build a special custom scaffold platform to work on that is strong enough to hold the weight of a worker, tools, bricks and a 5 gallon bucket of mortar. It also needs to sit gently on the roofing shingles to protect them. Sometimes this platform construction is half the work. There is also a braced arm sticking out to the side with a rope and pulleys to hoist up buckets full of bricks and just mixed mortar. The whole assembly is custom fit and screwed together for easy removal when we are done.
For this top cover, the cement is formed near the shape of the cap, and then the cap is pressed and tapped onto it for a tight fit, so the cement fills into each crevice of the cover. It also has the advantage of giving the chimney a real working drip edge. It has galvanized screws pressed into holes drilled into the center section, and driven into the cement. This way the cap cannot blow off in high wind. For a more permanent installation I would now have made this cap in copper in stead. This chimney is only used for a gas vent, so high heat was not an issue. |
|
.
.
|
Helpful Roofing Information For some valuable advice with regards to roofing and rain management issues check out our:
(a)
Gutter Installation web pages for answers and solutions that could save you thousands of $ and a great deal of anguish. If you do find this information very helpful, feel free to send us a $ tip for the assistance we so freely have published on the web here for your benefit, like you might tip a waitress. Heck, send us a gift certificate for a candle lit dinner for two. |
|
Below is a
photo of our |
|
|
|
We were also a 1997 finalist for this same award. See our referral web page to see how we managed to be honored with this special award |
 Homepage |
.
|
|
Company Profile |
|
Roof Caps |
|
Chimney Caps |
|
Scuppers |
|
Gutters |
|
Shipping |
|
Contact Info |
.
.
.
.
.
.
.
.
.
.
.
.
.
.
.
.


